Appliancization enables you to present the computer hardware and the data protection
software as a single unified solution. Appliancization allows you to install and
configure the software modules at the factory, and ship the computer to the user
as a software appliance. When the appliance is activated by the user, the software
is initiated at the user's environment and the computer is ready for data protection
operations.
The software appliance setup can be created on physical as well as virtual computers.
Software appliance setup is not supported on clusters.
Plan your post-install configuration options. You can add additional configurations
to the appliance either at the factory, or at the user location.
This section provides the procedure to setup the appliance with default installation
options.
| 1. |
Place the
Software Installation Disc
for the Windows platform into the disc drive. After a few seconds, the installation
program is launched. Click Exit to close the install program.
|
| 2. |
Choose the language you want to use during
installation. Click the down arrow and select the desired language from
the drop-down list, and click Next to continue. |

|
| 3. |
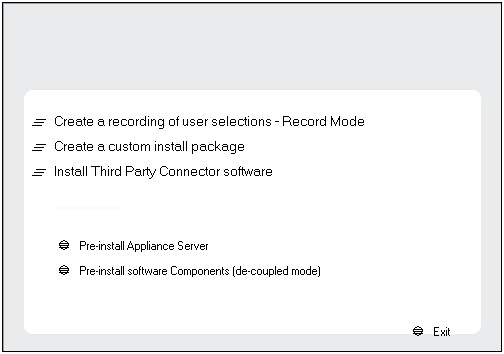
Click the Advanced options. |

|
| 4. |
Click Pre-install Appliance Server. |
|
| 5. |
Read the license agreement, then select I accept the terms
in the license agreement. Click Next to continue.
|
 |
| 6. |
The following components are pre-selected for install:
- CommServe
- CommCell Console
- CommNet Server
- CommNet Browser
- MediaAgent
- Windows File System
iDataAgent
NOTES
- Your screen may look different from the example shown.
- The Special Registry Keys In Use field will be highlighted when GalaxyInstallerFlags
registry key is enabled. Move the mouse pointer over this field to
see a list of registry keys that have been created in this computer.
Click Next to continue.
|
 |
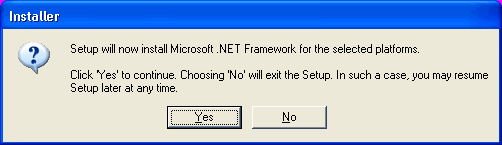
| 7. |
Click YES to install Microsoft .NET Framework
package. NOTES
- Follow the on-screen prompts for installing the Microsoft .NET
Framework package.
- If you are prompted to install the Service Pack for the
Microsoft .NET Framework, click Yes.
- This prompt is displayed only when Microsoft .NET Framework is
not installed.
- Once the Microsoft .NET Framework is installed, the software
automatically installs the Microsoft Visual J# 2.0 package.
|
 |
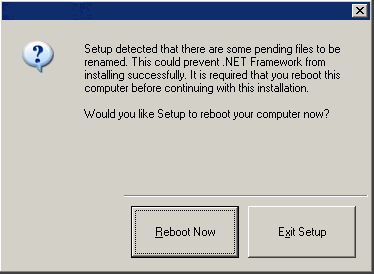
| 8. |
The System Reboot message may be displayed. If so, select one of the following:
- Reboot Now
If this option is displayed without the
Skip Reboot
option, the install program has found files required by the software
that are in use and need to be replaced. If Reboot Now is displayed
without the Skip Reboot option, reboot the computer at this point. The
install program will automatically continue after the reboot.
- Exit Setup
If you want to exit the install program, click
Exit
Setup.
|
 |
|
|
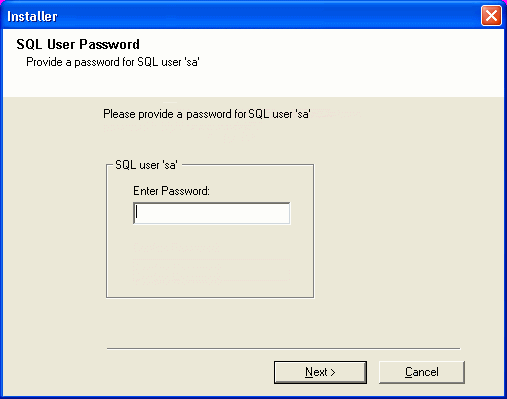
| 9. |
Specify the SQL Server System Administrator password. NOTES
- This is the password for the administrator's account created by SQL
during the installation.
Click Next to continue.
|
 |
| 10. |
Click Yes to set up a dedicated instance of Microsoft
SQL Server for the CommNet Server. NOTES
- This prompt will only be displayed if SQL Server database instance
is not installed on this computer.
- Clicking No will exit the install program.
|
 |
| 11. |
Enter the Installation Path for the Database Engine.
NOTES
- This is the location where you want to setup the Microsoft SQL Server
System databases.
Click Browse to change directories.
Click Next to continue.
The install program installs the database instance.
|
 |
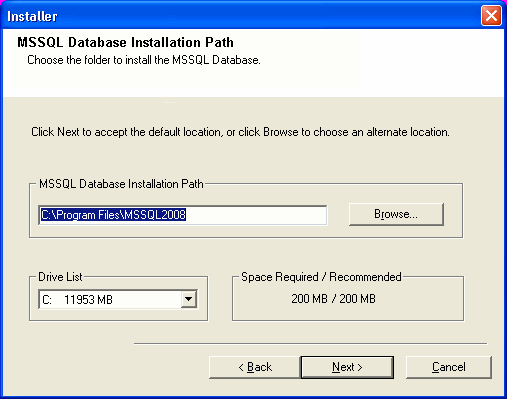
| 12. |
Enter the MSSQL Server Installation Path. NOTES
- This is the location where you want to install Microsoft SQL Server.
Click Browse to change directories.
Click Next to continue.
This step may take several minutes to complete.
|
 |
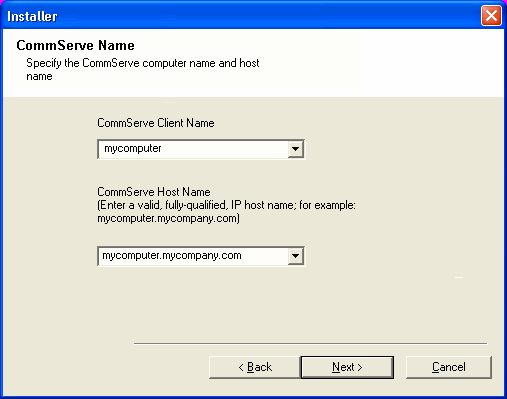
| 13. |
Enter the CommServe Client Name and the CommServe Host Name. NOTES
- The CommServe client name is the name of the computer. This field
is automatically populated.
- The CommServe host name is the TCP/IP network interface name of the
CommServe computer. This field is automatically populated.
- Do not use the following characters in the CommServe client name or the
CommServe host name:
\|`~!@#$%^&*()+=<>/?,[]{}:;'"
Click Next to continue.
|
 |
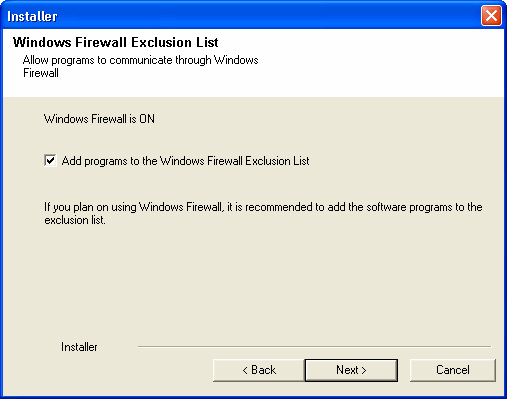
| 14. |
Select Add programs to the Windows Firewall Exclusion List, if
you wish to add CommCell programs and services to the Windows Firewall
Exclusion List.
NOTES:
Click Next to continue.
|
 |
| 15. |
Specify the location where you want to install the software.
NOTES
- Do not install the software to a mapped network drive.
- Do not use the following characters when specifying the destination
path:
/ : * ? " < > |
It is recommended that you use alphanumeric characters only.
- If you intend to install other components on this computer, the
selected installation directory will be automatically used for that
software as well.
- If a component has already been installed, this screen may not be
displayed if the installer can use the same install location as previously
used.
Click Browse to change directories.
Click Next to continue.
|
 |
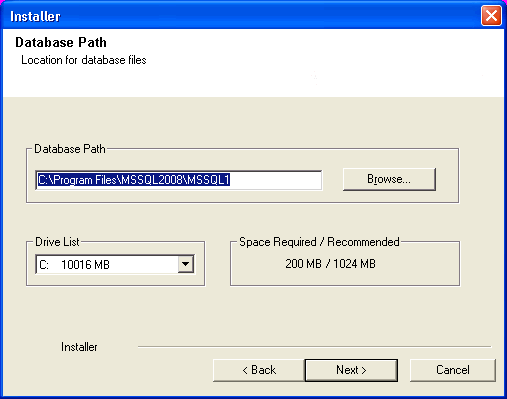
| 16. |
Specify the location of the database. NOTES
- Do not specify a mapped network drive.
- You can either accept the default or select a different location on a
local disk drive. However, you must ensure that the drive has at least
1GB of free space.
- The directory file path selected should
not be located on a FAT drive. A FAT drive cannot be supported as the
location for this database because it does not allow a temporary sparse file
to be generated when creating the database snapshot, which is required for
data verification.
- If the default metadata database directory is low in disk space, provide
a path that is not associated with another application.
Click Browse to change directories.
Click Next to continue.
|
 |
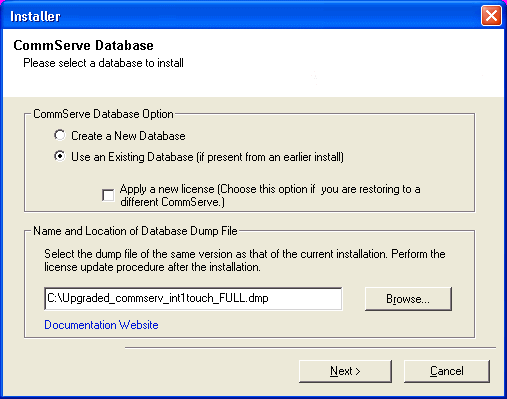
| 17. |
Select the Create a New Database option and click
Next to continue. NOTES
- This screen may look different from the example shown.
|
 |
| 18. |
Enter the network or local path where Disaster Recovery Backup
files should be stored.
NOTES
- For cluster, specify a shared drive.
- If you selected Use Network Path, you must enter the Network
share username and the Network share password.
- The Network share username is the domain\username of the user that
has administrative rights to the Disaster Recovery
Backup destination path.
- The Network share password is the password of the network
share username.
Click Next to continue.
|
 |
|
|
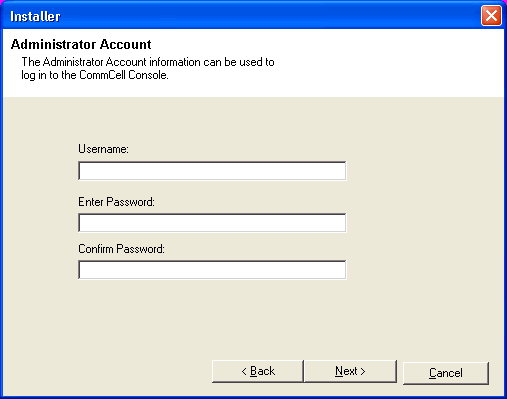
| 19. |
Enter the CommCell Username and CommCell Password. NOTES
- The CommCell username and password will be used by the Administrator user
to log on to the CommCell Console. This user is automatically created
during installation and, by default, has the necessary capabilities to
perform all functions. Additional CommCell
users with the same or less security rights can be created after the
installation of the software.
Click Next to continue.
|
 |
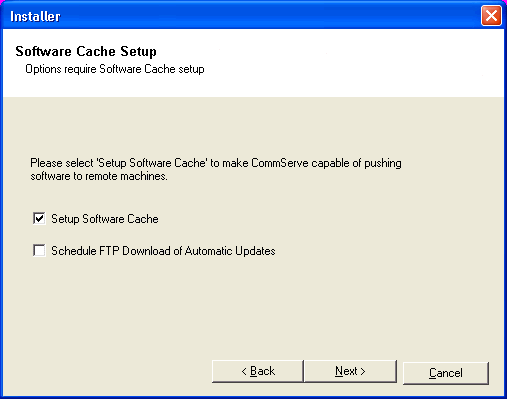
| 20. |
Select
Setup Software Cache option to download
the software updates automatically. Select Schedule FTP Download of
Automatic Updates option to schedule automatic FTP downloading of
software updates.
Click Next to continue.
|
 |
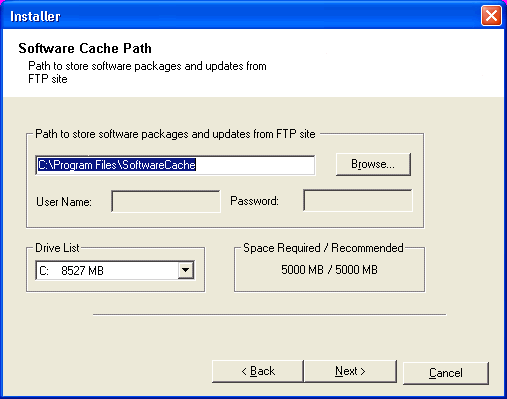
| 21. |
Specify the path where the update files from the FTP site
should be stored. NOTES
- This prompt will only be displayed if the Setup Software Cache option was enabled.
Click Next to continue.
|
 |
|
|
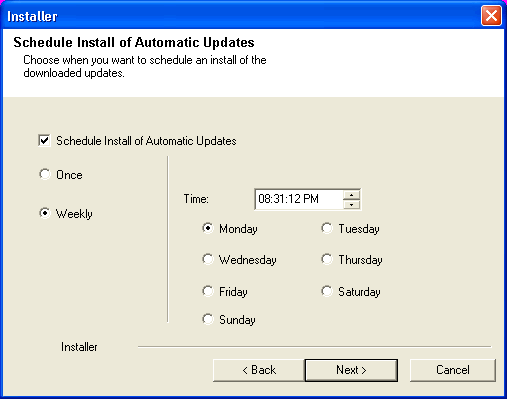
| 22. |
If necessary, select this option to schedule an automatic installation of software
updates.
NOTES
Click Next to continue.
|
 |
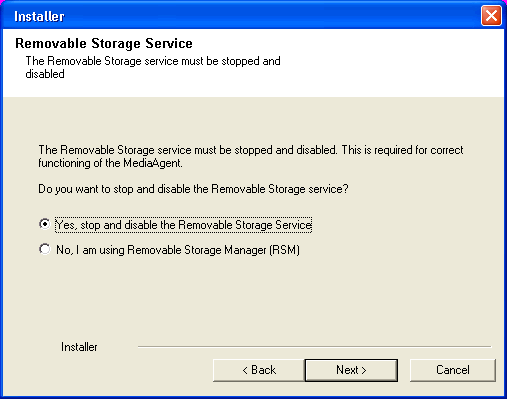
| 23. |
Select Yes to stop Removable Storage Services on the MediaAgent.
NOTES
- This prompt will not appear if Removable Storage Services are already
disabled on the computer.
Click Next to continue. |
 |
|
|
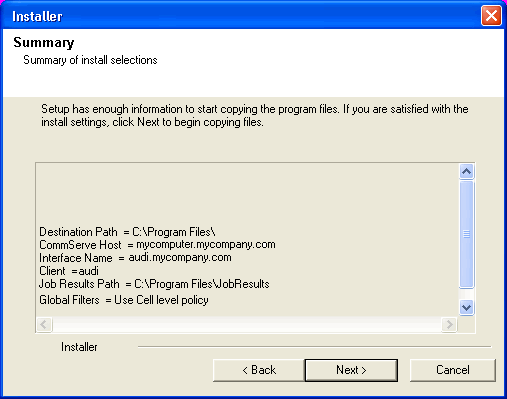
| 24. |
Verify the summary of selected options. NOTES
- The Summary on your screen should reflect the components
you selected for install, and may look different from the example shown.
Click Next to continue or Back to change any of the options.
The install program now starts copying the software to the computer.
This step may take several minutes to complete.
|
 |
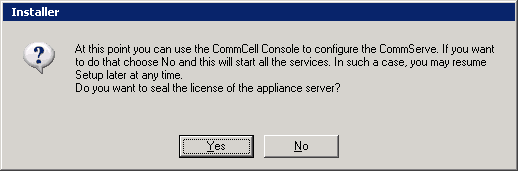
| 25. |
Click Yes to seal the license of the appliance server and
continue the installation. Click No to exit the setup, restart
the services, and configure the CommServe using the CommCell Console. |
 |
| 26. |
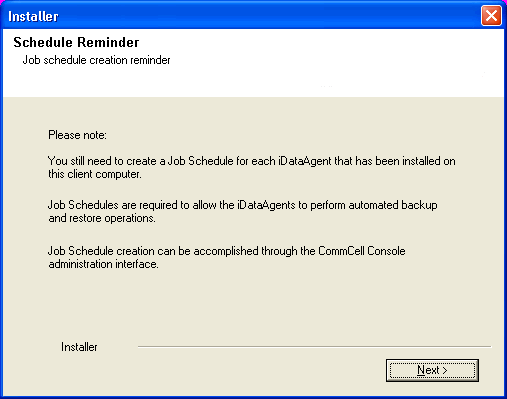
Click Next to continue.
NOTES
- Schedules help ensure that the data protection operations for the
Agent are automatically performed on a regular basis without user intervention.
For more information, see Scheduling.
|
 |
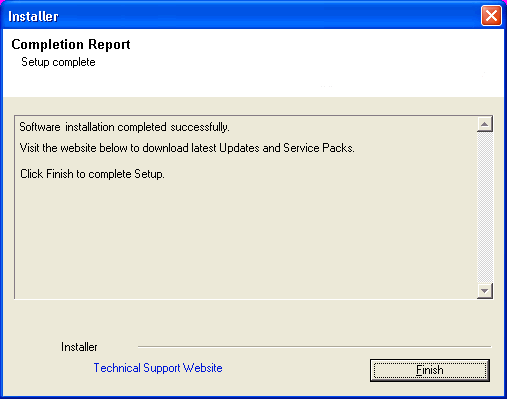
| 27. |
Setup displays the successfully installed components.
NOTES
- The Setup Complete message displayed on
your screen will reflect the components you installed, and may look different
from the example shown.
- If you install an Agent with the CommCell Console open, you need to
refresh the CommCell Console (F5) to see the new Agents.
- If Reboot Now button is displayed make sure to reboot the
computer before performing any other operations from the computer.
Click Finish to close the install program.
The installation is now complete.
|
 |
A silent install consists of two distinct phases. In the recording phase, an
install is recorded, saving your install options to an .xml file. In the
playback phase, the .xml file is played back by the install program, which
installs the software with the recorded options without any prompting. Through
this method, the deployment of the software can be automated.
This section provides the steps to record the options for silent install.
| 1. |
Place the software
installation disc for the Windows platform into the disc drive. After
a few seconds, the installation program is launched.
Click Exit to close the install program.
|
|
| 2. |
Choose the language you want to use during installation.
Click the down arrow and select the desired language from the drop-down list, and click Next to continue.
|
|
| 3. |
Select the Advanced options to install software.
NOTES
The options in the installation menu depends on the computer in which
the software is being installed, and may look different from the example
shown.
|
|
| 4. |
Select Create a recording of user selections - Record
Mode option to start the recording of the install. |
|
| 5. |
The install options will be recorded to a file called
UserInput.xml which will be located in the
C:\Documents and Settings\Company\LogFiles\
folder. Click Browse to change directories.
Click Next to continue.
|
 |
| 6. |
Read the license agreement, then select I accept the terms
in the license agreement. Click Next to continue.
|
|
|
|
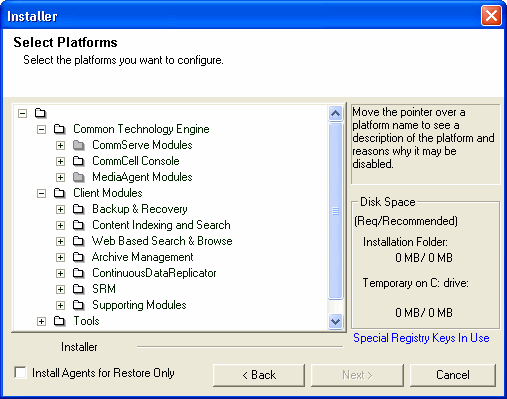
| 7. |
Select CommServe, MediaAgent software by expanding the
Common Technology Engine folder and
CommServe
Modules folder. The CommNet Server, CommNet Browser, CommCell
Console, Java Runtime Environment and Microsoft Windows File System
iDataAgent will be selected
by default.
NOTES
- Your screen may look different from the example shown.
- The Special Registry Keys In Use field will be highlighted when GalaxyInstallerFlags
registry key is enabled. Move the mouse pointer over this field to
see a list of registry keys that have been created in this computer.
Click Next to continue.
|
|
|
|
| 8. |
Specify the location where you want to install the software. NOTES
- Do not install the software to a mapped network drive.
- Do not use the following characters when specifying the destination path:
/ : * ? " < > | #
It is recommended that you use alphanumeric characters only.
- If you intend to install other components on this computer, the selected installation directory will be automatically used for that software as well.
- If a component is already installed in this computer, this screen may not be displayed.
The software will be automatically installed in the same location that was
previously specified.
Click Browse to change directories.
Click Next to continue.
|
|
| 9. |
Specify the location of the database. NOTES
- Do not specify a mapped network drive.
- You can either accept the default or select a different location on a
local disk drive. However, you must ensure that the drive has at least
1GB of free space.
- The directory file path selected should
not be located on a FAT drive. A FAT drive cannot be supported as the
location for this database because it does not allow a temporary sparse file
to be generated when creating the database snapshot, which is required for
data verification.
- If the default metadata database directory is low in disk space, provide
a path that is not associated with another application.
Click Browse to change directories.
Click Next to continue.
|
|
| 10. |
Enter the network or local path where Disaster Recovery Backup
files should be stored.
NOTES
- For cluster, specify a shared drive.
- If you selected Use Network Path, you must enter the Network
share username and the Network share password.
- The Network share username is the domain\username of the user that
has administrative rights to the Disaster Recovery
Backup destination path.
- The Network share password is the password of the network
share username.
Click Next to continue.
|
|
|
|
| 11. |
Enter the CommCell Username and CommCell Password. NOTES
- The CommCell username and password will be used by the Administrator user
to log on to the CommCell Console. This user is automatically created
during installation and, by default, has the necessary capabilities to
perform all functions. Additional CommCell
users with the same or less security rights can be created after the
installation of the software.
Click Next to continue.
|
|
| 12. |
Select
Setup Software Cache option to download
the software updates automatically. Select Schedule FTP Download of
Automatic Updates option to schedule automatic FTP downloading of
software updates.
Click Next to continue.
|
|
| 13. |
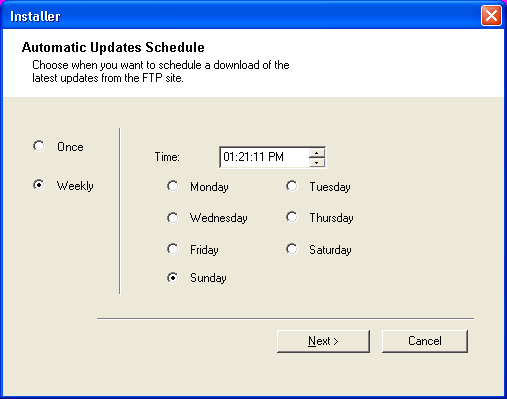
Schedule to download the latest software updates from the FTP site.
NOTES
- This screen will appear, when you select the Schedule FTP Download of
Automatic Updates option in the above step.
- Automatic Updates Schedule allows automatic downloading of software
updates on a single or weekly basis.
- If you do not select this option, you can schedule these updates later
from the CommCell Console.
Click Next to continue.
|
 |
| 14. |
Specify the path where the update files from the FTP site
should be stored. NOTES
- This prompt will only be displayed if the Setup Software Cache option was enabled.
Click Next to continue.
|
|
|
|
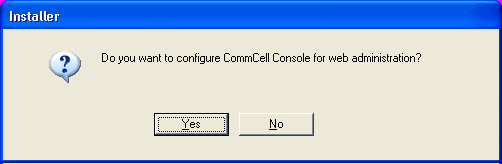
| 15. |
Click Yes to configure the CommCell Console for web administration, or
Click No to continue without configuring the CommCell Console for web
administration. NOTES
- The Internet Information Server (IIS) must be installed on this computer
in order to configure for web administration.
- Configuring this computer for web administration allows you to:
- Access the CommCell Console and Books Online from a remote computer
using a Web browser.
- View CommCell reports via a Web browser.
- Access Books Online by clicking the Help button (the icon with a ?)
in the CommCell Console.
|
 |
|
|
| 16. |
Verify the summary of selected options.
NOTES
- The Summary on your screen should
reflect the components you selected for install, and may look different from
the example shown.
Click Next to continue or
Back to change any of the options.
The install program now starts copying the software to the computer.
This step may take several minutes to complete.
|
|
|
|
| 17. |
Click OK. This completes the recording.
|
 |
|
|
|
The UserInput.xml
file created during the record mode can be edited to meet particular needs,
such as using the generated file as a base, and customizing it for many
different install. See
XML Input File for
Silent Install of Appliance Software for the example of the contents of a default xml
input file generated during the record mode of a CommServe and for the list of
parameters, the default values and description.
| <?xml version="1.0" encoding="UTF-8" standalone="no" ?> <CVInstallManager_ClientSetup Focus="New" JobID="0">
<CommServeInfo>
<CommserveHostInfo _type_="3" clientName="" hostName="" type="0"
/>
</CommServeInfo>
<clientComposition activateClient="1" packageDeliveryOption="0">
<clientInfo>
<client cvdPort="8400" evmgrcPort="8402"
installDirectory="C:\Program Files\Company\">
<clientEntity _type_="3" clientName=""
hostName="" type="0" />
<jobResulsDir path="C:\Program Files\Company\iDataAgent\JobResults"/>
</client>
<clientProps
/>
</clientInfo>
<components>
<componentInfo ComponentId="1" ComponentName="Base
Client" _type_="60" osType="Windows" />
<componentInfo ComponentId="20" ComponentName="Commserve"
_type_="60" osType="Windows" />
<componentInfo ComponentId="801" ComponentName="Commserve
DB" _type_="60" />
<componentInfo ComponentId="701" ComponentName="CommCell
Console" _type_="60" osType="Windows" />
<componentInfo ComponentId="702" ComponentName="FileSystem
iDA for Windows" _type_="60" osType="Windows" />
<componentInfo ComponentId="601" ComponentName="CommNet
Server" _type_="60" osType="Windows" />
<componentInfo ComponentId="804" ComponentName="Commnet
Server DB" _type_="60" />
<componentInfo ComponentId="602" ComponentName="CommNetBrowser"
_type_="60" osType="Windows" />
<commonInfo RequestedbyReleaseLicAtClientLevel="0"
apachePort="80" globalFilters="2" iisPort="80" iisSSLPort="443" />
<commserve>
<csdbInfo>
<CommCellUser password="2GCGSFFGeFFGKFFGBFFGnFF"
userName="admin" />
<ERPath path="C:\CVDR"/>
<FTPLocation path="C:\Program Files\Company\SoftwareCache"
/>
</csdbInfo>
</commserve>
<commcellConsole configureWebAlias="0" />
</components>
</clientComposition>
<installFlags deletePackagesAfterInstall="1" forceReboot="1" ignoreJobsRunning="0"
installLatestServicePack="1" killBrowserProcesses="0" overrideClientInfo="0" showFirewallConfigDialogs="0"
stopOracleServices="0" upgradeMode="0">
<sqlInstall sqlDataFilePath="C:\Program Files\MSSQL2008DATA">
<sqlSaUserAccount password="2GAmRllmzllmKllmJllmUllzlllgRllgEllggll"/> </sqlInstall>
</installFlags>
</CVInstallManager_ClientSetup>
|
Parameter Name
|
Description
|
| Focus |
This value is the Instance number to which the software
will be installed in a multi-instance environment. For more information
about Instances, see Multi Instancing.
Specify Instance001, if you are installing the software on the first
instance. If the machine has a multiple instance, if you are installing
to an existing instance, specify the instance number. Example:
Instancexxx.
|
| clientName |
The client Name is the name of the CommServe
computer. This is a client's short name. (e.g.,
vega). |
| hostName |
This is the server�s host name, which can be
either a long name or a short name (e.g.,
vega.stars.com).
Do not use this parameter if you are running a Decoupled Install of the
software.
|
| cvdPort |
This is the TCP port number for the Communications
Service (CVD). |
| evmgrcPort |
This is the TCP port number for the Client Event Manager
Service (EvMgrC). |
| installDirectory |
This is the directory where you want the Base software
and/or
iDataAgent installed. |
| clientName |
Optional. This is the client�s short name (e.g.,
sirius.star.com or
sirius). |
| hostName |
Optional. This is the client�s long name (e.g.,
sirius.star.com). |
| jobResulsDir path |
This is the directory where you want the job results to
reside. |
| ComponentId |
These are the package Id(s) of the components (agents)
to be installed, and these parameters are required if they are not
specified in the command line. See
List of Package Ids for valid values (e.g.,
1101).
ComponentName
|
ComponentId
|
| Base Client |
1 |
| CommServe |
20 |
| CommServe DB |
801 |
| CommCell Console |
701 |
| FileSystem iDA for
Windows |
702 |
| CommNet Server |
601 |
| CommNet Server DB |
804 |
| CommNet Browser |
602 |
|
| osType |
This value defines the type of the Operating System. |
| globalFilters |
(Optional) This is used to filter out specific
directories or files from the backups within the CommCell. The filters
are set using the Control Panel in the CommCell Console and, if enabled,
they will be effective for the default subclient. Valid values include
0 (use the CommCell-level policy),
1 (on), and 2
(off). |
| password |
This is the password used to log in to the CommCell, and
this information is required if the CommCell is enabled for client
authentication. Valid values are registered in the CommServe. |
| userName |
This is the user name used to log in to the CommCell,
and this information is required if the CommCell is enabled for client
authentication. Valid values are registered in the CommServe. |
| ERPath |
This is the path where Disaster Recovery Backup files
will be stored. |
| FTPLocation |
This is the path where the update files from the FTP
site will be stored. |
| configureWebAlias |
This value indicated to configure the
CommCell Console for web administration. |
| deletePackagesAfterInstall |
This value indicated to delete the packages
after silent install. |
| forceReboot |
This value indicated to reboot the machine
if required. Default value is 0, use value 1 to reboot. |
| ignoreJobsRunning |
This value is used during Install Software
from CommCell Console. This is used to ignore the job during software
install from CommCell Console |
| installLatestServicePack |
This is used to download and install the
latest service pack. Use value 1 to download and install the service
pack, value 0 to disable the download and install. |
| killBrowserProcesses |
This value is used to kill the
Browser if any browsers are running during Console install. |
| showFirewallConfigDialogs |
This value indicates that the
firewall dialog screens will not be displayed during the remote install;
a value of 1 means they will be displayed. For more information about
firewalls, see Firewall Considerations. |
| stopOracleServices |
This value indicates to stop the oracle services during
Oracle iDataAgent install. Use value 0 to stop the services, value 1 to
start the services |
| upgradeMode |
This value indicated that this is silent upgrade; a
value 1 means this is upgrade. |
| sqlDataFilePath |
This is the location where you want to setup the
Microsoft SQL Server System databases. |
| sqlSaUserAccount |
This is the password for the administrator's account
created by SQL during the installation. |
|
To start the installation, perform the following
- Click the Windows Start button, point to Programs,
point to Accessories, then click Command Prompt.
- Type the following command:
QInstaller.exe
/Appliance /play "path\filename.xml"
For example, if you type QInstaller.exe
/Appliance /play
"C:\Documents and Settings\Company\LogFiles\UserInput.xml", the file
called UserInput.xml located in the
C:\Documents and Settings\Company\LogFiles\
folder will be played back, installing the software with all the recorded
options to the local computer.
| |
If you set forceReboot value as 1 in the
UserInput.xml file, specify the
absolute path of the QInstaller.exe
to auto run the installation after the reboot. The syntax
you specify in the command line is as follows:
<installation drive>\<platform
specific folder>\QInstaller.exe /Appliance /play
"path\filename.xml"
For example:
D:\Company\Win32\QInstaller.exe
/Appliance /play "path\filename.xml" |
|
You can define post-install configuration commands that can be executed
at the user location, upon activating the software appliance. You can add your
configurations to the ActivateAppliance.bat
file located at <Software Installation Path>\Base
folder. Commands added to this file would be executed upon activation.
Ensure that the batch file returns error code '0' upon successful completion.
Any non-zero error code might be reported as a failure.
