All CommCell® computers (i.e., CommServe, MediaAgent, and Client computers)
must be connected via a network configured with TCP/IP protocol. To ensure each
computer can resolve the names of other CommCell computer members and therefore
communicate, we offer the following guidelines.
A DNS environment provides a centralized means of resolving computer names with
their corresponding IP addresses. Refer to your operating system documentation for
information on how to establish and manage DNS.
A multi-homed computer is one that has two or more network interface cards (NICs).
To ensure proper name/IP address resolution within the CommCell computer, it is
necessary to uniquely name each NIC in the DNS. For example, assume there is a computer
whose computer name is amber and fully qualified
host names are amber1.company.com and
amber2.company.com respectively. This computer has
two NICs with the following IP addresses:
First NIC: 150.128.4.78
Second NIC: 150.128.6.32
To ensure that both interfaces can be resolved, define unique names within DNS,
such as:
amber1.company.com 150.128.4.78
amber2.company.com 150.128 6.32
If a computer name resolves to multiple IP addresses,
the software will automatically use the first IP address resolved. However,
if that first IP address becomes unreachable, the software will not be able
to reach the computer using the other IP addresses in the list. In such
scenarios, it is recommended that a hosts file be created with all the computer's
reachable IP addresses included.
If your network does not have DNS lookup or some other name resolution facility,
the CommServe® manager will provide the names and IP addresses of all
the members in the CommCell® group. The fully qualified computer name
and IP address of the CommServe manager is stored in the hosts file of each CommCell
member. The hosts file in the CommServe computer, in turn, stores the fully qualified
computer name and IP addresses of all the members in the CommCell, thereby providing
the lookup facility to all the members in the CommCell group. Depending on the operating
system on your computer, the hosts file is located in one of the following directories:
On a Windows computer, the hosts file is
located in %SystemRoot%\system32\drivers\etc
directory. (%SystemRoot% is the Windows installation
directory on your system.)
On a computer with a Unix operating system, the
hosts file is located in the /etc/inet
directory.
During installation of each CommCell member, the install program attempts to
resolve the name of the CommServe manager to an IP address. If the resolution fails,
the installation prompts you to enter the IP address of the CommServe computer.
Proper name/IP address resolution is essential to reliable
network communications.
Prior to performing any installation, ensure that the hostname and the fully
qualified domain name are reachable from the CommCell network, and the IP
Addresses/Host Names are resolved correctly using the DNS System.
Computers in a network use the Domain Name System to determine the IP address
associated with a host/domain name. This process is also known as forward DNS
resolution. Reverse DNS lookup is the inverse process, the resolution of an IP
address to its designated host/domain name. For a proper network communication,
the IP Address to Host Name resolution and Host Name to IP address resolutions
are essential.
If reverse DNS lookup is not enabled on a client computer, it will not be
able to communicate with the remote computer by using the host name.
Use the following steps to perform a reverse lookup on an IP address:
Logon to the client computer as an Administrator.
Click Start, and then click Run.
In the Open box, type cmd, and then click OK.
From the command prompt, run the following command:
nslookup<remote_computer_ip_address>
Example:
C:\administrator.idclab\nslookup
172.xxx.xxx.244
Server: ingpdc01.gp.cv.company.com
Address: 172.16.xxx.xxx
Name: faraday.gp.cv.company.com
Address: 172.xxx.xxx.244
In the above example, the first section specifies the server and the IP
address of that server that provided you with the domain name, and the second
section shows the host name associated with the IP address that you typed with
nslookup command.
If the DNS service is not running on the setup, the above command returns one
of the following
error messages:
Use the following steps to enable Reverse DNS lookup on a client computer:
1.
Logon to the computer as an Administrator.
Click Start, click Control Panel and then select
Network and Internet.
Click NetworkandSharing Center.
Under Tasks, Select Manage network connections.
Right-click the Local Area Connection icon, and then click
Properties.
On the Local Area Connection Properties dialog box, select
Internet Protocol Version4 (TCP/IPv4), and then click Properties.
If you have a DHCP Server in your network environment, then
select Obtain DNS server address automatically. Else, select
Use the following DNS server
addresses and follow the below steps:
In the Preferred DNS server box, type the IP Address of
the DNS server.
In the Alternate DNS server box, type the IP Address of the
alternate DNS server.
2.
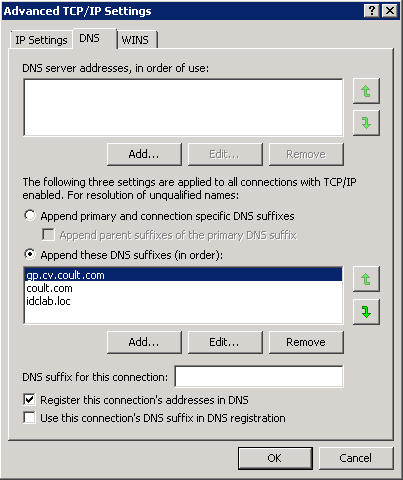
Click Advanced.
On the Advanced TCP/IP Settings dialog box, click the
DNS tab.
Click Append these DNS suffixes (in order).
Click Add, in the Domain suffix box, type the Domain suffix,
and then click Add. Repeat this step to add all the DNS suffixes in
order.
Click OK, and then click OK.
Click OK.
In case the DNS is not configured or not supported, then the client computer will not
be able to perform IP/Name resolution and will not be able to communicate with
the remote computers by using the host names. You can overcome this temporarily
by adding the IP addresses and the fully qualified domain names in the host file
of the client computer. It is not recommended to add Hosts file entries
as these create communications control points that may impact other server
operations and are difficult to maintain and manage. These should be used only
as temporary solutions until the larger network or DNS issues can be resolved. You can use the following steps to add entries to the host file of the
client computer with Windows operating system:
Logon to the computer as an Administrator.
Click Start, and then click Run.
In the Open box, type drivers, and then click OK.
Double-click etc folder, open hosts file with Notepad, and
then type the IP address, the fully qualified domain name and the host name
of the remote computer. You can add additional
entries on separate lines. Save the hosts file
after adding the entries.
Example:
172.32.xxx.xxx dbwin1.idclab.loc dbwin1
172.14.xxx.xxx dbwin2.idclab.loc dbwin2
Similarly, to enable reverse lookup on a remote computer,
repeat step 1 through step 3 for adding IP address of the client computer in the
hosts file of the remote
computer.
The CommServe® computer requires IPv4 to obtain permanent licenses.
However, the CommServe® computer can have both IPv4 and IPv6 enabled
using multiple NIC cards. If the client computers in the CommCell® use
the IPv6 protocol, the CommServe and MediaAgent must also use the IPv6 protocol.
Configuration
To enable CommCell® functionality for Windows computers on an IPv6
network, you must use the following registry keys:
nOverridePreferredIPFamily - This key provides the capability to
install CommCell components on computers in an IPv6 environment. This key must
be manually created on each computer in the CommCell group prior to installing
any software components.
Note that this key only provides IPv6 support for
the duration of the software installation.
nPreferredIPFamily - This key is provided with the software and allows
you to operate CommCell components in an IPv6 environment beyond the software
installation process. This key must be configured on each computer in the CommCell
group after the software has been installed.
To enable CommCell functionality for Unix computers on an IPv6 network, you must
perform the following:
Add the following to the cvpkgadd command:
-display-interface-family [nPreferredIPFamily]
For example, if you wish to apply both IPv4 and IPv6 support, you would add
the following to the cvpkgadd command:
-display-interface-family 0
Note that this key only provides IPv6 support for the duration of the software
installation.
nPreferredIPFamily - This key is provided with the software and allows
you to operate CommCell components in an IPv6 environment beyond the software
installation process. This key must be configured on each computer in the CommCell
group after the software has been installed.
CommCell Console Considerations
If a CommServe server has both IPv4 and IPv6 protocols enabled, the CommCell®
Console will always obtain an IPv4 address. If you wish to obtain and connect
with an IPv6 address, the following parameter must be added to the
java/javaw command:
Note that this configuration is supported for the CommCell Console as a stand-alone
application only. If you are running the CommCell Console as a remote web-based
application, you will always obtain an IPv4 address.
To run the CommCell Console as a Remote Web-Based Application in an IPv6
environment, the web alias must include either the IPv6 address or a host name
that resolves to the IPv6 address.
Macintosh File System Considerations
By default, the software installation program will not display IP addresses
that are not reverse-resolvable to the a host name in the interface list. To
display such IP addresses, create the following empty file:
/tmp/cvpkgadd_unlock_ipaddress
Outlook Add-In Considerations
To perform stub recalls using the Outlook Add-In in an IPv6 environment,
the
ipfamilypref
registry key must be configured to accept the IPv6 protocol. This key must be
configured on each computer on which Outlook Add-In is installed.
It has been seen that a Windows computer may crash with a blue screen when
accessing a file under the following conditions:
the file resides on a Celerra file server
the file has offline attributes set
the services handling offline file restores is disabled or shut down
the client Windows computer has IPv6 installed and enabled
Therefore, it is recommended that the services handling stub file restores
are running before accessing offline stub files on a Celerra file server from
a Windows computer with IPv6 enabled.
FPolicy with NetApp ONTAP is not supported with IPv6 on Microsoft Windows
Server 2008 platforms.
If the File Archiver Agent is installed on a computer using the IPv4 protocol
and the client computer is using the IPv6 protocol, it is recommended that the
nPreferredIPFamily registry key be created on the client computer
with the value set to 1. This will ensure connections
between the two computers are not disrupted during stub recalls.
Support
IPv6 is not supported for the following:
1-Touch client recoveries
Command Line Interface
Content Indexing and Search
Data Classification on Unix platforms
NDMP Remote Server (when backup up a file server that does not support NDMP
IPv6)
NetWare MediaAgent
NetWare File System iDataAgent
Novell Directory Services (NDS) iDataAgent
Novell GroupWise iDataAgent
Unix computers running HP-UX 11.00
Additionally, consider the following:
IPv6 support for AIX 5.3 and above may require use the of
/etc/hosts for IPv6 name resolution.
IPv6 support for Tru64 OSF1 Release 5.1A requires the use of
/etc/ipnodes for IPv6 name resolution.
IPv6 support for HP-UX 11.11 requires the installation of the Transport
Optional Upgrade Release (TOUR) 2.5 and OS patch PHCO29328.
For Linux computers, only varieties with a glibc of 2.3 or 2.4 are supported
with IPv6.
For Solaris computers, only Solaris 9 and above are supported with IPv6.
For Windows computers, only Microsoft Windows Server 2003 varieties and
above are supported with IPv6.
The Optimize for Concurrent LAN Backups option is not supported for
AIX MediaAgents using the IPv6 protocol.