Install Software in a PowerBrokerEnvironment from CommCell Console

If your Unix client computers are residing in an environment that uses PowerBrokerServers for your Unix root access control, you are recommended to configure few additional settings prior to performing the remote installation. Use the following steps to install the software in a PowerBroker environment from the CommCell Console.

Prerequisites

Prior to installing the software components in a PowerBrokerenvironment from the CommCell Console, do the following:

  1. Verify that the computer in which you wish to install the software satisfies the System Requirements.
  2. Verify if the PowerBroker profile that you want to use for installing the software has sufficient permissions. See Required permissions for more information.
  3. Configure the following registry key on the CommServe. For step-by-step instructions, see Configuring the CommServe section.

    sCmdToExecForNonRootUsers

  4. Copy the cvpkgseed file from SoftwareCache\CVPackages\9.0.0\Unix location on CommServe's Software cache to CVPackages\UnixSeedPackages folder.

Required permissions

Make sure that the PowerBroker profile that you use for installing the software has the following permissions:

  1. Permission to run any command from the following locations:
  2. Permission to execute the following command:

    chmod a+x /tmp/cvpkgseed

Configuring the CommServe

Before installing the software components for the first time, you are required to configure few additional settings on the CommServe. Use the following steps to configure the CommServe.

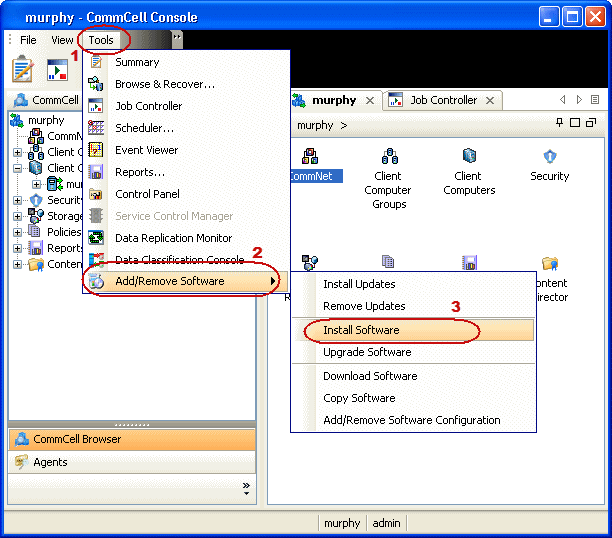
  1. Logon to the CommServe computer as an Administrator.
  2. Click the Windows Start button, click Run, type regedit in the Open box, and then click OK.
  3. From the Registry key editor, add the Registry key sCmdToExecForNonRootUsers at the following location. This registry key takes a String Value.

    HKEY_LOCAL_MACHINE\SOFTWARE\CommVault Systems\Galaxy\Instance<xxx>\Deployment

    If you do not find the Deployment key under <Instance001> , you must create it.

  4. Set the string value to:Full path to pbrun along with the appropriate options.

    For example: /usr/local/bin/pbrun -u root

  5. Close the Registry key editor.

Once you have configured the CommServe, use the following steps to install the software components on a Unix computer that resides in a PowerBroker environment:

Install Software from CommCell Console

  For sudo users, Service Pack 7a (or higher) must be available in the CommServe cache before performing the install. See Configure Download Software for step-by-step instruction on downloading the latest software or updates.
1. From the CommCell Browser, select Tools menu, point to Add/Remove Software, and then click Install Software.
2. Click Next.
3. Select Unix and Linux, and then click Next.
4. Select Manually Select Computers ,and then click Next.
5. Enter the fully qualified domain name of the computer in which you wish to install.

For example: apple.domain.company.com

The Unix File System iDataAgent will be installed on this client computer.

Click Next.

6. Click Next.
7. Type the User Name and Password of client computer who has administrator or sudo privileges.

Click Next.

  If a SUDO user has been created for root access, then use visudo to change /etc/sudoers, so that this user can SUDO into ssh without being prompted for the password.

Change the /etc/sudoers by commenting the following lines:

  • Defaults targetpw # ask for the password of the target user i.e. root
  • ALL ALL=(ALL) ALL # WARNING! Only use this together with 'Defaults targetpw'!
  • Defaults requiretty
8. Select the required component.

Click Next.

9.
  • Select Client Group from Available and click Add.

    Do not add more than one Client Group.

  • Select a Storage Policy from the drop-down list. Click Next.
  Select the Configure for Laptop or Desktop Backup option to install Backup Monitor utility. This utility allows you to view the backup job summary from the client computer without opening the CommCell Console. See Monitor - Laptop User for more information.
10. Click Next.
11. Select Immediate.

Click Next.

12. Click Finish.
13. You can track the progress of the job from the Job Controller or Event Viewer window.