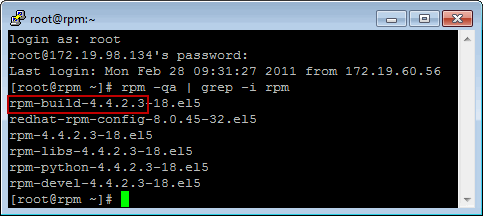
| rpm -qa | grep -i rpm | Output:
|
Using APT Package Management system you can create smaller installer packages that includes only the Agents that you plan to deploy. This enables you to build smaller install packages which will be useful to reduce WAN/LAN payload while installing remote clients.
The following procedure walks you through the process of creating and installing the Debian Linux versions of software components using Advanced Package Tool (APT) package management system on the Linux.
Ensure you have the following before creating a package using the APT Package Manager:
| rpm -qa | grep -i rpm | Output:
|
The software can be installed using one of the following
methods:Method 1: Decouple InstallUse this procedure to create a package, install in decouple mode and later register the client computer from the CommCell Console. Method 2: Record and InstallUse this procedure to create a package, record an install and perform the installation. |
| 1. | Navigate to Software Installation Package and run
the following command: ./cvpkgadd |
|
| 2. | The product banner and other information is displayed. Press Enter. |
|
| 3. | Read the license agreement. Type y and press Enter. | |
| 4. | Type 2 and press Enter. | Please select a setup
task you want to perform from the list below:
Advanced options provide extra setup features such as creating custom package, recording/replaying user selections and installing External Data Connector software. 1) Install data protection agents on this computer 2) Advanced options 3) Exit this menu Your choice: [1] 2 |
| 5. | Press Enter. | Please select a setup
task you want to perform from the list below:
[ Custom Package Creator ] 1) Create a custom install package [ De-coupled Installer ] 2) Pre-install software Components (De-coupled Mode) [ Integrated File Archiver ] 3) File System iDataAgent with Archiving Enabler [ Customized Cluster Agents ] 4) Veritas Cluster Agents [ Done ] 5) Exit this menu Your choice: [1] |
| 6. | Type 6 and press Enter. | Besides general package,
you may choose to create one additional native package from the list below. 1) General package only 2) Please also create RPM 3) Please also create solaris native package 4) Please also create hpux native package 5) Please also create Mac package using PackageMaker 6) Please also create APT 7) Exit Package Type Number [1] |
| 7. | Enter the number to choose a platform. To select multiple component, enter the number by adding a space. |
Please choose one or
more platforms to package from the list below. [ ] 1) Linux X86 [ ] 2) Linux X86_64 [ ] 3) Linux IA64 [ ] 4) Linux PPC64 [ ] 5) Linux S390 [a=all n=none r=reverse q=quit d=done >=next <=previous ?=help] Enter number(s)/one of "a,n,r,q,d,>,<,?" here: |
| 8. | A confirmation screen will mark your choice with an "X". Type "d" for Done, and press Enter. |
Please choose one or
more platforms to package from the list below. [X] 1) Linux X86 [ ] 2) Linux X86_64 [ ] 3) Linux IA64 [ ] 4) Linux PPC64 [ ] 5) Linux S390 [a=all n=none r=reverse q=quit d=done >=next <=previous ?=help] Enter number(s)/one of "a,n,r,q,d,>,<,?" here: |
| 9. | Enter the number corresponding to the IDA module. To select multiple component, enter the number by adding a space. |
Please choose one or
more subsystems to package from the list below.
[ ] 1) UNIX File System iDataAgent [1101]
[CVGxIDA] [a=all n=none r=reverse q=quit d=done
>=next <=previous ?=help] |
| 10. | A confirmation screen will mark your choice with an "X". Type "d" for Done, and press Enter. |
Please choose one or
more subsystems to package from the list below.
[X] 1) UNIX File System iDataAgent [1101]
[CVGxIDA] [a=all n=none r=reverse q=quit d=done
>=next <=previous ?=help] |
| 11. | Press Enter. The native custom package will be created in the following location: /opt/UnixCustomPackage/apt |
Save custom package to: [/opt] |
| 12. | Press Enter. | Optionally, you may choose
to record install to an xml parameter file now so that you can play it later.
The recorded xml will be encapsulated into the custom package and can be
used as an answer file in two ways:
(1) from the custom package run "silent_install -p default"; (2) from the native package run native installer(rpm/pkgadd/swinstall...) You can still perform the above two tasks without custom recording if you choose to use all default parameters. Do you want to record the install now? [no] |
| 13. | Debain APT Package creation is now complete. The package can be found in the following location: /opt/UnixCustomPackage/apt/custom-linux-4098_9.0.0_all.deb |
Creating the APT ... Moving it to /opt/UnixCustomPackage/apt ... done. Done. [ Custom Package Summary ] - General package created at /opt/UnixCustomPackage/pkg - Debian APT package created at /opt/UnixCustomPackage/apt: custom-linux-4098_9.0.0_all.deb Thank you for choosing Bull. |
| 14. | Navigate to the location in the previous step. | For Example: /opt/UnixCustomPackage/apt |
| 15. | Run the following command to install the apt package: dpkg -i <package_name> where <package_name> is the name of the APT package management system file. |
For Example:
[root@client apt]# dpkg -i custom-linux-4098_9.0.0_all.deb |
| 16. | The software installation is now complete. | Performing non-interactive
Install of the following modules.... * Base Client [1002] [CVGxBase] * Base0 Client [1003] [CVGxBase0] * UNIX File System iDataAgent [1101] [CVGxIDA] Install of the above modules completed successfully. REMINDER - You must register the client before decoupled installation is considered complete. |
| 17. | When you are ready to register the client in the CommCell: Login to the CommServe to which you wish to register the client computer and then launch the CommCell Console. |
|
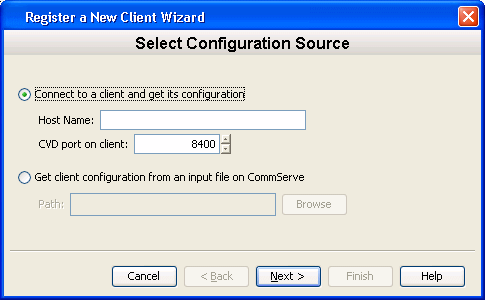
| 18. | From the CommCell Browser, right-click the Client Computers
icon, then select Register Client. The Register a new Client wizard is displayed. |

|
| 19. |
|
 |
| 20. | Click Next. |
 |
| 19. | The Summary screen is displayed. Verify that the information is correct, and then click Finish. |
 |
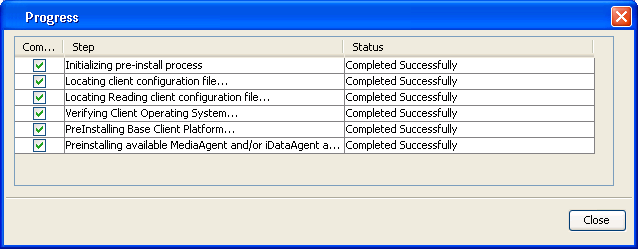
| 20. | The Progress screen is displayed until all the steps complete successfully. |
 |
| 21. | Refresh the CommCell Console to see the newly registered Client. To refresh, select the View menu, then Refresh. |
 |
| 1. | Navigate to Software Installation Package and run
the following command: ./cvpkgadd |
|||
| 2. | The product banner and other information is displayed. Press Enter. |
|||
| 3. | Read the license agreement. Type y and press Enter. | |||
| 4. | Type 2 and press Enter. | Please select a setup
task you want to perform from the list below:
Advanced options provide extra setup features such as creating custom package, recording/replaying user selections and installing External Data Connector software. 1) Install data protection agents on this computer 2) Advanced options 3) Exit this menu Your choice: [1] 2 |
||
| 5. | Press Enter. | Please select a setup
task you want to perform from the list below:
[ Custom Package Creator ] 1) Create a custom install package [ De-coupled Installer ] 2) Pre-install software Components (De-coupled Mode) [ Integrated File Archiver ] 3) File System iDataAgent with Archiving Enabler [ Customized Cluster Agents ] 4) Veritas Cluster Agents [ Third Party Connector ] 5) Symantec NetBackup Agent 6) NetApp Snap Manager for Oracle 7) NetApp Snap Manager for SAP/Oracle 8) IBM Tivoli Storage Manager [ Done ] 9) Exit this menu Your choice: [1] |
||
| 6. | Type 6 and press Enter. | Besides general package,
you may choose to create one additional native package from the list below. 1) General package only 2) Please also create RPM 3) Please also create solaris native package 4) Please also create hpux native package 5) Please also create Mac package using PackageMaker 6) Please also create APT 7) Exit Package Type Number [1] |
||
| 7. | Enter the number to choose a platform. To select multiple component, enter the number by adding a space. |
Please choose one or
more platforms to package from the list below. [ ] 1) Linux X86 [ ] 2) Linux X86_64 [ ] 3) Linux IA64 [ ] 4) Linux PPC64 [ ] 5) Linux S390 [a=all n=none r=reverse q=quit d=done >=next <=previous ?=help] Enter number(s)/one of "a,n,r,q,d,>,<,?" here: |
||
| 8. | A confirmation screen will mark your choice with an "X". Type "d" for Done, and press Enter. |
Please choose one or
more platforms to package from the list below. [X] 1) Linux X86 [ ] 2) Linux X86_64 [ ] 3) Linux IA64 [ ] 4) Linux PPC64 [ ] 5) Linux S390 [a=all n=none r=reverse q=quit d=done >=next <=previous ?=help] Enter number(s)/one of "a,n,r,q,d,>,<,?" here: |
||
| 9. | Enter the number corresponding to the IDA module. To select multiple component, enter the number by adding a space. |
Please choose one or
more subsystems to package from the list below.
[ ] 1) UNIX File System iDataAgent [1101]
[CVGxIDA] [a=all n=none r=reverse q=quit d=done
>=next <=previous ?=help] |
||
| 10. | A confirmation screen will mark your choice with an "X". Type "d" for Done, and press Enter. |
Please choose one or
more subsystems to package from the list below.
[X] 1) UNIX File System iDataAgent [1101]
[CVGxIDA] [a=all n=none r=reverse q=quit d=done
>=next <=previous ?=help] |
||
| 11. | Debain APT Package creation is now complete. The package can be found in the following location: /opt/UnixCustomPackage/apt/custom-linux-4098_9.0.0_all.deb |
Save custom package to: [/opt] | ||
| 12. | Type Yes to record your install and press Enter. | Optionally, you may choose
to record install to an xml parameter file now so that you can play it later.
The recorded xml will be encapsulated into the custom package and can be
used as an answer file in two ways:
(1) from the custom package run "silent_install -p default"; (2) from the native package run native installer(rpm/pkgadd/swinstall...) You can still perform the above two tasks without custom recording if you choose to use all default parameters. Do you want to record the install now? [no] yes |
||
| 13. | Enter the number corresponding to the IDA module. To select multiple component, enter the number by adding a space. |
Please choose one or
more subsystems to package from the list below.
[ ] 1) UNIX File System iDataAgent [1101]
[CVGxIDA] [a=all n=none r=reverse q=quit d=done
>=next <=previous ?=help] |
||
| 14. | A confirmation screen will mark your choice with an "X".
Type "d" for Done, and press Enter. |
Please choose one or
more subsystems to package from the list below.
[ ] 1) UNIX File System iDataAgent [1101]
[CVGxIDA] [a=all n=none r=reverse q=quit d=done
>=next <=previous ?=help] |
||
| 15. | Press Enter. | Do you want to configure the iDataAgent for laptop or desktop backups? [no] | ||
| 16. | Press Enter. | Do you want to install the agents for restore only without consuming licenses? [no] | ||
| 17. | Enter the path for installation directory and press Enter. | Please specify where
you want us to install Calypso binaries.
It must be a local directory and there should be at least 142MB of free space available. All files will be installed in a "Calypso" subdirectory, so if you enter "/opt", the files will actually be placed into "/opt/Calypso". Installation Directory: |
||
| 18. | Enter the path for log directory and press Enter. | Please specify where
you want to keep Calypso log files. It must be a local directory and there should be at least 100MB of free space available. All log files will be created in a "Calypso/Log_Files" subdirectory, so if you enter "/var/log", the logs will actually be placed into "/var/log/Calypso/Log_Files". Log Directory: |
||
| 19. | Press Enter to assign user group.
|
Most of Calypso
processes run with root privileges, but some are launched by databases and
inherit database access rights. To make sure that registry and log files
can be written to by both kinds of processes we can either make such files
world-writeable or we can grant write access only to processes belonging
to a particular group, e.g. a "Calypso" or a "dba" group. We highly recommend now that you create a new user group and enter its name in the next setup screen. If you choose not to assign a dedicated group to Calypso processes, you will need to specify the access permissions later. If you're planning to backup Oracle DB you should use "dba" group. Would you like to assign a specific group to Calypso? [yes] |
||
| 20. | Type the Group name and then press Enter. | Please enter the name
of the group which will be assigned to all Calypso files
and on behalf of which all Calypso processes will run. In most of the cases it's a good idea to create a dedicated "Calypso" group. However, if you're planning to use Oracle iDataAgent or SAP Agent, you should enter Oracle's "dba" group here. Group name: staff REMINDER If you are planning to install Calypso Informix, DB2, Sybase or LotusNotes iDataAgent, please make sure to include informix, db2, etc. users into group "staff". Press <ENTER> to continue ... |
||
| 21. | Type a network TCP port number for the Communications Service
(CVD) and press Enter. Type a network TCP port number for the Client Event Manager Service (EvMgrC) and press Enter. |
Every instance of Calypso
should use a unique set of network ports to avoid interfering with other
instances running on the same machine.
The port numbers selected must be from the reserved port number range and have not been registered by another application on this machine. Please enter the port numbers. Port Number for CVD : Port Number for EvMgrC: |
||
| 22. | Press Enter. | Is there a firewall between this client and the CommServe? [no] | ||
| 23. | Type CommServe Host Name and press Enter. | Please specify hostname
of the CommServe below. Make sure the hostname is fully qualified, resolvable
by the name services configured on this machine. CommServe Host Name: |
||
| 24. | Type the Client Computer Group Name and press Enter. | Please enter one Client
Computer Group name for this client to join. Client Computer Group Name: |
||
| 25. | Press Enter. | Do you want to configure subclient policy? [no] | ||
| 26. | Type Storage Policy Name and press Enter. | Please enter a storage
policy name for this IDA. Storage Policy Name: |
||
| 27. | Press Enter. | Please select which instance
you want to install/replay for this recording: 1) Always install to Instance001 2) Always install to Instance002 3) Always install to Instance003 4) Always install to Instance004 5) Always install to Instance005 6) Always install to Instance006 7) Always install to Instance007 8) Always install to Instance008 9) Always install to Instance009 10) Always install to Instance010 11) Always install to a new instance 12) I want to specify another instance Your choice: [11] |
||
| 28. | The record of your input is now complete. The package can be found in the following location: /opt/UnixCustomPackage/apt/custom-linux-4098_9.0.0_all.deb |
Creating the APT ....
done. Moving it to /opt/UnixCustomPackage/apt ... done. Done [ Custom Package Summary ] - General package created at /opt/UnixCustomPackage/pkg - Debian APT package created at /opt/UnixCustomPackage/apt: custom-linux-4098_9.0.0_all.deb Thank you for choosing Bull. |
||
| 29. | Navigate to the location in the previous step. | For Example: /opt/UnixCustomPackage/apt |
||
| 30. | Run the following command to install the apt package: dpkg -i <package_name> where <package_name> is the name of the APT package management system file. |
For Example:
[root@client apt]# dpkg -i custom-linux-4098_9.0.0_all.deb |
||
| 31. | The software installation is now complete. | Performing non-interactive
Install of the following modules.... * Base Client [1002] [CVGxBase] * Base0 Client [1003] [CVGxBase0] * UNIX File System iDataAgent [1101] [CVGxIDA] Install of the above modules completed successfully. |