Interactive Upgrade - Windows Agents

Table of Contents

Overview

Supported Upgrade Paths

Upgrade Requirements

Before You Begin

Upgrade Procedure

Post-Upgrade Considerations

Overview

The following procedure describes the steps involved in upgrading the software, directly from the Software Installation Disc or from a network location in a non-clustered computer.

If multiple components are installed on a computer, the upgrade will automatically upgrade all the components installed on a computer.

Verify that the computer in which you wish to upgrade the software satisfies the minimum requirements specified in System Requirements.

Supported Upgrade Paths

The following table provides a list of supported upgrade paths for the current software version. If the version currently installed on your computer is not listed here, contact your software provider for more information.

Installed Version

Upgrade to Version 9.0.0

Information

     
7.0.0 Supported Perform a direct upgrade to Version 9.0.0.
     
8.0.0 Not Supported Perform a direct upgrade to Version 10.0.0.

Click here for more details.

Upgrade Requirements

Review the following before upgrading the software:

General

Before You Begin

Ensure that you are logged on to the computer as a local Administrator or as a member of the local Administrator group on that computer.

Upgrade Procedure

  For database applications (Oracle, DB2 iDataAgent) on Windows, a reboot of a client is required when application services are running. It is recommended to upgrade when application services are not running.
1. Place the software installation disc for the Windows platform into the disc drive.

After a few seconds, the installation program is launched.

If the installation program does not launch automatically:

  • Click the Start button on the Windows task bar, and then click Run.
  • Browse to the installation disc drive, select Setup.exe, click Open, then click OK.
2. Choose the language you want to use during installation. Click the down arrow and select the desired language from the drop-down list, and click Next to continue.
3. Select the option to install software on this computer.

NOTES

  • The options that appear on this screen depend on the computer in which the software is being installed.
4. Read the license agreement, then select I accept the terms in the license agreement.

Click Next to continue.

5. Click Next to continue with the upgrade.

NOTES

  • The older version number depends on the version in the computer and may look different from the example shown.
6. Click Yes to continue.

NOTES

  • The upgrade process deletes and replaces this folder with newer files. To preserve this, move them to another location before clicking Yes.
  • Note that the upgrade process does not save any files such as command line scripts or folders from the <software installation path> folder.
  • Clicking No will exit the upgrade program.
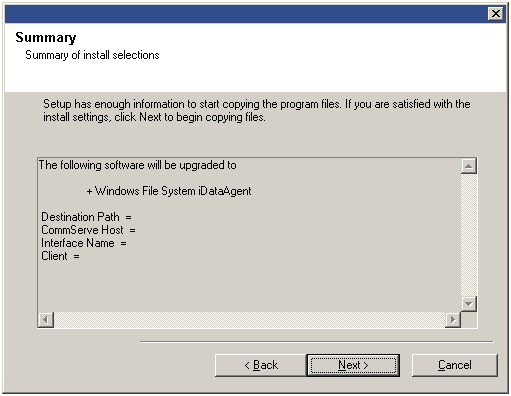
7. Verify the summary and Click Next to continue.

NOTES

  • The Summary on your screen will reflect the components installed on the computer, and may look different from the example shown.

The upgrade program now starts the upgrade process. This step may take several minutes to complete.

8. Click Finish to complete the upgrade.

NOTES

  • The Completion Report will reflect the components upgraded on the computer, and may look different from the example shown.

The upgrade is now complete.

Post-Upgrade Considerations

General