Topics | How To | Related Topics
Create the PreScan and PostBackup Batch Files
ProxyHost iDataAgent Backup of a Virtual Machine - File Backup
Related Topics
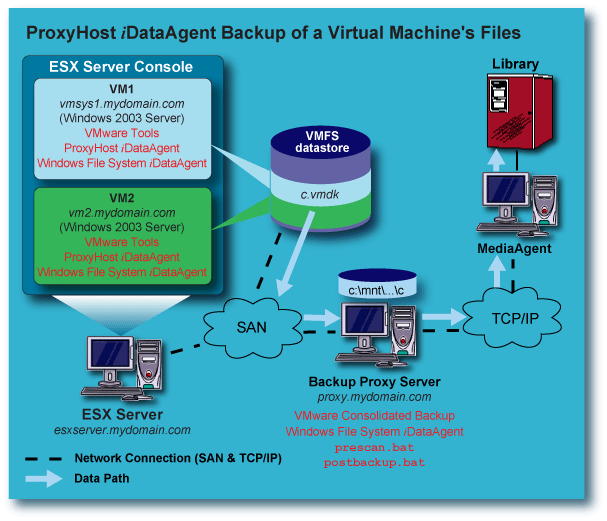
The illustration below shows an example of how the ESX Server, Virtual Machine(s), and VCB Proxy Server are configured when using the ProxyHost and Windows File System iDataAgents to back up the files for a VMware Virtual Machine running Windows 2003 Server:

ESX Server
Virtual Machines
VCB Proxy Server
C:\Program Files\VMware\VMware Consolidated Backup Framework
which has two subdirectories:
HOST="esxserver.mydomain.com";
HOST="virtualcenter.mydomain.com";
USERNAME="root";
PASSWORD="password";
The PreScan and PostBackup batch files are executed during the backup, to trigger the VMware utilities to create a snapshot of the Virtual Machine's VMFS disk image, and do the following:
For a file backup of a Virtual Machine from the VCB Proxy Server, two batch files are required; the PreScan batch file and PostBackup batch file.
PreScan Batch File File Backup
For file backups of Virtual Machines with Windows 2003 Server as the guest operating system, create the file prescan.bat in the ..\generic subdirectory referenced above. This batch file will need the following contents:
cd <location of Consolidated Backup installation>\generic
cscript pre-command.wsf <location of Consolidated Backup installation <FQDN of VM to backup> [<backup type>]
where <backup type> is either
fullvm or file.
Default is file.
Example for file backup:
cd "C:\Program Files\VMware\VMware Consolidated Backup Framework\generic"
cscript pre-command.wsf "C:\Program Files\VMware\VMware Consolidated Backup Framework" "vmsys1.mydomain.com" file
The cscript pre-command.wsf accesses part of the installed Consolidated Backup package and performs the following when prescan.bat is executed:
C:\mnt\<VM name>\letters\C
C:\mnt\<VM name>\letters\D
.
.
.
and so on. Assuming vmsys1.mydomain.com has a single C: drive, it would mount to the VCB Proxy Server as follows:
C:\mnt\vmsys1.mydomain.com\letters\C
Post Backup Batch File File Backup
For file backups of Virtual Machines with Windows 2003 Server as the guest operating system, once the backup is completed, the files will need to be unmounted from the VCB Proxy Server. Create the file postbackup.bat in the ..\generic subdirectory referenced above. This batch file will need the following contents:
cd <location of Consolidated Backup installation>\generic
cscript post-command.wsf <location of Consolidated Backup installation> <FQDN of mounted Virtual Machine>
Example:
cd "C:\Program Files\VMware\VMware Consolidated Backup Framework\generic"
cscript post-command.wsf "C:\Program Files\VMware\VMware Consolidated Backup Framework" "vmsys1.mydomain.com"
The cscript post-command.wsf accesses part of the installed Consolidated Backup package and performs the following when postbackup.bat is executed:
To perform a file backup of a Virtual Machine with Windows 2003 Server as the guest operating system, perform these steps:
General Tab:
Content Tab:
Pre/Post Process Tab:
Storage Device Tab:
The following occurs when a backup is performed using the ProxyHost subclient you created.
NOTES
Create the PreScan and PostBackup Batch Files
Windows File System iDataAgent Backup of a Virtual Machine - File Backup
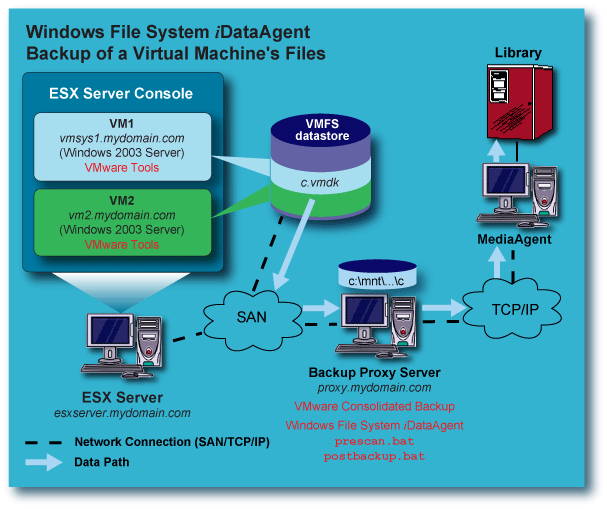
The illustration below shows an example of how the ESX Server, Virtual Machine(s), and VCB Proxy Server are configured when using the Windows File System iDataAgent to back up the files for a VMware Virtual Machine running Windows 2003 Server:

ESX Server
Virtual Machines
VCB Proxy Server
C:\Program Files\VMware\VMware Consolidated Backup Framework
which has two subdirectories:
HOST="esxserver.mydomain.com";
HOST="virtualcenter.mydomain.com";
USERNAME="root";
PASSWORD="password";
The PreScan and PostBackup batch files are executed during the backup, to trigger the VMware utilities to create a snapshot of the Virtual Machine's VMFS disk image, and do the following:
For a file backup of a Virtual Machine from the VCB Proxy Server, two batch files are required; the PreScan batch file and PostBackup batch file.
PreScan Batch File File Backup
For file backups of Virtual Machines with Windows 2003 Server as the guest operating system, create the file prescan.bat in the ..\generic subdirectory referenced above. This batch file will need the following contents:
cd <location of Consolidated Backup installation>\generic
cscript pre-command.wsf <location of Consolidated Backup installation <FQDN of VM to backup> [<backup type>]
where <backup type> is either
fullvm or file.
Default is file.
Example for file backup:
cd "C:\Program Files\VMware\VMware Consolidated Backup Framework\generic"
cscript pre-command.wsf "C:\Program Files\VMware\VMware Consolidated Backup Framework" "vmsys1.mydomain.com" file
The cscript pre-command.wsf accesses part of the installed Consolidated Backup package and performs the following when prescan.bat is executed:
C:\mnt\<VM name>\letters\C
C:\mnt\<VM name>\letters\D
.
.
.
and so on. Assuming vmsys1.mydomain.com has a single C: drive, it would mount to the VCB Proxy Server as follows:
C:\mnt\vmsys1.mydomain.com\letters\C
Post Backup Batch File File Backup
For file backups of Virtual Machines with Windows 2003 Server as the guest operating system, once the backup is completed, the files will need to be unmounted from the VCB Proxy Server. Create the file postbackup.bat in the ..\generic subdirectory referenced above. This batch file will need the following contents:
cd <location of Consolidated Backup installation>\generic
cscript post-command.wsf <location of Consolidated Backup installation> <FQDN of mounted Virtual Machine>
Example:
cd "C:\Program Files\VMware\VMware Consolidated Backup Framework\generic"
cscript post-command.wsf "C:\Program Files\VMware\VMware Consolidated Backup Framework" "vmsys1.mydomain.com"
The cscript post-command.wsf accesses part of the installed Consolidated Backup package and performs the following when postbackup.bat is executed:
To perform a file backup of a Virtual Machine with Windows 2003 Server as the guest operating system, perform these steps:
General Tab:
Content Tab:
Pre/Post Process Tab:
Storage Device Tab:
The following occurs when a backup is performed using the Windows File System subclient you created.
NOTES
Create the PreScan and PostBackup Batch Files
Windows File System iDataAgent Backup of a Virtual Machine - Full Image Backup
The illustration below shows an example of how the ESX Server, Virtual Machine(s), and VCB Proxy Server are configured when using the Windows File System iDataAgent to back up the full disk image for a VMware Virtual Machine running any operating system:

ESX Server
Virtual Machines
VCB Proxy Server
C:\Program Files\VMware\VMware Consolidated Backup Framework
which has two subdirectories:
HOST="esxserver.mydomain.com";
HOST="virtualcenter.mydomain.com";
USERNAME="root";
PASSWORD="password";
For a Full Image backup of a Virtual Machine from the VCB Proxy Server, only one batch files is required; the PreScan batch file. You may optionally choose to create a PostBackup batch file as well, if that would be helpful in your environment.
PreScan Batch File Full Image Backup
For Full Image backups of Virtual Machines with any guest operating system, create the file prescan.bat in the ..\generic subdirectory referenced above. This batch file will need the following contents:
cd <location of Consolidated Backup installation>\generic
cscript pre-command.wsf <location of Consolidated Backup installation <FQDN of VM to backup> [<backup type>]
where <backup type> is either
fullvm or file.
Default is file.
Example for Full Image backup:
cd "C:\Program Files\VMware\VMware Consolidated Backup Framework\generic"
cscript pre-command.wsf "C:\Program Files\VMware\VMware Consolidated Backup Framework" "vmsys1.mydomain.com" fullvm
The cscript pre-command.wsf accesses part of the installed Consolidated Backup package and performs the following when prescan.bat is executed:
C:\mnt\<VM name>-fullVM\
In this example the directory will be:
C:\mnt\vmsys1.mydomain.com-fullVM\
NOTE
Creating the Full Image backup on the VCB Proxy Server can be time intensive,
depending upon the size of the Virtual Machine.
Post Backup Batch File Full Image Backup
Unlike the file backup, a Full Image backup does not require any additional actions to be taken once vcbMounter completes a backup of the Virtual Machine. However, you may choose to use a Post Backup script to delete the Full Image backup files from the VCB Proxy Server after the backup has completed, or for some other purpose which meets the needs of your environment.
To perform a Full Image backup of a Virtual Machine with any guest operating system, perform these steps:
General Tab:
Content Tab:
Pre/Post Process Tab:
Storage Device Tab:
The following occurs when a backup is performed using the Windows File System subclient you created.
NOTES
Create the PreScan, Prebackup, and PostBackup Script Files
Backup of a Virtual Machine from the Service Console - Full Image Backup
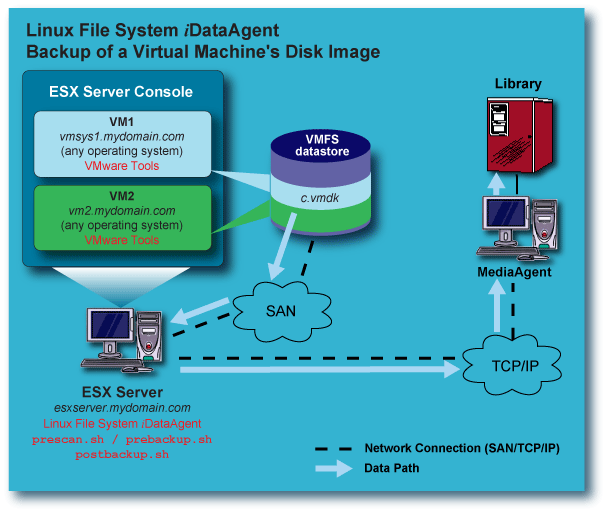
The illustration below shows an example of how the ESX Server and Virtual Machine(s) are configured when using the Linux File System iDataAgent from the Service Console to back up the full disk image for a VMware Virtual Machine running any operating system:

ESX Server
Disable the firewall on the ESX Server by executing the following command:
/etc/init.d/firewall stop
Executing the above will disable the firewall until the next reboot or until it is explicitly restarted. It is left to administrators to disable the firewall permanently if so desired.
The above will now allow the successful installation of the Linux File System iDataAgent on the Service Console. However, to ensure proper backup and restore operation, it will be necessary to configure the firewall when installing the Linux File System iDataAgent on the Service Console, to match the settings for the CommServe and any MediaAgents that will be used to back up and restore data from the Service Console. Failure to configure the firewall properly will cause backups to fail. See Firewalls for information on configuring CommCell components across firewalls.
Virtual Machines
VCB Proxy Server
Create PreScan and PostBackup script files, based on which VMware utility you will be using -- vcbMounter or vcbSnapshot; select one of the following:
For a Full Image backup of a Virtual Machine from the Service Console, only one script is required; the PreScan script. You may optionally choose to create a PostBackup script as well, if that would be helpful in your environment.
PreScan Script Full Image Backup from the Service Console using vcbMounter
This example prescan.sh script will be used to invoke the vcbMounter utility to perform the Full Image backup:
#!/bin/bash
sudo /usr/sbin/vcbMounter -h esxserver.mydomain.com -u root -p password -a ipaddr:vmsys1.mydomain.com -r /vmfs/volumes/SanBackup1/vmsys1-imageBackup -t fullvm -M 0 F 0
The vcbMounter command in the sample script has these components:
-h esxserver.mydomain.com FQDN of ESX Server
-u root Login for ESX Server
-p password Password for ESX Server
-a ipaddr:vmsys1.mydomain.com The Virtual Machine to back up
-r /vmfs/volumes/SanBackup1/vmsys1-imageBackup
The destination directory for the Full Image backup
(This directory must not already exist.)-t fullvm Type of backup to be performed
-M 0 Break up Full Image backup into 2GB files
F 0 Optimize the Full Image backup file
There is more than one method to specify the Virtual Machine to be backed up. For more information, refer to the VMware Virtual Machine Backup Guide. The above method used the FQDN of the Virtual Machine and requires the Virtual Machine to be active to work. The Virtual Machine's VMFS disk image in this example is located in a datastore on a non-SAN local SCSI disk.
The following information is intended to show how this information is derived, so that you can create a script for your environment. More detailed information on the vcbMounter utility can be obtained from VMware.
# vdf
Filesystem 1K-blocks Used Available Use% Mounted on
/dev/sda2 5036316 1430076 3350408 30% /
/dev/sda1 101089 33737 62133 36% /boot
none 134156 0 134156 0% /dev/shm
/dev/sda8 1462604 55972 1332336 5% /var/log
/vmfs/devices 454740210 0 454740210 0% /vmfs/devices
/vmfs/volumes/238c5ef3-9be4ed7b
92033536 53295336 38738200 57% /vmfs/volumes/nfsDataStore1
/vmfs/volumes/3204d433-533283f0
58603260 16842748 41760512 28% /vmfs/volumes/nfsDataStore2
/vmfs/volumes/444e6f5d-ac750886-4f6d-0011435b35d5
63438848 53569536 9869312 84% /vmfs/volumes/Vmfs3Vol1
/vmfs/volumes/44bd0297-a0d76b9c-5d85-0011435b35d5
35389440 14519296 20870144 41% /vmfs/volumes/SanTarget0
/vmfs/volumes/44c529af-b8365ad6-7307-0011435b35d5
35389440 641024 34748416 1% /vmfs/volumes/SanBackup1
#
# pwd
/vmfs/volumes/Vmfs3Vol1
# ls -l
total 384
drwxr-xr-x 1 root root 2240 Jul 18 11:07 vmsys1
drwxr-xr-x 1 root root 2240 Jul 6 11:08 vmsys2
drwxr-xr-x 1 root root 1260 Jun 23 09:22 vmsys3
drwxr-xr-x 1 root root 2520 Jul 18 11:07 vmsys4
drwxr-xr-x 1 root root 2240 Jul 21 15:37 vmsys4
drwxr-xr-x 1 root root 2240 Jul 21 13:19 vmsys5
#
# ls -l vmsys1
total 6931200
-rw------- 1 root root 805306368 Jul 20 08:41 vmsys1-79672131.vswp
-rw------- 1 root root 6291456000 Jul 25 10:31 vmsys1-flat.vmdk
-rw------- 1 root root 8664 Jul 20 08:41 vmsys1.nvram
-rw------- 1 root root 343 Jul 21 15:37 vmsys1.vmdk
-rw------- 1 root root 471 Jul 21 15:37 vmsys1.vmsd
-rwx------ 1 root root 1400 Jul 21 15:37 vmsys1.vmx
-rw------- 1 root root 255 Jul 20 08:29 vmsys1.vmxf
-rw------- 1 root root 43774 Jul 20 08:12 vmware-4.log
-rw------- 1 root root 26219 Jul 20 08:12 vmware-5.log
-rw------- 1 root root 19355 Jul 20 08:12 vmware-6.log
-rw------- 1 root root 27734 Jul 20 08:12 vmware-7.log
-rw------- 1 root root 42141 Jul 20 08:12 vmware-8.log
-rw-r--r-- 1 root root 19033 Jul 20 08:35 vmware-9.log
-rw-r--r-- 1 root root 62039 Jul 24 13:34 vmware.log
#
PostBackup Script Full Image Backup from the Service Console using vcbMounter
A Full Image backup of a Virtual Machine from the Service Console does not require any additional actions to be taken once vcbMounter completes a backup of the Virtual Machine. However, you may choose to use a Post Backup script to delete the Full Image backup files from the ESX Server after the backup has completed, or for some other purpose which meets the needs of your environment.
The following postbackup.sh script will be used in our example to remove the image files once the Linux File System iDataAgent has completed the backup:
#!/bin/bash
rm rf /vmfs/volumes/SanBackup1/vmsys1-imageBackup
For a Full Image backup of a Virtual Machine from the Service Console using vcbSnapshot, two scripts are required; the PreBackup script and PostBackup script.
PreBackup Script Full Image Backup from the Service Console using vcbSnapshot
This example prebackup.sh script will be used to invoke the vcbSnapshot utility to perform the Full Image backup:
sudo /usr/sbin/vcbSnapshot -h esxserver.mydomain.com -u root -p password -c moref:64 vmsys1snap
The vcbSnapshot command in the sample script has these components:
-h esxserver.mydomain.com FQDN of ESX Server
-u root Login for ESX Server
-p password Password for ESX Server
-c moref:64 vmsys1snap Creates snapshot for Virtual Machine vmsys1 with moref:64
and names the snapshot vmsys1snap.
The following command example can be used to determine the moref value:
vcbVmName h esxserver.mydomain.com u root -p password s name:vmsys1
# vcbVmName -h esxserver.mydomain.com -u root -p password -s name:vmsys1 [2006-07-27 11:29:31.503 'App' 3076452480 info] Current working directory: /root/scripts [2006-07-27 11:29:31.547 'BaseLibs' 8653744 warning] [Vmdb_Unset] Unsetting unknown path: /vmomi/
Found VM: moref:64 name:vmsys1 uuid:564df2c7-51a8-bac7-4b7e-3a4a0eddcfaa ipaddr:192.168.1.5 #
PostBackup Script Full Image Backup from the Service Console using vcbSnapshot
This example postbackup.sh script will be used to remove the snapshot file:
The first command returns the SSID of the snapshot given its moref and snapshot name. The SSID is needed when issuing the second command to remove the snapshot.
#!/bin/bash
# get the SSID of the snapshot
SSID=$(sudo /usr/sbin/vcbSnapshot-h esxserver.mydomain.com -u root -p password -f moref:64 vmsys1snap | grep SsId )# remove the snapshot
sudo /usr/sbin/vcbSnapshot -h esxserver.mydomain.com -u root -p password -d moref:64 $SSIDThe actual remove command issued would look similar to the following:
sudo /usr/sbin/vcbSnapshot -h esxserver.mydomain.com -u root -p password -d moref:64 ssid:/vmfs/volumes/444e6f5d-ac750886-4f6d-0011435b35d5/vmsys1/vmsys1.vmx-snapshot-1
To perform a Full Image backup, from the Service Console, of a Virtual Machine with any guest operating system, perform these steps:
General Tab:
Content Tab:
Pre/Post Process Tab:
Storage Device Tab:
The following occurs when a backup is performed using the Linux File System subclient you created:
#
ls -ltr
total 6948672
-rw------- 1 root root 42141 Jul 20 08:12 vmware-8.log
-rw------- 1 root root 27734 Jul 20 08:12 vmware-7.log
-rw------- 1 root root 19355 Jul 20 08:12 vmware-6.log
-rw------- 1 root root 26219 Jul 20 08:12 vmware-5.log
-rw------- 1 root root 43774 Jul 20 08:12 vmware-4.log
-rw------- 1 root root 255 Jul 20
08:29 vmsys1.vmxf
-rw-r--r-- 1 root root 19033 Jul 20 08:35 vmware-9.log
-rw------- 1 root root 805306368 Jul 20 08:41 vmsys1-79672131.vswp
-rw------- 1 root root 8664 Jul 20 08:41
vmsys1.nvram
-rw------- 1 root root 343 Jul 21
15:37 vmsys1.vmdk
-rw------- 1 root root 6291456000 Jul 25 14:16 vmsys1-flat.vmdk
-rwx------ 1 root root 1407 Jul 25 14:16
vmsys1.vmx
-rw------- 1 root root 18380 Jul 25 14:16 vmsys1-Snapshot5.vmsn
-rw------- 1 root root 530 Jul 25
14:16 vmsys1.vmsd
-rw------- 1 root root 231 Jul 25
14:16 vmsys1-000001.vmdk
-rw-r--r-- 1 root root 65750 Jul 25 14:16 vmware.log
-rw------- 1 root root 16777216 Jul 25 14:16 vmsys1-000001-delta.vmdk
# pwd
# /vmfs/volumes/Vmfs3Vol1/vmsys1
# ls -l vmsys1-imageBackup
total 850560
-rw------- 1 root root 8664 Jul 25 14:16 vmsys1.nvram
-rw------- 1 root root 1407 Jul 25 14:16 vmsys1.vmx
-rw-r--r-- 1 root root 909 Jul 25 14:16
catalog
-rw------- 1 root root 866713600 Jul 25 14:24 scsi0-0-0-vmsys1-s001.vmdk
-rw------- 1 root root 327680 Jul 25 14:16 scsi0-0-0-vmsys1-s002.vmdk
-rw------- 1 root root 262144 Jul 25 14:16 scsi0-0-0-vmsys1-s003.vmdk
-rw------- 1 root root 474 Jul 25 14:16
scsi0-0-0-vmsys1.vmdk
-rw------- 1 root root 43774 Jul 25 14:16 vmware-4.log
-rw------- 1 root root 26219 Jul 25 14:16 vmware-5.log
-rw------- 1 root root 19355 Jul 25 14:16 vmware-6.log
-rw------- 1 root root 27734 Jul 25 14:16 vmware-7.log
-rw------- 1 root root 42141 Jul 25 14:16 vmware-8.log
-rw------- 1 root root 19033 Jul 25 14:16 vmware-9.log
-rw------- 1 root root 65750 Jul 25 14:16 vmware.log
# /vmfs/volumes/SanBackup1
The following occurs when a backup is performed using the Linux File System subclient you created: