

| Deployment | Setup | Advanced Options |
|
Once you have installed Data Classification Enabler, follow the steps given below to enable data classification scan:
By default the Data Classification Enabler is installed in the MONITOR mode. In the this mode, the Data Classification scan is performed only for those volumes which are included in the monitored volumes list.
On a cluster setup, the shared volumes need to be added to the Monitored Volumes list on all the nodes manually. Otherwise, the passive node does not automatically start monitoring the shared volumes during a failover as they are not added to the Monitored Volumes list on it.
Follow the steps given below to add volumes to Monitored volumes list.
/opt/Calypso/Base
DcClient -monitor <mount path>
where: <mount path> is the volume that you want to add to the monitoring list.
DcClient -cluster vollist <virtual client name>.
DcClient -cluster volcreate <virtual client name> <vol 1, vol 2,...vol n>
After you have added all the required volumes in the monitored volumes list, enable the data classification scan for a backupset.
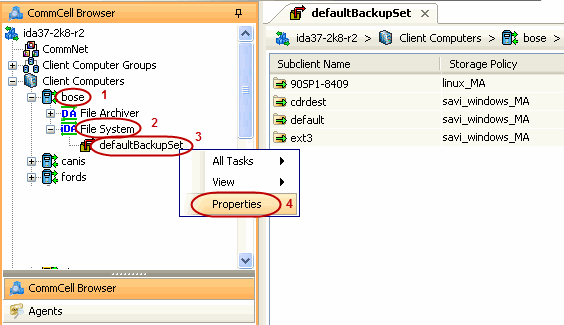
| 1. |
|
 |
||
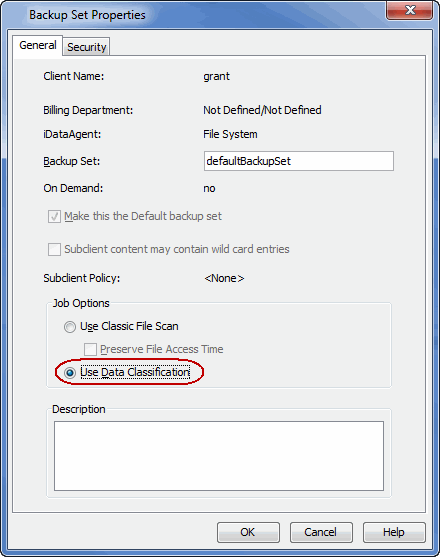
| 2. |
|
 |
||
| 3. |
The data classification scan is performed when you run a backup for any
subclient in the backupset.
If you want to further explore this Agent's features read the Advanced sections of this documentation. |
|
|