DASH Full - Accelerated Synthetic Full Backups

When a storage policy copy is deduplicated, synthetic full backups can be created in an accelerated mode to significantly reduce the copy duration. This is done by identifying and transferring the data signatures (instead of the data itself) to the target wherever possible.

DASH Full backups can be setup using the following main steps:

  1. Configure a Disk Library
  2. Enable DASH full in Storage Policy Copy
  3. Associate a Subclient to Storage Policy
  4. Run a Full Backup
  5. Run an Accelerated Synthetic Full Backup
  6. View Job History

Configure A Disk Library

1. Click the Backup Target button on EZ Operations Wizard.
  If the EZ Operations Wizard is not displayed double-click the icon in the toolbar.
2. Click Disc Library (For backup to disc) and click Next.
3.
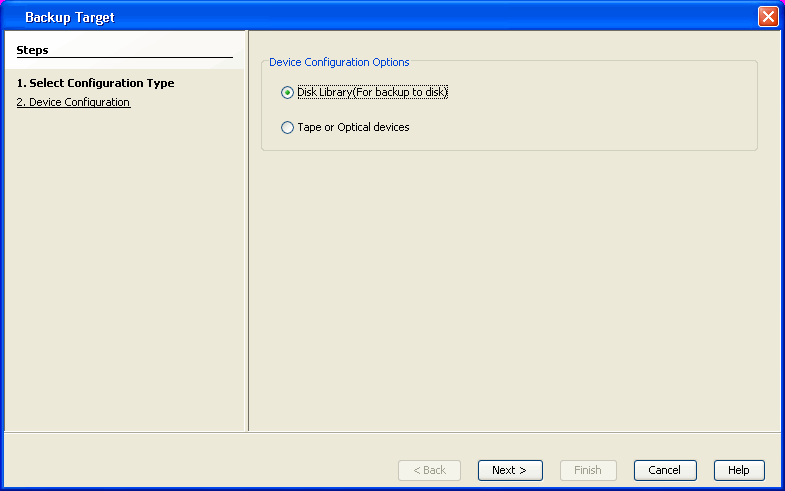
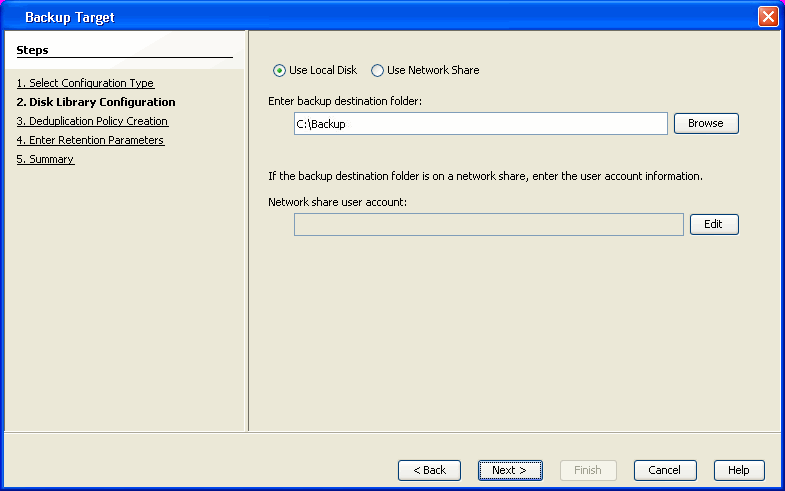
  • Click Use Local Disk.
  • Type the name of the folder in which the disc library must be located in the Enter backup destination folder box or click the Browse button to select the folder.
  • Click Next.

If you click the Use Network Share option you will be prompted for the credentials (user name and password) to access the share.

4.
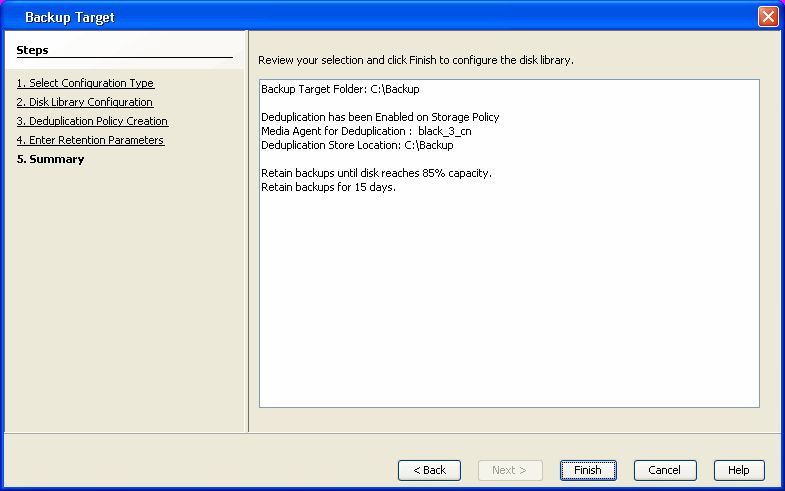
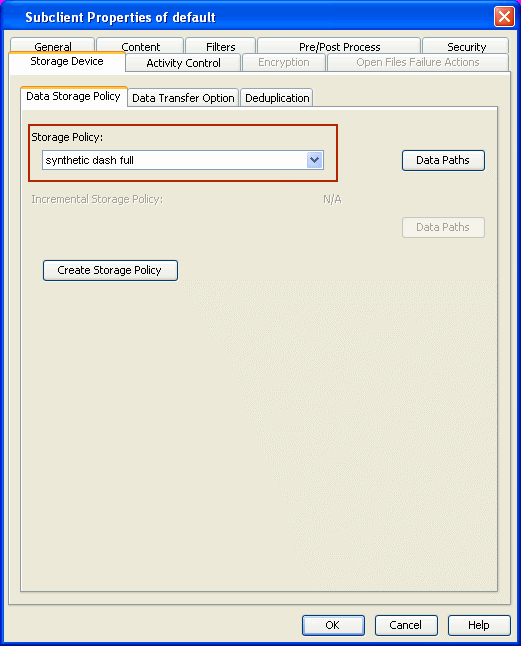
  • Click and select the Enable Deduplication option - this will save disc space for storage.
  • Type the name of the folder in which the deduplication database must be located in the Deduplication Store location box or click the Browse button to select the folder.
  • Click Next.
5. Click Next.
6. Click Finish.

Enable DASH full in the Storage Policy Copy

7.
  • From the CommCell Browser, navigate to Policies | Storage Policies | <Storage Policy>.
  • Right-click the primary storage policy copy displayed in the right pane and then click Properties.
8.
  • Click the Deduplication tab, and then click the Advanced tab.
  • Select the Enable DASH Full (Read Optimzed Synthetic Full) option.
  • Click OK.

Associate Subclients to the Storage Policy Copy

9.
  • From the CommCell Browser, navigate to Client Computers | <Client> | File System | defaultBackupSet.
  • Right-click the subclient in the right pane and click Properties.
10.
  • Click the Storage Device tab.
  • In the Storage Policy list, click the storage policy where DASH full was enabled.
  • Click OK.

Run a Full Backup

11.
  • From the CommCell Browser, navigate to Client Computers | <Client> | File System | defaultBackupSet.
  • Right-click the subclient and click Backup.
12.
  • Under Select Backup Type, click Full.
  •  Under Job Initiation, click Immediate.
  • Click OK.
13. You can track the progress of the job from the Job Controller window. Ensure that the job completes successfully. Once the job completes:
  • Right click the job and click Details

  • Click the Progress tab.

In the Progress tab, the Transferred Data Size on Network displays the amount of data sent over the network.

RUN an Accelerated Synthetic Full Backup

14.
  • From the CommCell Browser, navigate to Client Computers | <Client> | File System | defaultBackupSet.
  • Right-click the subclient and click Backup.
15.
  • Under Select Backup Type, click Synthetic Full.

    Select the Run Incremental Backup box.

    Click the Before Synthetic Full option.

  •  Under Job Initiation, click Immediate.
  • Click OK.
16. You can track the progress of the job from the Job Controller window. Ensure that the job completes successfully. Once the job completes:
  • Right click the job and click Details

  • Click the Progress tab.

In the Progress tab, the Transferred Data Size on Network displays the amount of data sent over the network.

View Job History

17.
  • From the CommCell Browser, navigate to Client Computers | <Client> | File System | defaultBackupSet.
  • Right-click the subclient and click Backup History.
18. The Job History clearly depicts the size of application versus the amount of data written with a total savings percentage.