|
|
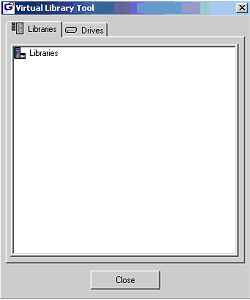
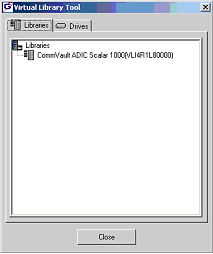
- The VirtualLibraryTool.exe file is located in the
<software installation path>\Base
folder. Recommend creating a shortcut on the desktop for the tool. The
Virtual Library Tool's initial screen as shown in the sample image is
displayed.
- Libraries created by the utility are actually XML files which are
saved in the <software installation path>\LibEmulator
folder.
- Virtual tape media can be created and imported from a
shelf to a library. Virtual tape media
can be exported back to a shelf, deleted, or moved to another library.
- Virtual tape will hold 40GB compressed. This capacity can be changed
in the MMS2MediaType table.
- Virtual libraries DO NOT write backup data. Backups will run to
a virtual library and report successful completion, however no actual
data is written to virtual tape. As such, no data can be restored.
- Cleaning tapes are not supported in Virtual Libraries.
- Indexes created in the Index Cache directory can be used to browse
the backup data list, but any attempt to restore data from virtual tape
will fail
- The VirtualLibraryTool can create direct-attached (single MediaAgent),
dynamic/SAN (multiple MediaAgent), and shared (split between multiple
MediaAgent) libraries. Stand-alone libraries and pooled Standalone libraries
can be configured using the Library and Drive Configuration tool or
by directly editing the library xml file.
|
 |
|
|
1.
|
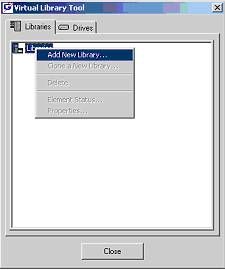
Start the VirtualLibraryTool utility.
In the Virtual Library Tool window, right-click
on the Libraries object level and select Add New
Library from the shortcut menu
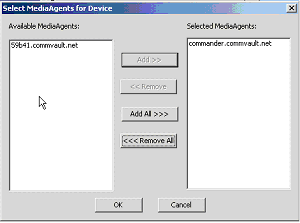
The Select MediaAgents for Device window will open.
|
 |
2.
|
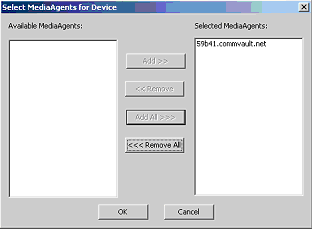
In the Select MediaAgents for Device window,
select the MediaAgent that will control the library. Click
OK to close the MediaAgent selection window
and open the Library Properties window.
|
 |
3.
|
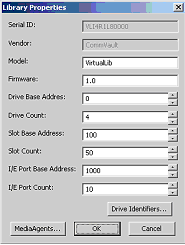
In the Library Properties window, set the
Drive Count, Slot Count, and I/E Port Count values. To emulate a specific
vendor library, you can also set the Model and Firmware values.
Base Address values are for advanced use. Do not edit.
When you have set all values click on the Drive
Identifiers button to open the Drive Identifiers window.
|
 |
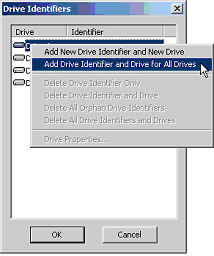
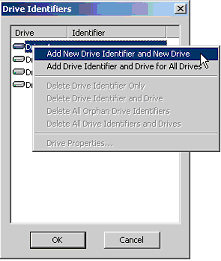
4.
|
In the Drive Identifiers window, right-click
on any drive and select the Add Drive Identifier
and Drive for All Drives option.
The Select MediaAgents for Device window
will open.
|
 |
5.
|
In the Select MediaAgents for Device window, select the MediaAgent that
will control all the drives.
Click OK to close the MediaAgent selection
window.
Click OK to close the Drive Identifier
window.
Click OK to close the Library Properties
Window.
|
|
6.
|
The newly created library should appear in the Libraries tab of the Virtual
Library Tool window. Click on the Drives
tab and verify that the number of drives specified for that library are
listed.
Both the library and all drives should have a serial number next to their
description.
Click Close to exit the Virtual Library
Tool.
You have successfully created a virtual tape library.
|
 |
|
|
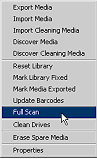
1.
|
Start the VirtualLibraryTool utility.
In the Virtual Library Tool window, right-click
on the Libraries object level and select Element
Status from the shortcut menu
The Element Status window will open.
|
 |
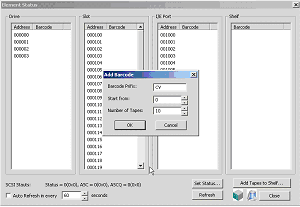
2.
|
In the Element Status window, click on the Add
tapes to Shelf button.
Enter a Barcode Prefix (optional); a starting barcode number; and the
number of virtual tapes to create.
Click OK to create the tapes. The tapes
will appear in the Shelf window on the right.
|
 |
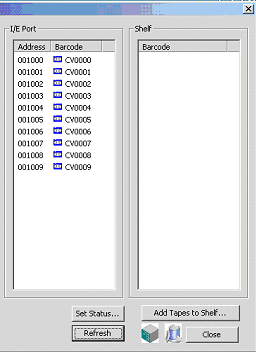
3.
|
Use the shift key and mouse, highlight the number of tapes in the
Shelf window that you want to import.
DO NOT import more tapes then the number of I/E Ports available
DRAG the selected tapes into the I/E Port
window or Slot Addresses
For configured libraries, tapes should move from the I/E ports into library
slots within 30 seconds. Click the Refresh
button or enable the Auto Refresh option
and set the refresh interval.
|
 |
4.
|
Additional media can be added at anytime by repeating the above steps.
Do not duplicate barcodes.
Tapes will move from the I/E ports into library slots within 30 seconds.
Click the Refresh button or enable the
Auto Refresh option and set the refresh
interval.
|
 |
|
|
1.
|
Start the VirtualLibraryTool utility. In the
Virtual Library Tool window, right-click on the Libraries object
level and select Add New Library from the
shortcut menu
The Select MediaAgents for Device window
will open.
|
 |
2.
|
In the Select MediaAgents for Device window,
there should be at least two MediaAgents. Select the one MediaAgent that
will control the library. Click OK to
close the MediaAgent selection window and open the
Library Properties window.
|
 |
3.
|
In the Library Properties window, set the
Drive Count, Slot Count, and I/E Port Count values. To emulate a specific
vendor library, you can also set the Model and Firmware values.
Base Address values are for advanced use. Do not edit.
When you have set all values click on the Drive
Identifiers button to open the Drive Identifiers
window.
|
 |
4.
|
In the Drive Identifiers window, right-click
on first drive and select the Add New Drive Identifier
and New Drive option.
The Select MediaAgents for Device window
will open.
|
 |
5.
|
In the Select MediaAgents for Device window,
select which one of the available MediaAgents will control that the drive.
Click OK to close the MediaAgent selection
window.
Repeat steps 4 and 5 for each drive, selecting which one of the available
MediaAgents will control each drive.
Click OK to close the Drive Identifier
window.
Click OK to close the
Library Properties Window.
|
|
6.
|
The newly created library should appear in the
Libraries tab of the Virtual Library Tool
window
Click on the Drives tab and verify that
the number of drives specified for that library are listed.
Both the library and all drives should have a serial number next to their
description.
Click Close to exit the Virtual Library
Tool.
You have successfully created a shared virtual tape library.
|
 |
|
|
Option 1
|
1.
|
Follow all steps in the procedure for creating a direct-attached library.
The Library should have at least 2 drives plus as many drives as you expect
to make stand-alone libraries. You do not need to create media. Virtual
stand-alone libraries will be automatically loaded with a virtual tape. |
2.
|
In the Library and Drive Config tool, right-click
on a drive of the newly created library and select
Create Stand-alone Library. Note that you
can create many stand-alone libraries in this manner. However, there must
be at least two drives left in the source library. |
3.
|
If you intend to pool the stand-alone libraries, do not configure them at
this point. |
4.
|
Right-click on the library and configure the library and all drives. |
Option 2
|
1.
|
Follow all steps in the procedure for creating a direct-attached library.
The Library should have 1 drive � no slots and no import/export mail slots.
You do not need to create media. Virtual stand-alone libraries will be automatically
loaded with a virtual tape. |
2.
|
Using notepad, open the LibEmulator/<library>.xml
file. Look for the tag <ScsiDeviceType>8</ScsiDeviceType>.
Change the 8 to a 4 and save the file. |
3.
|
In the Library and Drive Config tool, discover
the new stand-alone library. Right-click on the library and configure the
library and all drives. |