Table of contents |
Related Topics |
|
Hardware Supported Storage Array Mining a SnapProtect Backup from SharePoint Mounting a Snapshot of a SharePoint Content Database Attaching the Snapshot to a Database on a SQL Server Instance Accessing the Snapshot from SharePoint Central Administration |
SnapProtect™ Backup - Microsoft SQL Server Use SnapProtect backup to create a point-in-time snapshot of the data using hardware storage arrays to provide snapshot functionality for data protection operations. |
The following are prerequisites to using this feature:
These versions of Microsoft SharePoint are supported for snap mining:
A snapshot needs to be created for snap mining. It can be created before or after configuring the subclient for snap mining. Snapshots are created in one of these ways:
A snapshot can be created with SnapProtect backup using a supported storage arrays.
For step-by-step instructions on creating a snapshot with a hardware storage array, refer to SnapProtect Backup - Microsoft SQL Server.
A snapshot can be created with SnapProtect backup when Data Replicator is selected as the storage array. Data Replicator provides the snapshot functionality without the need for any specialized hardware.
For step-by-step instructions on creating a snapshot with Data Replicator as the software storage array, refer to SnapProtect™ Backup - Data Replicator.
| Data Replicator is not supported when mining a snapshot on a single source computer. |
| You can mine data from a snapshot directly on the computer hosting the snapshot or from a proxy computer. |
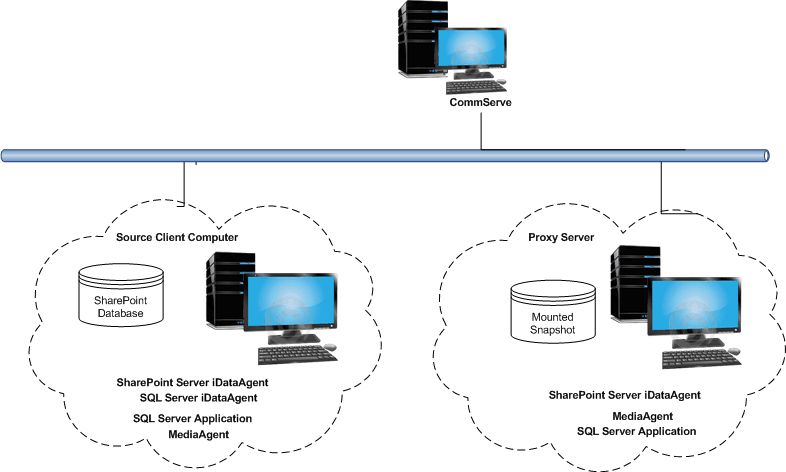
Select one of the following configurations to run a snap mining job on the proxy computer. Then configure the subclient of the SharePoint Server iDataAgent.
The SQL Server iDataAgent creates the snapshot on the source computer. To run the snap mining job on a proxy but configure it on the source computer, install the following components:
Source Computer
Proxy Computer
The configuration of the subclient content of the SharePoint Server iDataAgent is performed on the source client. Mounting of the snapshot and backing it up are performed on the proxy computer.
The SQL Server iDataAgent creates the snapshot on the source computer. To configure and run the snap mining job on a proxy, install the following components:
Source Computer
Proxy Computer
The SharePoint Server iDataAgent is installed on the proxy server and configuration of the subclient content is performed on the proxy server. Mounting of the snapshot and backing it up are also performed on the proxy server.
A Snap Mining job is configured from a subclient of the SharePoint Server iDataAgent.
| Keep in mind that once snap mining is enabled for a subclient, it cannot be reversed. |
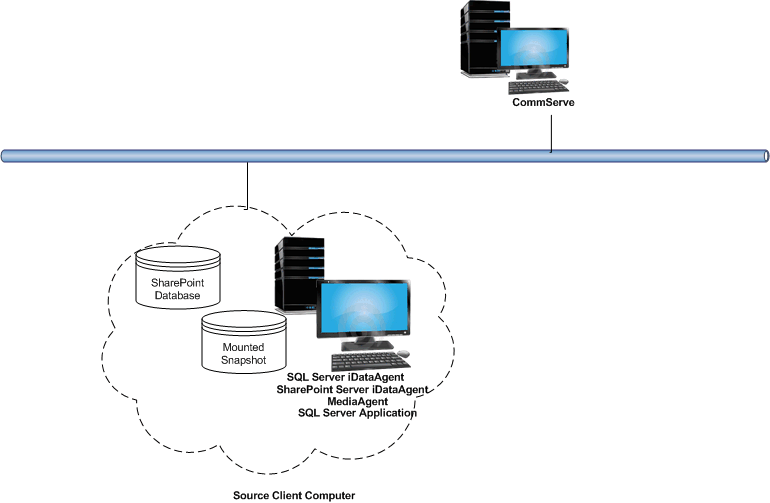 When running a snap mining job on a single computer, install the following components:
In this configuration, the SQL Server and SharePoint Server iDataAgents are installed on the same computer, so creating the snapshot and configuring the subclient is performed on this computer. Mounting of the snapshot and backing it up are also performed on this computer.
A Snap Mining job is configured from a subclient of the SharePoint Server iDataAgent.
| Keep in mind that once snap mining is enabled for a subclient, it cannot be reversed. |
Run a snap mining job by selecting the subclient that was configured.
Once a snap mining job has completed, it may be useful to view specific historical information about the job, such as the following:
This information can be viewed in the Job History window. The history provided depends on the entity from which the job history is viewed. For example, viewing job history from the subclient level will yield information for the jobs performed for that subclient. Conversely, viewing job history from the instance level will yield information for jobs run from all subclients within that instance.
To view the backup job history:
The system displays the Job History window.
To view the additional options discussed above, right-click the desired job choose the appropriate option.
You can restore a SnapProtect backup of a SharePoint content database without restoring a configuration database, and then mine the contents of the snapshot with SharePoint Central Administration.
Perform the following operation on an SQL Server iDataAgent that contains a snapshot of a SharePoint content database.
You can mount any available snapshot to access the data included in the snapshot. It is recommended that you select the option to protect a snapshot when it is mounted, as this will ensure that the changes made to the snapshot when it is mounted are not retained when you unmount the snapshot and the snapshot is usable for data protection operations. Follow the steps given below to mount snapshots:
You must attach the snapshot of the SharePoint content database using SQL Server Management Studio.
To attach the snapshot to a database on a SQL server instance:
| 1. | Open Microsoft SQL Server Management Studio. | |
| 2. | From the Server type list, select Database Engine. |
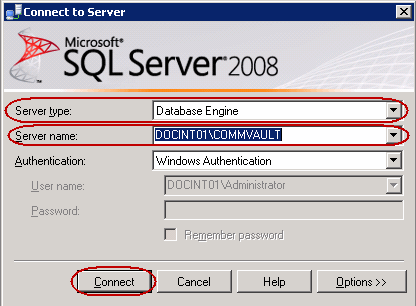 |
| 3. | In the Server name list, specify a server, and then click Connect. | |
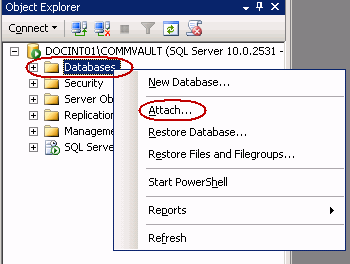
| 6. | In Object Explorer, right-click Databases,and then click Attach. |
 |
| 7. | In the Attach Databases dialog box, click Add. |
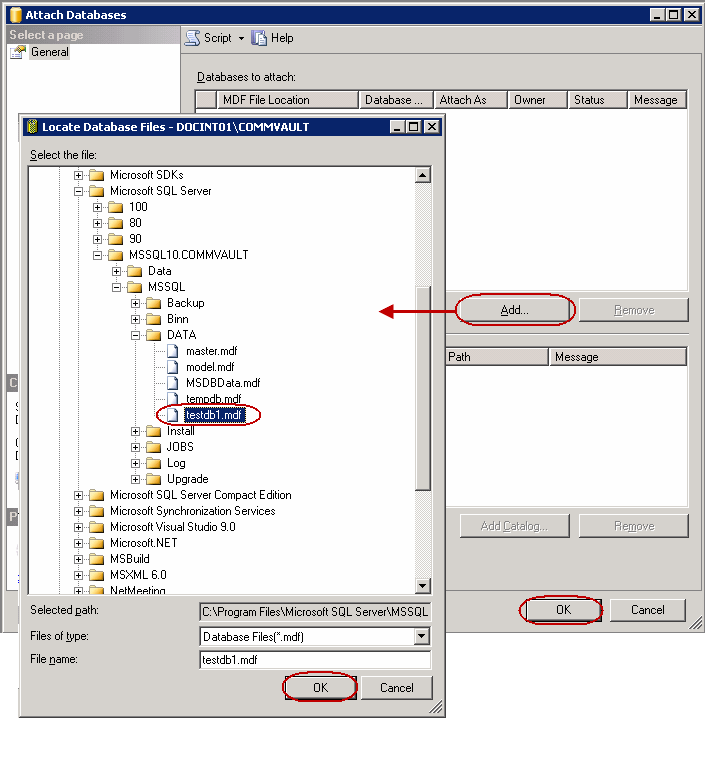 |
| 8. | In the Locate Database Files dialog box, navigate to the disk drive where the snapshot of the SharePoint content database resides, and then select the .mdf file for the snapshot. | |
| 9. | Click OK. | |
| 10. | Click OK. The snapshot is now attached to the SQL Server instance. |
Once you have attached the SharePoint content database snapshot to a SQL server instance, you can then view, back up, or restore the contents. You must perform these steps inside SharePoint Central Administration.
To access the SharePoint content database snapshot from the SharePoint Central Administration application:
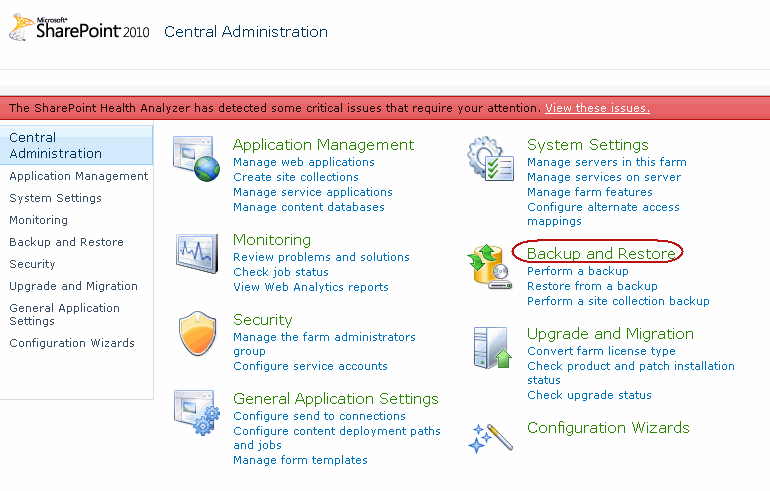
| 1. | Open the SharePoint Central Administration application. | |
| 2. | Click Backup and Restore. |
 |
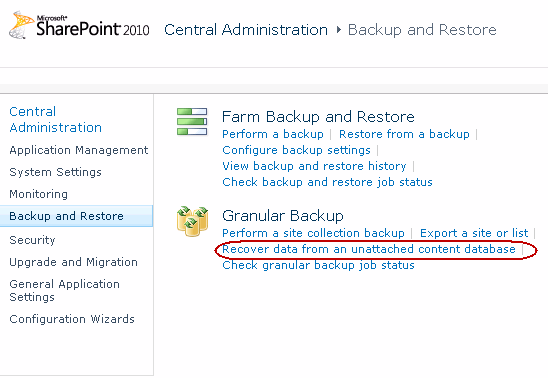
| 3. | Under Granular Backup, click Recover data from an unattached content database. |
 |
| 4. | In the Database Server box, enter the name of the Database Server where the content database is located. |
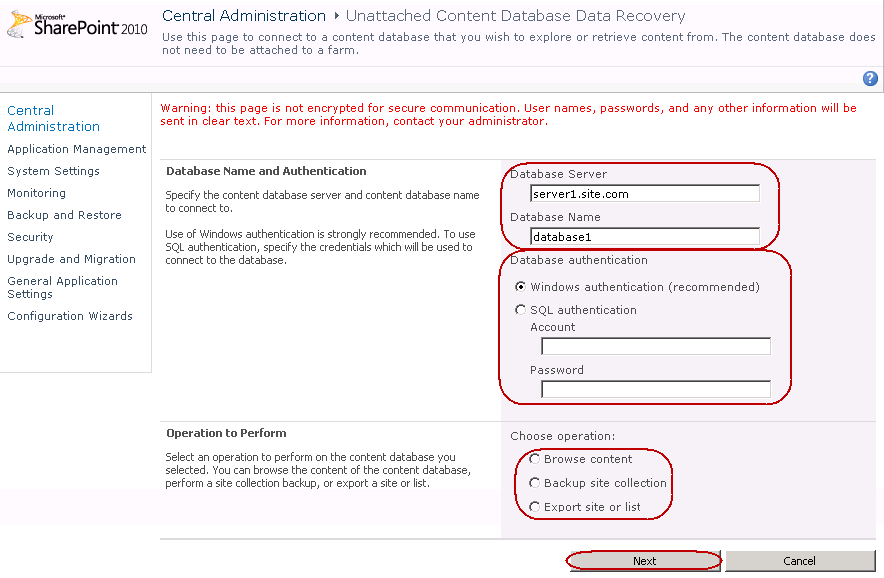 |
| 5. | In the Database Name box, enter the name of the content database. | |
| 6. | Under Database authentication, select an authentication type, and if required, enter the appropriate credentials. | |
| 7. | Select one of the options, and then click Next.
|
During snap mining backup, views that reside on a Web Server’s file system will not be backed up.