

|
|
Skip this page if you are using CIFS connection.
Click  to continue.
| EMC Celerra File Server can be configured to use either CIFS or HTTP access. CIFS connection is highly recommended. |
Follow the steps given below to configure the IIS Server on the computer where archiver agent is installed.
| 1. |
Navigate to Services on the proxy client computer | Internet Information Services (IIS) Manager. Right-click Default Web Site point to Newand click Virtual Directory. |
 |
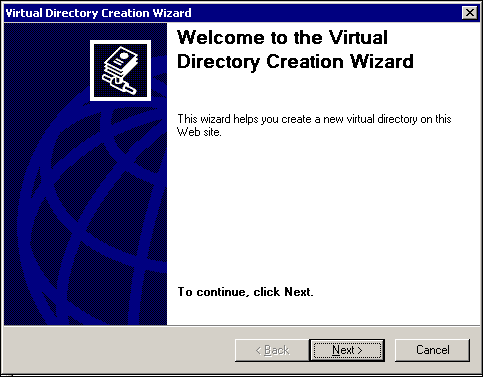
| 2. |
On Virtual Directory Creation Wizard click Next.
|
 |
| 3. | Enter Alias name for the Virtual Directory to be created, which can be any descriptive name (e.g., Celerra_proxy) and click Next. |
 |
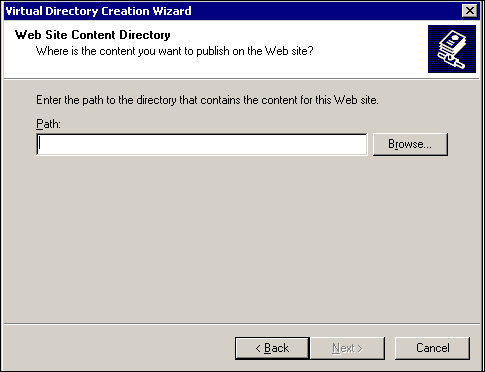
| 4. | Type in or Browse the local Path to the directory that will be used as a Virtual Directory and click Next. |
 |
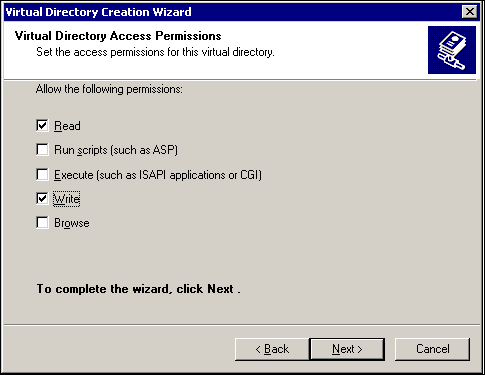
| 5. | Select the options for Read, Write and Browse permissions and click Next. |
 |
| 6. | Click Finish. |
 |
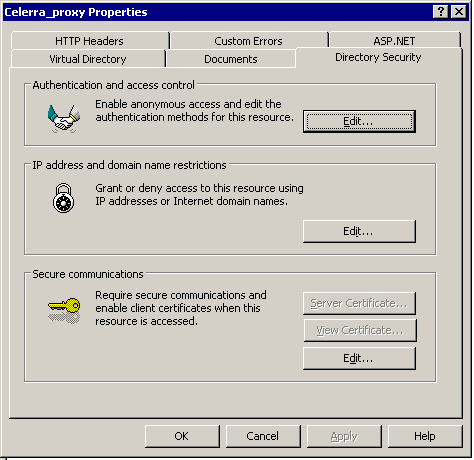
| 7. |
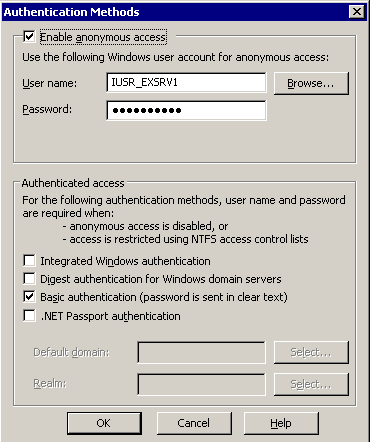
Navigate to the newly created Virtual Directory, right-click Properties. Click the Directory Security tab. Under Authentication and access control section click Edit.
|
 |
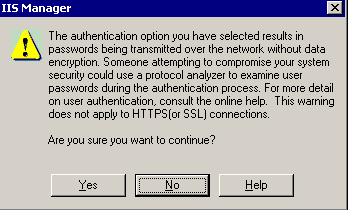
| 8. | Select the Basic authentication checkbox and click OK. |
 |
| 9. | Click Yes. |
 |
| 10. | Enter or Select the name of the Default domain and click OK. |
 |
| 11. |
Navigate to the newly created Virtual Directory, right-click Properties
and then select the Enable content expiration
checkbox.
|
 |
| 12. |
Navigate to the command prompt and define a connection between the EMC Celerra Data Mover and the proxy
client computer where the File Archiver for
Celerra Agent is installed. The EMC Celerra File Server will use
this connection to recall files
HTTP Syntax:
HTTP Example: Where "FS6" is the name of the file system where the share resides, and where "http://exsrv1/celerra_proxy" is the URL of the virtual directory on the proxy server (in this example). Note:
The following syntax can be used to create a connection and
to provide access credential in a single command. Example |
[root@scylla
bin]# fs_dhsm -connection FS6 -create -type http -secondary http://exsrv1/celerra_proxy
-read_policy_override full -cgi n FS6: state = enabled offline attr: = on popup timeout = 0 backup: = passthrough read policy override = none log file: = on max log size: = 10MB cid = 1 type = HTTP secondary = http://exsrv1/celerra_proxy state = enabled read policy override = full write policy = full user = options = cgi=n Done |
|
|