Migration Archiving - Windows File Archiver Agent 

Table Of Contents

Scheduling an Archive Job

Running a Backup to Protect Stubs

Scheduling Stub Backups

Managing Jobs

Restarting Jobs

Controlling Jobs

Additional Options

Scheduling an Archive Job

1.
  • From the CommCell Console, navigate to Client Computers | File Archiver | <instance_name> | defaultArchiveSet.
  • In the right pane right-click the Subclient and click Archive.
2.
  • Click Schedule to schedule the archive job for a specific time.
  • Click Configure to set the schedule for the archive job.
3. In the Schedule Details dialog box select the appropriate scheduling options.

 For example:

  • Click Weekly.
  • Check the days you want the run the archive job.
  • Change the Start Time to 9:00 PM
  • Click OK to close the Schedule Details dialog
  • Click OK to close the Archive Options dialog

The archive job will execute as per the schedule.

Running a Backup to Protect Stubs

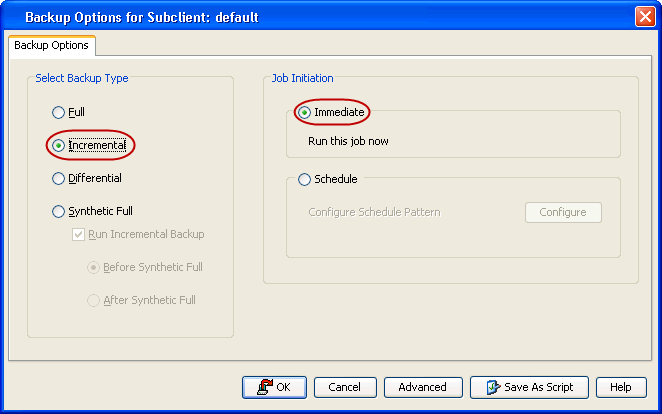
The stubs of the archived data can be protected by running a full backup. Follow the steps given below:

  1. From the CommCell Browser, navigate to Client Computers | <Client> | File System | BackupSet.
  2. In the right pane right-click the new Subclient and click Backup.
  3. Select Full as backup type and Immediate to run the job immediately.
  4. Click OK.
  5. You can track the progress of the job from the Job Controller window of the CommCell console.
  6. Once job is complete, view the details of job from the Backup History.
  7. Right-click the Subclient and select Backup History.
  8. Click OK.

Scheduling Stub Backups

An incremental backup contains only data that is new or has changed since the last backup, regardless of the type. Therefore the stubs that are created after the full backup can be protected by running an incremental backup. On an average, incremental backups consume far less media and uses less resources than full backups. 
  1. From the CommCell Console, navigate to <Client> | File System | defaultBackupSet.
  2. In the right pane right-click the Subclient and click Backup.
  3. Select Incremental as backup type and Immediate to run the job immediately.
  4. Click OK.

    You can track the progress of the job from the Job Controller.  When the backup has completed, the Job Controller displays Completed.

Managing Jobs

Jobs can be managed in a number of ways. The following sections provide information on the different job management options available:

Restarting Jobs

Jobs that fail to complete successfully are automatically restarted based on the job restartability configuration set in the Control Panel. Keep in mind that changes made to this configuration will affect all jobs in the entire CommCell.

To Configure the job restartability for a specific job, you can modify the retry settings for the job. This will override the setting in the Control Panel. It is also possible to override the default CommServe configuration for individual jobs by configuring retry settings when initiating the job. This configuration, however, will apply only to the specific job.

Backup jobs for this Agent are resumed from the point-of-failure.

Configure Job Restartability at the CommServe Level

  1. From the CommCell Browser, click Control Panel icon.
  2. Select Job Management.
  3. Click Job Restarts tab and select a Job Type.
    • Select Restartable to make the job restartable.
    • Change the value for Max Restarts to change the maximum number of times the Job Manager will try to restart a job.
    • Change the value for Restart Interval (Mins) to change the time interval between attempts for the Job Manager to restart the job.
  4. Click OK.

Configure Job Restartability for an Individual Job

  1. From the CommCell Console, navigate to <Client> | File Archiver | <Instance>
  2. Right-click the Subclient and select Archive
  1. Click Advanced.
  2. In the Advanced Backup Options dialog box, click the Job Retry tab.
  3. Select Enable Total Running Time and specify the maximum elapsed time before a job can be restarted or killed.

    Select Kill Running Jobs When Total Running Time Expires to kill the job after reaching the maximum elapsed time.

  4. Select Enable Number Of Retries and specify the number of retries.
  5. Click OK.
 

Controlling Jobs

The following controls are available for running jobs in the Job Controller window:

Suspend

Temporarily stops a job. A suspended job is not terminated; it can be restarted at a later time.

Resume

Resumes a job and returns the status to Waiting, Pending, Queued, or Running. The status depends on the availability of resources, the state of the Operation Windows, or the Activity Control setting.

Kill

Terminates a job.

Suspending a Job

  1. From the Job Controller of the CommCell Console, right-click the job and select Suspend.
  2. The job status may change to Suspend Pending for a few moments while the operation completes. The job status then changes to Suspended.

Resuming a Job

  1. From the Job Controller of the CommCell Console, right-click the job and select Resume.
  2. As the Job Manager attempts to restart the job, the job status changes to Waiting, Pending, or Running.

Killing a Job

  1. From the Job Controller of the CommCell Console, right-click the job and select Kill.
  2. Click Yes when the confirmation prompt appears if you are sure you want to kill the job. The job status may change to Kill Pending for a few moments while the operation completes. Once completed, the job status will change to Killed and it will be removed from the Job Controller window after five minutes.

Additional Options

Several additional options are available to further refine your Archiving operations. The following table describes these options, as well as the steps for configuring them. Be sure to read the overview material referenced for each feature prior to using them.

option description related topics
Data You can select advanced archive data options for the archive operation.
  1. From the CommCell Browser, click Client Computers| <client> | File Archiver | Instance | ArchiveSet. The default and other subclients (if available) are displayed on the right-hand window pane.
  2. Right-click the subclient in the right-pane that contains the data you want to archive.
  3. Click Archive.
  4. Click Advanced.
    • Check the option Create new Index  to create a new index with a full or On Demand data protection operation.
  5. Select the desired Catalog option for index cache sharing and granular restartability options for the job.
 
Startup You can select advanced archive data options for the archive operation.
  1. From the CommCell Browser, click Client Computers |<client> | File Archiver  | Instance | ArchiveSet. The default and other subclients (if available) are displayed on the right-hand window pane.
  2. Right-click the subclient in the right-pane that contains the data you want to archive.
  3. Click Archive.
  4. Click Advanced.
  5. Click Startup.
  6. Select Use Default Priority option to use default priority for the job.
    • Select Change priority option to change the priority for a job, between 0 (highest priority) and 999 (lowest priority).
  7. Select Start up in Suspended State option to specify the selected job to start in the Job Controller in a suspended state.
  8. Click OK.
Refer to Job Priority and Priority Precedence.
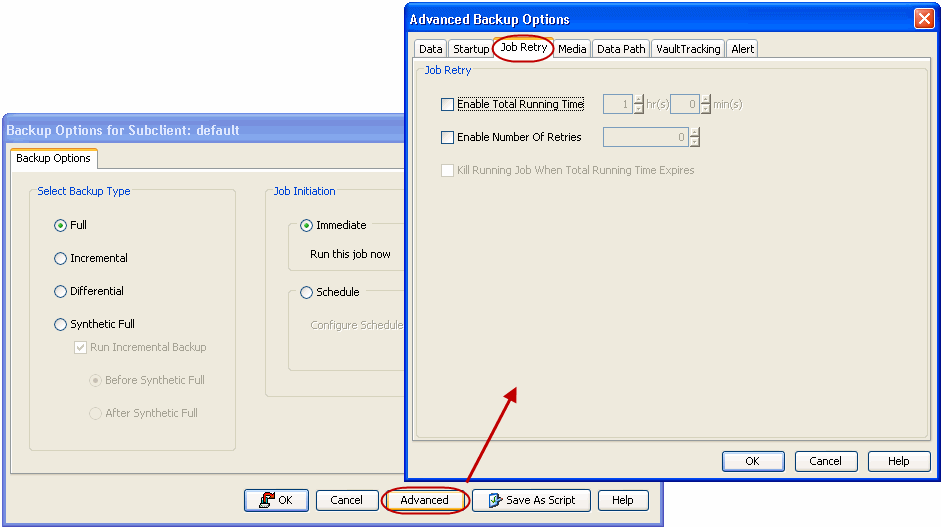
Job Retry The Archive jobs can be restarted either by a user or automatically by the Job Manager. You can specify the maximum elapsed time before a job can be restarted or killed and the maximum number of restart attempts.
  1. From the CommCell Browser, click Client Computers |<client> | File Archiver | Instance | ArchiveSet. The default and other subclients (if available) are displayed on the right-hand window pane.
  2. Rght-click the subclient in the right-pane that contains the data you want to archive.
  3. Click Archive.
  4. Click Job Retry.
  5. Select Enable Total Running Time.
  6. Select Enable Number of Retries option to select number of times the Job Manager will attempt to restart the job.
  7. Select Kill Running Jobs When Total Running Time Expires option to kill the job when the specified Total Running Time has elapsed.
  8. Click OK.
Refer to Job Management for more information
Media You can select the advanced archive media options for the archive operation.
  1. From the CommCell Browser, click Client Computers | <client> | File Archiver | Instance | ArchiveSet. The default and other subclients (if available) are displayed on the right-hand window pane.
  2. Right-click the subclient in the right-pane that contains the data you want to archive.
  3. Click Archive.
  4. Click Advanced.
  5. Click Media.
  6. Select Start New Media to start archive operation on a new media.
  7. Select Mark Media Full on Success to mark this media full after the completion of the archive operation.
  8. Select Reserve Resources Before Scan to  reserve the media before the scan phase.
  9. Select Infinite under Extend Job Retention to retain this job indefinitely.
    • Select Number of Days to specify the number of days after which this job will be pruned.
    • Select Storage Policy Default to apply the retention rules of the associated storage policy.
  10. Click OK.
 
Data Path Data Protection operations use a specific data path (Library, MediaAgent, Drive Pool, and Drive) to perform the backup operations as configured in the CommCell. By default, the system automatically identifies the data path for the backup operations.
  1. From the CommCell Browser, click Client Computers | <client> | File Archiver | Instance | ArchiveSet. The default and other subclients (if available) are displayed on the right-hand window pane.
  2. Right-click the subclient in the right-pane that contains the data you want to archive.
  3. Click Archive.
  4. Archive Options for Subclient window, click Advanced.
  5. From the Data Path tab, select Use MediaAgent and Use Library or Use Drive Pool and Use Drive from the respective drop-down combo boxes.
  6. Click OK.
Refer Change Data Path for more information.
Vault Tracking The VaultTracker feature provides the facility to manage media that are removed from a library and stored in offsite locations.
  1. From the CommCell Browser, click Client Computers | <client> | File Archiver | Instance | ArchiveSet. The default and other subclients (if available) are displayed on the right-hand window pane.
  2. Right-click the subclient in the right-pane that contains the data you want to archive.
  3. Click Archive.
  4. ght-click the Subclient and select Archive.
  5. From the Archive Options for Subclient window, click Advanced.
  6. From the VaultTracking tab, select the necessary options.
  7. Click Ok.
Refer to the following documentation for a comprehensive overview prior to using this feature:


Alert The Alert option is used for setting up the criteria to raise notifications/alerts for job statuses such as failure, success, or any other conditions triggered by the backup job. Adding alerts helps the user or the user group to get the notification automatically about the status of the backup job.
  1. From the CommCell Browser, click Client Computers | <client> | File Archiver | Instance | ArchiveSet. The default and other subclients (if available) are displayed on the right-hand window pane.
  2. Right-click the subclient in the right-pane that contains the data you want to archive.
  3. Click Archive.
  4. Click Advanced.
  5. On the Alert tab, click Add Alert and it opens Add Alert Wizard window.
  6. From the Add Alert Wizard window, select the Threshold and Notification Criteria. Click Next.
  7. Select the Notification Types. Click Next.
  8. Select the Users and User Groups. Click Next.
  9. Click Finish.
Refer Alerts for more information.