Desktop Browse - File Archiver for Windows (User)
table of contents
Restoring Data From a Specific Time Range
Restoring Data to a Specific Client Computer
Search and Locate Data using Find Options
Finding
Data with a Specific Pattern
Finding
Data within a Specific Folder
Finding Data with a Specific Modified Time
You can also browse and restore data that was backed up some time earlier or within a specific time range.
- From the Web Console, click Browse on the left pane.
- Double-click the <CommServe computer name>.
- Double-click Archived Files.
- Double-click the specific <client computer name>
and select
one of the following options:
- Within 6 Months
- 6 to 12 Months
- 1 to 2 Years
- 2 Years Ago.
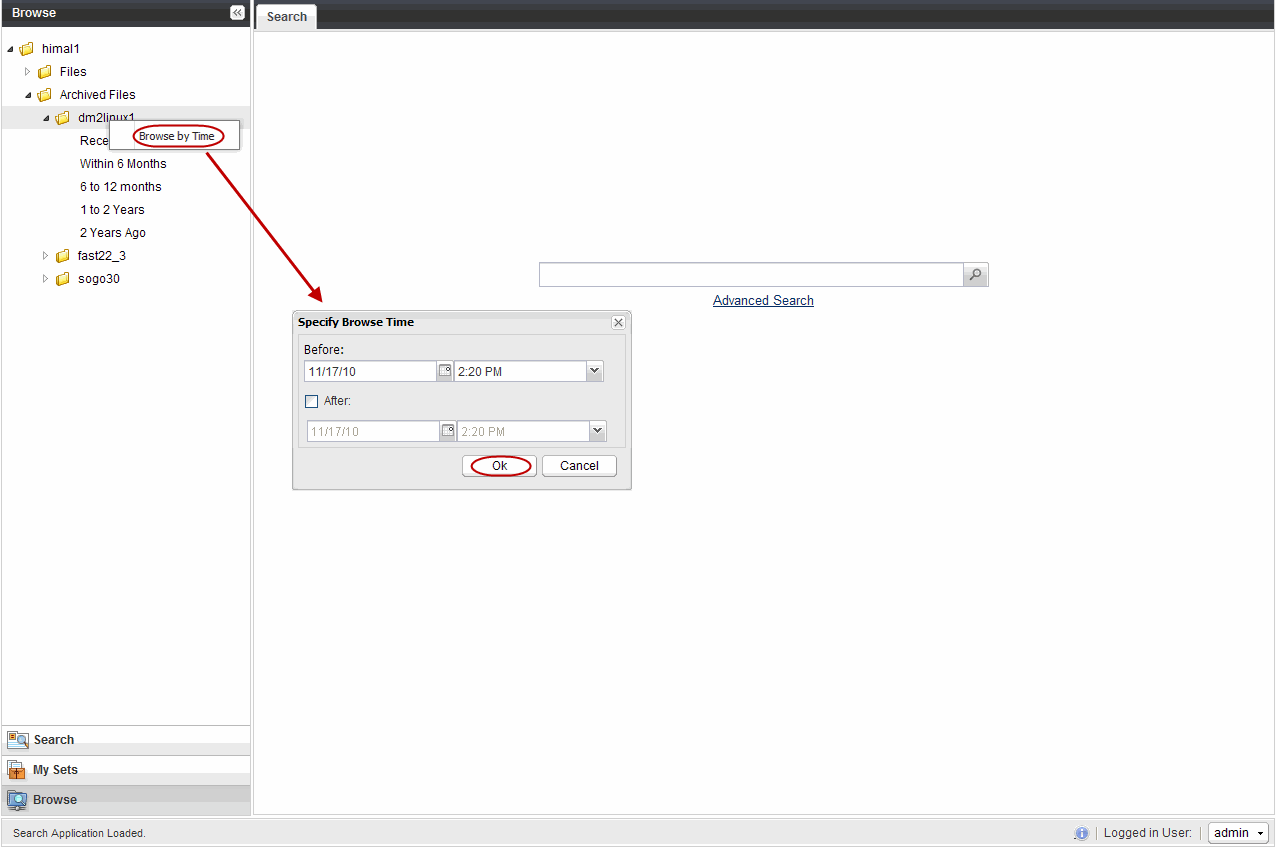
- Right-click the <client computer name> and select Browse
By Time.
- Select the time range in the Before drop down boxes.
- Click After and specify the time range.
- Click OK.
- Navigate to the file to be restored on the right pane.
- Right-click the file and
select Restore. The file is copied to the MyReviewSet
folder under MySets | ReviewSet node in the Web Console.
- Right-click the file and select Download Item.
- Click Save from the File Download dialog.
- Specify the location where the file needs to be downloaded in
the Web Browser's download dialog box and click Save.
|
 |
- From the Web Console, click Browse on the left pane.
- Double-click the <CommServe computer name>.
- Double-click Archived Files.
- Double-click the specific <client computer name>
and select
one of the following options:
- Within 6 Months
- 6 to 12 Months
- 1 to 2 Years
- 2 Years Ago.
- Right-click the <client computer name> and select Browse
By Time.
- Select the time range in the Before drop-down box.
- Click After and specify the time range.
- Click OK.
- Navigate to the file to be restored on the right pane.
- Right-click the file and
select Restore To Client.
- Select the Destination Computer from the drop-down box.
- Uncheck the Restore to the same folder check box
- Enter the destination path to restore the file to a specific
folder in the computer.
- Click OK. The file will be restored to the specified
destination computer.
|
|
You can use Find option to search and locate files with a specific
file name or file name pattern.
Follow
the steps given below to find and locate files with a specific file name
or file name pattern:
- From the Web Console, click Browse on the left pane.
- Double-click the <CommServe computer name>.
- Double-click Files.
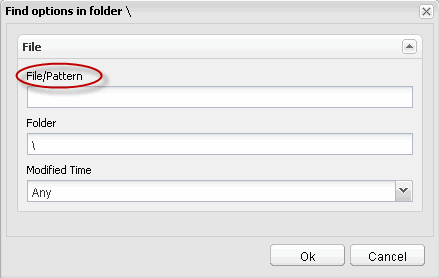
- Right-click the <Client computer name> and select Find.
- Type the file name or wildcard pattern criteria in the
File/Pattern text box from the Find Options dialog box.
- Click OK.
|
 |
You can find and locate a folder with a specific folder name.
Follow the steps given below to find and locate a folder with a
specific name.
- From the Web Console, click Browse on the left pane.
- Double-click the <CommServe computer name>.
- Double-click Files.
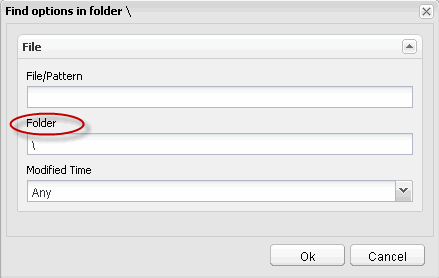
- Right-click the <Client computer name> and select Find.
- Type the folder name in which the file resides in the Folder
text box from the Find Options dialog box.
- Click OK.
|
 |
You can find and locate a file based on the time range (such as any, today,
yesterday, etc) when the files were modified.
Follow the steps given below to find and locate files based on the
modified time.
- From the Web Console, click Browse on the left pane.
- Double-click the <CommServe computer name>.
- Double-click Files.
- Right-click the <Client computer name> and select Find.
- Click the Modified Time drop-down box and select the time
range (such as Any, Today, Yesterday, This Week, etc.) when the
files were modified.
- Click OK.
|
 |

