McAfee® Antivirus Version 8 Settings for Archiver for Windows
McAfee® antivirus can be configured on the computers
that have the Windows File Archiver
agent 9 installed. It allows for scanning of processes that are running on
the servers. By default these processes are scanned in real-time for known
viruses as and when the files are being processed for archiving. The "Scanning
Phase" of archiving keeps triggering the scanning process of the antivirus,
which is very resource intensive.
However the antivirus can be configured to define certain task as "Low Risk",
which can avoid triggering the scanning process of the antivirus.
All configuration settings described here
should always be tested in the your CommCell Environment to
confirm these settings meet all of the Security and Threat
detection policies as well as all server, network and enterprise
policies.
Follow the steps given below to define the archiving process as "Low Risk":
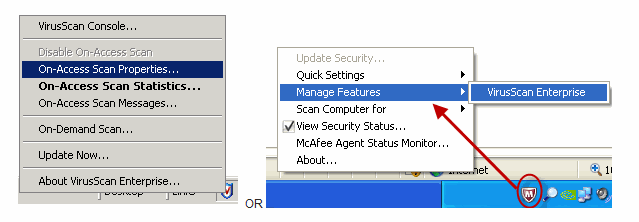
1.
On the System Tray right-click the VirusScan Shield and
click On Access Scan Properties.
Or
On the System Tray right-click the VirusScan Shield
point at Manage Features andclick VirusScan Enterprise
Properties.
Right-click On-Access Scanner and click Properties.
2.
If the Low Risk Icon is displayed Skip to
Step 4.
3.
Click All Processes.
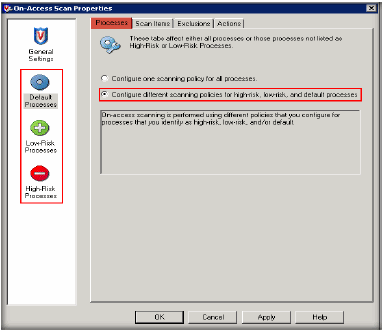
4.
Click the Process tab.
Click Configure different scanning policies for high-risk,
low-risk, and default processes.
Click on the Low Risk Processes icon.
Click Add.
5.
Click Browse to navigate to the BullCalypso/Calypso/Base directory and add the following to the list:
GXHSMStub.exe
GXHSMService.ex (Ensure that the extension is ‘.ex’)
GXHSMService.exe
CVD.exe
CLRestore.exe
CLBackup.exe
IFind.exe
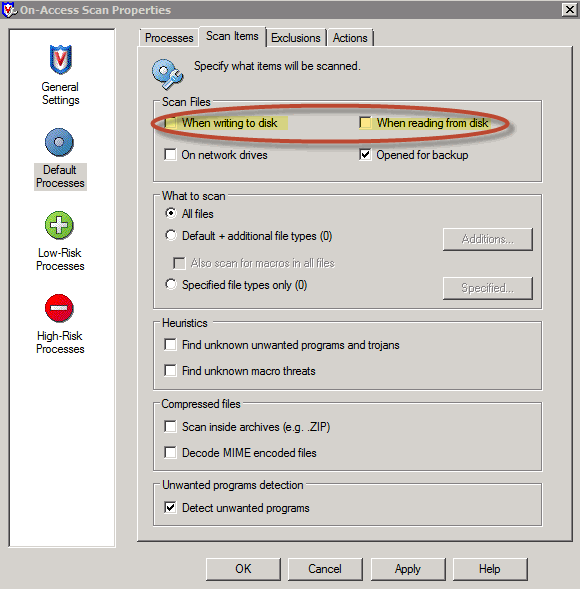
6.
Click the Scan Items tab and clear the following
check boxes:
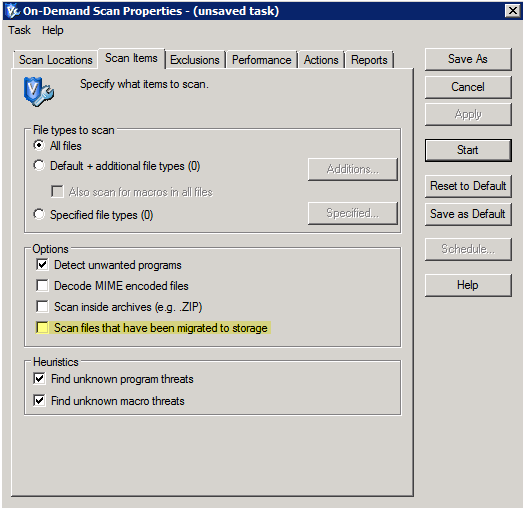
If you plan to migrating files to a remote storage
located on the network follow the steps given below:
On the Virus Scan Console click the Scan Items tab.
Clear the Scan files that have been migrated to storage
checkbox.
Configuring Windows Registry
Start the Registry Editor on the computer where the
file archiver agent is installed.
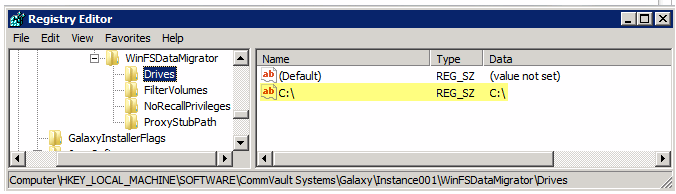
Navigate to HKEY_LOCAL_MACHINE\SOFTWARE\CommVault
Systems\Galaxy\Instance001\WinFSDataMigrator\
Under the drive key, ensure that the resources are listed along
with any other volumes that File Archiver will be using.
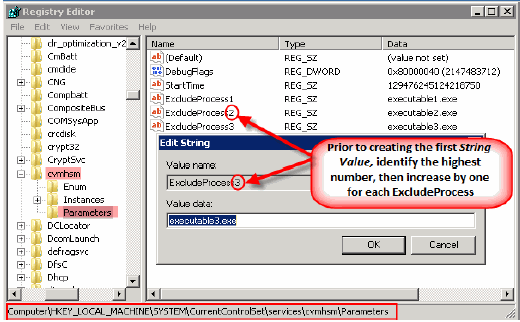
Navigate to HKEY_LOCAL_MACHINE\SYSTEM\CurrentControlSet\services\cvmhsm\Parameters\.
Right-click Parameters, point at New and click
String Value.
In the Value Name box type ExcludeProcessX.
Where X is the next consecutive number in the list
(i.e. ExcludeProcess1, ExcludeProcess2, etc.)) for any process that
should not initiate recalls.
All ExcludeProcess names must be truncated
to a maximum 15 character string value or the Windows OS Kernel
Mode will not process the exclusion properly. This would result
in the exclusion being ignored, unexpected recalls occurring and
other unexplained stub activities.
Ensure that in addition to registry keys
with environment specific executables, ExcludeProcess registry
has to be created with McShield.exe as its value data.
Restart the Bull Calypso services for the registry to take its effect.
In a cluster setup repeat all the above mentioned steps on all
the physical machines.