Symantec® Endpoint Security v11xAV Settings for Windows File Archiver - Version 9

Symantec® Endpoint Security v11xAV can be configured on the computers that have the Windows File Archiver 9 agent installed. It allows for scanning of processes that are running on the servers. By default these processes are scanned in real-time for known viruses as and when the files are being processed for archiving. The "Scanning Phase" of archiving keeps triggering the scanning process of the antivirus, which is very resource intensive.

However Symantec® Endpoint Security can be configured to avoid scanning the archived files.

All configuration settings described here should always be tested in the your CommCell Environment to confirm these settings meet all of the Security and Threat detection policies as well as all server, network and enterprise policies.

Follow the steps given below to configure the security system to avoid scanning of archived files:

Prerequisite

Before you begin, ensure that the following are enabled:

Active Scan (Upon Startup)

Customer Scan(S)

Full Scan

1. On the System Tray double-click the Symantec Endpoint Protection.
2. In the left pane click the Change Settings tab.
3. From the Antivirus and Antispyware Protection section, click the Configure Settings button.
4.
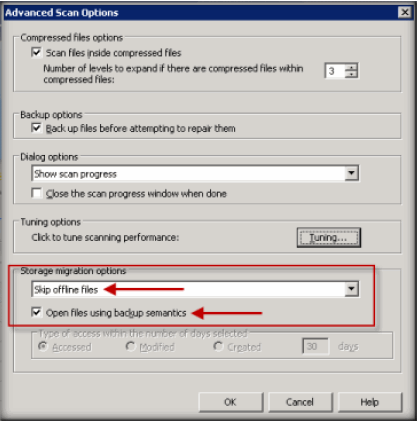
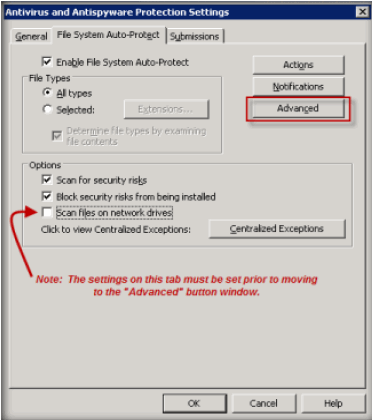
  • Click the File System Auto-Protect tab.
  • Clear the Scan files on network drives checkbox.
  • Click the Advanced button.
5.
  • Under the Scan Files when section, click the Scan When a file is modified and clear Scan when a file is backed up checkbox.
  • Click Ok.
6. On the Symantec Endpoint Protection console click the Scan for threats tab.
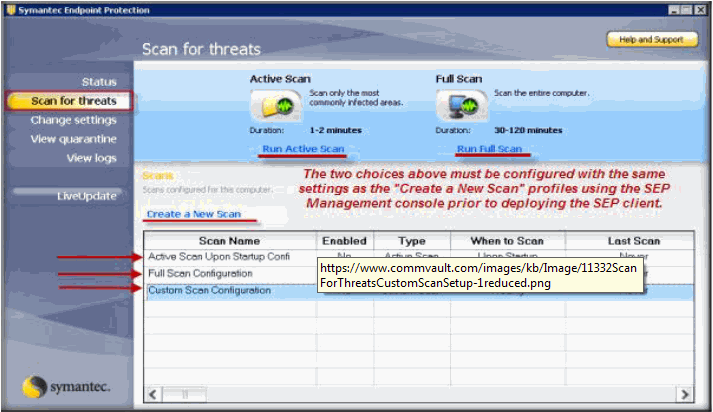
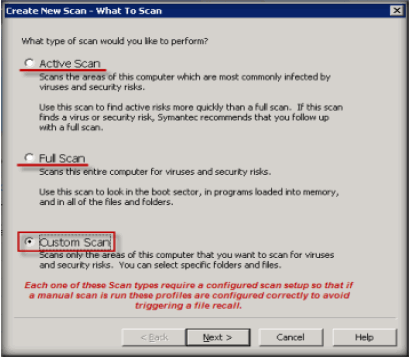
For any Symantec Endpoint Protection  Management Console (SEP MC) controlled or policy scheduled scans ensure that the "Run Active Scan" and the "Run Full Scan" profiles are configured prior to deploying the SEP Client.

This can be done through the SEP MC by setting up a Group Policy configuration that is enforced for the two choices.

Otherwise make sure to de-activate the two choices on the SEP Client server.


Creating Custom  Scheduled Scans

Each scan type must have a profile created that follows the same settings. Make sure these profiles are the only ones used for Client side scheduled scans or for manual scans.

Follow the steps given below to create profiles for each type of scan:

1.
  • On the Symantec Endpoint Protection console click the Scan for threats tab and click Create a New Scan.
  • Click Next.


2. Click the Advanced button.
3.
  • From the Storage Migration options list select Skip offline files.
  • Click the Open files using backup semantics checkbox.
  • Click Ok.

Configuring Windows Registry

Once the SEP Client is configured and before any scans are run please add the following changes to the Bull Calypso Software registry section on the SEP Client server.

  1. Start the Registry Editor on the computer where the file archiver agent is installed.
  2. Navigate to HKEY_LOCAL_MACHINE\SYSTEM\CurrentControlSet\services\cvmhsm\Parameters\.
  3. Right-click Parameters, point at New and click String Value.
  4. In the Value Name box type ExcludeProcessX.

    Where X is the next consecutive number in the list (i.e. ExcludeProcess1, ExcludeProcess2, etc.)) for any process that should not initiate recalls.

    All ExcludeProcess names must be truncated to a maximum 15 character string value or the Windows OS Kernel Mode will not process the exclusion properly. This would result in the exclusion being ignored, unexpected recalls occurring and other unexplained stub activities.
    Ensure that in addition to registry keys with environment specific executables, ExcludeProcess registry is also created with RtvScan.exe as its value.

  5. Restart the Bull Calypso services for the registry to take its effect.
  6. In a cluster setup repeat all the above mentioned steps on all the physical machines.