Upgrade from CommCell Console

Table of contents

Overview

What Can be Upgraded

What Cannot be Upgraded

Pre-Requisites

Space Requirement

General

Upgrade Procedure

Upgrade the CommServe

Configure Download Software

Install Updates

Upgrade Software on Clients

Upgrade Software on Client Using Save As Script

Verify Upgrade on Client

Troubleshooting

Unix

Windows

Overview

Agents and package distribution can be upgraded - both scheduled and on-demand from the CommCell Console. This process can expedite and facilitate the upgrade process from your CommCell.

What Can be Upgraded

To see which components are supported for Upgrade Software from the CommCell Console, see Upgrade - Support.

What Cannot be Upgraded

Upgrade from CommCell Console is not supported on Unix platforms for ContinuousDataReplicator and on SGI IRIX clients for File Archiver for Unix.

Pre-Requisites

Space Requirement

General

Upgrade Procedure

Upgrade software from CommCell Console is configured in the following sequences:

Upgrade the CommServe

1. Upgrade the CommServe computer to the current software version. See Upgrade the CommServe for more information on upgrading the CommServe software.

Configure Download Software

1. Verify that you have adequate space for the packages.
2. After CommServe Upgrade, enable the job using the Activity Control tab from the CommCell Properties dialog box in the CommCell Console.
2. From the CommCell Browser, right-click on the CommServe computer node, and click All Tasks -> Add/Remove Software -> Download Software.
3. From the General tab, select the Download Packages option which automatically selects both Windows and Unix options.

Select Windows to download Windows packages for clients running Windows-based Operating Systems.

Select Unix to download Unix packages for clients running Unix-based operating systems.

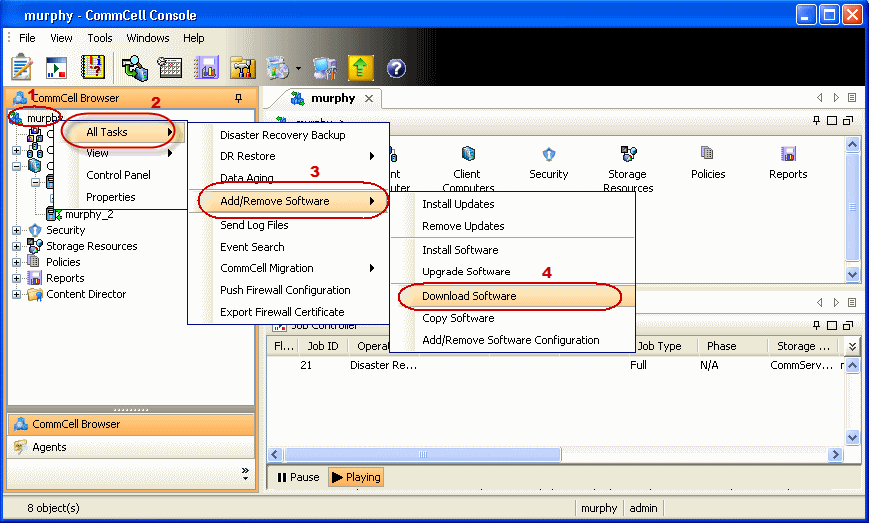
Select Download Updates option to download the latest updates.

4. Configure the additional download options::
  • Copy Updates to 1-Touch Cache: Select this option to copy updates to the configured 1-Touch cache directory. This checkbox is available when using 1-Touch Server node.
  • Synchronize Software Agents After Download: Select this option to enable the software agents to automatically receive the updates from the CommServe update cache so that they are in sync with the CommServe update cache. If selected, the Software Agent caches will be automatically synchronized with the CommServe update cache when software/updates are downloaded to the CommServe.

Click OK.

5. From the Job Initiation tab select Immediate to run the job now.

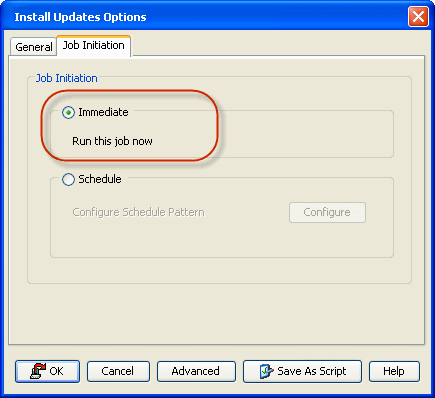
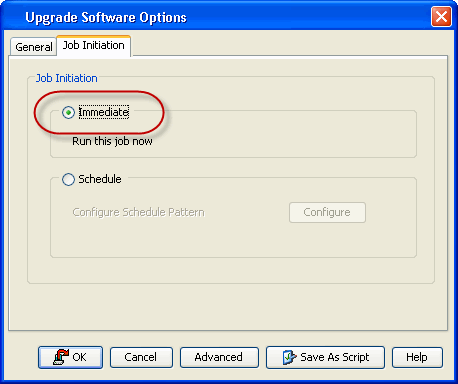
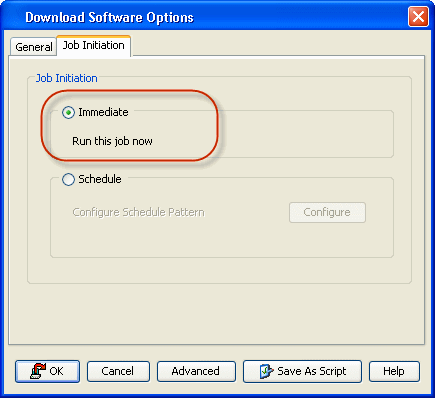
Click OK to run the job immediately.

  To schedule the job for a specific time, select Schedule option.

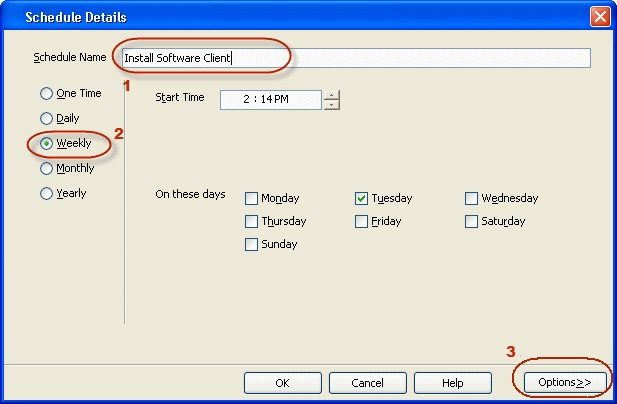
If you schedule the job, click Configure, the Schedule Details dialog box appears.

  From the Schedule Details dialog box, specify the Schedule Name for the job. Click Options to configure the Advanced Schedule Options.
  Specify the following options in Advanced Schedule Options dialog:
  • Range of recurrence: Specify the date on which you want this schedule to take effect.
  • Repeat: Select the value for which you want to run the job repeatedly on the day in which the job is scheduled to run.

    Select Advanced button to create an exception to a weekly schedule.

  • Time Zone: Select a specific time zone from which the job schedule time will be based.

Click OK once all the desired options have been configured.

6. Click OK.  
7. Your job operation will execute according to the specified schedule. Once initiated, you can track the progress of the job from the Job Controller or on Event Viewer window.

Install Updates

1. You will need the following to complete the configuration for Upgrade Software from CommCell Console.
  • For 8.0 Clients make sure you have the latest Service Pack.
  • For 7.0 Clients, minimum requirement is Service Pack 5, Update #1567.

Be sure to install the update(s) applicable to your clients platform environment.

2. From the CommCell Browser, right-click on the CommServe computer node, and click All Tasks -> Add/Remove Software -> Install Updates.
3. Install Updates Options dialog will be displayed. Click the Client Computers or Client Computer Groups checkbox to install the updates on all the client machines available on the CommServe.
4. From the Job Initiation tab select Immediate to run the job now.

Click OK to install updates immediately.

  To schedule the job for a specific time, select Schedule, click Configure, the Schedule Details dialog box appears.

Specify the Schedule Name for the job, click Options to configure the Advanced Schedule Options. Specify the following options in Advanced Schedule Options dialog:

  • Range of recurrence: Specify the date on which you want this schedule to take effect.
  • Repeat: Select the value for which you want to run the job repeatedly on the day in which the job is scheduled to run.

    Select Advanced button to create an exception to a weekly schedule.

  • Time Zone: Select a specific time zone from which the job schedule time will be based.

Click OK once all the desired options have been configured.

Do not schedule an FTP download at the same time an Install Software job is scheduled to run.
5. Click OK.  
6. Your Install Updates job operation will execute according to the specified schedule. Once initiated, you can track the progress of the job from the Job Controller or on Event Viewer window.

Upgrade Software on Clients

1. From the CommCell Browser, right-click on the CommServe computer node, and click All Tasks -> Add/Remove Software and then select Upgrade Software.

The Upgrade Software Options dialog will be displayed.

You can also right-click on a specific client/MediaAgent to access the Upgrade Software Options.

2. In the General tab, select the Client Computers checkbox or Client Computer Groups to upgrade the software on all the client machines available on the CommServe.
3. Select the Reboot Client option if you are upgrading clients/agents with driver-based platforms and database applications on Windows, to ensure successful completion of the upgrade operations.

Driver-based platforms include, but are not limited to:

  • File Share Archiver
  • File Archiver for Windows
  • Quick Recovery
  • Image Level ProxyHost
  • ContinuousDataReplicator

Database Application:

  • Oracle iDataAgent
  • DB2 iDataAgent
4. Check the following options if applicable to your environment:
  • Shutdown Oracle DB: For Oracle iDataAgent on Windows, select Shutdown Oracle DB box, to stop the Oracle database services.
  • Shutdown Internet Browser: If your environment requires an upgrade of JRE, any Internet Browser applications must be terminated during upgrade operations for them to complete successfully.
  • Ignore Running Jobs: If it is necessary to run the upgrade operations at a specific time when jobs are running, the software will be upgraded on the selected client/MediaAgent as per schedule even if jobs are currently running. Services will be stopped, thereby suspending the running jobs to allow the upgrade to complete. Upon completion of the upgrade, the restartable jobs will automatically resume, if configured to do so.
      When enabled, this option temporarily stops services, thereby suspending all running jobs including those that may not be restartable. Therefore, use caution if enabling this feature.
  • Update Software After Installation: This option is enabled by default. When selected, once software has been installed, the associated service packs and updated will be automatically be applied as well. The updates and services packs will be obtained from the computer's associated software cache directory.
5. From the Job Initiation tab select Immediate to run the job now.

Click OK to upgrade software immediately.

6. To schedule the job for a specific time, select Schedule, click Configure, the Schedule Details dialog box appears.

Specify the Schedule Name for the job, click Options to configure the Advanced Schedule Options. Specify the following options in Advanced Schedule Options dialog:

  • Range of recurrence: Specify the date on which you want this schedule to take effect.
  • Repeat: Select the value for which you want to run the job repeatedly on the day in which the job is scheduled to run.

    Select Advanced button to create an exception to a weekly schedule.

  • Time Zone: Select a specific time zone from which the job schedule time will be based.

Click OK once all the desired options have been configured.

7. Click OK.  
8. Your upgrade from Commcell Console job operation will execute according to the specified schedule. Once initiated, you can track the progress of the job from the Job Controller or on Event Controller window.
9. Review the Upgrade Considerations specific to the components that were upgraded using this procedure.  

Upgrade Software on Client Using Save As Script

Use the following steps to upgrade software on clients using Save As Script:

For Windows

  1. From the CommCell Browser, click Tools, point to Add/Remove Software and then click Upgrade Software.
  2. Select the Client Computer(s) on which you want to install the updates.
  3. Select the Reboot Client check box to allow the computer to reboot after installing the updates.
    When the Reboot Client check box is selected, the system automatically reboots the client and/or MediaAgent computers if a reboot is required.

    If the install update or upgrade includes a driver update, all the updates required for the computer will not be installed if this option is cleared.

    Select the Shutdown Oracle DB check box.

    When selected, the system automatically stops Oracle database services if the update requires Oracle Database services to be restarted.
  1. Click the Job Initiation tab.
  2. Select Immediate.
  3. Click Save As Script button.
  4. From Save As Script dialog box, specify the following:
    • From the Client list, select the client on which you want to save the script.
    • In the Path box, type the path and name for the .bat file to be saved e.g., E:\Install_Script\input_file.bat
    • For Mode, by default Synchronous option is selected which exits only when the operation has completed.

      Select Asynchronous option, to submit the job to the CommServe and exit immediately; returns the control to the calling program or script.

    • Click OK to save the operation as a script file.

      This generates a .xml file and a .bat file.

  5. To automatically login and install updates on the client, use the the following steps:
    • From the command prompt, navigate to the location where the .bat and .xml files are saved and then run the .bat file.

      Example

      E:Scripts>\input_file.bat

      Where

      The .bat file contains the following commands and performs the following operation:

      qlogin - to login to the session

      qoperation execute - to execute the xml script

      qlogout - to logout from the session

      The .xml file is the script file that contains information on the options selected from the CommCell Console. This .xml file is given as input to the qcommand execute in the batch file.

  6. To install updates using qoperation execute command, perform the following from the command prompt:
    • Login to the CommServe using the qlogin command and CommCell credentials:

      E:\Script\> qlogin -cs commserve_name -u user_name

    • Run the following execute operation using qoperation

      USAGE:

      qoperation execute -af <xml_file>

      Example:

      qoperation execute -af input_file.xml

  7. To override the client name specified in the .xml file or to install the same updates to multiple clients, run the following command:

    Usage:

    <batch_file> -<updateOption>/<clientAndClientGroups/clientName  <client_name>

    Example:

    input_file.bat -<updateOption><clientAndClientGroups/clientName purple.mydomain.mycompany.com

For Unix

  1. From the CommCell Browser, click Tools, point to Add/Remove Software and then click Install Updates.
  2. Select the Client Computer(s) on which you want to install the updates.
  3. Select the Reboot Client check box to allow the computer to reboot after installing the updates.
  1. Click the Job Initiation tab.
  2. Select Immediate.
  3. Click Save As Script button.
  4. From Save As Script dialog box, specify the following:
    • From the Client list, select the client on which you want to save the script.
    • In the Path box, type the path and name for the .bat file to be saved e.g., /Install_Script/input_file
    • For Mode, by default Synchronous option is selected which exits only when the operation has completed.

      Select Asynchronous option, to submit the job to the CommServe and exit immediately; returns the control to the calling program or script.

    • Click OK to save the operation as a script file.

      This generates two files input_file.xml and input_xml file.

  1. To login automatically and install updates on the client, perform the following:
    • From the command prompt, navigate to the location where the script files are located and then run the script file.

      Example

      [root@localhost Scripts]# ./input_file

      Where

      The script file contains the following commands and performs the following operation.

      qlogin - to login to the session

      qoperation execute - to execute the xml script

      qlogout - to logout from the session

      The .xml file is the script file that contains information on the options selected from the CommCell Console. This .xml file is given as input to the qcommand execute in the batch file.

  2. To install updates using qoperation execute command, perform the following from the command prompt:
    • Login to the CommServe using the qlogin command and commcell credentials:

      [root@localhost Script]# ./qlogin -cs commserve_name -u user_name

    • Run the following execute operation using qoperation

      USAGE:

      ./qoperation execute -af <xml_file>

      Example:

      ./qoperation execute -af input_file.xml

  3. To override the client name specified in the .xml file or to install the updates to multiple clients, run the following command:

    Usage:

    ./<batch_file> -<updateOption>/<clientAndClientGroups/clientName  <client_name>

    Example:

    ./input_file -<updateOption><clientAndClientGroups/clientName purple.mydomain.mycompany.com

Verify Upgrade on Client

1. From the CommCell Browser, right-click on the Client computer node, and click All Tasks -> Add/Remove Software and then select Properties.

Client Computer Properties dialog will be displayed.

2. In the Version Tab verify that the Version information is updated to 9.0.0 and the Update Status and Package Status are Up To Date.

Click OK.

Troubleshooting

Unix

Use the following steps to troubleshoot remote upgrade failures:

  1. View the logs in the following location:
  2. Determine the problem, such as:

    Issue Resolution

    Client Could Not Connect To the CommServe

    Check the network connectivity between CommServe and the client computer.
    • Login into client computer.
    • Navigate to /opt/Calypso/Base
    • Run the following command:

      # ./cvping <CommServe_host_name> <port_number>

    • If you are unable to connect:
      • Login to CommServe computer
      • Navigate to C:\WINDOWS\system32\drivers\etc folder
      • Add IP address and Fully Qualified Domain name of client computer in the hosts file.

    After resolving the above issue, ensure that the client is registered in the CommCell Console. To verify the registration, see Verify Upgrade on Client.

    If the Client Failed Halfway through and you need to restart the upgrade

    • Navigate to /opt/CVPackages/9.0.0/Unix directory and launch silent install by running the following command:

      silent_install -upgrade Instance###

    • After resolving the above issue, ensure that the client is registered in the CommCell Console. To verify the registration, see Verify Upgrade on Client.

    Current installation has issues and cannot be upgraded

    After resolving the above issue, ensure that the client is registered in the CommCell Console. To verify the registration, see Verify Upgrade on Client.

    You are unable to determine the problem and require a cleanup

    • Delete the Bull Calypso install directory.
    • Delete logs directory located at /var/log
    • Remove registry

      Run rm –rf /etc/CommVaultRegistry command to remove registry.

    • Kill Calypso processes. For example CVD, EvMgrC and cvmountd processes
    • Remove port allocation in /etc/services. For example, search for CVD or 8400, 8402
    • Install the software. If the client hostname is not modified the client will be reinstalled or upgraded in the Console

    After resolving the above issue, ensure that the client is registered in the CommCell Console. To verify the registration, see Verify Upgrade on Client.

Windows

Cause

An automatic upgrade of a client can fail for several reasons. If a client's status is listed as Failed, the Reason for Job Delay field and/or Event Viewer will display the reason for failure. If the reason for failure is one of the following, automatic upgrade can be rescheduled after resolving the error.

All other failures indicate that the upgrade must be manually completed via the client.

Resolution

Go to the client, and manually resume the upgrade.

  1. From the client machine, launch the Command Line Interface, and navigate to the software installation directory where the upgrade packages reside.
  2. Run the following command:

    QInstaller.exe /setup

  3. Follow the prompts to resume the upgrade. Refer to the upgrade procedure for the particular agent for more information regarding the upgrade steps; see Upgrades.

Back to Top