You can create user defined backup sets to group a set of selected data that you
need to backup. A user-defined backup set will contain its own default subclient.
On Demand backups allow content to be specified as an external input at the time of initiating
a backup. Whereas traditional backups are performed using subclients,
which contain fixed content configured prior to performing the operation, On Demand
backups allow you to specify content each time you perform a backup.
Content for On Demand backups is defined through two entities:
a Content File, which is a text file that defines the location of
the data that you want to protect. Each Content File contains the fully qualified paths from the root directory to files, links, and
devices to be backed up.
a Directive File, which is a text file that defines where each
Content File is located. The Directive File contains the fully qualified
paths from the root directory to one or more Content Files. Only one Directive File is needed for a single On Demand backup.
Once these entities are defined, an On Demand Backup Set is then created.
Backups run from this Backup Set will provide the facility to select the Content
and Directive Files to be included.
Formatting Content and Directive Files
Content File entries should be in the following format with no filters,
wildcards, or regular expressions included:
\\client1\shares\ondemand_content\test1.txt
/usr/datafile
/usr/textfile
/etc/docfile
Similarly, Directive File entries should be in the
following format with no filters, wildcards, regular expressions, or blank
lines:
/usr/ContentFile1
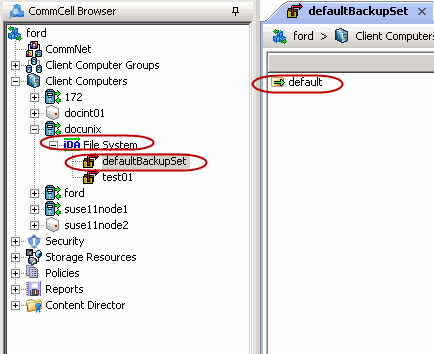
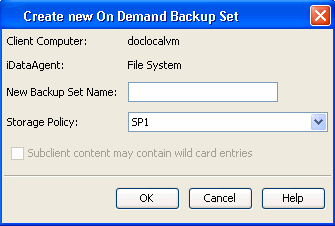
Configuring On Demand Backup Sets
Create one or more Content Files defining the content to be backed up.
From the CommCell Browser, navigate to Client Computers | <Client>.
Right-click the File System, point to All Tasks and then click
New On Demand Backup Set.
In the New Backup Set Name box, type a name (up to 32
characters).
Click OK.
Create a Directive File defining the locations of each Content File.
Once an On Demand Backup Set has been created, it cannot be changed into a traditional backup set.
Adding Files and Folders with Unicode Characters to Content Files
If the path or the filename contains Unicode characters, the Content File
must be converted to a format that can be used by the data protection operation. The
Unicode Conversion utility must be used to convert the Content File to a format
that can be provided as input.
Using a text editor, create a file that contains a list of files/folders
with Unicode characters. Make sure to save the file as a Unicode text file.
From the Command Line, navigate to the <software install folder>/base
folder and type the following:
cvconvertunicode
<source file> <destination file>
Where:
<source file> is the full path
and name of the file created in Step 1.
<destination file> is the full
path and name of the destination file. The file will automatically be created
by the utility.
Use the destination file as the content file to perform an
On-Demand backup.
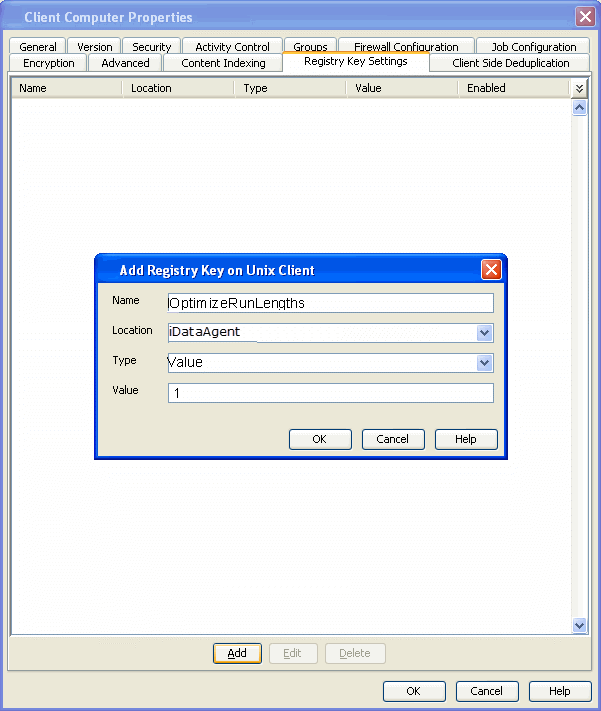
Preventing Duplicate Backups of Files
On-Demand Backups explicitly backs up the files listed in the Content File. If the
Content file has two entries for the file, the file can be backed up twice.
For
example, consider a Content File that lists the following entries:
/usr/
/usr/textfile
In this scenario, a backup operation will back up the contents of all data residing
in the textfile folder twice as the Content File already has the entry for the parent
folder to be backed up.
It is recommended that Content Files do not include such duplicate entries. If
you are not able to avoid duplicate entries, use the following steps to prevent
the duplication of data.
Configuring Content File to Exclude Duplicate Entries
From the CommCell Browser, navigate to Client Computers.
Right-click the <Client> in which you want to add
the registry key, and then click Properties.
You can create user-defined subclients to protect specific portions of the client
data. For example, you may need to frequently backup a specific directory or a set
of directories. You can create a subclient for such directories and schedule frequent
backups for that subclient.
By default, the content of the Default Subclient contains
the entire file system.
When you create a user-defined Subclient, the
contents of the user-defined Subclient will be excluded from the Default
Subclient.
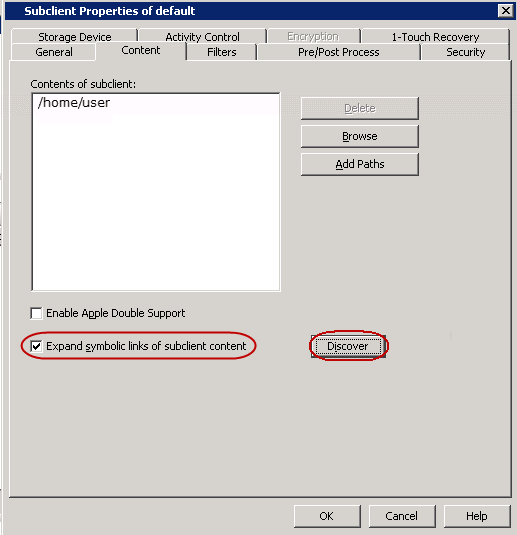
A symbolic link is a file that points to another file. By default, the
symbolic link file will be included in the subclient content. However, use the
following procedure to expand and backup the path in the symbolic link.
From the CommCell Browser, navigate to Client Computers |
<Client> | File System.
Right-click the Backup Set, point to All Tasks and
then click New Subclient.
In the Subclient Name box, type a name.
Click the Storage Device tab.
In the Storage Policy list, click a storage policy name.
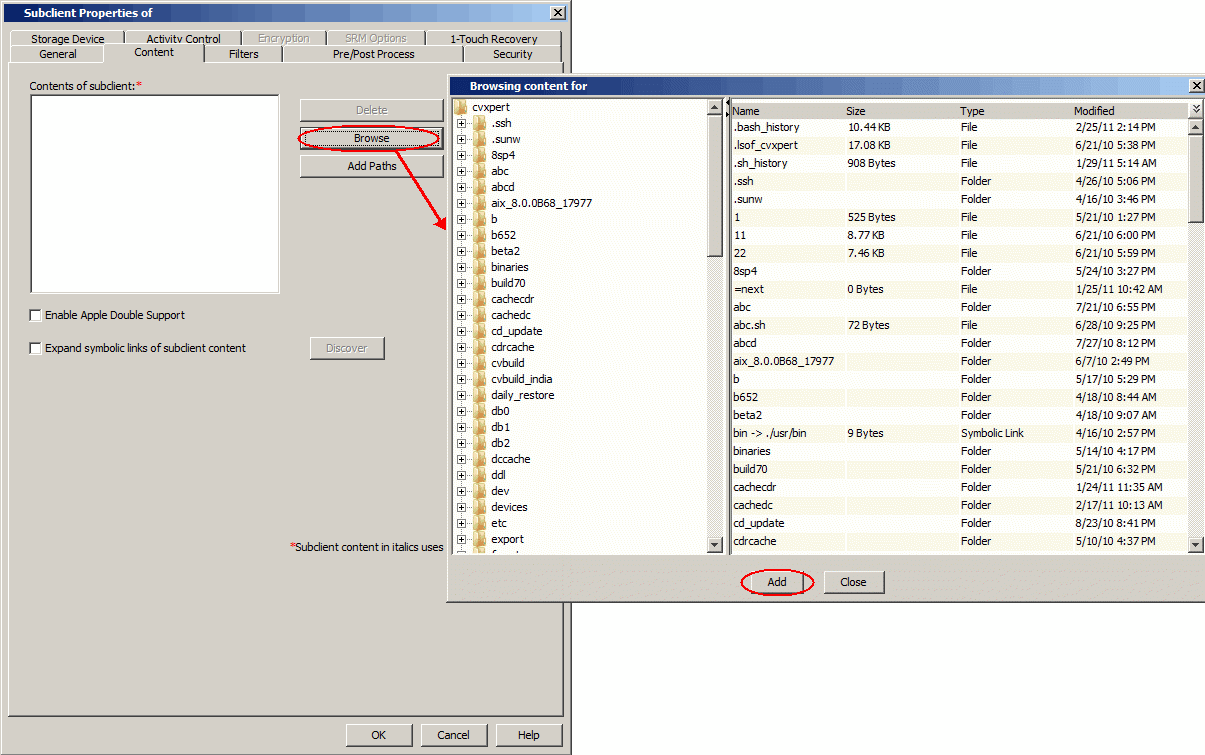
Click the Content tab.
Select the Expand symbolic links of subclient content
check box and then click Discover.
The data paths to which the symbolic links in the data contents
are pointing will be displayed in contents of subclient.
Click OK.
Enabling backup of symbolic link contents on a Subclient
Backup of content pointed by the symbolic links can be enabled at the
subclient level.
Use the following steps to follow the symbolic links under a subclient and
include the content pointed by these links for backup:
From the CommCell Browser, navigate to Client Computers |
<Client> | File System | Backup Set.
Right-click the <Subclient> and
then click Properties.
Click the Content tab.
Click Browse.
Select the directory or file to be backed up and click Add.
Repeat this step to include all the files and directories to be
backed up.
Click Close.
Select the Expand symbolic links of subclient content
check box and then click Discover.
The data paths to which the symbolic links in the data contents
are pointing will be displayed in contents of subclient.
Symbolic links are backed up by default when they are part of subclient
content. In addition to symbolic links, you can enable back up of data pointed
by symbolic links that are present under the subclient content path but reside
outside the content path.
For example, consider a subclient with content as
/home/user having symbolic links under this directory:
When you enable the option, symbolic links as well as the data they are
pointing to will be backed up, i.e., the data content of the directories,
/user/lib and /etc/commonProfile.rc
is backed up.
Note that data will be backed up unless there is another subclient with
content covering the path the symbolic link is pointing to; if the other
subclient is not scheduled for backup, loss of data due to user error will
occur.
Use the following steps to enable backup of data pointed by symbolic links:
From the CommCell Console, navigate to Client Computers.
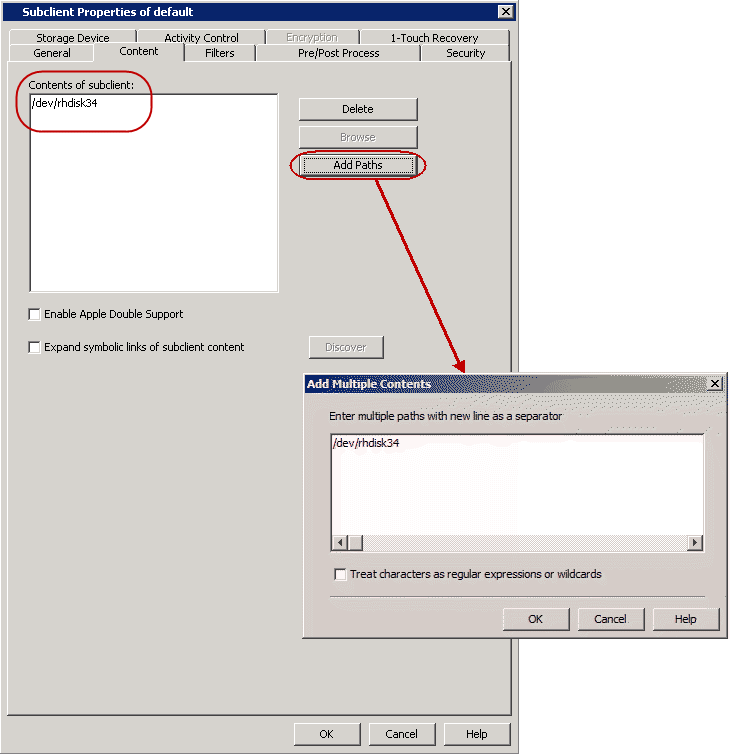
You can create subclients to backup block and character raw devices. You can
include raw device files referenced by one or more symbolic links in the
subclient content.
The following should be noted:
Use character device files instead of block device files for achieving
better backup and restore performance.
Raw devices are backed up using Full Backups.
Raw device backups are not restartable. Hence, it is recommended to run
these backups under high priority.
Number of bytes backed up is always displayed as
0 on the CommCell Console
even for a successful backup. However, the correct number of backed-up bytes
is displayed in the Job History.
From the CommCell Browser, navigate to Client Computers |
<Client> | File System.
Right-click the Backup Set, point to All Tasks and
then click New Subclient.
In the Subclient Name box, type a name.
Click the Storage Device tab.
In the Storage Policy list, click a storage policy name.
Click the Content tab.
Click Add Paths.
Type the raw device path (e.g., /dev/rhdisk34).
Click OK.
Click OK to close the Subclient Properties dialog
box.
Data can be linked to two or more files using hard links. By default, the
hard links are backed up twice. Use the following steps to prevent duplicate
backups of hard links.
From the CommCell Browser, navigate to Client Computers.
Right-click the <Client>, and then click Properties.
By default, NFS mounted file systems are not included in the default subclient.
You can include NFS mounted file systems to an existing subclient using the following
steps:
From the CommCell Browser, navigate to Client Computers
| <Client> | File System | BackupSet.
Right-click the <Subclient> in the right pane, and
then click Properties.
Click the Content tab.
Click Browse.
Select the NFS mount point to be included in the backup.
Files with advisory locks are backed up by default. However, files with mandatory
locks are skipped during backups. Use the following methods to configure the backups
of files with mandatory locks.
By default, the File System iDataAgent
backs up Macintosh files on a shared mount point. During these backups, if the
data on the Macintosh file system share are Apple Double formatted files, they are backed up as two
separate files.
Use the following steps to backup the Apple Double formatted Macintosh files as
a single file:
From the CommCell Browser, navigate to Client Computers |<Client>
| File System | Backup Set.
Right-click the <Subclient> in the right pane and click Properties.
Use the following
steps to enable restore of X9000 IBRIX files appropriately. When enabled, the files will be
created initially with 600 permissions and the original permissions are applied
to the files when they are closed.
From the CommCell Browser, navigate to Client Computers, right-click
<Client> and then click Properties.
Click Advanced button.
Click the Additional Settings tab.
Click Add button.
From the Add Additional Settings on <OS> Client dialog box,
click Lookup button.
From the Lookup Additional Settings dialog box, in the Find
box type
nIbrixEnabled.
The registry key will be listed, click
OK.
In the Add Additional Settings on <OS> Client dialog box,
in the Value box type 1 and then click OK.
Click OK to close Advanced Client Properties dialog box.
Click OK to close Client Computer Properties for client dialog
box.
To backup and restore files containing non-ASCII (international) characters
appropriate locale has to be configured in the server. Once configured, these
settings enable you to:
Back up files with names containing non-ASCII characters.
Restore file names containing non-ASCII characters without distortion.
Properly display files with non-ASCII characters when browsing subclient
content or backup data
The following steps use the example of KOI-8R character encoding scheme to
store the files with Russian names.
1.
Logon to the client as root and stop the Services.
Calypso stop
2.
Run the locale command (with no options) to determine
which locale is currently set on the server. A sample output is
shown in the example.
Example:
LANG=en_US.iso885915
LC_CTYPE="en_US.iso885915"
LC_NUMERIC="en_US.iso885915"
LC_TIME="en_US.iso885915"
LC_COLLATE="en_US.iso885915"
LC_MONETARY="en_US.iso885915"
LC_MESSAGES="en_US.iso885915"
LC_ALL=
This output shows that the en_US.iso885915
locale for the LANG environment
variable is currently set.
3.
Use the LC_CTYPE environment
variable to set the desired locale.
Example:
LC_CTYPE=ru.koi8-r
4.
Export the locale.
export LC_CTYPE
5.
Run the locale command. A
sample output is shown in the example.
Example:
LANG= en_US.iso885915
LC_CTYPE="ru.koi8-r"
LC_NUMERIC="ru.koi8-r"
LC_TIME="ru.koi8-r"
LC_COLLATE="ru.koi8-r"
LC_MONETARY="ru.koi8-r"
LC_MESSAGES="ru.koi8-r"
LC_ALL=
6.
Start the Services
Calypso start
A properly configured system will have the correct locale set in one of
the operating system startup scripts (e.g., /etc/profile). In case you do not want to change the locale for
the entire system, you may make the changes to the
Calypso startup scripts by editing the
/opt/calypso/galaxy_vm file
Example:
LC_CTYPE=ru.koi8-r
export LC_CTYPE
To update the CRC consistency checking, include the following command as
root from the Base directory:
/updatecrc32 galaxy/Base/Galaxy
Restart the server to allow the iDataAgent
to start with the correct locale settings.
By default, the default subclient includes all the data in the client. However,
the above mentioned file systems are not included in the backups. Use the following
steps to include the skipped file systems in the default subclient.
From the CommCell Browser, navigate to Client Computers.
Right-click the <Client>, and then click Properties.
You can set filters to prevent specific data from being backed up. Typically,
you can use filters to exclude certain system-related files and database
application files which consistently fail during a backup operation.
Subclient-level backup filters are available for the File System
iDataAgent to exclude specified
directories and files from being backed up. Follow the steps given below to configure filters on a subclient:
From the CommCell Browser, navigate to Client Computers | <Client>
| File System
| Backup Set.
Right-click the Subclient in the right pane and then click
Properties.
Click the Filters tab.
Under Exclude these files/folders/patterns, click Browse.
Click the file, folder, or directory that you want to exclude from
backup operations and click Add.
Optionally, click Add under Exclude these files/folders/patterns and type the path to files and folders that
you want to exclude. You can also enter patterns of files or folders using
wild cards.
You cannot enter Escape sequence to specify the path or file name.
Once you set the filters, you can also provide exceptions for the filters.
The files or folders added to the exception list will be included in the backup
operations.
For example, if you want to exclude from your back up operation all the files in
the /Ops directory except the Maintenance file. You can add a subclient filter
to exclude the /Ops directory from being backed up and also provide an exception
to allow the Maintenance file to be backed up.
From the CommCell Browser, navigate to Client Computers | <Client>
|
File System | Backup set.
Right-click the <Subclient> in the right pane and click Properties.
Click the Filters tab.
Under Except for these files/folders/patterns, click Browse.
Click the file, folder, or directory that you want to include in
the backups and then click Add.
By default Classic File Scan is selected as the method for scanning files to
determine which files have changed and/or have been backed up. However, you can
also select Data Classification Enabler as the preferred method of scanning files. If
you want to use Data Classification Enabler , see
Data
Classification.
Classic File Scan is always used when files
or file level wildcards are used in the subclient content.
From the CommCell Browser, navigate to Client Computers |
<Client> | File System.
Right-click the Backup set in the right pane, and then click Properties.
The File System iDataAgent uses
the operating system's kernel resources, such as shared memory, semaphores,
etc., to perform data protection and recovery operations. If
you are using an earlier version of the operating system, you can optimize the
usage of these
resources by setting the kernel parameter values.
The following table displays the possible range of values for each parameter:
If "*" appears
after the parameter name, this indicates that you can increment the
value of the parameter based on the number of desired streams by using
the formula
parameter value = 64 * number of desired streams
as long as the "high-end" value of the range for the parameter is not
exceeded.
Parameters
Description
Possible Range of Values
SEMMSL*
Defines the minimum recommended semaphore value.
1 � 2147483647 [MAXINT]
SEMMNS*
Defines the maximum semaphores in the system.
1 � 2147483647 [MAXINT]
SEMOPM
Defines the maximum number of operations for each semaphore call.
100
SEMMNI*
Defines the maximum number of semaphore sets in the entire system.
1 � 65535
SHMMNI*
Defines the maximum number of shared memory segments in
the entire system.
1 � 2147483647 [MAXINT]
SHMMAX
Defines the maximum allowable size of one shared memory segment.
0 � 2147483648 [2 GB] (the high-end value is the recommended value)
SHMALL
Defines the maximum total shared memory system-wide.
2097152
Use the following steps to modify the kernel parameters:
1.
From the unix prompt, log on to the client as root.
2.
Navigate to the /proc/sys/kernel.
cd /proc/sys/kernel
3.
View the current values of the parameters in the sem
file.
For example, view the values
of all semaphore parameters. The output provides the current value for
the following parameters in the order listed: SEMMSL, SEMMNS, SEMOPM, and
SEMMNI.
Example:
cat sem
250 32000 32 128
In this example, SEMMSL=250,
SEMMNS=32000, SEMOPM=32, and
SEMMNI=128
4.
Modify the required parameter.
For example, modify the
semmns parameter.
Use the following formula to
calculate the value for the parameter:
parameter value = current value + (64 * number
of desired streams)
If the client is configured as iDataAgent, be sure
to allocate 10 streams per each affected parameter. If the
client is configured as a MediaAgent, be sure to allocate at least 100
additional streams per each affected parameter.
If the system is configured as both an
iDataAgent and a MediaAgent, be sure to consider the sum of
the respective parameter values for this purpose.
sysctl -w kernel.<parameter>="value"
For example:
sysctl -w kernel.semmns="2147483647"
5.
Restart the computer to allow the changes to
take effect.
On a redhat linux computer, you can permanently modify the parameters using
the following steps:
1.
From the unix prompt, log on to the client as root.
2.
Open the /etc/sysctl.conf file.
vi /etc/sysctl.conf
3.
Modify the required parameters.
For example, modify the
sem
parameters.
Use the following formula to
calculate the value for the parameter:
parameter value = current value + (64 * number
of desired streams)
If the client is configured as iDataAgent, be sure
to allocate 10 streams per each affected parameter. If the
client is configured as a MediaAgent, be sure to allocate at least 100
additional streams per each affected parameter.
If the system is configured as both an
iDataAgent and a MediaAgent, be sure to consider the sum of
the respective parameter values for this purpose.
File System Multi-Streaming employs multiple data streams per subclient for data
protection operations. This enables the subclient's contents to be distributed to
all the streams, transmitting them in parallel to the storage media. Hence a subclient
whose data is secured using three data streams, utilizes more of the available
network resources, and can complete in as little as one third the time that the
same data would require using a single stream. You can allocate a maximum of 63
streams for a subclient.
Note that, you do not have to enable
multi-streaming if you have multiple mount points pointing to the same physical
drive. Do not use multiple streams if you have added UNC paths to the subclient
content.
Before enabling multi streaming, ensure that you can use multi-streaming when
you restore the data and create an auxiliary copy.
Follow the steps given below to configure multi-streaming.
From the CommCell Browser, navigate to Client Computers |<Client>
| File System | Backup Set.
Right-click the <Subclient> in the right pane and click Properties.
In the Number of Data Readers box type or select the number of data
streams.
Select the Allow multiple data readers within a drive or mount point
checkbox.
Click the Storage Device tab.
In the Storage Policy list, click a storage policy name.
Click OK.
The number of streams configured in the Storage Policy
should be equal to, or greater than the specified Number of Data Readers
.
This option accelerates Full or On Demand backups and is enabled by default.
Subsequently, when you perform a browse and restore operation, the default browse
displays data up to the most recent full backup. To browse and restore older data
you have to use the options to browse before or between specific dates.
When disabled, Full or On Demand backups may be slower. However, the default browse
displays all data in the entire retention period; not just one full backup cycle.
Use the following steps to configure this option for all subclients. This option
can also be set for the individual backups when initiating the job.
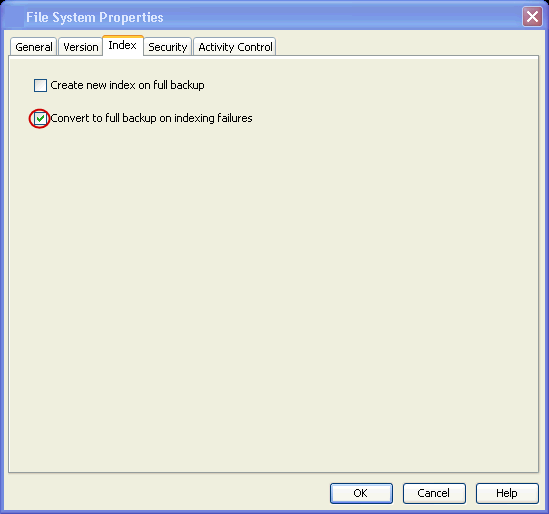
Click the Index tab.
Select the Create new index on Full Backup check box.
Use this option to ensure that the backup does not fail if the
index is irretrievable. When disabled, the backup will fail if the index is irretrievable.
Click the Index tab.
Select the Convert to full backup on indexing failures check box.
Incremental and differential backups can be configured depending on the changed
time. The changed time can include ctime (changes in the file properties) or mtime
(changes to the data in the file). You can use ctime to include the files with their
properties changed since last backup/last full backup. Similarly, you can use mtime
to include the files with their data changed since last backup/last full backup.
The ctime and mtime will be applicable only for the volumes which are scanned
by the Classic File Scan. When the Data Classification is used for scanning the
volumes, ctime and mtime will not be taken into account.
Follow the steps given below to configure an incremental backup using ctime
and mtime options.
From the CommCell Browser, navigate to Client Computers | <Client> |
File System | Backup Set.
Right-click the <Subclient> in the right pane, and then click Properties.
Under Incremental backups should use, selectthe
change time(ctime or mtime).
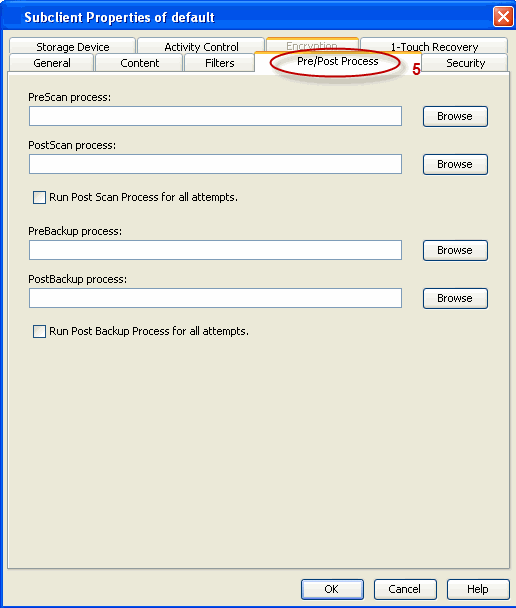
You can add and modify Pre/Post processes for a subclient. These are batch files
or shell scripts that you can run before or after certain job phases. For example, you can use an echo command to check
the level of a backup. Similarly, you can include a case
statement within a script to run specific operations based on the level of the backup
job.
A Save As Script file can also be run as a pre/post process, if
you include the absolute path of the associated input file in the script file.
The first line of the script must execute a command that is designed to
call in the pre/post program. Ensure that you have included the appropriate
command in the first line of the script.
The following is an example of a typical pre/post script:
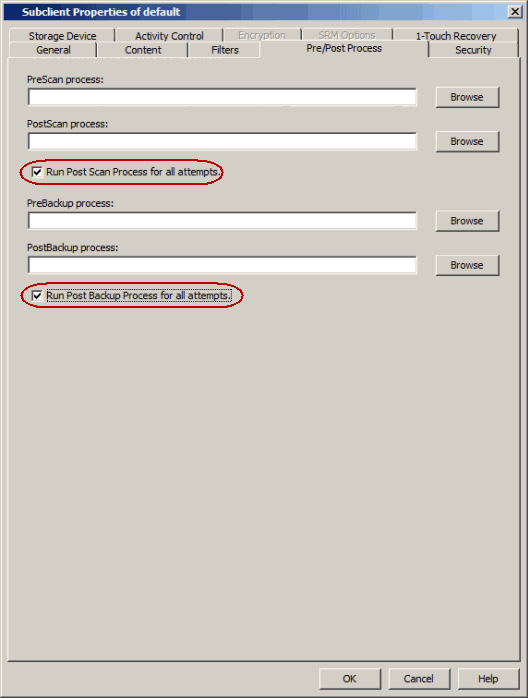
By default, a specified post process command is executed only on successful completion
of the scan or backup operation or if the job is killed.
Use the following steps to run a post process even if the scan or backup operation
did not complete successfully. For example, this may be useful to bring a database
online or release a snapshot.
From the CommCell Browser, navigate to Client Computers | <Client>
| File System | BackupSet.
Right-click the <Subclient> in the right pane, and then click Properties.
Click the Pre/Post Process tab.
Select the Run Post Scan Process for all attempts check
box.
Select the Run Post Backup Process for all attempts check
box.
The sparse files are restored by default as flat
files, wherein the holes are restored as data. This will increase the disk
usage. Use the following steps to restore the holes as genuine holes which will
considerably reduce the disk usage.
From the CommCell Browser, navigate to Client Computers.
Right-click the <Client> in which you wish to
perform the restore, and then click Properties.
The following table displays all the
parameters you can use with the commands mentioned in the above sections. To add a
parameter to
your command, use the following syntax: (Some examples are provided at the end
of the table.)
qoperation execute -af <template XML file> -<parameter
name> <value>
Parameter
Description of Parameter
values
clientName
Name of the client computer.
backupsetname
Name of the backup set. If the backup set name is
not specified in the command query, the default backup set is used
by default.
appName
Name of the application. In this case it would be
'File System'.
subclientname
Name of the subclient.
newName
New name of the subclient.
enableBackup
Option to enable/disable backup.
Valid values
are True/False.
encryptionFlag
Option to set the encryption points during
backups. Valid values are:
ENC_MEDIA_ONLY, to encrypt the backup data after
transmission and prior to storage on the media.
ENC_NETWORK_AND_MEDIA, to encrypt the backup data before
transmission. The data is stored encrypted on the media.
ENC_NETWORK_ONLY, to encrypt the backup data for
transmission and then decrypt the data prior to storage on the
media.
ENC_NONE, to disable data encryption.
networkAgents
Number of Network Agents.
softwareCompression
Option to enable compression on the
Client or MediaAgent computer. Valid values are:
ON_CLIENT, to enable software compression on the client.
ON_MEDIAAGENT, to enable software compression on the
MediaAgent.
OFF, to disable software compression.
throttleNetworkBandwidth
Enhancing backup performance by reducing network
bandwidth overhead.
Valid values are 0/1.
enableDeduplication
Option to enable deduplication on subclient.
Valid values
are True/False.
generateSignature
A component of deduplication performed on the
client or MediaAgent computer. Valid values are:
ON_CLIENT, to enable signature generation on the client.
ON_MEDIA_AGENT, to enable signature generation on the
MediaAgent.
OFF, to disable signature generation.
storagePolicyName
Name of the Storage Policy to be associated for
backup.
useGlobalFilters
Option to enable the use of global filters. Valid values are:
ON, to enable global filters for the subclient.
USE_CELL_LEVEL_POLICY, to enable the use of global filters
if the Use Global Filters on
All Subclients option is enabled on the Control Panel (Global Filters)
dialog. If the option is disabled, USE_CELL_LEVEL_POLICY will
disable global filters for the subclient.
OFF, to disable global filters.
useVSS
Option to enable/disable VSS for backing up the
file system
data.
Valid values are True/False.
useVSSForSystemState
Option to enable/disable VSS for backing up the
system state.
Valid values are True/False.
backupSystemState
Option to enable/disable back up of the system
state.
Valid values are True/False.
postBackupCommand
Path to the post process script that will be run
after the backup.
postScanCommand
Path to the post process script that will be run
after the scan phase
preBackupCommand
Path to the pre process script that will be run
before the backup.
preScanCommand
Path to the pre process script that will be run
before the scan phase
runAs
Option to specify the user name who has permissions to run the pre/post
process scripts. Valid values are:
USE_IMPERSONATION, to specify a user with enough privileges
to run the scripts. When using this value, you also need to
provide the user credentials:
Location of the content to be included
in the backup from the excluded list. This parameter must be used
along with the contentOperationType parameter, for example:
You can use the Show Folder Size option to get a graphical
representation of the space used by backed up data on a client. This can be done
for each subclient for a given client. The graph gets refreshed every time a
backup is run for the change in data. To use this option, you must enable SRM
for a given client and run a Full Backup.
Enable SRM
From the CommCell Browser, right-click the File System
iDataAgent
and select Properties.
Click Enable SRM Feature from the General tab.
Click OK.
Run a Backup
Right-click the subclient, and click
Backup in the CommCell Browser.
Click Full as backup type and thenclick Immediate.
Click OK.
Show Folder Size
From the CommCell Browser, navigate to Client Computers | <Client> |
File System | defaultBackupSet.
Right-click the subclient for which you want to display folder size
information and click Show Folder Size.
Chart displaying the folder size of the backed up data will be
displayed.
The following table describes the properties that can be configured from the
agent, backup set and subclient levels.
Option
Description
Related topics
Preserving the File Access Time
This option allows you to prevent the file access
time from being changed as a result of running data protection
operations on the client. When this option is selected, the file access
time will be preserved.
From the CommCell Browser, right-click the backup set, and then click Properties.
Select the Preserve File Access Time check box.
Click OK.
Change Storage Policies
You can modify the storage policies in any of the following situations.
To include a different media for the backup operation.
To use a storage policy with a different retention criteria.
You can change the storage policies from the subclient level.
From the CommCell Browser, navigate to
Client Computers | <Client>| File System |
<Backup Set>
Right-click the <user-defined Subclient> in the right pane, and then click Properties.
Click the Storage Device tab.
Select the Storage policy from the drop-down list.
From the CommCell Bowser, navigate to
Client Computers |<Client>| File
System.
Right-click the <Backup Set>, and then click
Properties.
In the Backup Set box, type a name.
Click OK.
Renaming subclient:
From the CommCell Browser, navigate to
Client Computers | <Client>| File System |
<Backup Set>.
Right-click the
<user-defined Subclient>, and then click
Properties.
In the Storage Policy list, click a storage policy name.
Click OK.
Data Transfer Options
You can efficiently configure the available resources for transferring data secured
by data protection operations from the subclient level. This includes the following:
Enable or disable Data Compression either on the client or the MediaAgent.
Configure the transfer of data in the network using the options for Network
Bandwidth Throttling and Network Agents.
You can configure the data transfer options.
From the CommCell Browser, navigate to Client Computers | <Client>
| File System | BackupSet.
Right-click the <Subclient> in the right pane, and then click Properties.
Clickthe Storage Device tab.
Clickthe Data Transfer Option tab.
Choose the appropriate software compression option for this subclient.
Select the Throttle Network Bandwidth
check box, and set the required bandwidth.
You can view the data paths associated with the primary
storage policy copy of the selected storage policy or incremental storage
policy. You can also modify the data paths including their priority from
the subclient level.
From the CommCell Browser, navigate to Client Computers | <Client>
| File System | BackupSet.
Right-click the <Subclient> in the right pane, and then click Properties.
Clickthe Storage Device tab.
In the Storage Policy list, click a storage policy name.
Click Data Paths.
Configure Activity Control
You can enable backup and restore operations from the agent and subclient level.
However, you can enable restore operations only from the agent level.
From the CommCell Browser, navigate to
Client Computers | <Client>
Right-click the <Client> or <Subclient> in the right pane, and then click Properties.
Click the Activity Control tab and select or clear option(s) as desired.
You can configure user security from the agent or subclient
level.
You can perform the following functions:
Identify the user groups to which this CommCell object is associated.
Associate this object with a user group.
Disassociate this object from a user group.
From the CommCell Browser, right-click the subclient.
Click Properties.
Click the Security tab.
Select the appropriate user groups to
which you want to associate to the CommCell object from the Available
Groups pane, and then move the user group to the Associated Groups
pane.
You can enable data encryption from the subclient level. Encryption must be enabled at the client level prior to configuring any
instances residing on that client.
From the CommCell browser, navigate to
Client Computers | <Client>| File System |
<Backup Set>
Right-click the <Subclient> in the right pane, and then click Properties.
The Version tab, at the Agent level displays the
software version and post-release service packs and updates installed for
the component.
From the CommCell Browser, navigate to
Client Computers
Right-click the <Client> for which you want to view the
version and the click Properties.
Click the Version tab.
Click OK.
CommCell Configuration Report
The CommCell Configuration Report provides the properties of the
CommServe, MediaAgents, clients, agents, SRM agents, subclients, and
storage policies within the CommCell based on the selected filter
criteria.
From the CommCell Browser, double-click Reports icon.
When you delete an instance or backupset,
the associated data is logically deleted and you can no longer access the
corresponding data from CommCell Console for recovery purposes.
You need to uninstall or DeConfigure the agent software from the client
computer before deleting from CommCell Browser. After you delete the client software, you can either leave the corresponding
data
intact for appropriate action or you can remove the data immediately. If you choose
to remove the data immediately, you must delete the agent from the CommCell
Browser. If you delete the agent, all of the agent's data is irretrievably
lost.
You cannot delete an agent while operations for that agent are
running.
From the CommCell Browser, navigate to Client Computers | <Client>.
Right-click the <Agent>, and then click Delete.
A confirmation message is displayed with the following message:
This operation will permanently delete the data
backed up from this level and it cannot be restored.
Click OK to continue with the deletion operation., or click No to
abort the deletion.
Apple Double Encoded Support, Classic Scan, Ctime, Hard
Links, Hole, Locale for Non-ASCII character, Locked File, NFS Mount, mount
point, Mtime, Raw device, Sparse File, Symbolic Link