Backup Set - collective information of all the data that needs to be backed up for the client.
Subclient - defines the data to be backed up.

|
NAS iDataAgent uses the following main components to perform
backup and
restore operations from the CommCell Console. Backup Set - collective information of all the data that needs to be backed up for the client. Subclient - defines the data to be backed up. |
|
A default backup set is created as soon as the NAS client is added. The default backup set includes a default subclient which will backup all the data in the file server.
You can create user defined backup sets to group a set of selected data. A user defined backup set will contain its own default subclient.
|
 |
On Demand backups allow content to be specified as an external input at the time of initiating a backup. Whereas traditional backups are performed using subclients, which contain fixed content configured prior to performing the operation, On Demand backups allow you to specify content each time you perform a backup.
Content for On Demand backups is defined through a Content File, which is a text file that defines the location of the data that you want to protect. The Content File contains the fully qualified paths from the root directory to the directories and devices which you want to back up. The Content File must be placed on the CommServe or the MediaAgent.
The following examples demonstrate the specific format for entries in the Content File for NetApp File Server:
/vol/vol0/Dir1
/vol/vol0/Dir2
The following examples demonstrate the specific format for entries in the Content File for Celerra File Server
/fs1/Dir1
/fs1/Dir2
Do not use filters, wildcards, or regular expressions in the Content File.
If you want to use the content file stored on a MediaAgent, create the following registry key on the MediaAgent:
|
 |
After creating the Content File defining the content to be backed up, create an On Demand Backup Set.
|
 |
As file servers may contain large amounts of data, you can create user defined subclients to manage your backups, such as the following:
For example, a file server has two directories that you want to back up. Create a user-defined subclient that consists of /fs1/dir1 and another user-defined subclient that consists of /fs1/dir2.
|
 |
Use the following guidelines while specifying the content for a subclient:
BlueArc |
You can include CIFS shares or NFS exports in the subclient content in the following format: /__VOLUME__/<File System Name>/<path in the file system> For example: /__VOLUME__/FS1/share1 /__VOLUME__/FS1/share2 |
EMC Celerra/ Hitachi |
Use the following format to define the subclient content: /<File System Name>/<directory name> For example: /fs001/dir1 /fs001/dir2 |
NetApp |
Use the following format to define the subclient content: the following format: /<File System Name>/<directory name> A maximum data size of 50-80G per subclient is recommended. For example: /vol/vol0 /vol/vol1 |
The Multi-Streaming feature enables multiple data streams per subclient for data protection operations. This allows backups of multiple paths in a subclient to run concurrently, as part of the same job, thus reducing the total number of running jobs. This feature is dependant on the number of available resources (drives) and can be useful in the following scenarios:
|
 |
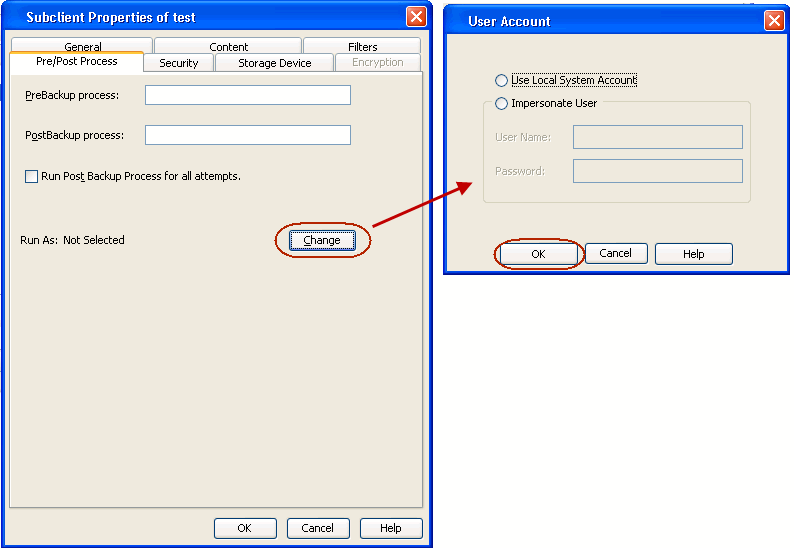
If the file server access information has been modified, follow the steps given below to change the user account settings.
|
 |
A Save As Script file can also be run as a pre/post process, if you include the absolute path of the associated input file in the script file.
The Pre/Post Process commands are executed on the MediaAgent associated with the active drive pool of the storage policy that is assigned to the subclient. Ensure that the required batch files or shell scripts are available on the MediaAgent where the Pre/Post commands are executed.
Follow the steps given below to specify the Pre/Post commands for a subclient:
|
 |
Use the following steps to run a post process when the backup operation does not complete.
|
|
For a Windows MediaAgent you must specify the user account and password required for executing the Pre/Post commands.
|
 |
You can set filters to exclude certain files and directories from backups. Filters can also be used to exclude system-related files which consistently fail during a backup operation. See Content, Filters, and Regular Expressions for comprehensive information on filtering data from backup.
Follow the steps given below to configure filters for a subclient:
You can modify or delete existing filter strings. Any modification to the filter configuration is effective during the following backup. |
 |
Use the following guidelines while entering the filters:
EMC Celerra |
|
Hitachi |
Filters are not supported. |
NetApp |
|
|
 |
|
 |
Auto-detection is the recommended method of configuring library and drives attached to a file server. The auto-detection method is explained in Getting Started. However, you can manually configure the library and drives if the automatic detection fails or you want to configure a specific drive for the file server.
| 1. | Ensure that the tape drive and media changer are detected by the file server. For information on verifying tape drive(s) and media changer, refer to your vendor documentation. | |
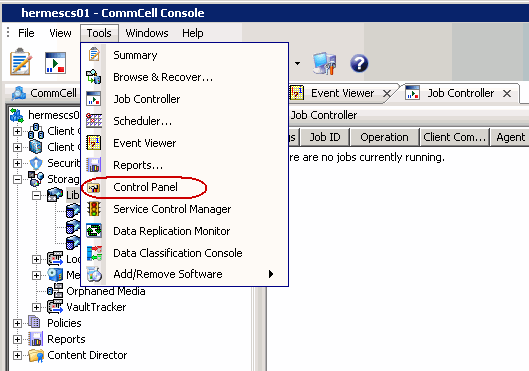
| 2. | From the Tools menu in the CommCell Console, click Control Panel. |
 |
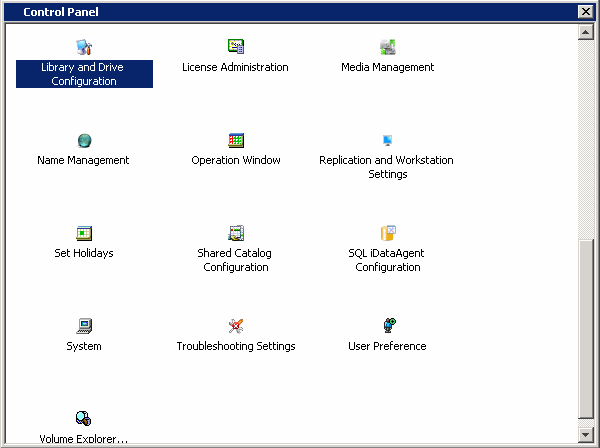
| 3. | Double click Library & Drive Configuration. |
 |
| 4. |
|
 |
| 5. | Click Start | NDMP and then select Add Library... . |
 |
| 6. |
|
 |
| 7. |
The library information is displayed, with "not configured" status,
and place holders for the drives in the library. Click Start | NDMP and then select Add Drive.... |
 |
| 8. |
|
 |
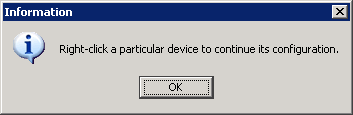
| 9. | Right-click the library and select Configure. |
 |
| 10. |
|
 |
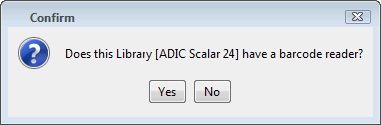
| 11. | Click Yes. |
 |
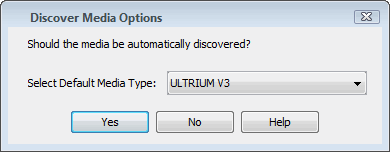
| 12. | Select Default Media Type from the list and click Yes. |
 |
| 13. |
The status of the library changes to
Configured.
If you chose to configure all associated drives, the status of the drives also changes to Configured. The Libraries tab provides the physical view of the devices (library and drives). |
 |
In a SAN environment, the drives in a library can be dynamically shared between the file servers and MediaAgents. When you share a library between two file servers, the file server configured first will control the media changer. The same rule applies for a library shared between a MediaAgent(s) and file server(s).
| 1. | Configure the shared library using a file server. For more information refer to Configure a library and drives attached to NAS file server using automatic detection. | |
| 2. | From the Tools menu in the CommCell Console, click Control Panel. |
|
| 3. |
|
|
| 4. |
|
 |
| 5. |
A prompt appears informing you that the exhaustive detection will unload
all drives and hence may interfere with backup/restore jobs. Click Yes. |
|
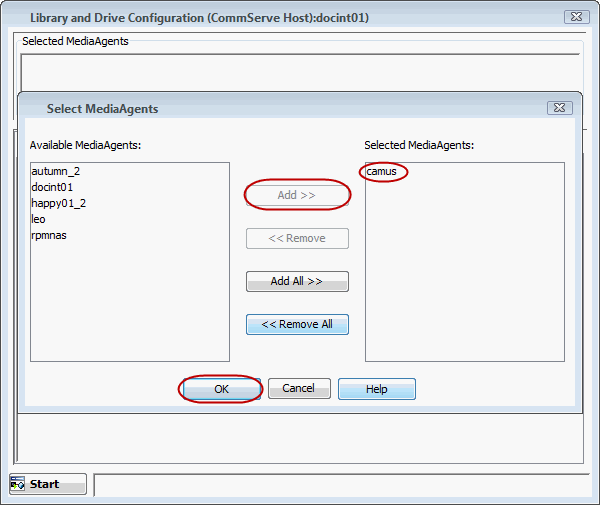
| 6. | Select the file server from which you wish to detect the library and click OK. |
 |
| 7. | Click Yes to start the device detection process. |
 |
| 8. | When the exhaustive detection process is completed, the log file is displayed. Note the log file contents and click Close to proceed. |
 |
| 9. | Click OK. |
 |
| 10. |
When the Exhaustive Detection is completed, the system displays the
devices in the Library and Drive Configuration window. New detected devices are not configured at this point, and the configuration information will not be saved if you exit from the Library and Drive Configuration window.
|
 |
| 11. | Right-click the library and then click Configure. | |
| 12. |
|
|
| 13. | Click Yes. |
|
| 14. | Select Default Media Type from the list and click Yes. |
|
| 16. |
The status of the library changes to
Configured.
If you chose to configure all associated drives, the status of the drives also changes to Configured. The Libraries tab provides the physical view of the devices (library and drives). |
|
| Feature | Description | Applies To |
| Tape Silvering | Tape silvering is the process of shipping a physical copy of the source data to a destination site. This is useful for large file systems as it saves time and resources and also avoids transferring the file system over the network. Refer to the EMC Celerra documentation for more information. | EMC Celerra running version 5.6 or higher. |
|
 |
| Feature | Description | Applies To |
| Block Based Backup |
The block based backup allows you to backup an entire volume to media. Snapshots
on the volume will be included in the backup. Restoring from a block based
backup provides fast volume recovery as opposed to a file based restore. When you configure a backup set for block backup, you cannot change this configuration and use the backup set for regular (non-block) backups. Follow the steps given below to create a backup set for block based backups: |
NetApp running ONTAP 8.0 or higher |
|
 |
You can add, modify or delete several configurable properties for the NAS iDataAgent from command line.
Command line configuration enables you to:
The following sections describe the available command line configurations:
To run command line operations you must first login to the CommServe as follows:
qlogin -cs <commserve name> -u <user name>
qlogin -cs server1 -u user1
qoperation execute -af create_NAS_client.xml -ndmpServerHostName XXXXX -userName xxxxx -password xxxxx
qoperation execute -af create_subclient_template.xml -clientName xxxxx -subclientName xxxxx -numberOfBackupStreams 2 -description 'xxxxx' -enableBackup true -storagePolicyName xxxxx -contentOperationType ADD -content/path 'xxxxx' -content/excludePath 'xxxxx'
qoperation execute -af get_subclient_properties_template.xml -clientName xxxxx -subclientName xxxxx
qoperation execute -af update_subclient_add_template.xml -clientName xxxxx -subclientName xxxxx -contentOperationType ADD -description 'xxxxx' -numberOfBackupStreams 4 -enableBackup true -storagePolicyName xxxxx -content/path 'xxxxx'
qoperation execute -af delete_subclient_template.xml -clientName xxxxx -subclientName xxxxx
The following table displays all the parameters you can use with the commands mentioned in the above sections. To add a parameter to your command, use the following syntax: (Some examples are provided at the end of the table.)
qoperation execute -af <template XML file> -<parameter name> <value>
| Parameter | Description of Parameter Values |
| clientName | Name of the client computer. |
| appName | Name of the application. In this case it would be 'NAS NDMP'. |
| subclientName | Name of the subclient. |
| enableBackup | Option to enable/disable backup. Valid values are True/False. |
| encryptionFlag | Option to set the encryption points during
backups. Valid values are:
|
| numberOfBackupStreams | Option to set the number of backup streams. |
| description | A general description of the subclient if needed. |
| networkAgents | Number of Network Agents. |
| storagePolicyName | Name of the Storage Policy to be associated for backup. |
| content/path | Location of the content to be backed up. This
parameter must be used along with the contentOperationType parameter, for example: -contentOperationType <value> -content/path '<path value>' |
| content/excludepath | Location of the content to be excluded from
backup. This parameter must be used along with the contentOperationType
parameter, for example: -contentOperationType <value> -content/excludepath '<path value>' |
| contentOperationType | Modification type. Valid values are
|
The following examples show how to add a parameter for a command:
| Adding Content |
To update the location for the subclient content, add the 'path'
parameter to the following command: qoperation execute -af update_subclient_add_template.xml -clientName client1 -subclientName subclient1 -description 'add content' -contentOperationType ADD -content/path '/vol/vol1/vol123' |
| Setting a Storage Policy |
To assign a storage policy to a subclient, add the 'storagePolicyName'
parameter to the following command: qoperation execute -af update_subclient_add_template.xml -clientName client1 -subclientName subclient1 -storagePolicyName sp1 |
For detailed information on the Subclient parameters see Subclient Properties.
You can modify the username and password for a NAS client. Execute the following command from the <Software_Installation_Directory>/Base folder after substituting the parameter values.
qoperation execscript -sn SetNasIDAProp -si @clientName='client1' -si @userName='domain\user1' -p2 @password='password'
Where:
ClientName is the NAS client name.
UserName and Password are the user credentials that you want to define for the client.
qoperation execute �af sched_policy_association_template.xml �taskName mypolicy
| Parameter | Description of Parameter Values |
| taskName | Name of the Schedule Policy to be associated. |
You can use the Show Folder Size option to get a graphical representation of the space used by backed up data on a client. This can be done for each subclient for a given client. The graph gets refreshed every time a backup is run for the change in data. To use this option, you must enable SRM for a given client and run a Full Backup.
|
 |
Add the sAddFileLevelAnalyticsMeta key to turn on collection of file level access time as index metadata for NDMP backups.
|
 |
The following table describes the properties that can configured from the agent, backup set and subclient levels.
| Option | Description | Related topics |
| Create New Index on Full Backup |
This option accelerates Full or On Demand backups and is enabled by default. Subsequently, when you perform a browse and restore operation, the default browse displays data up to the most recent full backup. To browse and restore older data you have to use the options to browse before or between specific dates. When disabled, Full or On Demand backups may be slower. However, the default browse displays all data in the entire retention period; not just one full backup cycle. Use the following steps to configure this option for all subclients. This option can also be set for the individual backups when initiating the job.
|
|
| Convert to Full Backup on Indexing Failure |
Use this option to ensure that the backup does not fail if the
index is irretrievable. When disabled, the backup will fail if the index is irretrievable.
|
|
| Change Storage Policies |
You can modify the
storage policies in any of the following situations:
You can change the storage policies from the subclient level.
|
Refer to Storage Policies. |
| Rename a Backup Set or Subclient |
You can rename backup sets and subclients. Renaming BackupSet:
Renaming subclient:
|
|
| Data Transfer Options |
You can efficiently configure the available resources for transferring data secured
by data protection operations from the subclient level. This includes the following:
You can configure the data transfer options.
|
Refer to Data Compression. |
| View Data Paths |
|
|
| Configure Activity Control |
You can enable backup and restore operations from the agent and subclient level.
However, you can enable restore operations only from the agent level.
|
Refer to Activity Control. |
| Configure User Security |
You can configure user security from the agent or subclient
level.
You can perform the following functions:
|
Refer to User Administration and Security. |
| Enable/Disable Data Encryption |
You can enable data encryption from the suclient level.Encryption must be enabled at the client level prior to configuring any
instances residing on that client.
|
Refer to Data Encryption. |
| View Software Version and Installed Updates |
The Version tab, at the Agent level displays the
software version and post-release service packs and updates installed for
the component.
|
The following sections describe the steps involved in deleting an agent, archive set or subclient.
|
When you delete an instance or backupset, the associated data is logically deleted and you can no longer access the corresponding data from CommCell Console for recovery purposes. Refer to the troubleshooting article on Recovering Data Associated with Deleted Clients and Storage Policies for information on how to recover data if you accidentally delete an entity. |
You need to uninstall or DeConfigure the agent software from the client computer before deleting from CommCell Browser. After you delete the client software, you can either leave the corresponding data intact for appropriate action or you can remove the data immediately. If you choose to remove the data immediately, you must delete the agent from the CommCell Browser. If you delete the agent, all of the agent's data is irretrievably lost.
This operation will permanently delete the data backed up from this level and it cannot be restored.
Consider the following before deleting a Backup Set:
Click No to cancel the deletion and retain the Backupset, or click Yes to continue the deletion.
Consider the following before deleting a subclient:
Click No to cancel the deletion and retain the subclient, or click Yes to continue the deletion.