Backup Set - collective information of all the data that needs to be backed up for the client.
Subclient - defines the data to be backed up.

|
Windows
File System iDataAgent uses following main components to perform
backup and
restore operations from the CommCell Console. Backup Set - collective information of all the data that needs to be backed up for the client. Subclient - defines the data to be backed up. |
|
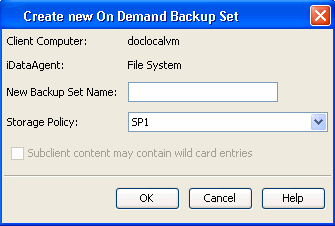
On Demand backups allow content to be specified as an external input at the time of initiating a backup. Whereas traditional backups are performed using subclients, which contain fixed content configured prior to performing the operation, On Demand backups allow you to specify content each time you perform a backup.
Content for On Demand backups is defined through two entities:
Once these entities are defined, an On Demand Backup Set is then created. Backups run from this Backup Set will provide the facility to select the Content and Directive Files to be included.
Content File entries should be in the following format with no filters, wildcards, or regular expressions included:
\\client1\shares\ondemand_content\test1.txt
c:\data\datafile.txt
Similarly, Directive File entries should be in the following format with no filters, wildcards, regular expressions, or blank lines:
c:\temp\ContentFile1.txt
Create one or more Content Files defining the content to be backed up.
Create a Directive File defining the locations of each Content File.
|
 |
If the path or the filename contains Unicode characters, the Content File must be converted to a format that can be used by the data protection operation. The Unicode Conversion utility must be used to convert the Content File to a format that can be provided as input.
cvconvertunicode <source file> <destination file>
Where:
<source file> is the full path and name of the file created in Step 1.
<destination file> is the full path and name of the destination file. The file will automatically be created by the utility.
For example, consider a Content File that lists the following entries:
/usr/
/usr/textfile
In this scenario, a backup operation will back up the contents of all data residing in the textfile folder twice as the Content File already has the entry for the parent folder to be backed up.
It is recommended that Content Files do not include such duplicate entries. If you are not able to avoid duplicate entries, use the following steps to prevent the duplication of data.
|
 |
You can create user defined subclient to manage and back up specific data files.
|
 |
A UNC path describes the location of a volume, directory, or file. You can add UNC paths as a content in a subclient.
Before adding UNC paths as a content in a subclient, note the following:
|
|
You can use the wildcards to specify the content of a default subclient in any backup set. Note that you can use wildcards only in the default subclient. Hence, if you want to use wildcards to specify the pattern of files or directories as a subclient content, it is recommended to create a new backup set.
If you modified the content of a default subclient using wildcards, make sure to perform a full backup. |
 |
You can use the following wildcards for a default subclient:
Wildcards |
Description |
Example |
||
| * | Any number of characters This wildcard is used in following scenarios:
|
*.doc will backup all files with the
extension .doc (e.g., status.doc,
mission.doc) on all drives on the client computer. C:\Test\*.doc will backup all .doc files only in the C:\Test\directory a*.dll will backup all files with the extension .dll (e.g., alsvc.dll, advdcc.dll) on the client computer which have the name beginning with "a". |
||
| ? | Any one character This wildcard is used in following scenarios: Backup all files (or folders) for which the name begins with a specific word and the last character of the word is variable. |
access? will backup any folder on the C drive for which the name begins with- "access" followed by any one character such as access1 or access5. However, access12 or access15 will not backup because the last two characters in the name are variable. | ||
| [ ] | Set of characters. You can combine this wildcard with *.
|
C:\[a-m]*.doc will backup any file with
.doc extension on the C drive for which
the name begins with the letters "a" through "m”. C:\[AEIOU]*.doc will backup any file name that ends with .doc and begins with the letters A, E, I, O, U |
||
| [ ! ] | The negation of a set of characters. You can use the wildcard in
following scenario: Back up all files in a directory except the files for which the name starts with any character from the specified set of characters.
|
C:\Windows\[!AEIOU]*.doc would backup all .doc files in the C:\Windows directory that start with a letter other than A, E, I, O, or U. | ||
| ** | Any directory level. | C:\**\move.cpp -
the file named move.cpp located at any directory level under
the c: drive. (e.g., c:\info\com\move.cpp)
C:\sys*\** - all directories starting with sys will be filtered. |
Some applications and system programs lock certain files while in use (open). Files that are locked are skipped during the backup job. The Windows File System iDataAgent automatically attempts to obtain any skipped files in the next backup job.
In some cases, it may be desirable to allow write operations on data being backed up to continue while the backup runs. Enabling VSS for backups provides this capability.
Microsoft Volume Shadow Service is the default, and only supported VSS software provider. The VSS software provider takes a snapshot of the source volume, database or file, which is then used to create backups or QR Volumes (when used with the Quick Recovery Agent).
VSS can be enabled for backups of local volumes in both clustered and non-clustered environments. VSS can be enabled only on the NTFS volumes and not on the FAT or FAT32 volumes. If the operating system fails to create a shadow copy of the data a traditional backup of the data will be performed, and a corresponding message will appear in the Event Viewer.
VSS is supported on all the Windows operating systems listed in the System Requirements, except Windows 2000. You cannot enable VSS on Windows 2000.
|
 |
For Windows XP clients, you can use QSnap to enable backup of mandatory locked files. Before you enable this option, install QSnap on the client. Follow the steps given below to use QSnap as a snap engine:
Before you enable this option, install QSnap on the client. Follow the steps given below to use QSnap as a snap engine:
|
 |
You can ignore the file lock detection and backup the files with mandatory locks using the following steps:
|
 |
By default, system state data is backed up along with file system data by the default subclient. System state data includes the following:
You can also create a separate subclient to back up the system state. Within any backup set, however, only one subclient can back up the system state. To back up System State data, the service user must be either an administrator or a backup operator. Also, system state backups require backup operator group permissions on the HKLM\SYSTEM\SETUP key to enable system-protected file backups.
This subclient will be used to backup the system state. Additionally, system state data will be removed from all subsequent backups of the default subclient.
|
 |
The Office Communications Server is made up of data, settings, and metadata. OCS data and settings are backed up and restored using the OCS enabled Windows File System iDataAgent. You can perform the backup of following OCS versions:
The OCS application stores its metadata in a SQL database. Use the SQL Server iDataAgent to backup and restore the OCS database that contains the OCS metadata.
The following sections describe how to include the OCS data and settings in the File System backup.
If you have Office Communications Server on multiple computers, you must install Windows File System iDataAgent and enable OCS backup on all servers.
Follow the steps given below to enable OCS backup using the Windows File System iDataAgent:
|
 |
OCS data and settings can be backed up by any subclient of a Windows File System iDataAgent backup set, for which the OCS backup is enabled. Within a backup set, only one subclient can back up the OCS data and settings. The OCS data and settings is always backed up in full irrespective of the backup type selected for the subclient that includes the OCS.
Follow the steps given below to include the OCS data and settings in a subclient:
|
 |
Prior to backups, you can set filters to prevent specific type of files from being backed up. Filters can also be used to exclude certain system-related files and database application files which consistently fail during a backup operation and are not integral to the operation of the system or application.
See Content, Filters, and Regular Expressions for comprehensive information on filtering data from backup.
Subclient-level backup filters are available for the File System iDataAgent to exclude specified directories and files from being backed up. Follow the steps given below to configure filters on a subclient:
Ensure that the subclient content does not have any UNC paths. The data from a UNC path will not get backed up if you are using wildcards in a subclient content. You can create another subclient to backup the UNC paths. |
 |
You can use the following wildcards to specify the pattern of files as a filter.
wildcard |
definition |
example |
| * | Any number of
characters.
This wildcard is used in following scenarios:
|
C:\*.log will filter all files with the .log extension on root
of the C drive. If you want to filter files with the
.log extension from a folder on the C
drive, you must include the path to the folder in the filter. (e.g.
C:\Test\*.log) ntuser* will filter all files for which the file name starts with the word ntuser. |
| ? | Any one character This wildcard is used in following scenarios: Filter all files (or folders) for which the name begins with a specific word and the last character of the word is variable. |
To filter files: C:\access?.doc will filter any files with the extension .doc on the C drive for which the name begins with- "access" followed by any one character such as access1.doc or access5.doc. However, access12.doc or access15.doc will not be filtered because the last two characters in the name are variable. To filter folders: C:\access?\**\* will filter any on the C drive for which the name begins with- "access" followed by any one character such as C:\access1 or C:\access5. However, C:\access12 or C:\access15 will not be filtered because the last two characters in the name are variable. |
|
**\* |
All files under a specific directory | C:\Test\Data\**\*
will filter all files and subdirectories under and including
C:\Test\Data C:\**\Data\**\* will filter all files and subdirectories below and including any directory called "Data" at any level in the C: volume G:\Users\**\xpprofile\*.log will filter all files with the .log extension from any xpprofile subdirectory under Users directory G:\Users\**\xpprofile\ntuser* will filter all filenames starting with ntuser from any xpprofile subdirectory under Users directory |
By default, the system state is backed up along with file system data by the default subclient of a Backup Set. A system state backup is always a full backup whether you select full, incremental, or differential backup for the subclient that includes the system state. You can, however, filter out some components from system state backup.
|
 |
Once you set the filters, you can also provide exceptions for the filters. The files or folders added to the exception list will be included in the backup operations. For example, if you want to exclude from your back up operation all the files in the /Ops directory except the Maintenance file. You can add a subclient filter to exclude the /Ops directory from being backed up and also provide an exception to allow the Maintenance file to be backed up.
|
 |
Software Installation, Index Cache, Job Control, and Job Results directories are by default included in the backups performed by the Windows File System iDataAgent. To exclude them from data protection operations follow the steps given below:
|
 |
You can remove a filter by deleting it from the exclusion list.
|
 |
You can use one of the following scan methods to determine which files in a backup set have changed and/or have been backed up.
Change Journal is selected as the default method for scanning files to determine which files have changed and/or have been backed up. When using this method of scanning the incremental backup will backup all the new or changed data since the last incremental or full backup, ignoring any differential backups performed prior to the current backup.
|
 |
There are some instances in which the Classic File Scan is always used, including but not limited to:
Follow the steps given below to configure Classic File Scan:
|
 |
By default Change Journal Scan is selected as the method for scanning files to determine which files have changed and/or have been backed up. However, you can also select Data Classification as the preferred method of scanning the files, as this method is much faster as compared to the Classic File Scan.
Before selecting Data Classification as the scan method, consider the following:
|
 |
Note that, you do not have to enable multi-streaming if you have multiple mount points pointing to the same physical drive. Do not use multiple streams if you have added UNC paths to the subclient content.
Before enabling multi streaming, ensure that you can use multi-streaming when you restore the data and create an auxiliary copy.
Follow the steps given below to configure multi-streaming.
|
 |
The following sections provide the steps to configure pre/post scripts for backup operations. For additional information, see Pre/Post Process.
A Save As Script file can also be run as a pre/post process, if you include the absolute path of the associated input file in the script file.
|
 |
Use the following steps to run a post process even if the scan or backup operation did not complete successfully. For example, this may be useful to bring a database online or release a snapshot.
|
 |
Users performing backups must be either an administrator or a backup operators. Backup operators (or Service Users) are designed to have full control to the registry and the install folder.
An administrator or a backup operator in a local group can back up any file and folder on the local computer to which the local group applies. An administrator or backup operator on a domain controller can back up any file and folder on any computer in the domain or any computer in a domain where a two-way trust relationship exists.
To back up files if you are not an administrator or a backup operator, you must be the owner of the files and folders you want to back up or have one or more of the following permissions for the files and folders you want to back up:
Users can be configured at the server and domain control levels to perform backups using the following procedures:
To add a user to the Backup Operators Group, perform the following steps on an individual server:
To add a user to the Backup Operators Group, perform the following steps on the domain controller:
You can define from the subclient level an account to be used when configuring a UNC Path as part of the subclient's content.
The user name and password that you use must have sufficient rights to access the share to which the UNC Path is pointing. Also, the user name and password must have the right to log on to the client machine that is running the backup, as well as rights to the logs on that computer.
To perform a backup or a restore operation using a UNC Path as either the content of the subclient or the destination for a restore, we recommend using an account that has administrative privileges. Also, the User Account that is used must be an account that already exists. If you choose to use an account that does not exist, it must be created.
Once you establish the account, you can modify the account. See Change Account for Configuring UNC Paths for step-by-step instructions.
Repeat this step if you want to add more files and/or folders to the content.
You can define a user or an account with permissions to restore data to either mapped/shared network drives or directories to which you have no write privileges.
This option accelerates Full or On Demand backups and is enabled by default. Subsequently, when you perform a browse and restore operation, the default browse displays data up to the most recent full backup. To browse and restore older data you have to use the options to browse before or between specific dates.
When disabled, Full or On Demand backups may be slower. However, the default browse displays all data in the entire retention period; not just one full backup cycle.
Use the following steps to configure this option for all subclients. This option can also be set for the individual backups when initiating the job.
|
|
|
 |
You can add, modify or delete several configurable properties for the File System iDataAgent from command line.
Command line configuration enables you to:
The following sections describe the available command line configurations:
To run command line operations you must first login to the CommServe as follows:
qlogin -cs <commserve name> -u <user name>
qlogin -cs server1 -u user1
qoperation execute -af create_subclient_template.xml -appName 'File System' -clientName xxxxx -backupsetName xxxxx -subclientName xxxxx -contentOperationType ADD -content/path 'xxxxx'
qoperation execute -af get_subclient_properties_template.xml -appName 'File System' -clientName xxxxx -backupsetName xxxxx -subclientName xxxxx
qoperation execute -af update_subclient_add_template.xml -appName 'File System' -clientName xxxxx -backupsetName xxxxx -subclientName xxxxx -contentOperationType xxxxx -content/path 'xxxxx'
qoperation execute -af update_subclient_add_template.xml -appName 'File System' -clientName xxxxx -backupSetName xxxxx -subclientName xxxxx -newName xxxxx
qoperation execute -af delete_subclient_template.xml -appName 'File System' -clientName xxxxx -backupsetName xxxxx -subclientName xxxxx
The following table displays all the parameters you can use with the commands mentioned in the above sections. To add a parameter to your command, use the following syntax: (Some examples are provided at the end of the table.)
qoperation execute -af <template XML file> -<parameter name> <value>
| Parameter | Description of Parameter values |
| clientName | Name of the client computer. |
| backupsetname | Name of the backup set. If the backup set name is not specified in the command query, the default backup set is used by default. |
| appName | Name of the application. In this case it would be 'File System'. |
| subclientname | Name of the subclient. |
| newName | New name of the subclient. |
| enableBackup | Option to enable/disable backup. Valid values are True/False. |
| encryptionFlag | Option to set the encryption points during
backups. Valid values are:
|
| networkAgents | Number of Network Agents. |
| softwareCompression | Option to enable compression on the
Client or MediaAgent computer. Valid values are:
|
| throttleNetworkBandwidth | Enhancing backup performance by reducing network
bandwidth overhead. Valid values are 0/1. |
| enableDeduplication | Option to enable deduplication on subclient. Valid values are True/False. |
| generateSignature | A component of deduplication performed on the
client or MediaAgent computer. Valid values are:
|
| storagePolicyName | Name of the Storage Policy to be associated for backup. |
| useGlobalFilters | Option to enable the use of global filters. Valid values are:
|
| useVSS | Option to enable/disable VSS for backing up the
file system
data. Valid values are True/False. |
| useVSSForSystemState | Option to enable/disable VSS for backing up the
system state. Valid values are True/False. |
| backupSystemState | Option to enable/disable back up of the system
state. Valid values are True/False. |
| postBackupCommand | Path to the post process script that will be run after the backup. |
| postScanCommand | Path to the post process script that will be run after the scan phase |
| preBackupCommand | Path to the pre process script that will be run before the backup. |
| preScanCommand | Path to the pre process script that will be run before the scan phase |
| runAs | Option to specify the user name who has permissions to run the pre/post
process scripts. Valid values are:
|
| content/path | Location of the content to be backed up. This
parameter must be used along with the contentOperationType parameter, for example: -contentOperationType <value> -content/path '<path value>' |
| content/excludepath | Location of the content to be excluded from
backup. This parameter must be used along with the contentOperationType
parameter, for example: -contentOperationType <value> -content/excludepath '<path value>' |
| content/includepath | Location of the content to be included
in the backup from the excluded list. This parameter must be used
along with the contentOperationType parameter, for example: -contentOperationType <value> -content/includepath '<path value>' |
| contentOperationType | Modification type. Valid values are
|
The following examples show how to add a parameter for a command:
| Adding Content |
To update the location for the subclient content, add the 'path'
parameter to the following command: qoperation execute -af update_subclient_add_template.xml -appName 'File System' -clientName client1 -backupSetName backupset1 -subclientName subclient1 -contentOperationType ADD -content/path '/etc' |
| Setting a Storage Policy |
To assign a storage policy to a subclient, add the 'storagePolicyName'
parameter to the following command: qoperation execute -af update_subclient_add_template.xml -appName 'File System' -clientName client1 -backupSetName backupset1 -subclientName subclient1 -storagePolicyName sp1 |
For detailed information on the Subclient parameters see Subclient Properties.
qoperation execute –af sched_policy_association_template.xml –taskName mypolicy
| Parameter | Description of Parameter Values |
| taskName | Name of the Schedule Policy to be associated. |
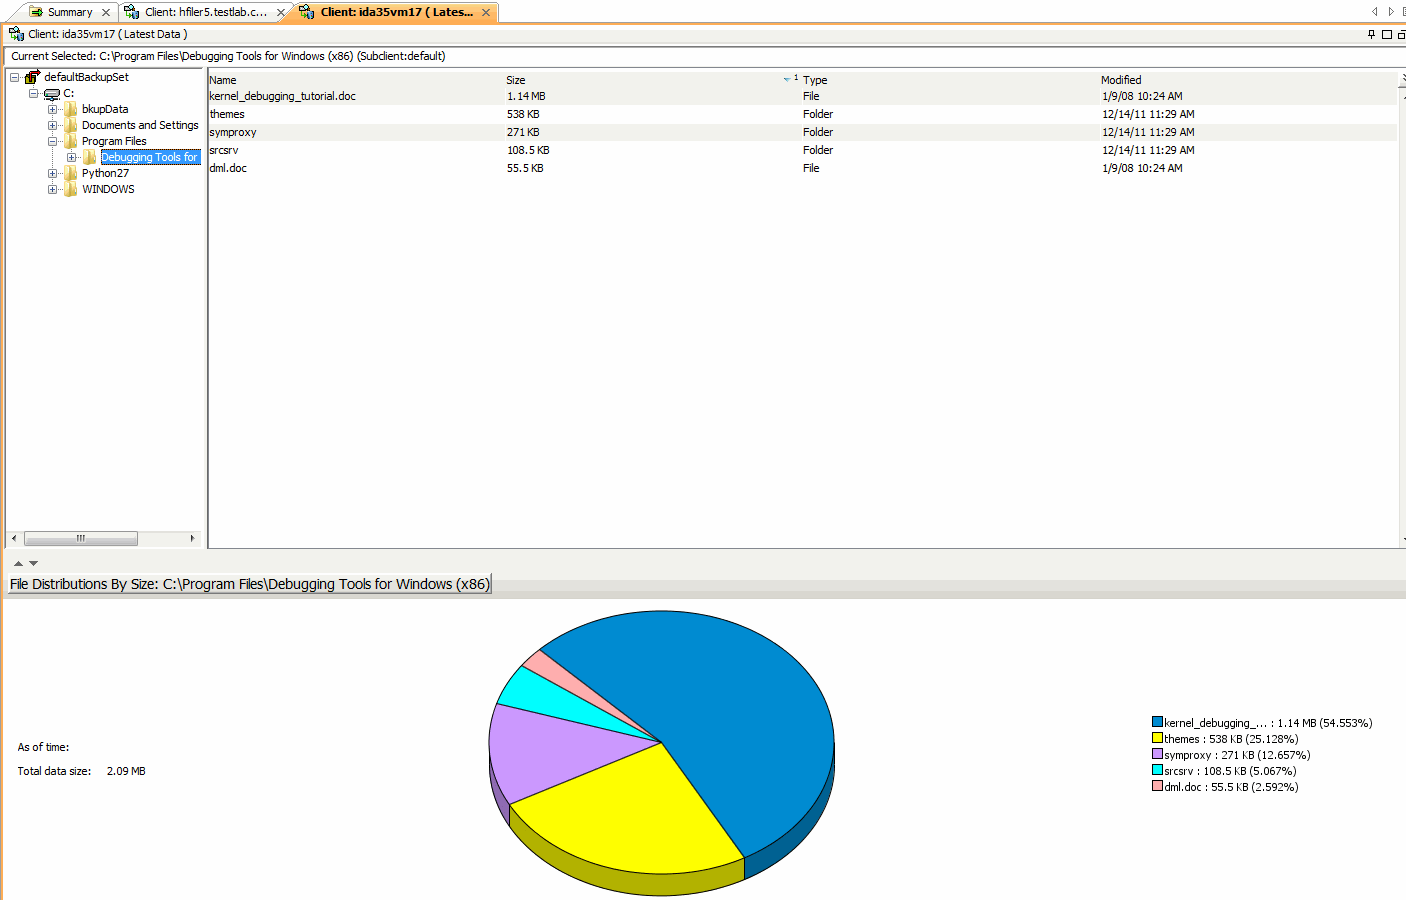
You can use the Show Folder Size option to get a graphical representation of the space used by backed up data on a client. This can be done for each subclient for a given client. The graph gets refreshed every time a backup is run for the change in data. To use this option, you must enable SRM for a given client and run a Full Backup.
|
 |
The following table describes the properties that can configured from the agent, backup set and subclient levels.
| Option | Description | Related topics |
| Preserving the File Access Time |
This option allows you to prevent the file access
time from being changed as a result of running data protection
operations on the client. When this option is selected, the file access
time will be preserved.
|
|
| Change Storage Policies |
You can modify the
storage policies in any of the following situations:
You can change the storage policies from the subclient level.
|
Refer to Storage Policies. |
| Rename a Backup Set or Subclient |
You can rename backup sets and subclients. Renaming BackupSet:
Renaming subclient:
|
|
| Data Transfer Options |
You can efficiently configure the available resources for transferring data secured
by data protection operations from the subclient level. This includes the following:
You can configure the data transfer options.
|
Refer to Data Compression and Network Bandwidth Throttling. |
| View Data Paths |
You can view the data paths associated with the primary
storage policy copy of the selected storage policy or incremental storage
policy. You can also modify the data paths including their priority from
the subclient level.
|
|
| Configure Activity Control |
You can enable backup and restore operations from the agent and subclient level.
However, you can enable restore operations only from the agent level.
|
Refer to Activity Control. |
| Configure User Security |
You can configure user security from the agent or subclient
level.
You can perform the following functions:
|
Refer to User Administration and Security. |
| Enable/Disable Data Encryption |
You can enable data encryption from the suclient level.Encryption must be enabled at the client level prior to configuring any
instances residing on that client.
|
Refer to Data Encryption. |
| View Software Version and Installed Updates |
The Version tab, at the Agent level displays the
software version and post-release service packs and updates installed for
the component.
|
|
| CommCell Configuration Report |
The CommCell Configuration Report provides the properties of the
CommServe, MediaAgents, clients, agents, SRM agents, subclients, and
storage policies within the CommCell based on the selected filter
criteria.
|
Refer to CommCell Configuration. |
The following sections describe the steps involved in deleting an agent, archive set or subclient.
|
When you delete an instance or backupset, the associated data is logically deleted and you can no longer access the corresponding data from CommCell Console for recovery purposes. Refer to the troubleshooting article on Recovering Data Associated with Deleted Clients and Storage Policies for information on how to recover data if you accidentally delete an entity. |
You need to uninstall or DeConfigure the agent software from the client computer before deleting from CommCell Browser. After you delete the client software, you can either leave the corresponding data intact for appropriate action or you can remove the data immediately. If you choose to remove the data immediately, you must delete the agent from the CommCell Browser. If you delete the agent, all of the agent's data is irretrievably lost.
This operation will permanently delete the data backed up from this level and it cannot be restored.
Consider the following before deleting a Backup Set:
Click No to cancel the deletion and retain the Backupset, or click Yes to continue the deletion.
Consider the following before deleting a subclient:
Click No to cancel the deletion and retain the subclient, or click Yes to continue the deletion.