Install the CommNet Server - Clustered Environment - Virtual Server


Click on a link below to go to a specific section of the software installation:

Install Requirements

  • Microsoft SQL Server with the appropriate Service Pack must be installed on the virtual server before installing the CommNet Server on a cluster. See System Requirements - CommNet Server for more information.
  • For step-by-step instructions on pre-installing the Microsoft SQL Database, see Pre-Installing SQL Database for CommNet Server - Clustered Environment - Virtual Server.
  • Installation or Upgrade of the software on a cluster is not supported on a Physical node.
  • It is recommended that you do not install the CommNet Server on a computer with the following components:
    • If Microsoft Exchange Server, Oracle database, or a previous version of Microsoft SQL Server is installed.
  • The CommNet Server can be installed on a CommServe computer.  However, if the installation configuration includes more than one hundred CommCell client computers for the CommServe, it is recommended that the CommNet Server be installed on a computer without a CommServe installed.  This will ensure efficiency of the CommServe as well as the CommNet Server.
  • In a clustered environment, Java™ Runtime Environment (JRE) SEv1.4.2_08 must be installed on the passive node manually; it is automatically installed on the active node, if not already installed.
  • SQL Server cannot be installed on a Cluster Quorum disk.
  • During the CommNet Server deployment, the CommNet Server Statistics Database is automatically enabled to enhance the performance of the software.

  • Verify that you have the appropriate Software Installation Disc.
  • Verify that the computer in which you want to install software satisfies the System Requirements - CommNet Server.
  • Verify that you have the license diskette.
  • Verify hardware devices such as disk arrays are configured and confirm connectivity to all drives.

Install Checklist

Collect the following information before installing the software. Use the space provided to record the information, and retain this information in your Disaster Recovery binder.
1. CommNet Server Display Name and CommNet Server Interface Name:______________________________________

See Set Up the CommNet Server Name and User for more information.

Before You Begin

  • Close all applications and disable any programs that run automatically, including anti-virus, screen savers and system utilities. Some of the programs, including many anti-virus software, may be running as a service. Stop and disable such services before you begin. You can re-enable them after the installation.

Install Procedure

Getting Started

1. Log on to the computer as the local Administrator or as a member of the local Administrators group on that computer. For clustered computers, log on as Domain User with administrative privileges to all nodes in the cluster.  
2. Place the appropriate Software Installation Disc into the drive. After a few seconds, the installation menu is displayed.

If the installation menu does not display:

  • Click the Start button on the Windows task bar, a then click Run.
  • Browse to the installation disc drive, select setup.exe, click Open, then click OK.
 
3. Select the desired language and click Next to continue.  
4. Select the option to install software.  
5. Select the option to install software on this computer.

NOTES

  • The options that appear on this screen depend on the computer in which the software is being installed.
 
6. From the Welcome screen, click Next to continue if no other applications are running.  
7. Read the virus scanning software warning.

Click OK to continue if virus scanning is disabled.

 
8. Read and agree to the license agreement.

Select I accept the terms in the license agreement then click Next to continue.


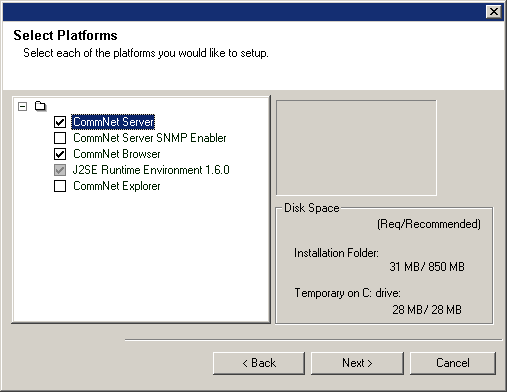
Select Components for Installation

9. Select Virtual server installation.

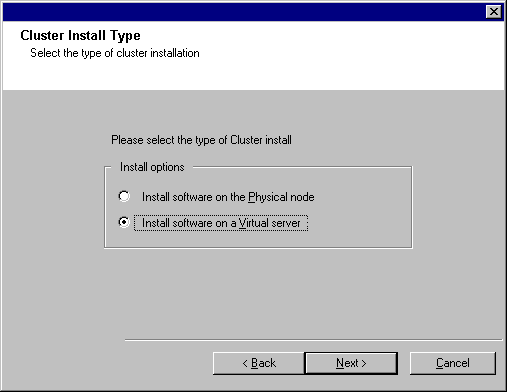
To install or upgrade the software on a cluster, select Install Calypso Monitor on a Virtual server and click next to continue.

NOTES

  • Installation or upgrade of the software on a cluster is not supported on a physical node.
10. Select the disk group to which you are installing the software.

Click Next to continue.

11. Select the platforms you want to install.

Click Next to continue.

NOTES

  • The CommNet Browser must be installed on the CommNet Server if you want to use scheduled reports.

Install the CommNet Server and CommNet Server Database

12. Specify a password for the SQL user sa.

Enter Password - Enter the password for the SQL user sa.

Use Windows Authentication - Check this box to use a Windows Administrator account with SQL System Administrator privileges in place of the sa account to access the SQL database. This option is deselected by default.

Click Next to continue.

13. Select the path to which you will install the software.

Enter or Browse to the desired destination path and click Next to continue.

NOTES

  • Do not install the software to a mapped network drive or to a path using any of the following characters:

    / : * ? " < > | ! ; @ ^ ]

  • It is recommended that you use alphanumeric characters only.
14. Select the path to which you will install the CommNet Server database.

Enter or Browse to the desired destination path and click Next to continue.

NOTES

  • It is recommended you select a Typical install. If you select a Custom install you will prompted for custom database paths in the next step.

Set Up the CommNet Server Name and User

15. Specify the CommNet Server Display Name and Interface Name.

CommNet Server Display Name - The name of the CommNet Server computer.

CommNet Server Interface Name - The TCP/IP network interface name of the CommNet Server computer.

Select or Enter the information and click Next to continue.

16. Specify a user and password.

Enter User Name - The name of the Administrator for the system.

Enter password - The password for the administrator account.

Confirm password - Reenter password for confirmation.

Click Next to continue.

Verify Summary of Install Options

17. Verify the summary of selected components.

Click Next to continue.

NOTES

  • The Summary to the right may look different depending upon the components selected for install or upgrade.
18. A System Reboot prompt may ask you to take one of the following actions:
  • Log Off - This option will be displayed if the install program needs to assign any required security privileges to the user. If the Log off option is displayed, log off and login to the computer at this point. The install program will automatically continue after you login.
  • Reboot - This option will be displayed if the install program finds any file required in use and needs to be replaced. If the Reboot option is displayed without the Skip Reboot option, reboot the computer at this point. The install program will automatically continue after the reboot.
  • Skip Reboot - This option will be displayed if the install program finds any files belonging to other applications, that need to be replaced. As these files are not critical for the CommNet Server installation, you may skip the reboot and continue the installation and reboot the computer at a later time.
  • The install program now starts copying the software to the computer. This step may take several minutes to complete.

Setup Complete

19. Verify that the passive nodes have been successfully installed or upgraded. If any nodes were unavailable during install/upgrade, or did not install/upgrade successfully, see Manually install or upgrade a passive node.

Click Next to continue.

20. Setup displays the successfully installed or upgraded software components. Click Finish to close the install program.

NOTES

  • The screen to the right may look different depending upon the components selected for install or upgrade.

Post-Install Considerations

General

Install post-release updates or Service Packs that may have been released after the release of the software.

Database Engine

Microsoft SQL Server 2005 Enterprise Edition (with Service Pack 2) will be automatically installed while installing the software. Later versions of the Service Pack, if available, are also supported.(* See Disclaimer below.)

If necessary, download and install the latest version of the Microsoft SQL Server service pack and/or post-release updates after an install or upgrade.

Server Specific

The Microsoft SQL Server iDataAgent software must be installed on the CommNet Server after installation. The iDataAgent can be a client of any CommCell. This provides a backup mechanism for the BullCalypso instance of SQL that contains the CommNet Server database on the CommNet Server. You can also configure firewall services between the CommCells and the CommNet Server when installing the SQL iDataAgent.

When installing the software, the interface names for the CommNet Server and the SQL iDataAgent must be the same. For example, if the CommNet Server is using server.company.com then the SQL iDataAgent should also use server.company.com.

See Books Online for information on installing the iDataAgent and configuring your computers for operation across a firewall.

Disaster Recovery

To protect the CommNet Server database against disasters, such as computer failure, application failure, etc. it is recommended that you have a Disaster Recovery strategy in place. See Disaster Recovery for more information.

DISCLAIMER

Minor revisions and/or service packs that are released by application and operating system vendors may, in some cases, affect the working of our software. Although we may list such revisions and/or service packs as “supported” in our System Requirements, changes to the behavior of our software resulting from an application or operating system revision/service pack may be beyond our control. However, we will make every effort to correct such disruption as quickly as possible. When in doubt, please contact your software provider to ensure support for a specific application or operating system.

Additional considerations regarding minimum requirements and End of Life policies from application and operating system vendors are also applicable.