|
|
|
|
| 1. |
Place the Software
Installation Disc for the Windows platform into the disc drive. After a
few seconds, the installation program is launched.
If the installation program does not launch automatically:
- Click the Start button on the Windows task bar, and then click Run.
- Browse to the installation disc drive, select Setup.exe, click Open, then click OK.
NOTES
- If you are installing on Windows Server Core editions, mount to Software
Installation Disc through command line, go to the AMD64 folder and run
Setup.exe.
|
| 2. |
Choose the language you want to use during installation.
Click the down arrow and select the desired language from the drop-down list, and click Next to continue.
|
 |
| 3. |
Select the option to install software on this computer. NOTES
- The options that appear on this screen depend on the computer in which
the software is being installed.
|
 |
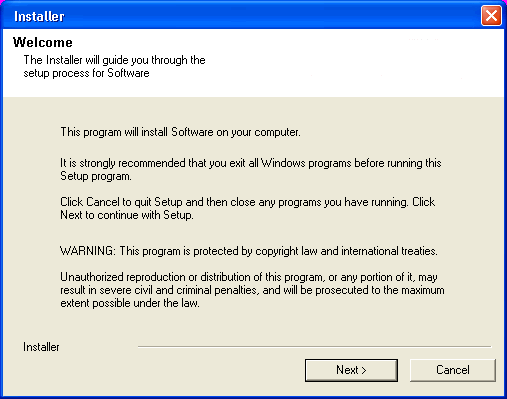
| 4. |
Read the Welcome screen.
Click Next to continue, if no other applications are
running.
|
 |
| 5. |
Read the virus scanning software warning.
Click OK to continue, if virus scanning software is disabled.
|
 |
| 6. |
Read the license agreement, then select I accept the terms
in the license agreement. Click Next to continue.
|
 |
|
If you are installing in clustered environment, follow the steps below. For non-clustered
environment, skip to Select Components
for Installation. |
| 7. |
Select Configure a Virtual Server. Click Next to continue.
|
 |
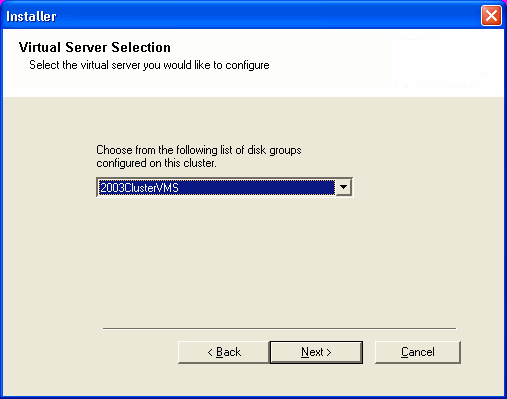
| 8. |
Select the disk group in which the cluster group resides. Click Next to
continue.
|
 |
|
|
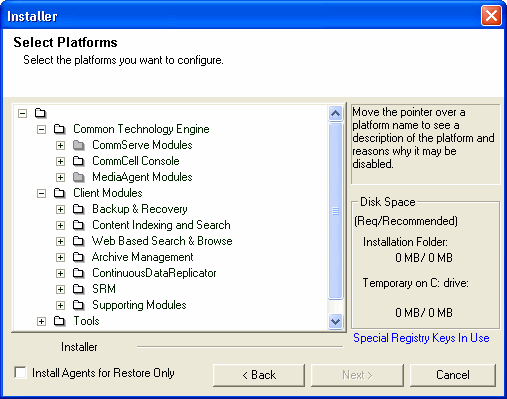
| 9. |
Select the component(s) to install. NOTES
- Your screen may look different from the example shown.
- Components that either have already been installed, or which cannot be installed, will be dimmed.
Hover over the component for additional details.
- If you wish to install the agent software for restore only, select
Install Agents for Restore Only checkbox. See
Installing Restore Only Agents for
more information.
- The Special Registry Keys In Use field will be highlighted when GalaxyInstallerFlags
registry key is enabled. Move the mouse pointer over this field to
see a list of registry keys that have been created in this computer.
Click Next to continue.
To install the ProxyHost
iDataAgent, expand the following
Client Modules folder,
Backup & Recovery folder and
File System folder. Then select the
following:
When you select the ProxyHost
iDataAgent for install, the appropriate Windows File System
iDataAgent is automatically selected for install. To use
the following component with the ProxyHost
iDataAgent and Quick Recovery Agent, select it for
installation:
- VSS Enabler for Quick Recovery
When you select the VSS Enabler for install, the Quick Recovery Agent
is automatically selected for install as well. |
 |
|
|
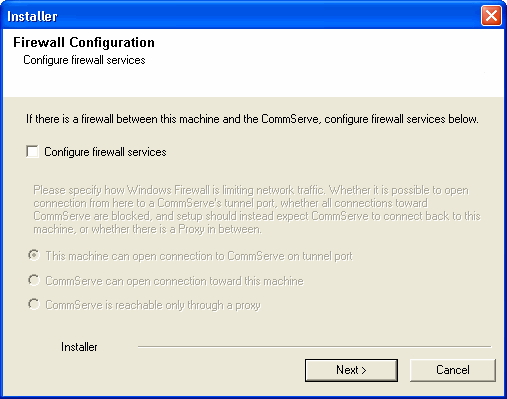
| 10. |
If this computer and the CommServe is separated by a firewall, select
the Configure firewall services option and then click Next to
continue.
For firewall options and
configuration instructions, see
Firewall Configuration
and continue with the installation.
If firewall configuration is not required, click Next to continue.
|
 |
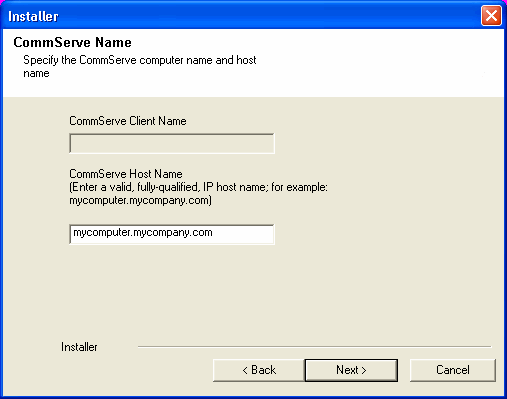
| 11. |
Enter the fully qualified domain name of the CommServe Host Name. This should be
TCP/IP network name. e.g., computer.company.com. NOTES
Click Next to continue.
|
 |
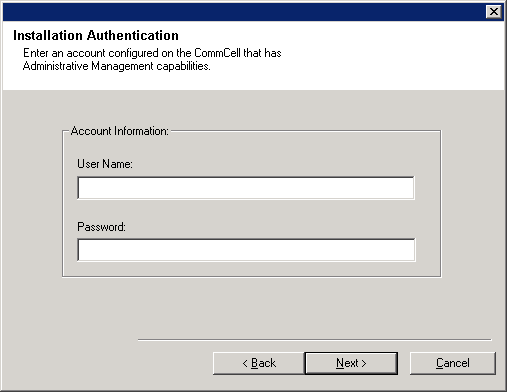
| 12. |
Enter the username and password associated with an external
domain user account or a CommCell user account to authorize the installation
of this agent. NOTES
- This window will be displayed when the Require Authentication for Agent
Installation option is selected in the CommCell Properties. For more
information, see
Authentication for Agent Installs.
Click Next to continue.
|
 |
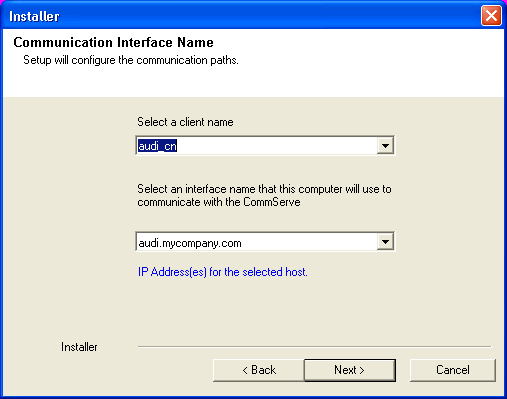
| 13. |
Enter the following:
- The local (NetBIOS) name of the client computer.
- The TCP/IP IP host name of the NIC that the client computer must use to communicate with the CommServe
Server.
NOTES
-
Do not use spaces when specifying a new name for the Client.
- The default network interface name of the client computer
is displayed if the computer has only one network interface. If the
computer has multiple network interfaces, enter the interface name that
is preferred for communication with the CommServe Server.
- If a component
has already been installed, this screen will not be displayed; instead, the
install program will use the same name as previously specified.
Click Next to continue.
|
 |
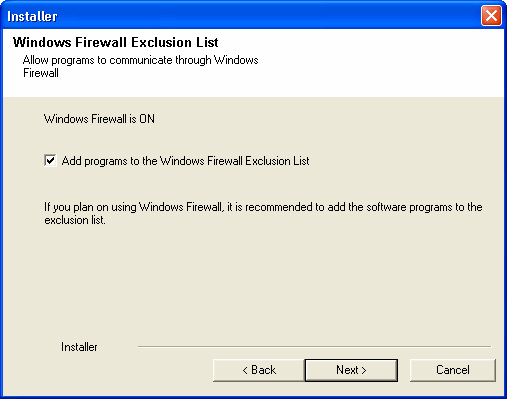
| 14. |
Select Add programs to the Windows Firewall Exclusion List, if
you wish to add CommCell programs and services to the Windows Firewall
Exclusion List.
NOTES:
Click Next to continue.
|
 |
|
|
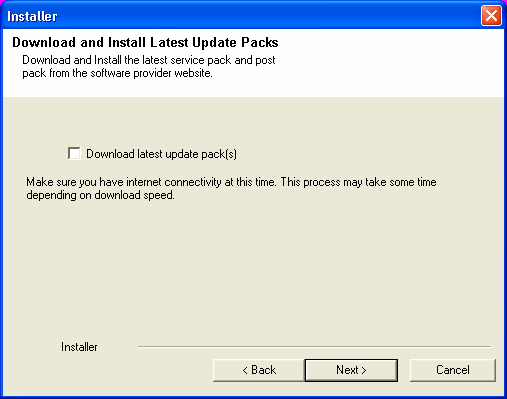
| 15. |
Select Download latest update pack(s) to automatically download and install the latest service packs
and/or post packs if applicable at the end of this agent install.
NOTES
- Internet connectivity is required to download updates.
- Updates are downloaded to the following directory:
<software installation>/Base/Temp/DownloadedPacks.
They are launched silently and installed automatically for the first instance.
Click Next to continue.
|
 |
| 16. |
Specify the location where you want to install the software. NOTES
- Do not install the software to a mapped network drive.
- Do not use the following characters when specifying the destination path:
/ : * ? " < > | #
It is recommended that you use alphanumeric characters only.
- If you intend to install other components on this computer, the selected installation directory will be automatically used for that software as well.
- If a component is already installed in this computer, this screen may not be displayed.
The software will be automatically installed in the same location that was
previously specified.
Click Browse to change directories.
Click Next to continue.
|
 |
|
|
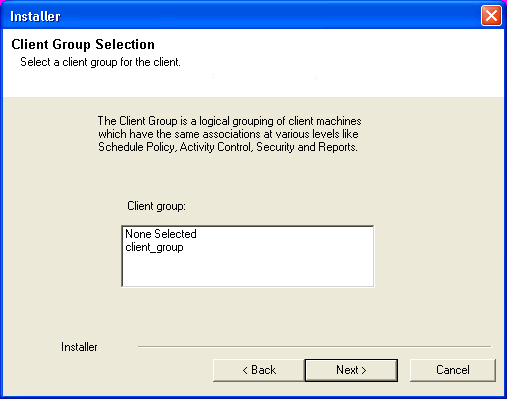
| 17. |
Select a Client Group from the list. Click Next to continue.
NOTES
- This screen will be displayed if Client Groups are configured in
the CommCell Console. For more information, see
Client
Computer Groups.
|
 |
|
|
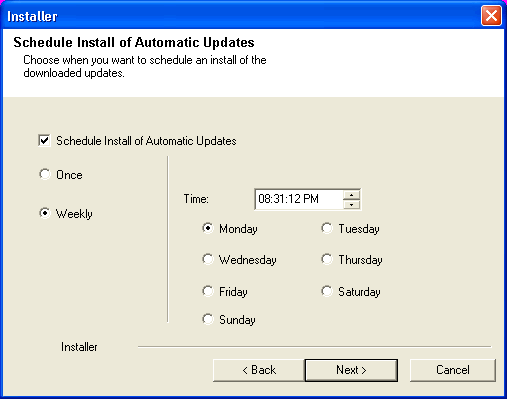
| 18. |
If necessary, select this option to schedule an automatic installation of software
updates.
NOTES
Click Next to continue.
|
 |
|
|
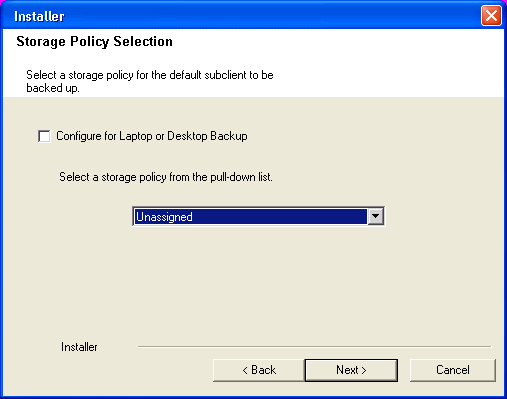
| 19. |
Select the storage policy through which you want to back up/archive the agent. NOTES
- A storage policy directs backup data to a media library.
- If desired, you can change your storage policy selection at any time
after you have installed the client software.
- This screen may appear more than once, if you have selected multiple
agents for installation. You will be prompted to configure the storage
policy association for each of the selected agents.
Click Next to continue.
|
 |
|
|
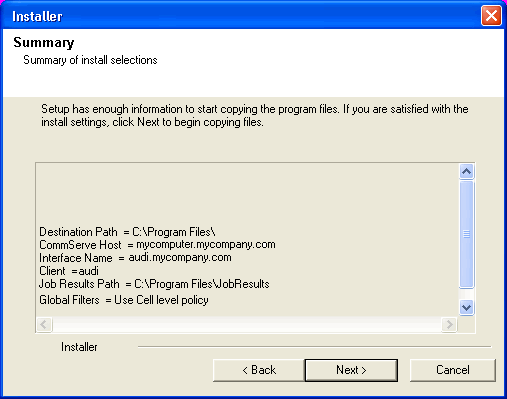
| 20. |
Verify the summary of selected options.
NOTES
- The Summary on your screen should
reflect the components you selected for install, and may look different from
the example shown.
Click Next to continue or
Back to change any of the options.
The install program now starts copying the software to the computer.
This step may take several minutes to complete.
|
 |
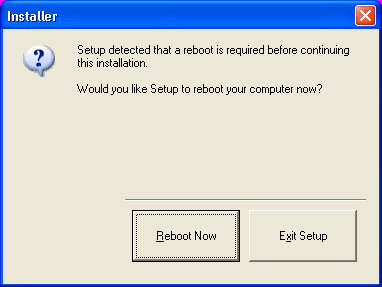
| 21. |
The System Reboot message may be displayed. If so, select one of the following:
- Reboot Now
If this option is displayed without the
Skip Reboot
option, the install program has found files required by the software
that are in use and need to be replaced. If Reboot Now is displayed
without the Skip Reboot option, reboot the computer at this point. The
install program will automatically continue after the reboot.
- Exit Setup
If you want to exit the install program, click
Exit
Setup.
|
 |
|
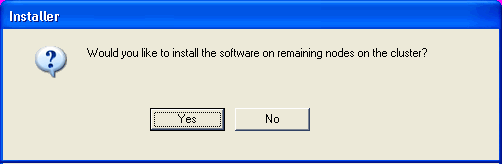
If you are installing in clustered environment, follow the steps below
to install on remaining nodes of the cluster. For non-clustered environment,
skip to Setup Complete.
|
| 22. |
To install/upgrade the software on the remaining nodes of the cluster, click Yes.
To complete the install for this node only, click No.
|
 |
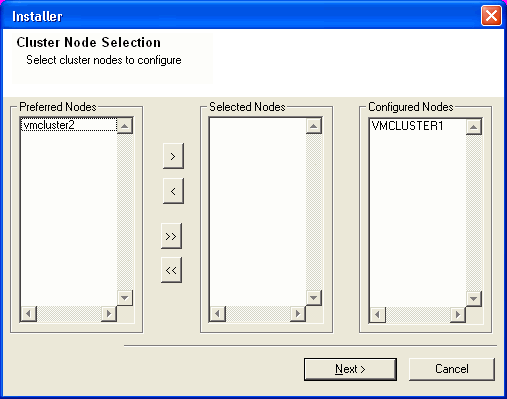
| 23. |
Select cluster nodes from the Preferred Nodes list and click the arrow
button to move them to the Selected Nodes list.
NOTES
- The list of Preferred Nodes displays all the nodes found in the
cluster; from this list you should only select cluster nodes configured to
host this cluster group server.
- Do not select nodes that already have multiple instances installed. For
more information, see
Multi Instancing.
When you have completed
your selections, click Next to continue.
|
 |
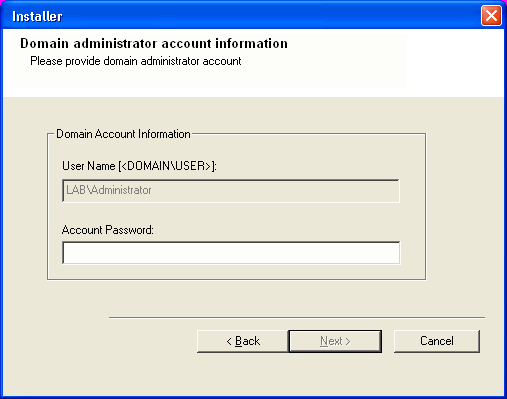
| 24. |
Type the User Name and Password for the Domain Administrator
account, so that the installer can perform the remote install/upgrade of the cluster
nodes you selected in the previous step.
Click Next to continue.
|
 |
| 25. |
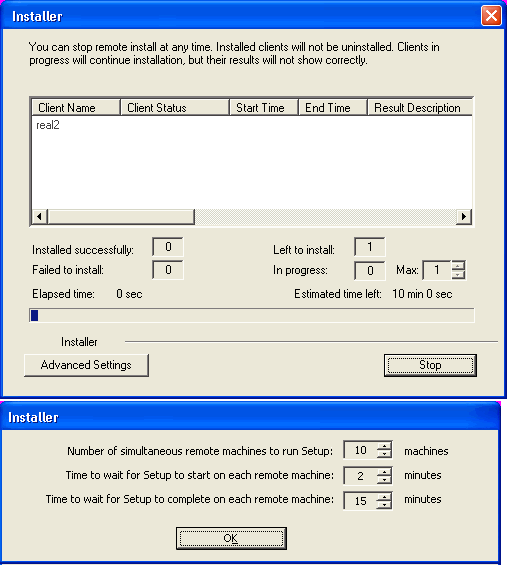
The progress of the remote install for the cluster nodes is displayed; the
install can be
interrupted if necessary.
Click Stop to prevent installation to any nodes after the current ones
complete.
Click Advanced Settings to specify any of the following:
- Maximum number of nodes on which Setup can run simultaneously.
- Time allocated for Setup to begin executing on each node, after which the
install attempt will fail.
- Time allocated for Setup to complete on each node, after which the install
attempt will fail.
NOTES
- If, during the remote install of a cluster node, setup fails to complete or is interrupted, you
must perform a local install on that node. When
you do, the install begins from where it left off, or from the beginning
if necessary. For procedures, see
Manually Installing
the Software on a Passive Node.
|
 |
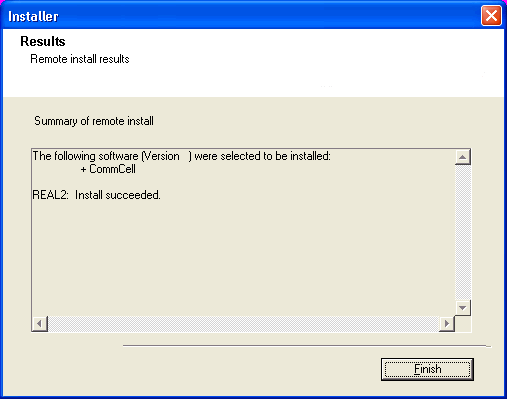
| 26. |
Read the summary for remote installation to verify that all selected nodes were installed
successfully.
NOTES
- If any node installation fails, you must manually install the software on that node once the
current installation is complete. (See
Manually Installing the
Software on a Passive Node for step-by-step instructions.)
- The message displayed on
your screen will reflect the status of the selected nodes, and may look different
from the example.
Click Next to continue.
|
 |
|
|
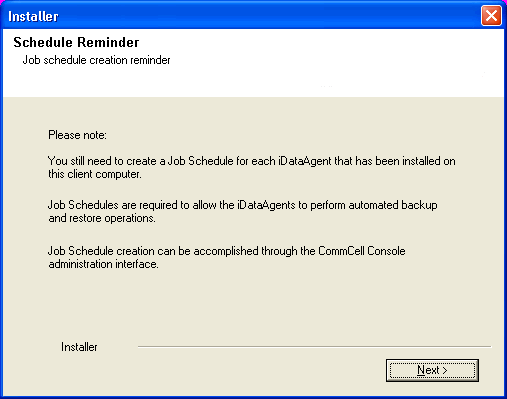
| 27. |
Click Next to continue.
NOTES
- Schedules help ensure that the data protection operations for the
Agent are automatically performed on a regular basis without user intervention.
For more information, see Scheduling.
|
 |
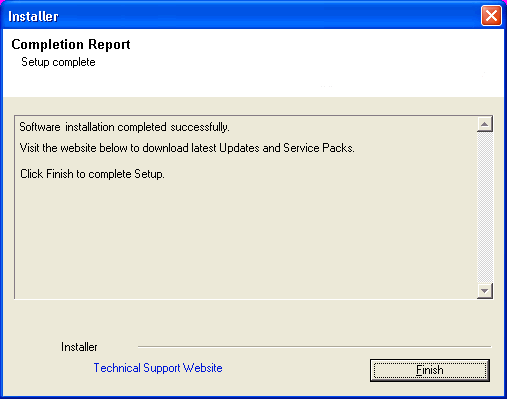
| 28. |
Setup displays the successfully installed components.
NOTES
- The Setup Complete message displayed on
your screen will reflect the components you installed, and may look different
from the example shown.
- If you install an Agent with the CommCell Console open, you need to
refresh the CommCell Console (F5) to see the new Agents.
- If Reboot Now button is displayed make sure to reboot the
computer before performing any other operations from the computer.
Click Finish to close the install program.
The installation is now complete.
|
 |
|
|
General
-
Review Install Considerations
after installing the software.
-
Install post-release updates or Service Packs that may have been released
after the release of the software. When you are installing a Service Pack,
ensure that it is the same version as the one installed in the CommServe Server.
Alternatively, you can enable
Automatic Updates for quick and easy installation
of updates in the CommCell component.
|