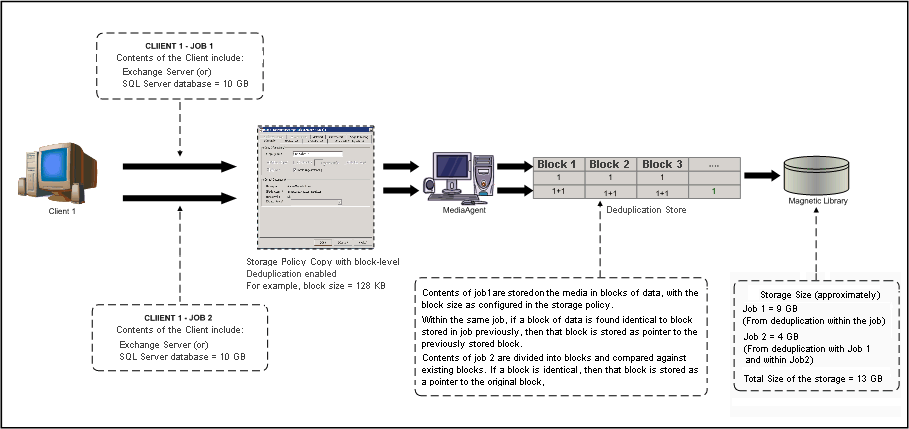
Deduplication provides a smart and efficient method to store
data by identifying and eliminating the duplicate items in backups. When
data is backed up for the first time, all the data is stored physically.
If the same data is subsequently identified in another backup operation,
then it is stored as a pointer to the previously stored copy.
Deduplication
is performed at the data block level by comparing blocks of data against
each other. Block level deduplication allows you to deduplicate data within
a given object. If an object (file, database, etc.) contains blocks of data
that are identical to each other, then deduplication eliminates storing
the redundant data and reduces the size of objects in storage.
Consider a backup containing data from Exchange Server or SQL Server
database. Deduplication will divide the data into individual data blocks
and then compare the different blocks against each other. If a data block
is unique, then the block is stored on the media. If a data block is found
to be identical to an existing block, then it is stored as a pointer to
that block.
Identical data blocks within an object, as well as from objects within
the same storage policy copy are deduplicated.
The diagram on the right illustrates the deduplication process.
The numbers in the diagram are meant for illustrative
purposes. Additional space requirements (overheads) for storing
metadata like File Access Control Lists will apply during actual
deduplication enabled operations.
Deduplication uses a hashing algorithm to compare data. A Signature Generation
module computes the hashed signature for each block and then compares it with the
existing signatures maintained in a Deduplication Store to determine whether it
is identical. Based on the comparison, the MediaAgent performs one of the following
operations:
If the signature is unique, the data is stored and an entry added to the
Deduplication Store for subsequent comparisons.
If the signature is identical to an existing signature, additional entries
are created in the Deduplication Store with pointers to the existing storage.
The deduplicated data are stored in specially designed container files to increase
the system throughput and scalability.
Deduplication is easy-to-use and does not require additional configurations once
it is setup. The following table describes the various operations when deduplication
is enabled.
Operation
Description
Backup Operations
The sequence of operations is almost similar to a regular
backup job when deduplication is enabled.
When a backup job is initiated the backup module secures the data and
starts the data transfer module to the MediaAgent. The following sequence
of events occur when data is secured:
If data compression is enabled on the client, data is first compressed.
Then, the signature generation module computes the signatures, if
it is enabled on the client.
Finally data is encrypted if client encryption is enabled.
Restore Operations
Data Recovery operations are identical to regular restore
operations and are virtually unaffected by deduplication.
Deduplication store is not contacted for normal restore operations, except
when the data is not available in the disk.
All types of restore operations (including Restore by Jobs and Restoring
from copies) are supported.
Auxiliary Copy
Auxiliary Copy operations will automatically unravel
or explode the deduplicated data, if deduplication is not enabled in the
copy.
If the secondary copy is set up for Deduplication, then a separate
Deduplication Store gets created for the copy and the associated data is
deduplicated for secondary copy.
Data Aging Operations
Data Aging operations will automatically look up the
Deduplication Store before data is deleted from the disk.
Data Aging will only delete the source data when all the references to
a given block is pruned.
So if you see older chunks in disk libraries remaining on the volume
even if the original data is deleted, it might be due to the fact that valid
deduplication reference(s) to the chunk exists within the data.
Data Encryption and Data Compression
When Data Encryption and/or Data Compression are enabled
the system automatically runs the signature module after data compression
and before data encryption. If the setup contradicts this order, the system
will automatically perform compression, signature generation and encryption
in the source client computer.
When you have a primary copy that is encrypted
(and is not deduplicated), enabling deduplication on a secondary
copy will not accomplish any viable deduplication on the secondary
copy. This is because each backup includes unique encryption keys
which in turn will cause unique signatures for each backup.
Deduplication does not support pass phrase protected
data encryption.
Data Multiplexing
Data Multiplexing is not supported with Deduplication.
Also a storage policy copy enabled for Deduplication cannot have a
direct or indirect source copy enabled for Data Multiplexing.
However
an Auxiliary Copy can be configured with Data Multiplexing when the source
copy is enabled for Deduplication.
Spool Copy
Deduplication-enabled Storage Policy Copies cannot be
configured as Spool Copies. Note that existing deduplicated Spool Copies
will continue to exist until the Spool Copy retention setting is removed;
once removed, the deduplicated copy cannot be configured as a Spool Copy.
Deduplication Jobs on Migrated CommCell
After CommCell Migration, the Deduplication Store operates
in the read-only mode in the destination CommCell.
The migrated (deduplication enabled) storage policies in the destination
CommCell can be used to restore the deduplicated data migrated from the
source CommCell and to perform Auxiliary Copy operation with the migrated
data as the source.
Migrated Storage Policies in the destination CommCell cannot be used
to deduplicate new backup operations.
The Deduplication store (or the Deduplication Database) serves as the repository
for signatures associated with all blocks that are backed up. It also has the reference
counts to copies of the blocks that are backed up using the storage policy copy.
Deduplication stores are maintained for each Storage Policy Copy that has the
deduplication option enabled. Multiple MediaAgents can be a part of the same copy
and use the same Deduplication Store provided the libraries accessed by the MediaAgents
are configured as static shared libraries and accessible from all the MediaAgents.
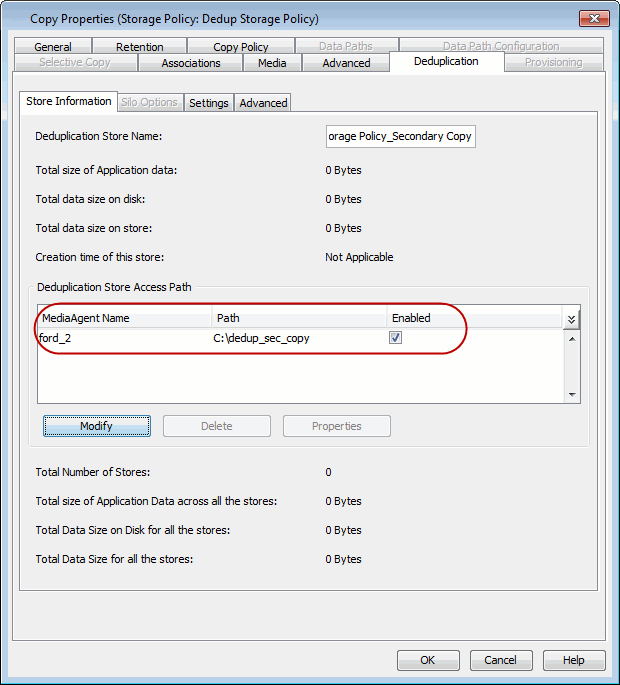
The Deduplication Store is configured when creating a storage policy copy, both
for primary and secondary storage policy copies. Any MediaAgent can be associated
in the Deduplication Store.
The MediaAgent associated with data store could be any one of the MediaAgents
in the data paths, or outside of the data path too. You can also change the MediaAgent
hosting the Deduplication Store.
Deduplication store can be located on any of the following platforms:
Windows
All platforms supported by Windows MediaAgents, except
64-bit editions on Intel Itanium (IA64) and Windows XP.
Supported on NTFS.
Linux
All platforms supported by Linux MediaAgents, except
Power PC (Includes IBM System p).
Supported
on ext3 and ext4.
Microsoft Cluster Service (MSCS)
Clusters supported by Windows MediaAgents.
Supported
on NTFS.
Linux Cluster
Clusters supported by Linux MediaAgents.
Supported
on ext3 and ext4.
Never delete the Deduplication Store manually. The
Deduplication Store facilitates the deduplication of backup jobs and data
aging jobs. If deleted, new deduplicated backup jobs cannot be performed
and the existing data in the disk mount paths will never be pruned.
To ensure optimal performance for deduplication operations, the disk hosting
the Deduplication Store must satisfy the following specifications. Note that these
specifications are only for the disk hosting the Deduplication Store, and not for
the entire mount path.
The Deduplication Store must be located on a fast access local disk with
high throughput and superior disk protection.
Ensure that the average read
throughput of the disk is around 500 GB per hour, and the average write throughput
of the disk is around 400GB per hour.
Calculate the average read and write throughputs from multiple samples (between
three and ten), for a FILECOUNT of 500.
The following section provides information on how to evaluate the disk in
which you plan to create
the Deduplication Store. This will help you to determine the size of the data
and store that can be hosted on the disk.
You can also use the user-interface version of this tool. See
SIDB Simulator for
more details and usage.
Running the Tool
Run the following file from the MediaAgent computer hosting
the Deduplication Store.
-simulateddb is the keyword to simulate
the deduplication database to evaluate the disk compatibility for hosting
the deduplication store.
-p is the location (an empty directory)
where the deduplication store will be located.
-in is the instance of the software using
the tool.
-datasize is the application data size
in GB. Number.
-dratio is the expected deduplicaiton
ratio. Number (default value is 5.)
-blocksize is the deduplication data
block size in KB. Number (default is 128.)
-tlimit is the value in microsecond.
Number (default value is 1000.) -tlimit
and -datasize arguments cannot be used together.
-samplesize is the size of the sample.
Number (default values is 10000.)
-diskperf and
-tpath. Diskperf is the keyword to measure
disk performance and tpath is the path of the disk. If you use
-diskperf, -tpath
is mandatory.
-keepddb is the option to keep the deduplication
database files. The files are removed by default.
-stopCounter signifies how many additional iterations to process after
reaching the threshold time. This is to limit spikes caused by caching.
(default value is 50.)
Example 1
For the details on the projected average transaction
time for an insert/query in the deduplication database based on the size
of the application data that is backed up, use the tool with the
-simulateddb and
-datasize options.
The disk is capable of hosting a deduplication
DB for:
0.500 TB of Application Data Size
0.100 TB of data on disk
146.0 microseconds average Q&I overhead perblock
Throughput for DDb server 3156 GB per Hour
Example 2
For recommendations on the maximum application data size
that can be backed up using the store based on the average access time for
each record, use the tool with the -simulateddb.
This will run till it reaches the default threshold time limit of 1000
microseconds.
-READWRITE is the option to measure
read/write performance.
-PATH is the deduplication store mount path to be tested for
performance.
-RANDOM is the keyword to measure random
read/write operations (Optional). By default, sequential read/write operations
are measured.
-FILECOUNT is the number of files used
in the read and write operations (Optional). Default value is 1024.
-USER, -PASSWORD, and -DOMAIN are options
to provide specific user credentials to impersonate access to the path provided
in the �PATH option (Optional). By default,
the application user-credential will be used. If domain name is not provided,
then the default domain will be used.
-OUTFILE is the location of the output file to store the disk
performance results (Optional). Default value is '.\CvDiskPerf.txt'
The details of the disk performance are stored in the output file provided
in the -OUTFILE option. The contents of a sample
output file are given below:
DiskPerf Version
: 1.3
Path Used
: f:\
Read-Write type : RANDOM
Block Size
: 128
Block Count
: 1024
File Count
: 500
Total Bytes Written : 1048576000
Time Taken to Write(S) : 7.113515
Throughput Write(GB/H) : 494.217709
Total Bytes Read : 1048576000
Time Taken to Read(S) : 7.581667
Throughput Read(GB/H) : 463.700792
Time Taken to Create(S) : 1.16
Throughput Create(GB/H) : 325.04
Ensure that the average read
throughput of the disk is around 500 GB per hour, and the average write
throughput of the disk is around 400GB per hour.
Calculate the average read
and write throughputs from multiple samples (between three and ten), for a FILECOUNT of 500.
The following table provides a sample of the disk performance calculation:
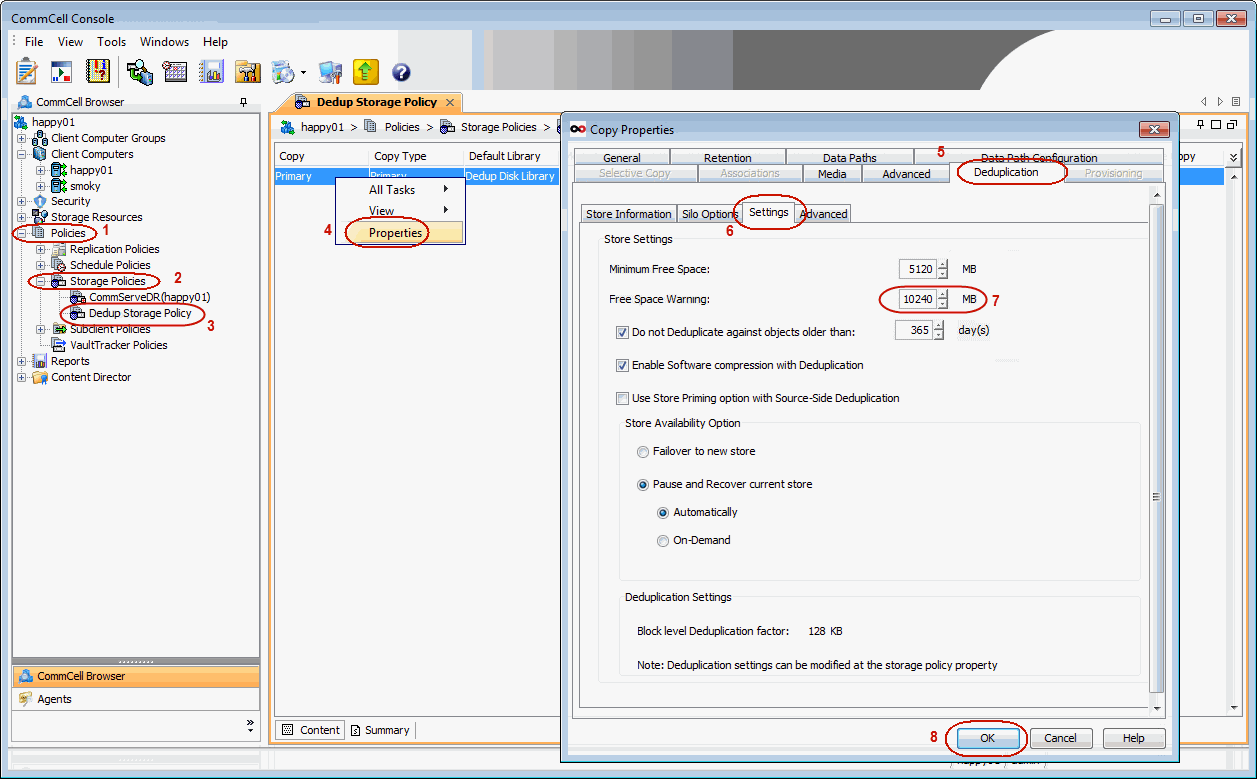
The minimum free space that must be available at all times in the volume in which
the Deduplication Store is configured. By default, if the free space is less than
2GB on the volume hosting the Deduplication Store, jobs will not continue.
Use the following steps to set the minimum free space.
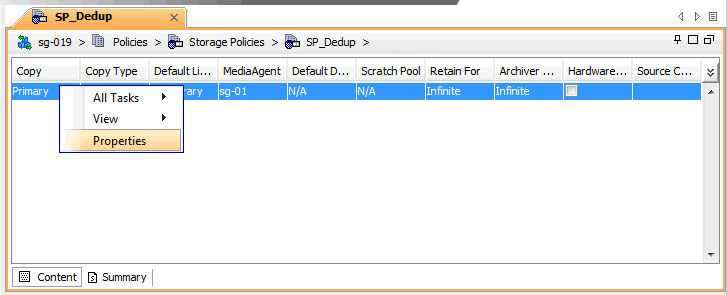
From the CommCell Browser, navigate to Policies | Storage
Policies | <Storage_Policy>.
Right-click the primary storage policy copy displayed in the right
pane and click Properties.
Click the Deduplication tab, and then click the Settings
tab.
In the Minimum Free Space box, type or select the amount
of free space you want to change.
If the amount of free space falls below the specified amount in the volume in
which the Deduplication Store is stored, the MediaAgent generates an event message
and generates the MediaAgents (Disk Space Low) alert, if configured.
Use the following steps to set the minimum free space to generate the alert:
From the CommCell Browser, navigate to Policies | Storage
Policies | <Storage_Policy>.
Right-click the primary storage policy copy displayed in the right
pane and click Properties.
Click the Deduplication tab, and then click the Settings
tab.
In the Free Space Warning box, type or select the amount
of free space you want to change to generate alert.
You can set the number of days after which a block cannot be used for new deduplication.
Setting this value will ensure that very old blocks are not allowed as the 'origin'
data for newer backup jobs that are deduplicated.
Use the following steps to set the number of days after which a block cannot
be used for deduplication:
From the CommCell Browser, navigate to Policies | Storage
Policies | <Storage_Policy>.
Right-click the primary storage policy copy displayed in the right
pane and click Properties.
Click the Deduplication tab, and then click the Settings
tab.
In the Do not Deduplicate against objects older than box,
type or select the number of days you want to change for deduplication
reference.
If you do not specify the value, the default value is set
to infinite.
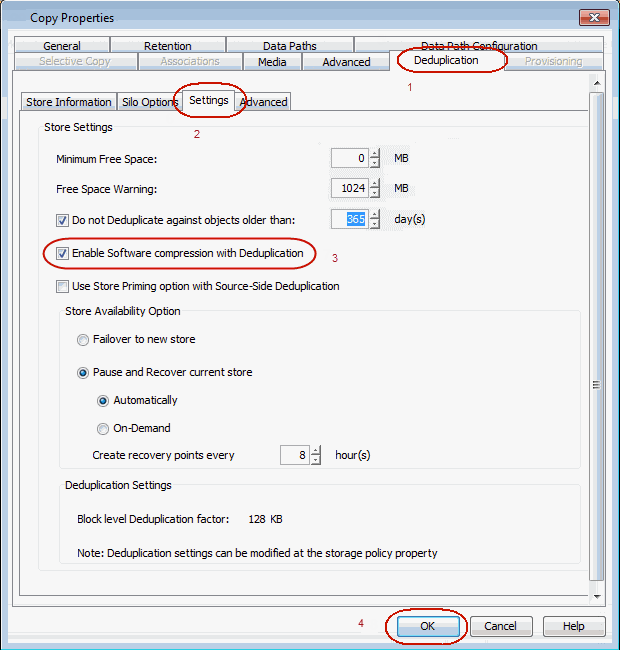
By default when deduplication storage policy is configured, compression is automatically
enabled for the storage policy copy. This setting overrides the subclient compression
settings by enabling Use Storage Policy Settings option at subclient level.
For most of the data types the compression is recommended. This process works by
compressing the blocks and then generating a signature hash on the compressed block.
Use the following steps to enable data compression for all subclients to storage
policy:
From the CommCell Browser, navigate to Policies | Storage
Policies | <Storage_Policy>.
Right-click the primary storage policy copy displayed in the right
pane and click Properties.
Click the Deduplication tab, and then click the Settings
tab.
Select the Enable Software Compression with Deduplication
box.
This options is enabled by default. It is recommended to have
data compression enabled when using deduplication.
When this option is enabled the Use
Storage Policy Settings option is enabled by default on
the corresponding subclients.
By default, all associated subclients uses the compression settings set on the
deduplication storage policy copy. To modify or turn off the compression settings
on the subclients, use the following steps:
From the CommCell Browser, navigate to Client Computers |
<Client_Computer> | File System | defaultBackupSet.
Right-click the <Subclient> to which the deduplication
storage policy is associated and then click Properties.
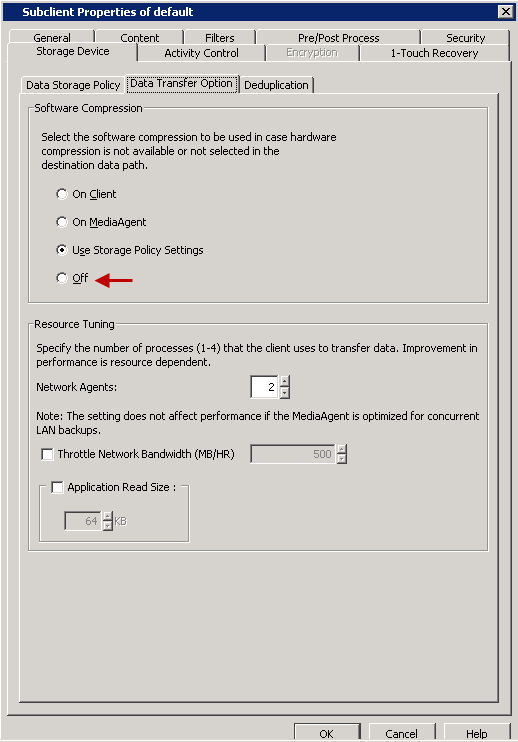
Click the Storage Device tab, and then click the Data
Transfer Option tab.
In the Software Compression area, Using Storage Policy
Settings option is selected by default.
Select On Client option to perform compression on client.
Select On MediaAgent option to perform compression on
MediaAgent.
Select the Off option to turn off the compression.
Make sure that there are no SIDB.exe and SIDB2.exe process are running on the
MediaAgent from which the SIDB currently resides. Use the following steps to confirm
that no process are running:
For Windows:
Click the Start button on the Windows task bar and then click
All Programs.
Navigate to bull | Calypso
and click Service Control Manager.
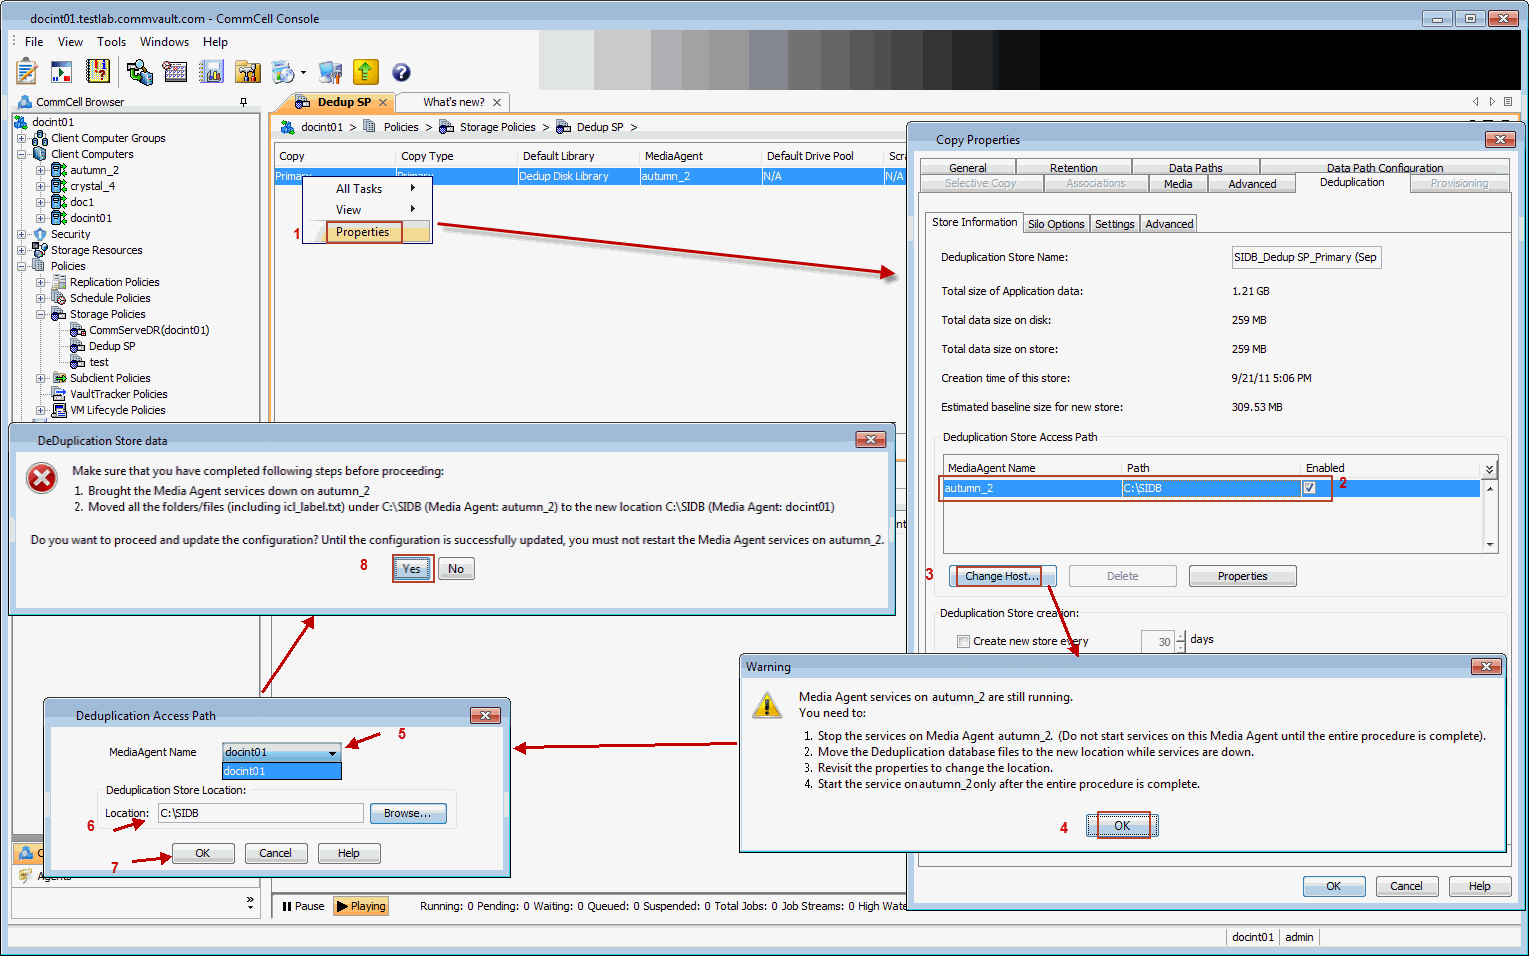
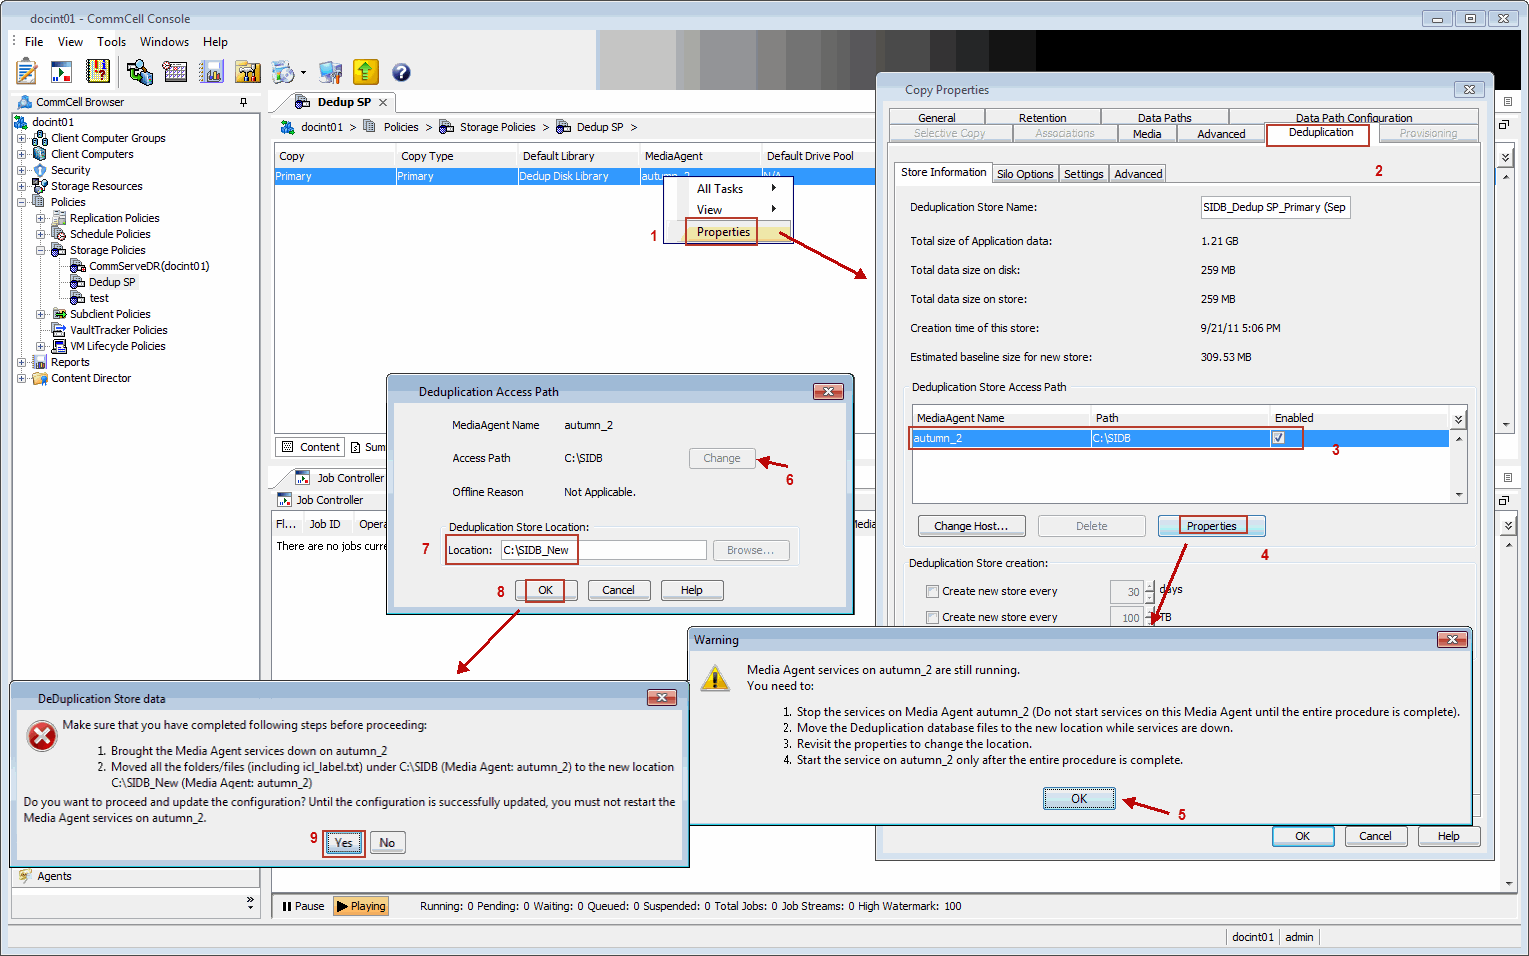
You need to manually copy the content available in the current Deduplication
Store to the new mediaagent which you want to host the Deduplication Store. Use
the following steps to copy the content available in the current Deduplication Store:
You cannot copy the deduplication database (SIDB) from
Windows to Linux or from Linux to Windows location.
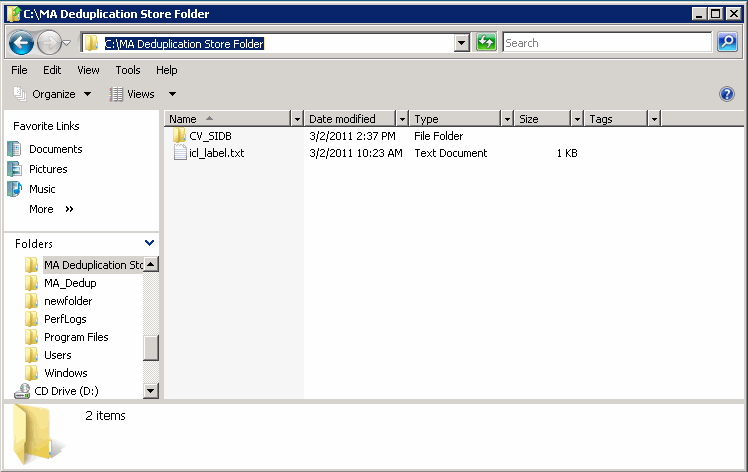
Login to the MediaAgent hosting the current Deduplication Store.
Navigate to the location where Deduplication database is available.
Copy the following available content on to a shared drive:
SIDB
icl_label.txt files
Login to the new MediaAgent that will be hosting a Deduplication
Store.
From the share drive, copy the files into desired folder that will
host the Deduplication Store.
Make sure to note down the directory
it is copied on.
Verify the size of the directory is in fact the same to ensure all
data was copied.
From the Deduplication Storage Access Path dialog box, perform
the following:
Select <MediaAgent> from MediaAgent Name drop-down
list.
In the Deduplication Store Location, type the name of
the folder to which the deduplication or click Browse
button to select the folder in which the deduplication database
must be located.
The store information is displayed in the Deduplication Store
Access Path area.
If your old MediaAgent is in use hosting deduplication store for other storage
policies and libraries or for backup, use the following steps to start the services.
For Windows:
Click the Start button on the Windows task bar and then click
All Programs.
Navigate to bull | Calypso
and click Service Control Manager.
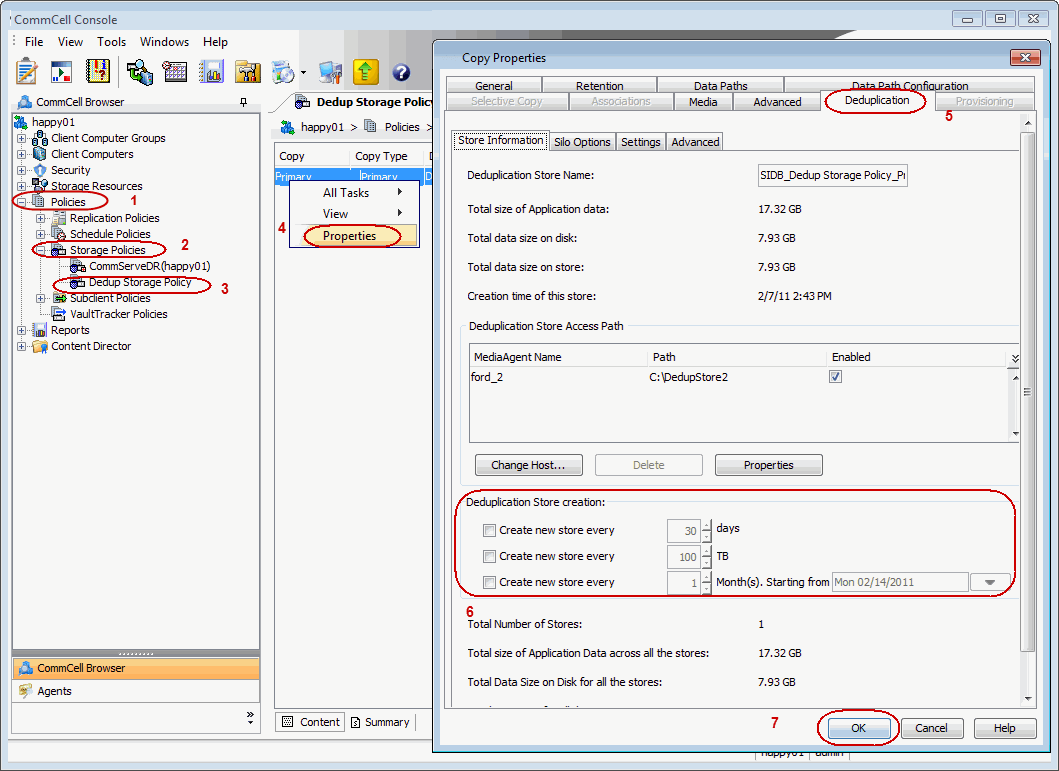
By default, a new Deduplication Store is created for every 100 TB of data. Note
that this is the amount of data stored on the media after deduplication.
Use the following steps to create new Deduplication Store:
From the CommCell Browser, navigate to Policies | Storage
Policies | <Storage_Policy>.
Right-click the primary storage policy copy displayed in the right
pane and click Properties.
Click the Deduplication tab.
In the Deduplication Store Creation, select one of the following:
Select Create new store every - days and specify
the number of days after which a new Deduplication Store must be
created.
Select Create new store every - TB and specify the size
of the store, reaching which a new Deduplication Store must be created.
If above both options are set, a new
Deduplication Store will be created if either one of the
two conditions is satisfied.
Select Create new store every - Month(s). Starting from...
and specify the month and start date for a new Deduplication Store
creation.
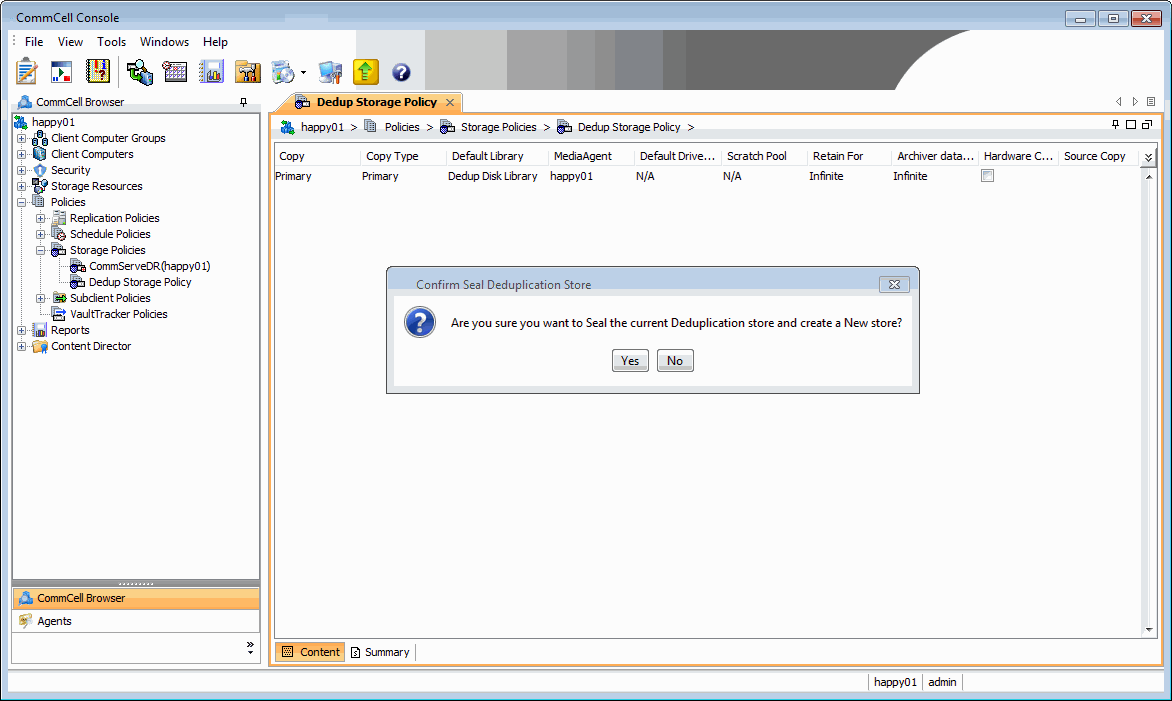
The currently active Deduplication Store can be sealed on-demand.
When a Deduplication Store is sealed:
No new data is deduplicated in the store.
The current Deduplication Store is closed.
A new store is automatically created, and deduplication on new backup jobs
is recorded in the new store.
The option to Seal Deduplication Stores is useful in rare cases when there are
hardware issues or disk malfunction. Creating a new store will prevent new data from
referencing any of the old data in the malfunctioned disks.
Use the following steps to seal the Deduplication Store:
From the CommCell Browser, navigate to Policies | Storage
Policies | <Storage_Policy>.
Right-click the primary storage policy copy displayed in the right
pane, point to All Tasks and then click Seal Deduplication
Store.
Click Yes on the Confirm Seal Deduplication Store
dialog.
Use the following method to backup the deduplication database so that it can
be reconstructed in the unlikely event of an offline deduplication database. If this method
is not used, the system will automatically use the automatic recovery process as
described in Setting Up Automatic Recovery to reconstruct
the database.
This is the recommended method of protecting the deduplication database. If there
are multiple deduplication databases on the MediaAgent, this method automatically
backs up all the deduplication databases.
This method performs a FULL backup of the deduplication database and the backup
data is sent to the appropriate backup media based on the storage policy selected
for the Deduplication Database subclient.
If you have deduplication database hosted on Linux
Intel Itanium (IA64) machine, deduplication database backups using DDB subclient
is not supported. To backup deduplication databases, use automatic recovery
process described in Setting Up Automatic Recovery.
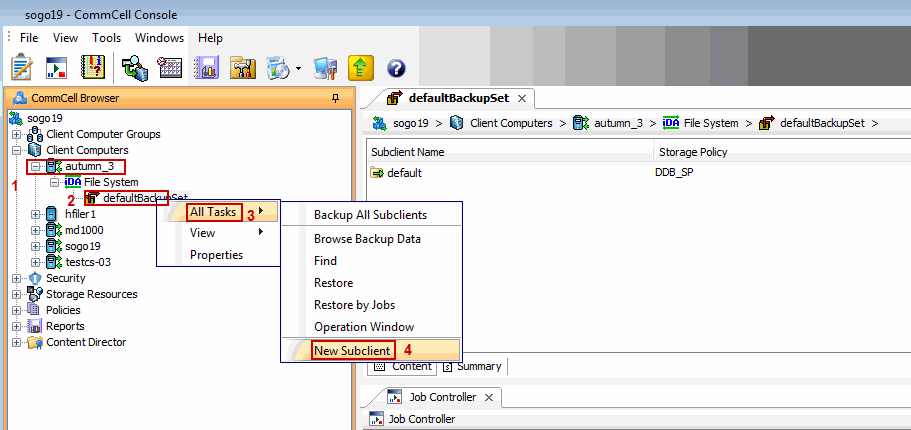
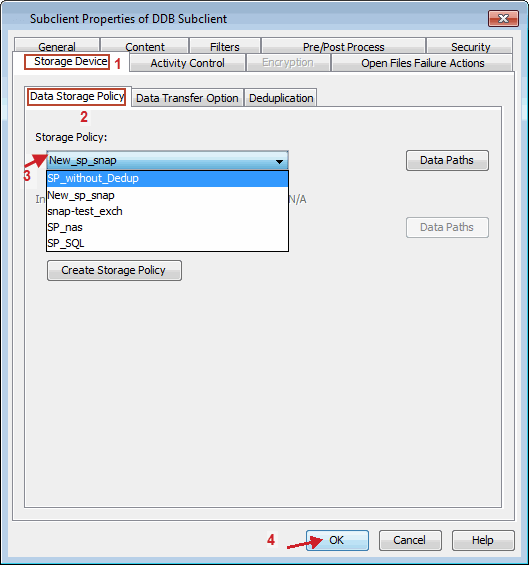
Use the following steps to create DDB subclient, assign storage policy to the
subclient and then schedule the DDB backup.
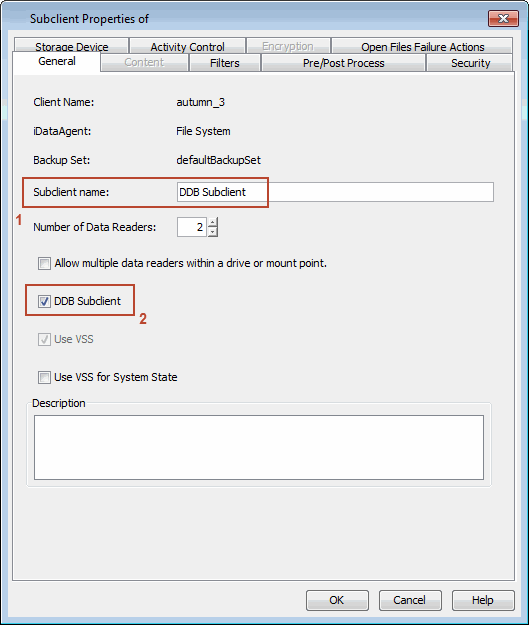
1.
File System iDataAgent
must be installed on the MediaAgent hosting the deduplication store.
You
can install the File System iDataAgent
as a Restore Only Agent without consuming any license.
To do so, make sure to select Install Agents for Restore Only
check box from the Select Platforms dialog box during File System
iDataAgent installation.
Note
that the other backup types such as incremental, differential etc.,
are not supported.
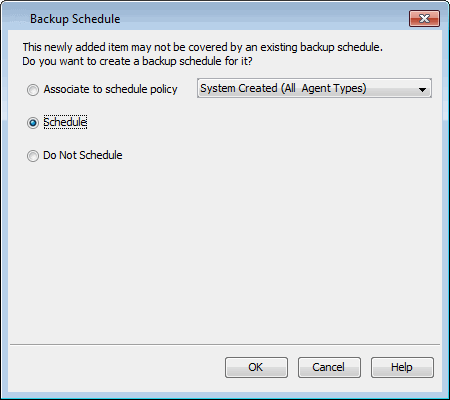
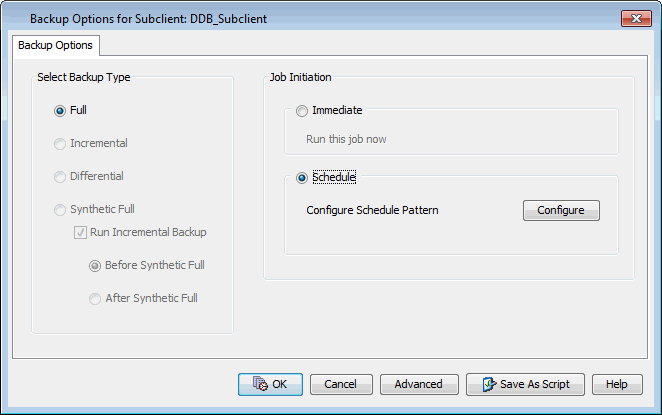
From Job Initiation, select the Schedule option and
then click Configure.
7.
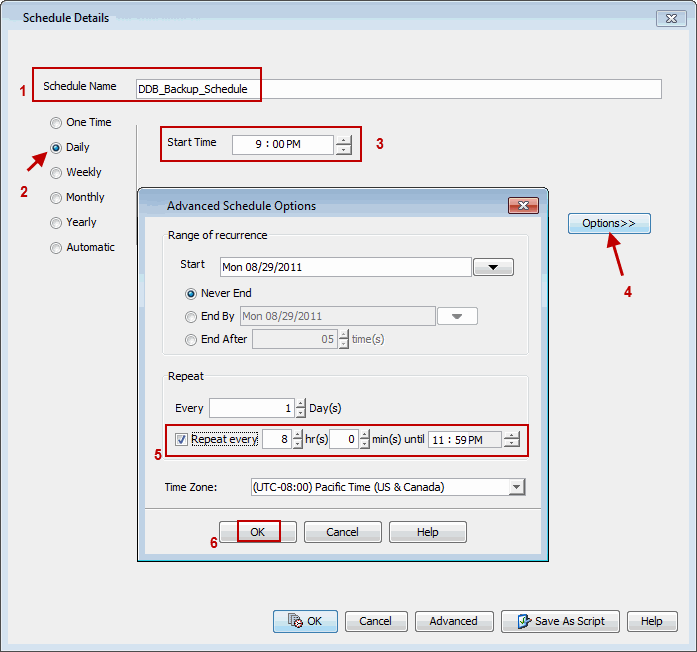
In the Schedule Name box, type a name of the schedule.
Select the appropriate scheduling options.
For example, use the
following steps to create a weekly schedule:
Type a name for the schedule in the Schedule Name box.
Select Daily.
Type the Start Time to start the schedule.
Click Options >> button.
From the Advanced Schedule Options dialog box, select
Repeat every check box.
The default value is set to 8 hours.
Click OK.
8.
Click OK.
The new Deduplicate Database Store subclient
will be displayed in the right-pane.
9.
When the schedule is run, the Job Controller window
will display the backup job as shown in the sample image.
During DDB backup job, if system detects reboot
of a DDB MediaAgent, then the DDB backup job will go into Pending
state. After reboot, the DDB backup job will restart from the beginning
by creating a new snapshot of the DDB to perform the backup.
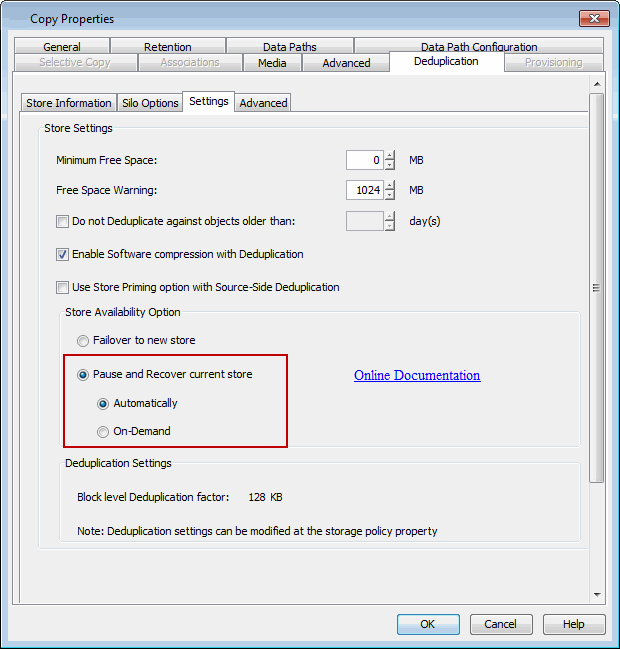
Use the following steps to set automatic recovery of a deduplication
database.
10.
From the CommCell Browser, navigate to Policies | Storage
Policies | <Storage_Policy> where the deduplication
store was created.
Right-click the primary storage policy copy displayed in the right
pane and click Properties.
11.
Click the Deduplication tab, and then click the Settings
tab.
Ensure that Pause and Recover current store and Automatically
options are selected.
If you had Failover to new store
selected, then make sure to
Seal the
Deduplication Database before selecting the Pause and
Recover current store to prevent data loss.
Click OK.
After DDB Subclient creation and first
successful backup of deduplication database store using DDB subclient,
Create recovery point every - Hour(s) box will not be available.
12.
When the system detects a offline deduplication database,
the Job Controller window will display the recover job as shown in
the sample image.
Additionally, you can configure alert for deduplication store backup jobs to
receive alerts when a deduplication store backup job fails and when there are no
deduplication backup jobs.
Use the following steps to configure alert for the deduplication database backup:
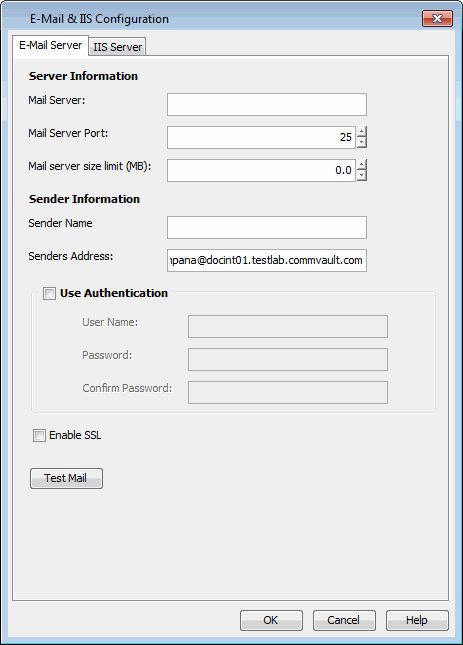
From the CommCell Browser, click Control Panel and then double-click
the Email and IIS Configuration.
In the Mail Server box, specify the mail server to be used
by alerts. The Mail Server must support SMTP messages.
In the Mail Server Port box, select the port number.
In the Mail Server Size limit, specify the size limit per
e-mail.
Click OK.
From the CommCell Browser, click Control Panel and then double-click
the Alerts.
From the Alert dialog box, click Add button.
In the Add Alert Wizard, specify the following:
In the Display Name box, specify the name for the alert.
In the Category list box, select Job Management.
In the Type list box, select Data Protection.
Click Next.
From the Entities Selection, navigate to <client_computer>
| File System and then select the <Deduplication_Backup_Subclient>
and then click Next.
If you have multiple deduplication
backup subclients on multiple MediaAgent(s), select the
<deduplication_backup_subclient> of each MediaAgent
and then click Next.
By default, Job Failed check box is selected which allows
you to receive alerts when deduplication backup job fails.
Select
No Data Protection check box to receive alerts when there
are no deduplication backup jobs.
Clear Delayed by 1 Hrs and Job Succeeded with Errors
check boxes and then click Next.
Select the way in which the alert is to be sent to its intended
recipient. Select the Select [Email/Pager] for notification
check box.
If you wish to customize the e-mail or pager notification,
click a token from the list and then click Add Token.
Select the CommCell users and/or CommCell user groups that will
receive the alert. Or,
Specify the e-mail address(es) of the recipient(s)
in the Email to Recipients box, these recipients can reside
within an external domain.
Click Next.
Verify the options you have selected for the alert in the
Summary and then click Finish.
The alert is now configured
and displayed in the Alerts dialog box.
When the system detects an offline deduplication database (DDB), the DDB
reconstruction job can be run to recover the DDB. During the deduplication database reconstruction job, the data in the DDB is validated
against the CommServe database to ensure that both the databases
are synchronized for successful recovery of the DDB. In addition, it allows you
to use the same DDB in the future.
The following sections explain the different methods of recovering the
deduplication database.
When a system detects a offline deduplication store, the 'recover job' will
automatically run to restore the deduplication store from the deduplication backup
which was backed up using DDB subclient.
Use the following steps to revert to the default settings if you have changed
the store recovery points.
From the CommCell Browser, navigate to Policies | Storage
Policies | <Storage_Policy>.
Right-click the primary storage policy copy displayed in the right
pane and click Properties.
Click the Deduplication tab, and then click the Settings
tab.
Click Pause and Recover current store.
Click Automatically.
If you had Failover to new store
selected, then make sure to
Seal the
Deduplication Database before selecting the Pause and
Recover current store to prevent data loss.
In the Create recovery points every - Hour(s) box, type or
change the frequency of Deduplication Store snapshots.
You will be able to use the deduplication
store snapshot frequency, if you have not already created a
DDB subclient for backing up deduplication database.
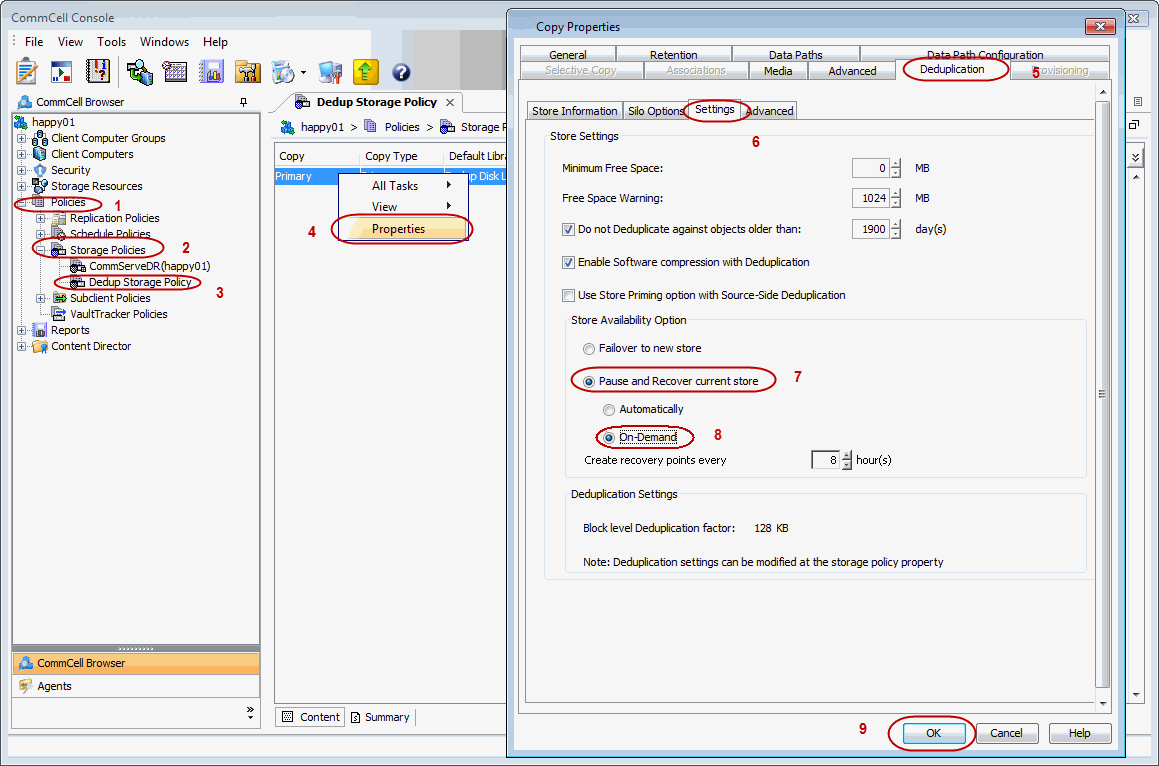
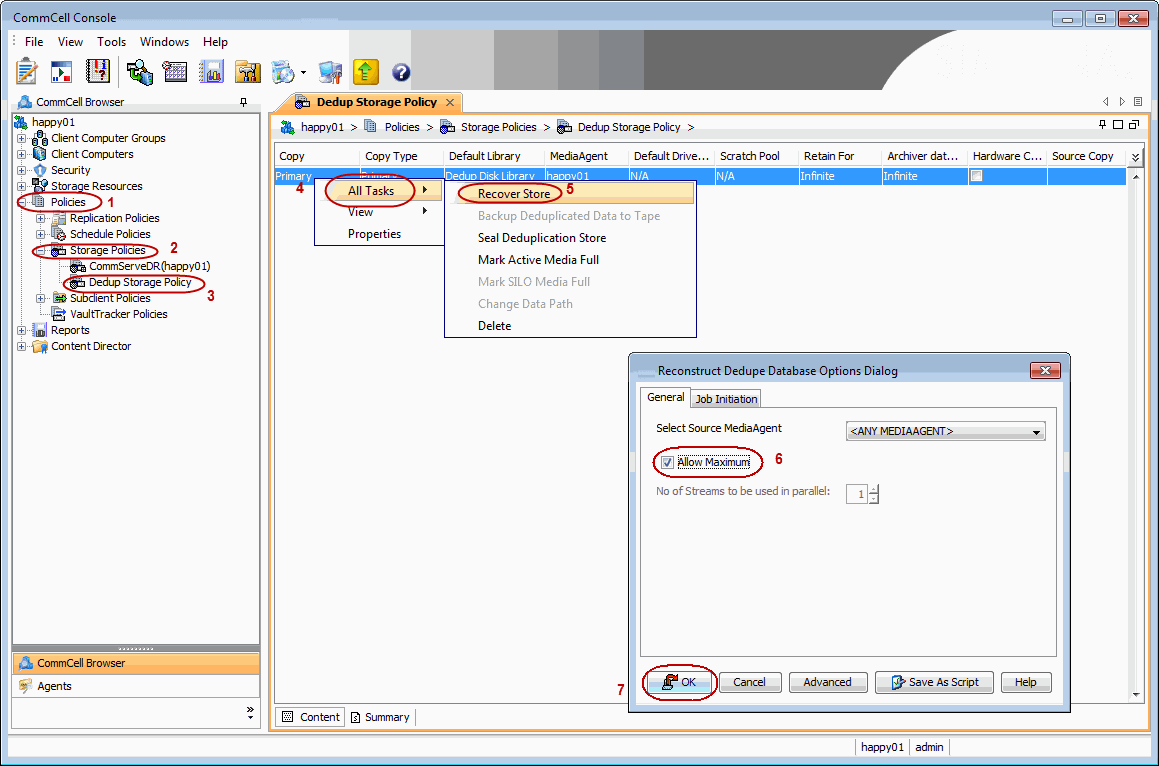
You can choose to recover from a offline deduplication store by manually reconstructing
the store. If a offline deduplication store is detected, all jobs on that copy are paused
until the store is manually reconstructed.
Use the following steps to configure and perform manual reconstruction:
From the CommCell Browser, navigate to Policies | Storage
Policies | <Storage_Policy>.
Right-click the primary storage policy copy displayed in the right
pane and click Properties.
Click the Deduplication tab, and then click the Settings
tab.
Click Pause and Recover current store and then click
On-Demand.
If you had Failover to new store
selected, then make sure to
Seal the
Deduplication Database before selecting the Pause and
Recover current store to prevent data loss.
In the Create recovery points every - Hour(s) box, type or
select the frequency of Deduplication Store snapshots.
You will be able to use the deduplication
store snapshot frequency, if you have not already created a
DDB subclient for backing up deduplication database.
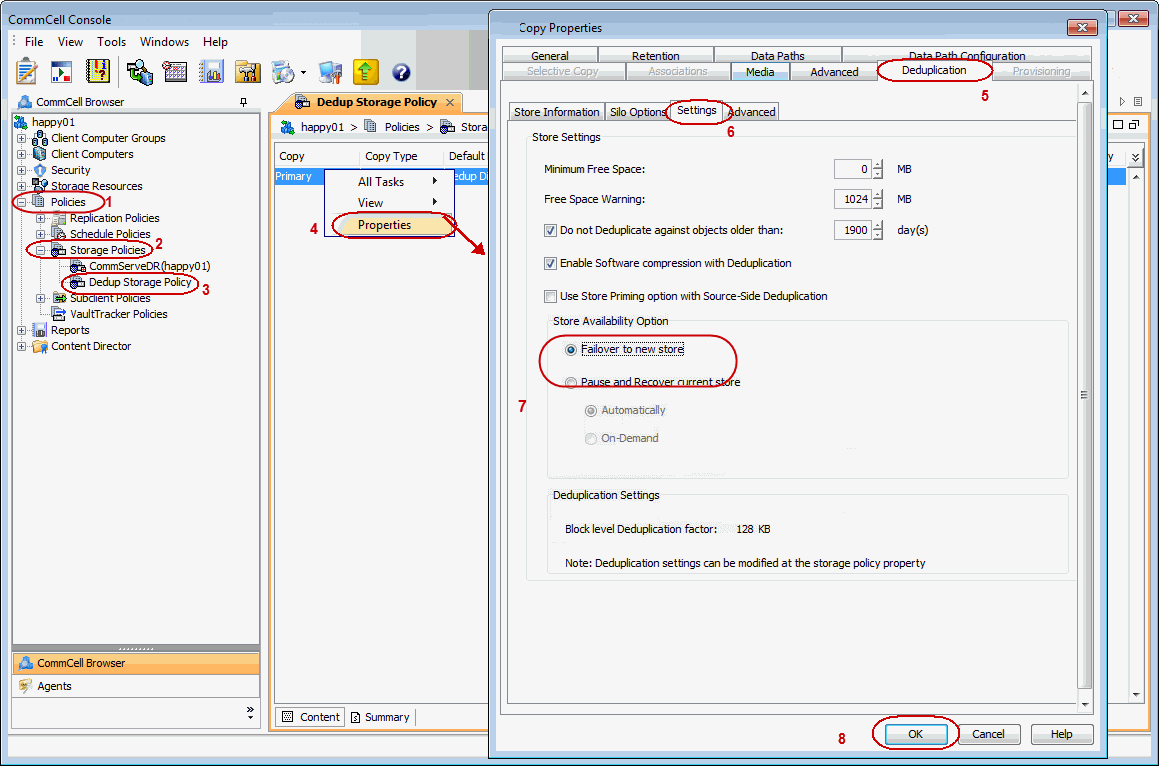
You can choose to automatically create a new Deduplication Store in the event
the active store becomes offline and deduplication database backup is not available.
When configured, if a offline store is detected then the store is
automatically sealed and a new store is created.
Use the following steps to automatically create a new Deduplication Store when
the store becomes offline and deduplication database backup is not available:
From the CommCell Browser, navigate to Policies | Storage
Policies | <Storage_Policy>.
Right-click the primary storage policy copy displayed in the right
pane and click Properties.
Click the Deduplication tab, and then click the Settings
tab.
By default, Failover to New Store option is selected.
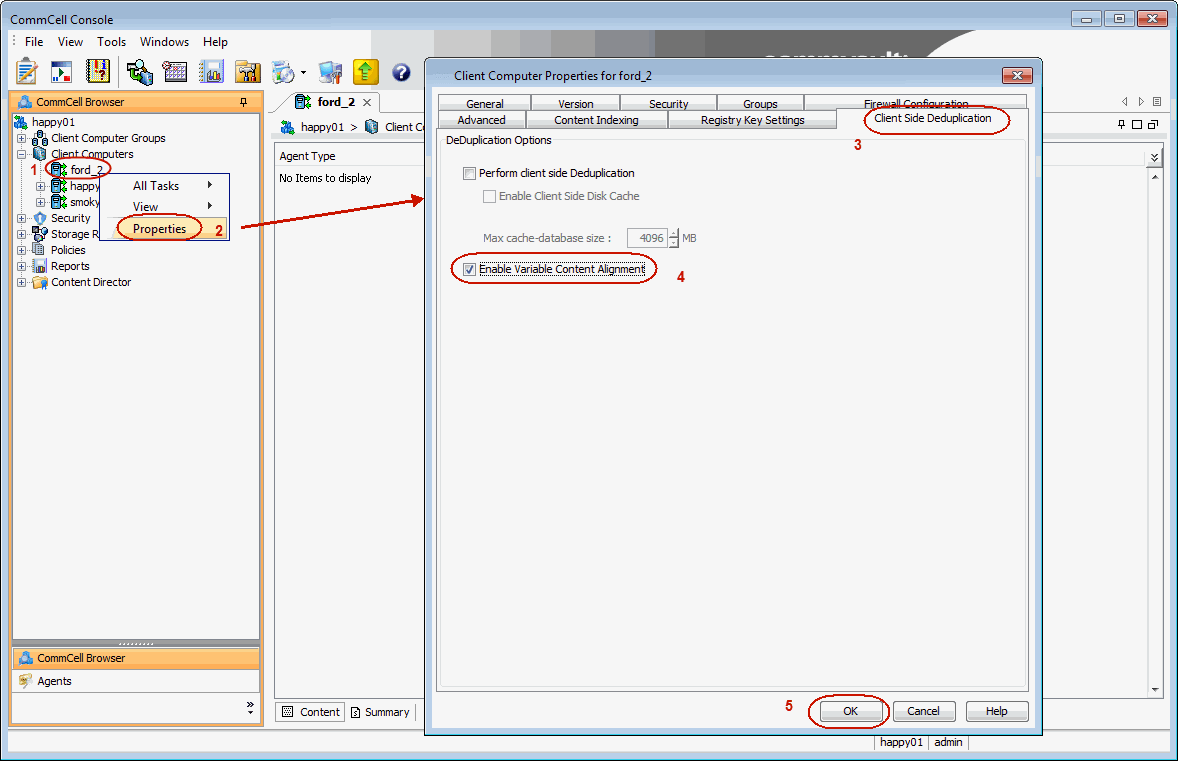
Variable content alignment is a content aware approach to deduplication that further
reduces the amount of data stored during a database agents backup. It accomplishes this
by aligning the segment boundaries of the backup data stream as minor changes to
the data in the stream that are made between incremental backups. Therefore, the effectiveness
of deduplication increases more with this feature on client systems that experience
small changes to the backup data.
Variable content alignment is performed on the
client system and consequently you may experience some performance overhead, especially
when used together with software compression. You can enable variable content alignment
as follows:
From the CommCell Browser, right-click the <Client>
you wish to enable variable content alignment and then click Properties.
Enabling this option will consume more
disk space. This happens because a fresh copy of the deduplicated data blocks with new signature
is created for that deduplication database. Hence, this new
signature will not match the existing signatures available
in the deduplication database and thus creates a new baseline
for the deduplication database.
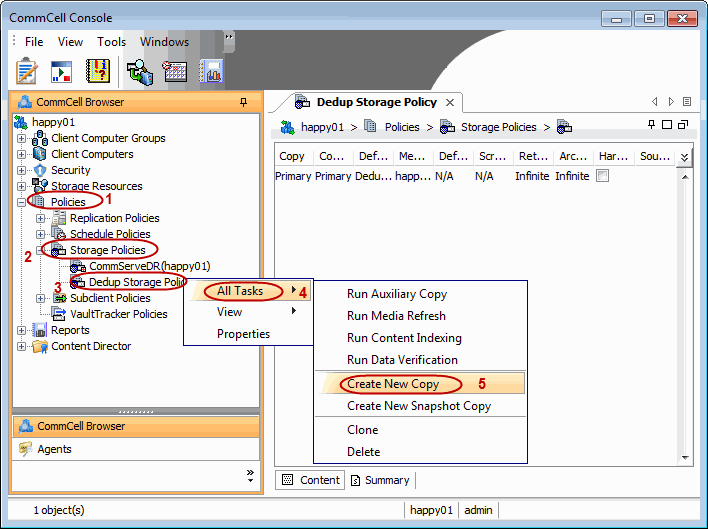
Deduplication can be enabled for secondary copies during Storage Policy Copy
creation. Once the copy is created, deduplication cannot be enabled later.
1.
From the CommCell Browser, navigate to Policies |
Storage Policies | <Storage_Policy>.
Right-click <storage_policy>, point to All
Tasks
and then click Create New Copy.
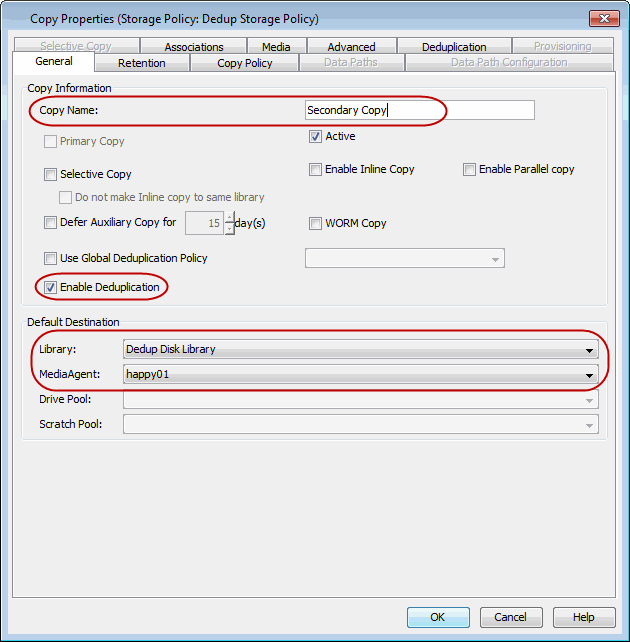
2.
Specify name in Copy Name.
From the Library list, click the name of a disk library.
From the MediaAgent list, click the name of a MediaAgent.
Select Enable Deduplication box. The Deduplication
tab is enabled.
Click Deduplication tab.
Deduplication can only be enabled for
storage policy copies associated with a disk library.
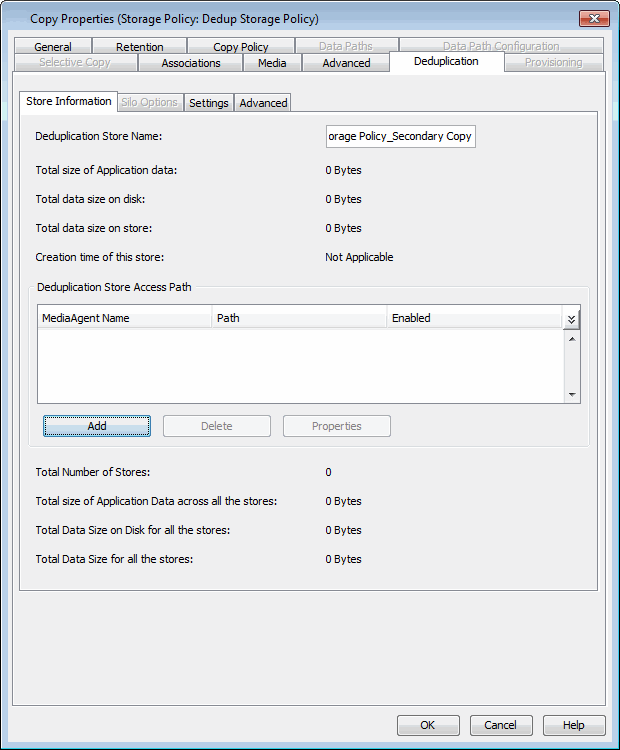
3.
The default name of the deduplication store is displayed in
Deduplication Store Name box.
In the Deduplication Store Access Path area, click
Add.
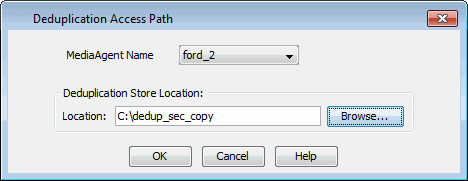
4.
From the MediaAgent list, click the name of a MediaAgent.
Type the name of the folder in which the deduplication database
must be located in the Deduplication Store Location or click
the Browse button to select the folder.
Click OK.
5.
The store information is displayed in the Deduplication Store
Access Path area.
Click OK.
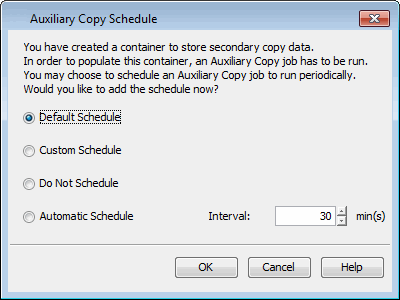
6.
Click OK to accept the default schedule.
7.
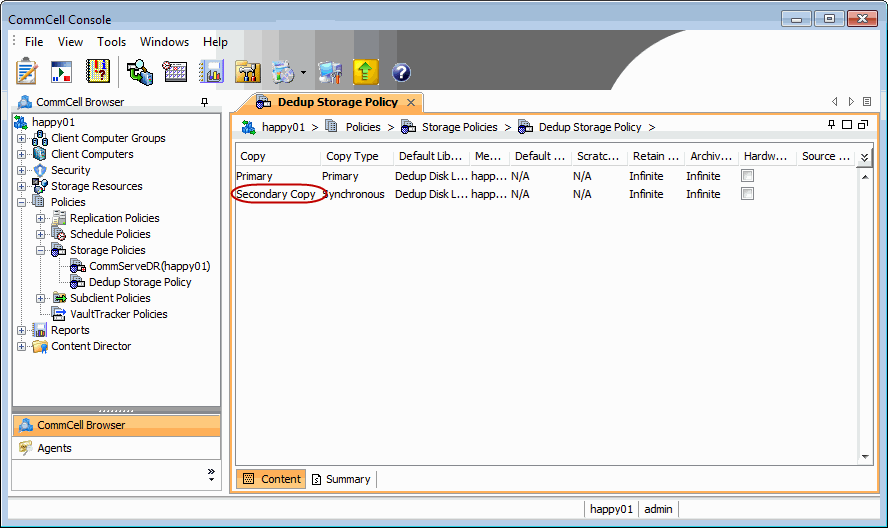
Secondary Copy is displayed in the Storage Policy
pane.
When the Primary Copy is deduplicated, you might want to create additional copies
for offline storage. Note that you could use the auxiliary copy feature for this.
But to create an Auxiliary Copy you would have to wait until the primary copy becomes
available. This could cause delays in getting the data offsite. The Inline Copy
feature allows you to create additional copies of data at the time of backups. Since
the Primary Copy is the source for the Inline Copy the Inline Copy can be created
along with the Primary Copy. However, note that the Inline Copy does not get deduplicated.
From the CommCell Browser, navigate to Policies | Storage
Policies | <Storage_Policy>.
Right-click <storage_policy>, point to All Tasks
and then click Create New Copy.
Specify name in the Copy Name.
From the Library list, click the name of a disk library.
From the MediaAgent list, click the name of a MediaAgent.
Note that the MediaAgent must be the same as the Primary Copy.
Select Enable Inline Copy box.
Click OK.
In the Auxiliary Copy Schedule, click OK to accept
the default schedule.
The Inline Copy created along with the Primary Copy will
be displayed in the right-pane.
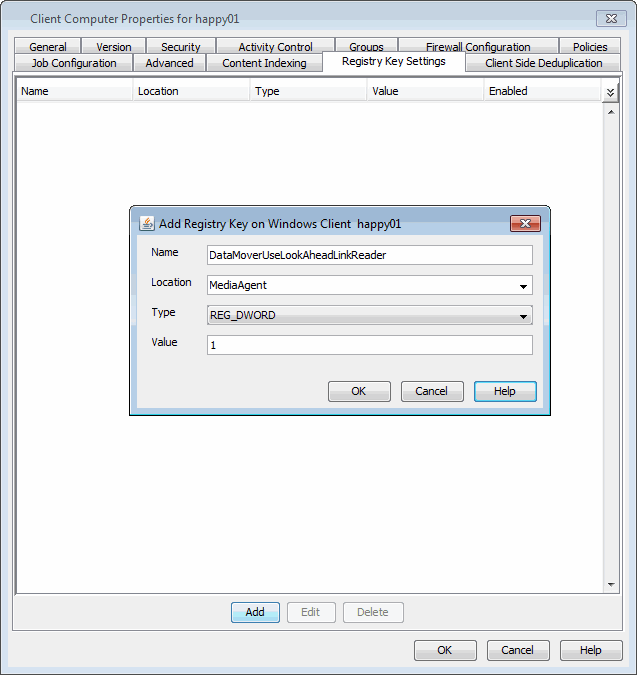
To reduce the time taken to read the data during restore and auxiliary copy operations,
deduplication-enabled operations can be performed using look-ahead reader. Use the
following steps to enable the look ahead reader, by creating
DataMoverUseLookAheadLinkReader registry key on the MediaAgent where the disk
library is created.
Look-Ahead Reader operation is not applicable for Cloud
Storage Library.
From the CommCell Browser, navigate to Client Computers.
Right-click the <Client> where the disk library attached
to the primary storage policy copy is created and then click Properties.
Click the Registry Key Settings tab.
Click Add.
In the Add Registry Key dialog box, enter the following:
In the Name box, type DataMoverUseLookAheadLinkReader
key.
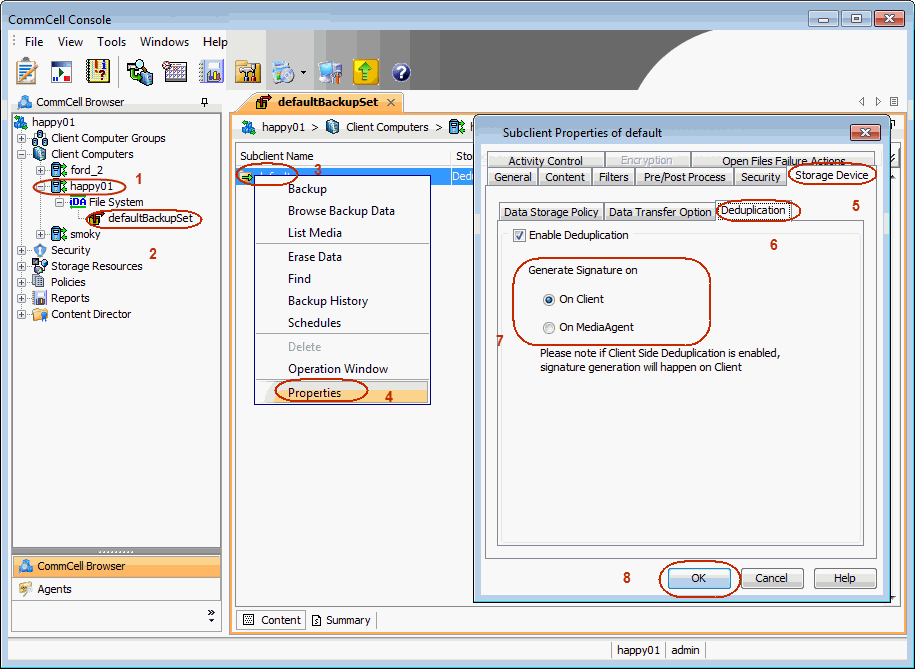
The signature generation module generates signatures for each block. This is
done using SHA 512 (Secure Hash Algorithm) along with the size of the data. This
combination eliminates the possibility of collisions, where two blocks hash to the
same value.
The signature generation module can be configured either on the Client or the
MediaAgent. Note that it is recommended to be run on the Client as it is both memory
and resource intensive. Follow the steps described below to configure the signature
generation:
Do not modify the properties of a subclient when a backup job associated
with the subclient is in progress.
From the CommCell Browser, navigate to Client Computers |
<Client> | File System | defaultBackupSet.
Right click the subclient for which you wish to enable (or disable)
deduplication and click Properties.
Click the Storage Device tab and then click the Deduplication
tab.
Select one of the following options for signature generation.
On Client option to enable the signature generation for
Deduplication on the client computer.
On MediaAgent option to enable the signature generation
for deduplication on the MediaAgent computer.
By default, signature generation is set On Client.
The signature generation is performed only
if the subclient is associated with a storage policy copy that
is deduplication enabled.
Data Aging operations will automatically look up the deduplication store
before data is deleted from the disk. Data Aging will only delete the source
data when all the references to a given block is aged. So if you
see older chunks in disk libraries remaining on the volume even if the original
data is deleted, it might be due to the fact that deduplication reference(s)
to the chunk is still valid.
If a deduplication store is offline, then that store will not be
aged until all data on the store is eligible for aging.
Do not manually delete the Deduplication Store. The Deduplication Store
facilitates the deduplication backup jobs and data aging jobs. If deleted,
new deduplicated backup jobs cannot be performed and the existing data in
the disk mount paths will never be aged.
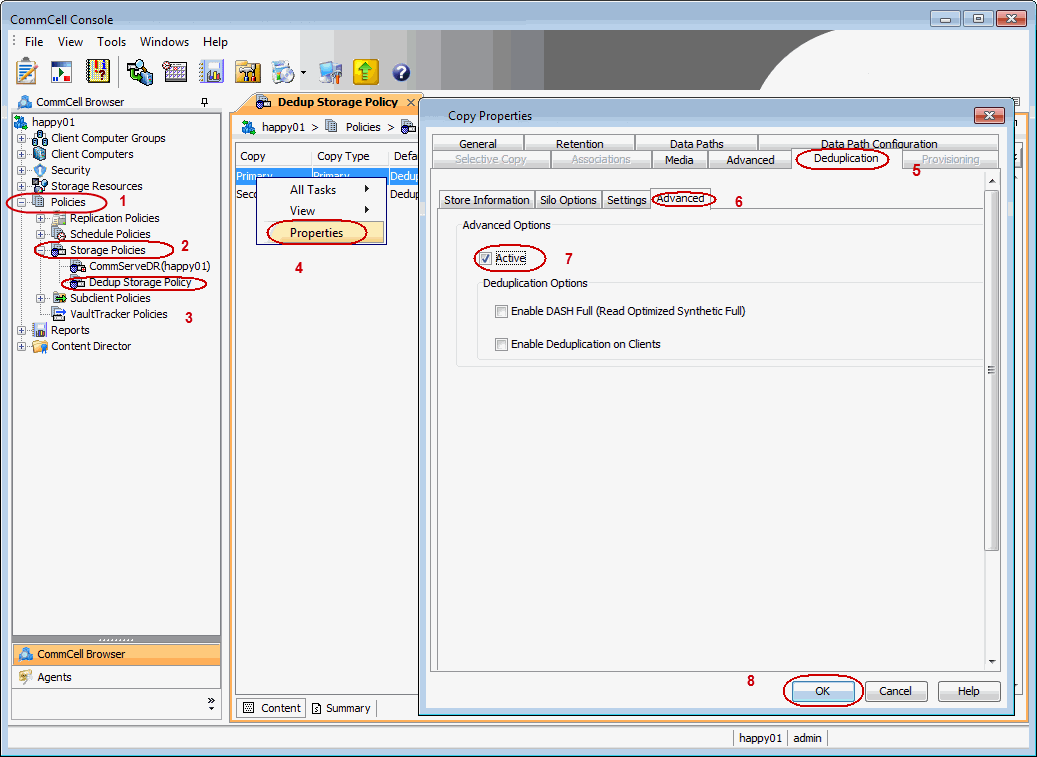
Although deduplication cannot be disabled, it can be temporarily suspended. Suspend
deduplication to temporarily detach the Deduplication Store to gain access to the
store, for diagnostics and maintenance purposes. Once you resume deduplication,
the signature verification and data deduplication is resumed.
Follow the step-by-step instructions described below to suspend/resume:
From the CommCell Browser, navigate to Policies | Storage
Policies | <Storage_Policy>.
Right-click the primary storage policy copy displayed in the right
pane and click Properties.
Click Deduplication tab, and then click the Settings
tab.
In Advanced Options area, clear Active box to temporarily
suspend deduplication.
When a storage copy is deduplicated, this
option is enabled by default.
You may want to reboot a MediaAgent for installing updates or maintenance purposes.
For MediaAgents controlling the deduplication database, you will have to ensure
that all the deduplication transactions in the memory are completed before rebooting.
Failure to follow the recommendations might result in the sealing of the Deduplication
Store, which will increase the amount of storage space consumed in the primary disk
library.
Reboot a Windows MediaAgent
Click the Start button on the Windows task bar and then click
All Programs.
Navigate to bull | Calypso
and click Service Control Manager.
Select All Services in Services.
Click Stop.
When the services are stopped, open the Windows Task Manager.
Select the Processes tab and locate the
SIDB.exe or SIDB2.exe process. If either
of the processes is located, then wait until the process is complete.
Depending on the size of the Deduplication database, this process might take
as long as 30 minutes to complete.
Once the process is complete and no longer displayed on the task manager,
reboot the computer.
Reboot a Unix MediaAgent
Log on to the computer as root and run the following command to stop
services:
Calypso stop
When the services are stopped, type the following command to view all the
deduplication processes that are still running.
ps
�aef | grep sidb
If either the SIDB.exe
or SIDB2.exe process is found running, then
wait until the process is complete.
Depending on the size of the Deduplication
database, this process might take as long as 30 minutes to complete.
Repeat Step 2 to confirm that the processes are no longer running
and then reboot the computer.
When a MediaAgent hosting the deduplication database (DDB) attempts to reboot
or power off, by default the system doesn't halt and the operating system will shut
down regardless of any processes that are running.
However, SIDB process has a built-in capability to receive the shutdown notification
and to bring down the deduplication database gracefully if there is enough amount
of time between the shutdown notification and the actual machine shutdown. In case
where the graceful stopping of the DDB takes more time than the OS allows, it
may still damage the DDB. In order to prevent the shutdown while the SIDB process is
still running, the following method is suggested, which will prevent the shutdown
in most of the cases.
To allow system to shut down gracefully when SIDB process is running, perform
the following on Windows computer.
For Linux, the Calypso stop automatically
handles the graceful shutdown of the MediaAgent.
Note that when MediaAgent attempts to reboot or shut down, the existing CVD process
attempts to stop so that it do not accept any more requests. By setting up the below
script, if there are any SIDB process that are running at this period, the CVD process
will go into Stopping state and wait for SIDB process to gracefully exit before
shutting down.
Install the latest version of Service Pack on the MediaAgent.
This installs
Update 34948 which automatically executes the AddScripttoShutdownGPO.exe
script. This script allows the system to delay the reboot or shutdown till it
reaches the grace period.
You can verify the AddScripttoShutdownGPO.exe script was executed
successfully by performing the following:
Logon to computer where the deduplication database is hosted.
Click Start, click Run..., type gpedit.msc, and
then click OK.
From the Local Group Policy Editor window, navigate to Local
Computer Policy | Computer Configuration | Windows Settings | Scripts (Startup/Shutdown).
In the right pane, double-click the Shutdown option.
In the Shutdown Properties dialog box, StopProc.vbs script
will be displayed.
If StopProc.vbs script is not populated then
perform the following:
From the Command Prompt, navigate to the following location:
<Installation Directory>\Base
Run the following command:
AddScripttoShutdownGPO.exe -vm InstanceXXX
Repeat step 2 to verify that the StopProc.vbs script is
populated in the Shutdown Properties.
Navigate to Local Computer Policy | Computer Configuration | Administrative
Templates | System | Scripts
In the right pane double click the Maximum wait time for Group Policy
scripts.
In the Maximum wait time for Group Policy script Properties dialog
box, specify 1800 seconds (30 minutes). By default time is set to
600 seconds (10 minutes).
This waiting time prevents the shutdown while the SIDB process is running, allows
the process to stop gracefully and not to damage the deduplication database.
To uninstall the script perform the following:
From the Command Prompt, navigate to the following location:
When a Deduplication Store is offline, the Deduplication Store is automatically
reconstructed based on the Deduplication Store availability options. This Reconstruct
Deduplication Database report provides the information about the storage policy,
Deduplication Store name to which it was reconstructed and status of the restore
job.
The following procedure provides the steps necessary to run a Reconstruct Deduplication
Database report:
From the CommCell Browser, click Tools -> Reports...
From the Reports pane, click Job Summary.
From the General tab, click Administrative Jobs and Reconstruct
Dedupe Database.
The Storage Policy report provides deduplication related information including
deduplication properties and Deduplication Store information. The following procedure
provides the steps necessary to run Storage Policy report:
From the CommCell Browser, click Tools -> Reports...
From the Reports pane, navigate to Storage and click Storage
Policy.
From the General tab, clear Include All Storage Policies.
Press Ctrl key and select <Storage_Policies>.
Click Include to move the selected storage policies to the Include
list box.