Requirements
Configure Recovery Director
- Recovery Director
- QuickRecovery Agent
- OSSV Enabler or ONTAP Enabler
- QSnap
- ProxyHost iDataAgent
- Windows File System iDataAgent
Install the following components on the Backup Host computer:
- Recovery Director
- ProxyHost iDataAgent
- Windows File System iDataAgent
- QSnap
For installation instructions, refer to Installation.
The replica location on the file server will take a form similar to the following:
/vol/<volume_name>/<client>_<volume>_cid_vid
The following template script files are supplied in the Resource Pack, which is available from Maintenance Advantage:
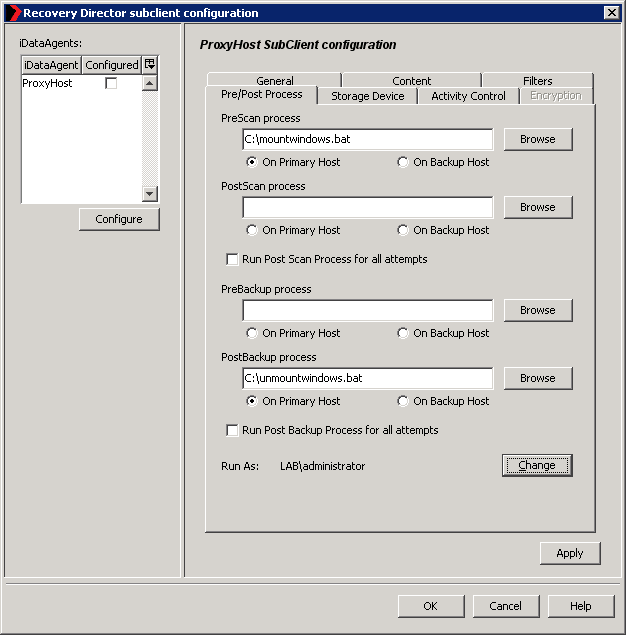
mountwindows.bat or mountunix.sh -- used in the PreScan phase to mount the replica
unmountwindows.bat or unmountunix.sh -- used in the PostBackup phase to unmount the replica
Edit the template script files with the actual location of the replica on your file server, and a user name with permissions to that location.
In the Pre/Post Process tab of the ProxyHost Subclient Configuration, enter the path to the two script files you created in the previous step.
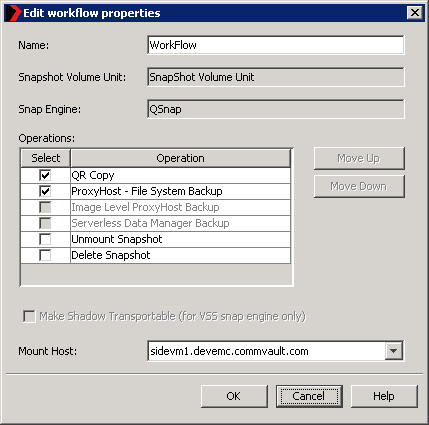
- Select QR Copy and ProxyHost File System Backup as the Workflow operations.
- Select QSnap as the Snap Engine.
- QSnap will create a snapshot of the source
- OSSV SnapVault will move the data to the file server, creating a replica
- The file server will create a snapshot of the replica
- QSnap will unsnap the source
- ProxyHost will mount the replica to the backup host, perform a backup, and unmount the replica
The next scheduled Workflow will repeat the same steps. Thus, each time the Workflow is run, both a backup and a snapshot of the replica are created.
- Browse and restore from the point-in-time backup. Since each version of the replica has been backed up, they can be restored to anywhere, including the source volumes. For more information, see Restore Data - Proxyhost.
- Recover from the point-in-time snapshot. This is done through the QR Browse screen.
