The following page describes the agent-specific restore options. Additional restore options are accessible from the Related Topics menu.
The Informix iDataAgent supports the
following types of restores:
Restoring entire Informix databases in multistream or single stream
(serially)
Restoring portions of Informix databases (i.e., dbspaces)
Restoring logical log files
Restoring emergency boot files (ixbar)
Restoring ONCONFIG files
Additionally, the Informix iDataAgent
supports:
Restores from the latest full backup
Point-in-time restores - you can restore dbspaces from the full backup
created at or before the point in time based on the date and time that you
specify
Restores up to a specified logical log - you can restore all of the data
for committed transactions up to and including the logical log that you
specify
Restores from a third-party command line
The Informix Restore Options dialog box that provides the first three options in the previous list
also provides an option that allows you to view restore-related information in
the time zone that you require.
Log Only option in Informix Restore Options Dialog box, allow you to apply the
transaction logs that were backed up on a primary system after a full database
backup, to the secondary machine. After a full backup on a primary system, you
must perform a cross machine full instance database restore by selecting
Physical option and unselecting the Logical option in Informix
Restore Options Dialog box. This will recover all committed data and keep
Informix database in Fast Recovery state. If you wish to switch over from primary to
the secondary machine, perform the Log Only restore job to restore all
the collected logs from primary machine to the secondary.
For the Informix iDataAgent, restore
operations can be performed from the client and
instance levels in the CommCell Browser.
When there is a problem with the Informix database or the client system (operating
system, hardware, hard drives, etc.), full system restores may be required. See
Restore Data - Informix
iDataAgent - Full System Restore for more information.
If the database is upgraded, the next backup that is run detects the new
version. The version is refreshed and displayed in the instance Properties dialog box and
for the SQL Server iDataAgent, it is
displayed during a browse operation. For more information, see
Browse Databases.
Before performing any restore procedures for this agent, review the following
information.
If you set up INFORMIX HOME
on the local disk for each node in a clustered environment instead of on the
shared directory (disk), and if a failover occurs during a backup, an additional
restore step is required when (and before) you restore the data to the node to
which the failover occurred. For example, suppose that while you are backing up
the Informix data from Node 1, a failover to Node 2 occurs. Thereafter, suppose you want to
restore the Informix data to Node 2. In such a case, you must first restore the
CONFIG files (i.e., ixbar.1 and
onconfig) originating from Node 1 to Node 2
before you restore the Informix data.
The additional restore is required under this scenario because the Informix
application (including $INFORMIX_DIR/etc) is not shared when you run the backup
on Node 1, and the ixbar.1 file on NODE 2 is not updated as the backup completes. This means that the
ixbar.1 file on each node now has different contents. However, the contents of the ixbar.1 file on Node 1 are required to complete the
restore of the Informix data, therefore necessitating the additional restore
discussed in this section.
By default, the Informix iDataAgent restores data to the client computer
from which it originated; this is referred to as an in-place restore. You can
also restore the data to another Client
computer in the CommCell. Keep in mind the following considerations when
performing such restores:
The destination client must reside in the same CommCell as the client
whose data was backed up.
Note that when you perform restores other than in-place
restores,
the restored data assumes the rights (i.e., permissions) of the parent
directory.
The following section enumerates the types of restore destinations that are
supported by the Informix iDataAgent. See Restore/Recover/Retrieve Destinations - Support for a list of Agents
supporting each restore destination type.
You should restore Informix database data to a different host
(or out of place) if the original (source) host is damaged. This is
sometimes called a cross-machine restore.
Whenever you perform this type of restore, the source computer
and destination computer must have the same operating system, Informix version,
Informix User, Informix group, and database dbspace directory structure. In addition, the database server
name, database server number, root path and all dbspace physical paths for the
destination host must be the same as those for the source host. Also, the
destination machine must have sufficient disk space to accommodate the restored
database.
You can perform a cross platform/ cross server restores using onbar. However,
the source and destination Informix servers must have the same db spaces name
and paths. Ensure that the source and destination Informix servers must have the
same SERVENUM number in ONCONFIG file. Ensure that the source and destination Informix servers are
configured within the same CommServe.
Use the following steps to perform a cross platform/cross server
restore:
On the source computer, as an Informix user, type the command at the
Command Prompt to note the Informix Dbspaces name and Dbspaces pathname.
onstat –d
On the destination computer, as an Informix user, type the command at the
Command Prompt to note the Informix Dbspaces name and Dbspaces pathname.
onstat –d
Make sure to include the following information in the source Informix user
profile:
CvInstanceName=<Calypso Instance
Name>
CvClientName=< Source Computer Name as seen on Commcell GUI>
Make sure to include the following information in the destination Informix
user profile:
CvInstanceName=<Calypso
Instance Name>
CvClientName=<Destination Computer Name as seen on Commcell GUI>
INFORMIXSERVER=< Destination Informix Server Name>
Perform a full backup of source Informix server including emergency boot
file (ixbar) file and ONCONFIG file
In the destination Informix server, rename the emergency boot file (ixbar)
with the destination database server number. You can check parameter (SERVERNUM)
in destination Informix server ONCONFIG file. Also rename the oncfg and ONCONFIG
files in the destination client.
Example:
mv ixbar.0 ixbar.org
mv oncfg_$servername.$servernum oncfg_$servername.$servernum.org
mv onconfig.$servername to onconfig.$servername.org
Copy the emergency boot file (ixbar), oncfg and ONCONFIG file manually
from source Informix server to destination Informix server in INFORMIXDIR/etc
directory.
In the destination Informix server, update the DBSERVERNAME and
SERVERNUM parameters with the Destination Informix Server name and number in
ONCONFIG file which has been copied from Source Informix server. The
DBSERVERNAME name can be different. However, make sure that the SERVERNUM
number must be same in the source and destination servers.
Use the following command to stop the destination Informix server
onmode –yuk
Type the following command to restore the Informix server on the
destination computer.
onbar –r
After a successful Cross Informix Server Restore, delete emergency boot
file (ixbar) in Destination Informix server.
Perform a full backup of destination Informix server either using a
CommCell Browser or onbar command line utility.
Perform the following validations to rename the db spaces during a cold
restore using ON–Bar command line utility:
Verify to see that the old db space pathnames and offsets exist in
archive reserved pages.
Verify to see that the new db space pathnames and offsets do not overlap
each other or existing db spaces.
If you rename the primary root or mirror root spaces, ON–Bar updates the
ONCONFIG file parameters ROOTPATH and ROOTOFFSET, or MIRRORPATH, and
MIRROROFFSET. The old version of the ONCONFIG file is saved as
$ONCONFIG.localtime.
ON–Bar restores the data from the old db spaces to the new db spaces.
New db spaces must have the proper permissions.
If either of the above steps fail, the renaming process stops and ON–Bar
writes an error message to the ON–Bar activity log. Provide the old dbspace
location and the new db space location either at the command line or in a file
to rename a db space. The following table lists example values for two db
spaces:
Element
Value for First db space
Value for second db space
Old Path
/dbspace1_Old
/dbspace2_Old
Old offset
0
10000
new path
/dbspace1_New
/dbspace2_New
new offset
20000
Renaming Database Spaces with Command Line Options
1.
At the Command Prompt, type the following command to rename
the chunks.
After a renaming and restoring operation, perform a level-0 backup.
Renaming Database Spaces with a File
1.
At the Command Prompt, type the following command to rename
the db spaces by supplying a file named listfile.
ListFile contains the following information:
/dbspace1_Old 0 /dbspace1_New 20000 /dbspace2_Old 10000
/dbspace2_New 0
onbar -r -rename -f listfile
2.
After a renaming and restoring operation, perform a level-0 backup.
Renaming Chunks While Specifying Other Options
1.
At the Command Prompt, type the following command to rename
the db spaces while performing a physical restore on
dbspace1 and dbspace2, where rootdbs is the name of the
rootdbs.
Alternatively, type the following command to
rename the db spaces using file while performing a physical
restore on dbspace1 and dbspace2.
You can perform a cross platform/ cross server restores using CommCell
Console. The source and destination Informix servers must have the same db
spaces name and paths. Ensure that the source and destination Informix servers
must have the same SERVENUM number in ONCONFIG file. Ensure that the source and destination Informix servers are
configured within the same CommServe.
Make sure to perform the following while restoring from a source server to a
destination server:
Perform a full backup of source Informix server including emergency boot
file (ixbar) file and ONCONFIG file
In the destination Informix server, rename the emergency boot file (ixbar)
with the destination database server number. You can check parameter (SERVERNUM)
in destination Informix server ONCONFIG file. Also rename the oncfg and ONCONFIG
files in the destination client.
Copy the emergency boot file (ixbar), oncfg and ONCONFIG file manually
from source Informix server to destination Informix server in INFORMIXDIR/etc
directory.
In the destination Informix server, update the DBSERVERNAME and
SERVERNUM parameters with the Destination Informix Server name and number in
ONCONFIG file which has been copied from Source Informix server.
Use the following steps to perform a Cross Platform/Cross Server Restore:
From the CommCell Browser, navigate to Client Computers |
<Client> | Informix iDataAgent.
Right-click the <Instance>, point to All Tasks and
then click Browse and Restore.
Click View Content.
From the Browse window, navigate and select the database to be
restored and click Recover All Selected.
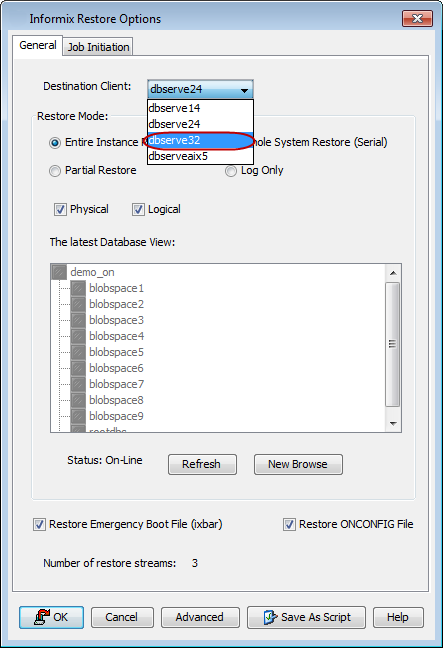
From the InformixRestore options check box,
select the destination Informix server that you want to restore to
from the Destination Client list.
Click
Entire Instance Restoree.
Select both Physical and Logical check boxes.
Select the Restore Emergency Boot File (ixbar) check box.
When the Informix database to be restored has been pruned from the primary
copy, the data and logs can be restored from a secondary copy that has a
different copy precedence. The restores from the secondary copy can be performed
in the following methods:
Performing Partial Restore from Physical and Logical Data
Performing Point-In-Time Restore for an Entire Instance
Restoring the Latest Data from secondary copy using the Log Number
The Data and Log storage policies should be the same at the instance and
subclient levels when you restore from a secondary copy.
Performing Partial Restore from Physical and Logical Data
Use the following steps to perform the partial restore from the physical
data:
From the CommCell Browser, navigate to Client Computers |
<Client> | Informix iDataAgent.
Right-click the <Instance>, point to All Tasks and
then click Browse Backup Data.
From the Browse window, navigate and select the data to be
restored and click Recover All Selected.
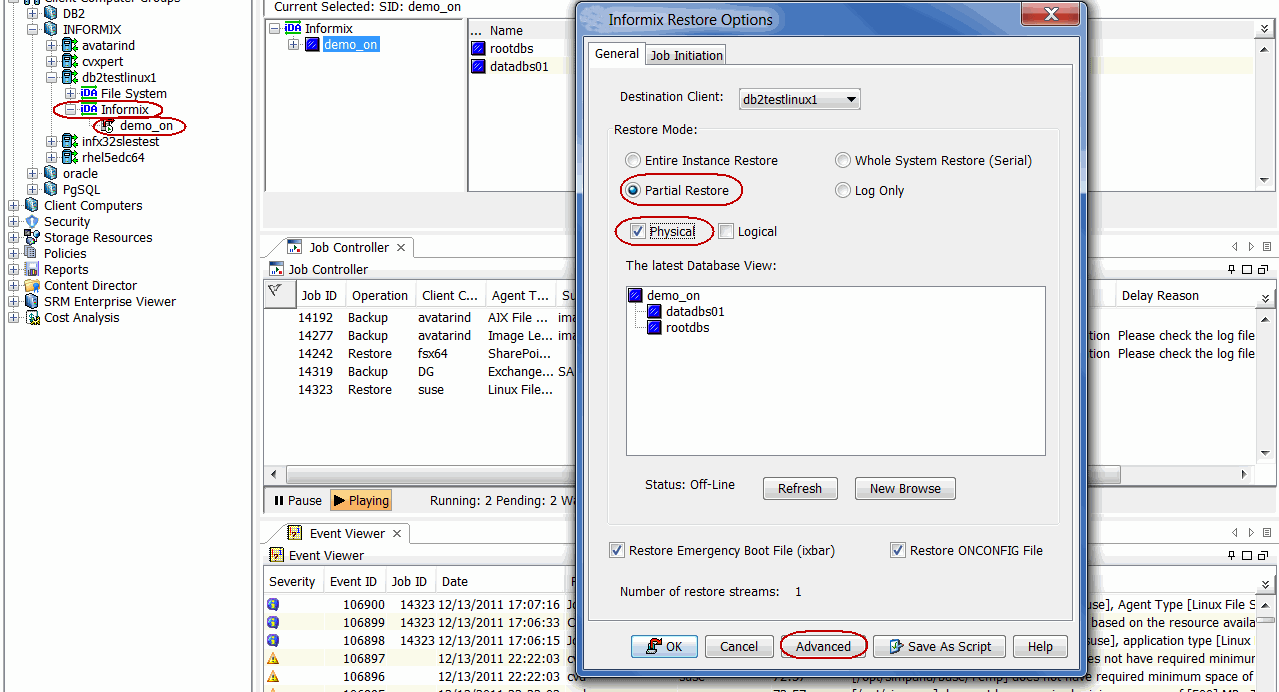
From the InformixRestore options check box, click
Partial Restore option and select Physical check box.
Select the Database from the Latest database view, andclick Advanced.
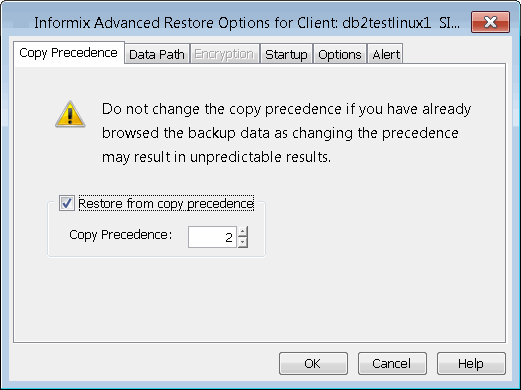
Click the Copy Precedence tab and select the Restore
from Copy Precedence option.
Select the Copy Precedence from the list.
Click OK.
On completion of data only restore, perform a logical restore. Use the
following steps to perform the partial restore from the logical data:
From the CommCell Browser, navigate to Client Computers |
<Client> | Informix iDataAgent.
Right-click the <Instance>, point to All Tasks and
then click Browse Backup Data.
From the Browse window, navigate and select the data to be
restored and click Recover All Selected.
From the InformixRestore options check box, click
Partial Restore option and select Logical check box.
Select the Database from the Latest database view, andclick Advanced.
Click the Copy Precedence tab and select the Restore
from Copy Precedence option.
Select the Copy Precedence from the list.
Click OK.
Performing Point-In-Time Restore for an Entire Instance
Use the following steps to perform a point-in-time restore for an entire
instance:
From the CommCell Browser, navigate to Client Computers |
<Client> | Informix iDataAgent.
Right-click the <Instance>, point to All Tasks and
then click Browse Backup Data.
From the Browse window, navigate and select the data to be
restored and click Recover All Selected.
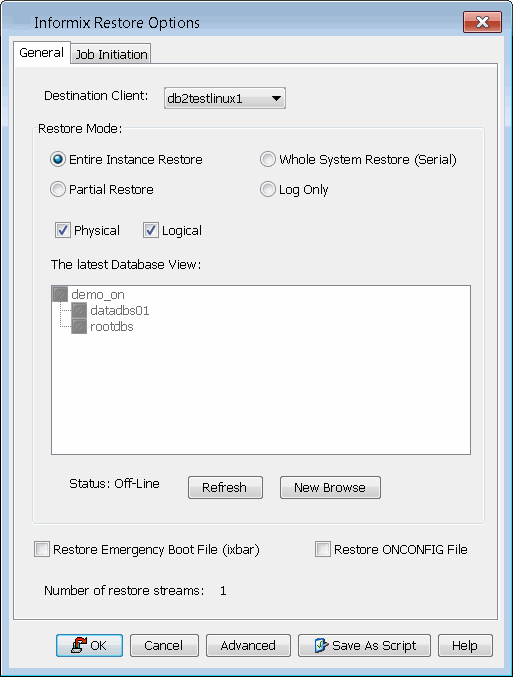
From the InformixRestore options check box, click
Entire Instance Restore.
Select both Physical and Logical check boxes.
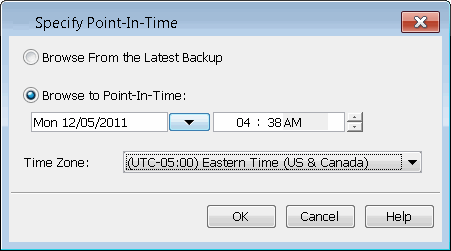
From the Latest database view, andclick New Browse.
From Specify Point-In-Time window, select browse to
Point-In-Time check box.
Specify the Date and time to which the backup data from
secondary copy needs to be restored.
Select your Time Zone from the list.
Click OK.
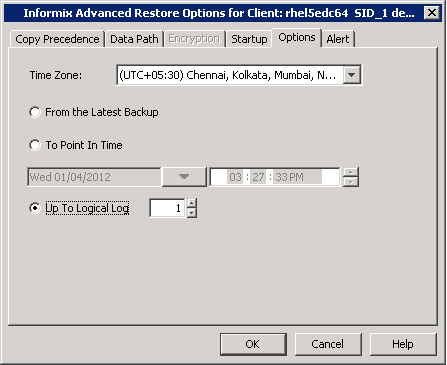
From the InformixRestore options check box, click
Advanced.
Click the Copy Precedence tab and select the Restore
from Copy Precedence option.
Select the Copy Precedence from the list.
Click OK.
Click the Options tab.
Click Up To Logical Log and select the logical log number
from the log that is backed up in the browse time
from the list. You can view the last log number from ixbar or
bar_act.log files.
Click OK.
Restoring the Latest Data from secondary copy using the Log Number
You can restore the latest data also from the secondary copy using the log
number to avoid restoring the salvaged logs.
Use the following steps to restore the latest data from a secondary copy using
the log number:
From the CommCell Browser, navigate to Client Computers |
<Client> | Informix iDataAgent.
Right-click the <Instance>, point to All Tasks and
then click Browse Backup Data.
From the Browse window, navigate and select the data to be
restored and click Recover All Selected.
From the InformixRestore options check box, click
Entire Instance Restore.
Select both Physical and Logical check boxes.
Click
Advanced.
Click the Copy Precedence tab and select the Restore
from Copy Precedence option.
Select the Copy Precedence from the list.
Click OK.
Click the Options tab.
Click Up To Logical Log and select the logical log number
from the latest backup log.
Informix XPS databases can be restored using a third party command line
utility (On-bar). Prior to running restores, you need to configure the
Informix XPS
database for restores. See
Configuring Backups and Restores of Informix XPS
Databases for step-by-step instructions.
If a critical dbspace is damaged due to a disk failure or corrupted data, the
database server automatically changes to offline mode. If a critical dbspace is
damaged, then you must perform an offline (cold) restore for all critical
dbspaces.
Use the following steps to perform an offline restore:
1.
From the On-Bar command prompt, run the command to switch the Informix XPS
instance to Micro Kernel mode
xctl onmode -yuk
xctl -C oninit -m
2.
Run the restore command.
onbar -r
4.
After a successful offline restore operation, the database server changes in
to quiescent (inactive) mode.
Run the following command to change the database server
online
Unless your database server has failed, you can restore noncritical
storage spaces in a warm restore in the following circumstances:
The storage space is online, but one of its chunks is offline,
recovering, or inconsistent.
The storage space is offline or down.
If the database server goes offline but the critical dbspaces are all right,
bring the database server online and perform a warm restore. Use the following steps to perform an online restore:
When you perform a physical restore, you can restore the database server
without the logs to allow the database server go to fast recovery mode. Once the
physical restore is completed, you can restore the logs.
Use the following steps to perform a physical restore and log restore
separately:
You can restore objects to a different database server
instance other than the one from which you have performed a backup. This restore
is also known as Imported Restore.
Ensure the following prior to performing a cross machine restore:
Perform a full (level-0) physical backup. Run the following command to
perform a full physical backup:
onbar -b -p
Do not perform an incremental backup prior to
performing a cross machine restore.
Perform a current log backup
xctl onmode -l
onbar -b -l
Make sure that every chunk (including mirrors) must
match exactly in size, location, and offset on the source and target
computers to successfully complete the imported restore operation.
Ensure that the source and destination Informix XPS servers must have
the same SERVENUM number.
Use the following steps to restore XPS databases to a different instance/host:
1.
On the target (destination) Informix server, run the following command to switch the
Informix XPS
instance to Micro Kernel mode.
xctl onmode -yuk
xctl -C oninit -m
2.
Configure the target Informix server instance in CommCell browser. See
Create an
Instance for step-by-step instructions.
3.
Copy the start_worker.sh file from the source computer to the
target computer and update it with the target computer information.
4.
Copy the emergency boot (Bixbar) file from the source computer to
the target computer and rename it with the target Informix server name.
The emergency boot file needs only the entries from the full (level-0)
backup on the source computer.
Example:
cp
Bixbar.SourceServerName.CoserverNum to
Bixbar.TargetServerName.CoserverNum
5.
Copy the oncfg file from the source computer to the target
computer and rename it with the target Informix server name. The file
name should match the DBSERVERNAME and SERVERNUM on the target computer.
ON–Bar needs the oncfg file to know what dbspaces to retrieve.
Example:
cp
oncfg_infserver01.0.1 to oncfg_dbserver01.0.1.
6.
Copy the ONCONFIG file from
source computer to the target computer and update DBSERVERNAME with the
target database name.
Example:
cp
onconfig.$servername to onconfig.$servername.org
7.
Type and run the following command on the target computer to restore the
Informix server.
onbar –r -p
onbar -r -l
xctl onmode -m
8.
After a successful Cross Informix Server Restore, delete the emergency boot
file (Bixbar) in the target Informix server.
9.
Perform a full backup of destination Informix server either using a
CommCell Browser or on-bar command line utility.
10.
Perform a full backup of source Informix server including
emergency boot file (Bixbar) file and
ONCONFIG file.
You can verify whether the restore operation is successful or a failure from
the ON-bar activity log. The ON–Bar utility writes informational,
progress, warning, error, and debugging messages to the ON–Bar activity log.
The activity log also records which dbspaces and logical logs were
backed up or restored, the progress of the operation, and approximately how long
it took for each operation. You can use this information in the activity log to
determine whether a backup or restore operation succeeded or failed. ON-Bar
Activity Log location can be found in ONCONFIG file and parameter name is
BAR_ACT_LOG.