Schedule Policy - Advanced

Getting Started Advanced Best Practices FAQ Support

Table of Contents

Creating Schedule Policies

Required User Capabilities

Auxiliary Copy Schedule Policy

Backup Copy Schedule Policy for Snap Backups

Content Indexing Schedule Policy

Data Protection Schedule Policy

All Agent Type Data Protection Schedule Policy

Agent-Specific Data Protection Schedule Policy

SRM Data Collection Schedule Policy

SRM Reports Schedule Policy

Configuring Alerts for a Schedule Policy

Setting a Time Zone for the Schedule Policy

Schedule Jobs Using the CommServe Time Zone

Schedule Jobs Using a Client Computer's Time Zone

Schedule Jobs Using a Specific Time Zones

Managing Schedules

Adding Schedules to a Schedule Policy

Deleting a Schedule from a Schedule Policy

Run a Schedule from a Schedule Policy On Demand

Decoupling a Schedule from a Schedule Policy

Managing Schedule Policies

Viewing a Schedule Policy

Modifying a Schedule Policy

Deleting a Schedule Policy

Cloning a Schedule Policy

Enabling/Disabling a Schedule Policy

Viewing Jobs Associated with a Schedule Policy


Related Reports

Job Schedule Report

Command Line Operations

Running Schedules

List All Schedule Policies in the CommCell

List Schedules and Schedule Policies from different CommCell Levels

Creating Schedule Policies

When multiple clients or tasks require similar operations to be scheduled you can create a schedule policy as a scheduling template and attach it to the respective client or task in the CommCell. Schedule policies also gives you the flexibility to modify or alter the job schedules from one central location. The modifications are automatically reflected in the associated schedules. 

You can create schedule policies for the following:

Required User Capabilities

Users with limited CommCell capabilities will require the following capabilities:

Auxiliary Copy Schedule Policy

Requires the Administrative Management capability configured at the CommCell level.

Data Protection Schedule Policy

Requires the Agent Scheduling and Data Protection/Management Operations capabilities configured at the level the schedules were created.

To associate a schedule policy to a CommCell object, you need the Agent Scheduling capability configured at the level the schedules were created. However, if you need to associate a schedule policy to a client computer group, the Agent Scheduling capability must be configured at the CommCell level.

Auxiliary Copy Schedule Policy

An auxiliary copy schedule policy is a scheduling template for auxiliary copy operations to be performed on specific storage policies or storage policy copies within a CommCell.

This type of policy is useful when there are many storage policies within the CommCell that require schedules for auxiliary copy operations.

Note that if you associate a schedule policy with a storage policy, all copies including any future copies will use the same auxiliary copy schedule.

Use the following steps to create an auxiliary copy schedule policy:

  1. From the CommCell Browser, navigate to Policies.
  2. Right-click Schedule Policies and click Add.
  3. Type a name for the schedule policy in the Name field.
  4. From the Type list, select Auxiliary Copy.
  5. Type an appropriate description in the Description field.
  6. Click the Add button.
  7. Type a name in the Schedule Name box.
  8. Select the appropriate scheduling options.
  9. Type the Start Time to start the schedule.
  10. Click Ok.
  1. Click the Associations tab.
  2. Click and select the Storage Policies that you wish to associate with the schedule policy.

    Note that you can associate a schedule policy with the storage policy copies as well.

  3. Click Ok.

Backup Copy Schedule Policy for Snap Backups

A backup copy schedule policy is a scheduling template for snap-to-tape backup operations to be performed on specific storage policies or storage policy copies within a CommCell.

This type of policy is useful when there are many storage policies within the CommCell that require schedules for snap-to-tape backup operations.

Note that if you associate a schedule policy with a storage policy, all copies including any future copies will use the same backup copy schedule.

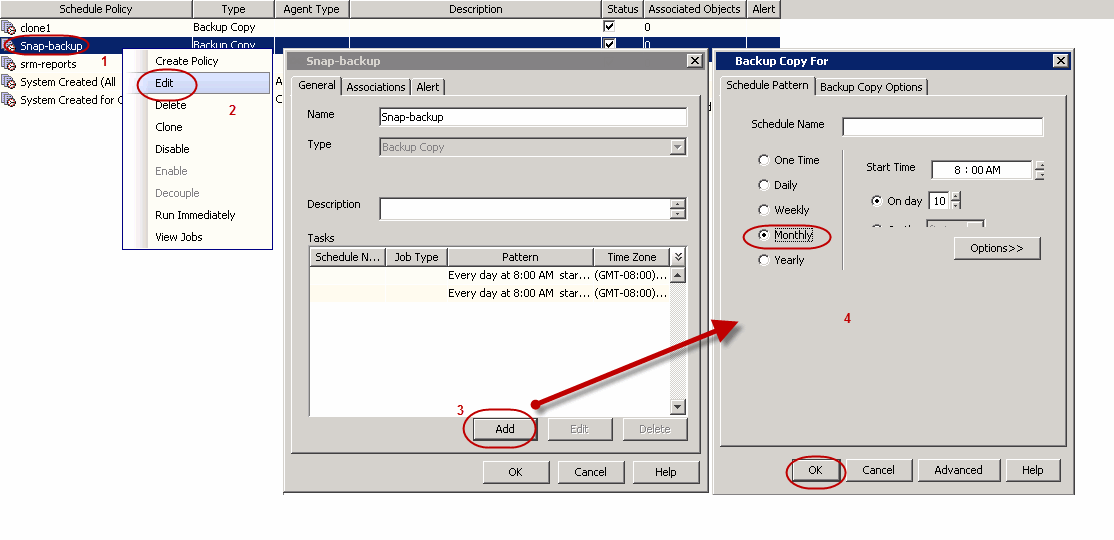
Use the following steps to create a backup copy schedule policy:

  1. From the CommCell Browser, navigate to Policies.
  2. Right-click Schedule Policies and click Add.
  3. Type a name for the schedule policy in the Name field.
  4. From the Type list, select Backup Copy.
  5. Type an appropriate description in the Description field.
  6. Click the Add button.
  7. Type a name in the Schedule Name box.
  8. Select the appropriate scheduling options.
  9. Type the Start Time to start the schedule.
  10. Click Ok.
  1. Click the Associations tab.
  2. Click and select the Storage Policies that you wish to associate with the schedule policy.

    Note that you can associate a schedule policy with the storage policy copies as well.

  3. Click Ok.

Content Indexing Schedule Policy

A content indexing schedule policy is a scheduling template for indexing operations to be performed on specific storage policies or storage policy copies within a CommCell.

This type of policy is useful when there are many storage policies within the CommCell that require schedules for content indexing operations.

Use the following steps to create a content indexing schedule policy:

  1. From the CommCell Browser, navigate to Policies.
  2. Right-click Schedule Policies and click Add.
  3. Type a name for the schedule policy in the Name field.
  4. From the Type list, select Content Indexing.
  5. Type an appropriate description in the Description field.
  6. Click the Add button.
  7. Type a name in the Schedule Name box.
  8. Select the appropriate scheduling options.
  9. Type the Start Time to start the schedule.
  10. Click Ok.
  1. Click the Associations tab.
  2. Click and select the Storage Policies that you wish to associate with the schedule policy.

    Note that you can associate a schedule policy with the storage policy copies as well.

  3. Click Ok.

Data Protection Schedule Policy

A data protection schedule policy can be created to schedule data protection operations which includes both backup and archive.

By default a system created all agent data protection schedule policy is available in the CommCell. You can use this schedule policy to schedule backup operations for all agents. This schedule policy includes the schedules for the following:

If necessary you can manually create the following schedule policies:

All Agent Type Data Protection Schedule Policy

An all agent type data protection schedule policy is a generic scheduling template for data protection operations for all agents in a CommCell.

Use the following steps to create an all agent type data protection schedule policy:

  1. From the CommCell Browser, navigate to Policies.
  2. Right-click Schedule Policies and click Add.
  3. Type a name for the schedule policy in the Name field.
  4. Type an appropriate description in the Description field.
  5. Click the Add button.
  6. Type a name in the Schedule Name box.
  7. Select the appropriate scheduling options.
  8. Type the Start Time to start the schedule.
  9. Click Ok.
  1. Click the Associations tab.
  2. Click and select the Client Computers that you wish to associate with the schedule policy.

    Note that you can associate the schedule policy from the client, backup set and subclient level as well.

  3. Click Ok.


Agent-Specific Data Protection Schedule Policy

An agent specific data protection schedule policy is a scheduling template for data protection operations for specific agents or group of agents in a CommCell.

This type of data protection policy is useful when there are many clients or subclients within a CommCell that require same schedules for agent-specific data protection operations. Additionally this policy provides the ability to granularly define advanced data protection options specific to the selected agent.

You can view the list of agents or agent groups from the Agent Type list available in the Schedule Policy dialog box.

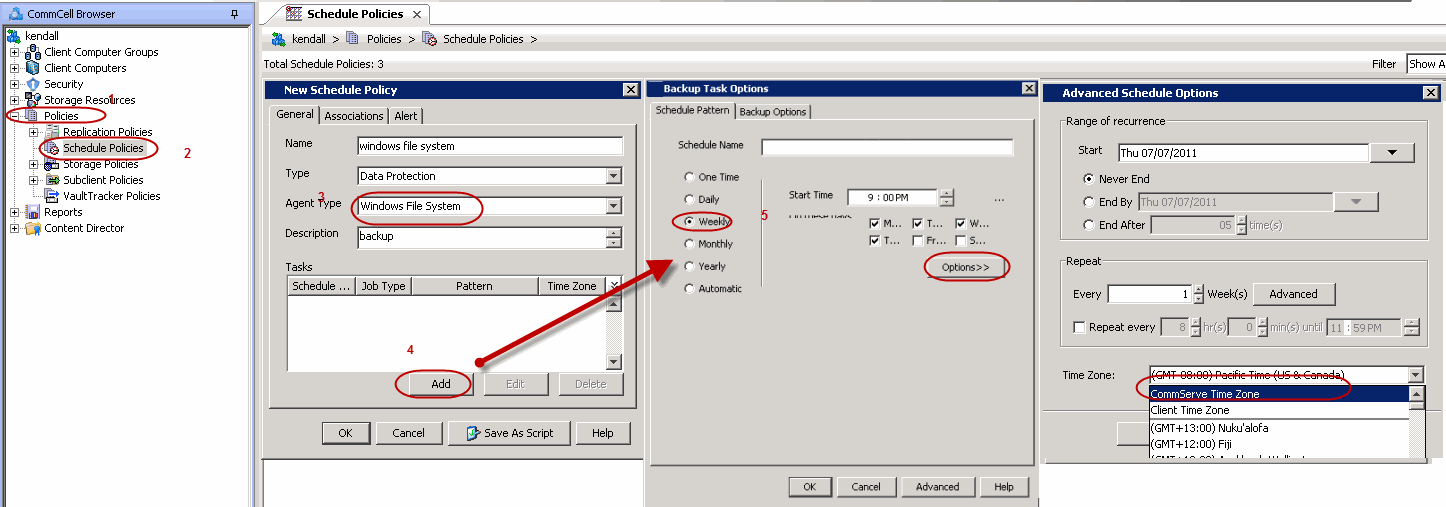
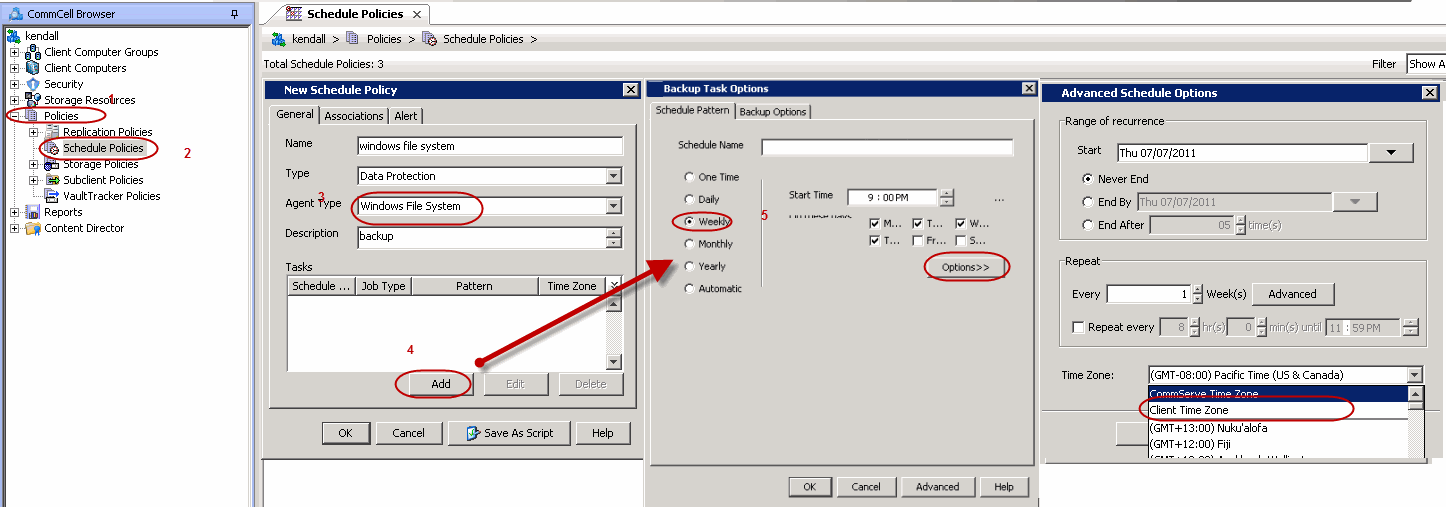
Use the steps given below to create a Windows File System iDataAgent specific data protection schedule policy. You can use similar steps to create other agent specific data protection schedule policy.

  1. From the CommCell Browser, navigate to Policies.
  2. Right-click Schedule Policies and click Add.
  3. Type a name for the schedule policy in the Name field.
  4. From the Agent Type list, select the specific agent.
  5. Type an appropriate description in the Description field.
  6. Click the Add button.
  7. Type a name in the Schedule Name box.
  8. Select the appropriate scheduling options.
  9. Type the Start Time to start the schedule.
  10. Click the Backup Options tab and click Incremental.
  11. Optionally, click the Advanced button to define advanced backup options.
  12. Click Ok.
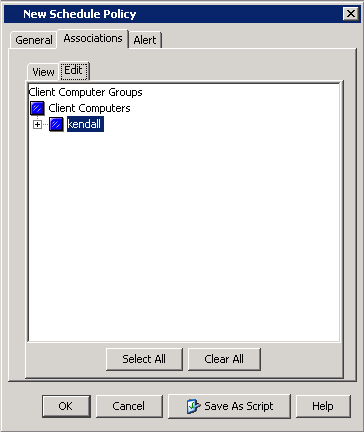
  1. Click the Associations tab.
  2. Click and select the Client Computers that you wish to associate with the schedule policy.

    Note that you can associate the schedule policy from the client, backup set and subclient level as well.

  3. Click Ok.


SRM Data Collection Schedule Policy

A SRM data collection schedule policy is a scheduling template for data collection operations to be performed on specific agents or group of agents in a CommCell.

This type of policy is useful when there are many clients or subclients within a CommCell that require same schedules for data collection operations.

Use the following steps to create a SRM data collection schedule policy:

  1. From the CommCell Browser, navigate to Policies.
  2. Right-click Schedule Policies and click Add.
  3. Type a name for the schedule policy in the Name field.
  4. From the Type list, select SRM Data Collection.
  5. Type an appropriate description in the Description field.
  6. Click the Add button.
  7. Type a name in the Schedule Name box.
  8. Select the appropriate scheduling options.
      You must set the Job Type option for each subclient in the Subclient Properties dialog box. Selecting the Job Type option in the Schedule Data Collection Job dialog box is not supported.
  9. Type the Start Time to start the schedule.
  10. Click Ok.
  1. Click the Associations tab.
  2. Click and select the Client Computers that you wish to associate with the schedule policy.

    Note that you can associate the schedule policy from the client, backup set and subclient level as well.

  3. Click Ok.


SRM Reports Schedule Policy

A SRM report schedule policy is a scheduling template for running SRM reports on user- defined SRM reporting templates.

This type of policy is useful when there are many clients or subclients within a CommCell that require same schedules for reporting operations.

Use the steps given below to create a File System Usage History Report schedule policy. You can use similar steps to create other report specific schedule policies.

  1. From the CommCell Browser, navigate to Reports | SRM Report Manager | File System | Windows | File System Usage History.
  2. In the right pane select the <Client>.
  3. Click the Column Selection tab and select the appropriate columns.
  4. Click the Save As button to save the report template.
  5. Type an appropriate name in the Enter Template Name field and click Ok.
  6. From the CommCell Browser, navigate to Policies.
  1. Right-click Schedule Policies and click Add.
  2. Type a name for the schedule policy in the Name field.
  3. From the Type list, select SRM Reports.
  4. Type an appropriate description in the Description field.
  5. Click the Add button.
  6. Type a name in the Schedule Name box.
  7. Select the appropriate scheduling options.
  8. Type the Start Time to start the schedule.
  9. Click the Options tab.
  10. From the Format list, select the report output format and click Ok.
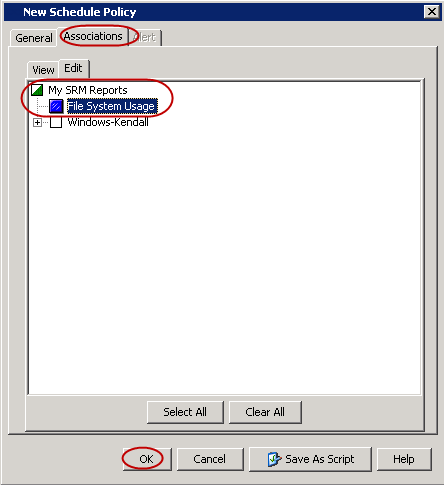
  1. Click the Associations tab.
  2. Click and select the SRM report template from My SRM Reports list that you wish to associate with the schedule policy.
  3. Click Ok.

Configuring Alerts for a Schedule Policy

You can configure alerts to generate automatic notifications when the properties of the associated schedule policy are modified.

Use the steps given below to configure alerts for a schedule policy:

  1. From the CommCell Browser, navigate to Policies.
  2. Right-click Schedule Policies and click Add.
  3. Type a name for the schedule policy in the Name field.
  4. Click the Associations tab.
  5. Click and select the Client Computers that you wish to associate with the schedule policy.
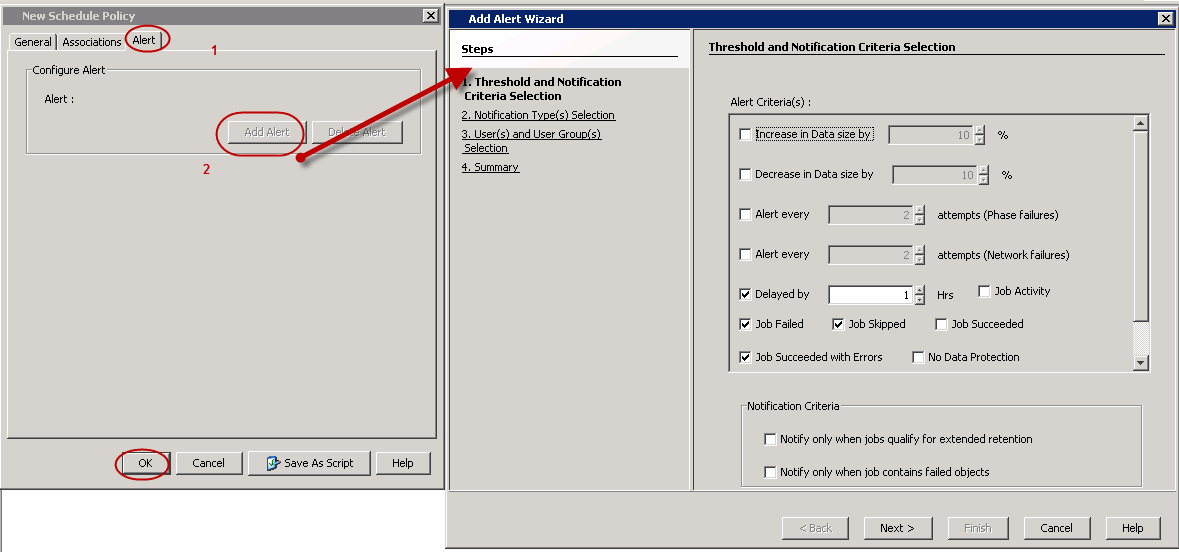
  6. Click the Alert tab.
  7. Click Add Alert.
  8. From the Add Alert Wizard dialog box, select the required threshold and notification criteria and click Next.
  9. Select the required notification types and click Next.
  10. Select the recipients and click Next.
  11. Click Finish.
  12. Click OK.
Configure fresh alerts after cloning a schedule policy. The associated alerts are not replicated during the cloning process.

Setting a Time Zone for the Schedule Policy

When your CommCell is spread across several time zones, you can add schedule to a schedule policy to run using one of the following time zones:

The following sections describe how to create schedules using these time zone.

Schedule Jobs Using the CommServe Time Zone

Schedules in a schedule policy can be defined to run based on the CommServe time zone.

For example:

A job schedule configured to run on the first Monday of every month at 4:00 PM on the CommServe computer's time zone will run as follows for the associated clients in 3 different time zones:

Component Time Zone Local time for the schedule
CommServe: New York Eastern Standard Time (US & Canada) 4:00 PM EST
Client Computer A: Chicago Central Standard Time (US & Canada) 3:00 PM CST
Client Computer B: Salt Lake City Mountain Standard Time (US & Canada) 2:00 PM MST
Client Computer C: Los Angeles Pacific Standard Time (US & Canada) 1:00 PM PST

The steps given below are for creating a data protection schedule for Windows File System iDataAgent, based on the CommServe's time zone. You can use similar steps to create other schedule policies based on the CommServe's time zone:

  1. From the CommCell Browser, navigate to Policies.
  2. Right-click Schedule Policies and click Add.
  3. Type a name for the schedule policy in the Name field.
  4. From the Agent Type list, select the specific agent.
  5. Type an appropriate description in the Description field.
  6. Click the Add button.
  7. Type a name in the Schedule Name box.
  8. Select the appropriate scheduling options.
  9. Type the Start Time to start the schedule.
  10. Click the Options button.
  11. In the Time Zone box, select CommServe Time Zone and click Ok.
  12. Click Ok.
  1. Click the Associations tab.
  2. Click and select the Client Computers that you wish to associate with the schedule policy.

    Note that you can associate the schedule policy from the client, backup set and subclient level as well.

  3. Click Ok.


Schedule Jobs Using a Client Computer's Time Zone

Schedules in a schedule policy can be defined to run based on the time zone associated with the client computers.

For example:

A job schedule associated with 3 clients, spread across 3 different time zones and configured to run on the first Monday of every month at 4:00 PM will run as follows:

Component Time Zone Local time for the schedule
CommServe: New York Eastern Standard Time (US & Canada) 4:00 PM EST
Client Computer A: Chicago Central Standard Time (US & Canada) 4:00 PM CST
Client Computer B: Salt Lake City Mountain Standard Time (US & Canada) 4:00 PM MST
Client Computer C: Los Angeles Pacific Standard Time (US & Canada) 4:00 PM PST

The steps given below are for creating a data protection schedule for Windows File System iDataAgent, based on the Client Computer's time zone. You can use similar steps to create other schedule policies based on the client computer's time zone:

  1. From the CommCell Browser, navigate to Policies.
  2. Right-click Schedule Policies and click Add.
  3. Type a name for the schedule policy in the Name field.
  4. From the Agent Type list, select the specific agent.
  5. Type an appropriate description in the Description field.
  6. Click the Add button.
  7. Type a name in the Schedule Name box.
  8. Select the appropriate scheduling options.
  9. Type the Start Time to start the schedule.
  10. Click the Options button.
  11. In the Time Zone box, select Client Time Zone and click Ok.
  12. Click Ok.
  1. Click the Associations tab.
  2. Click and select the Client Computers that you wish to associate with the schedule policy.

    Note that you can associate the schedule policy from the client, backup set and subclient level as well.

  3. Click Ok.


Schedule Jobs Using a Specific Time Zones

Schedules in a schedule policy can be defined to run based on a specific time zone.

For example:

A job schedule associated with 3 clients, spread across 3 different time zones and configured to run on the first Monday of every month at 4:00 PM Mountain Standard Time will run as follows:

Component Time Zone Local time for the schedule
CommServe: New York Eastern Standard Time (US & Canada) 6:00 PM EST
Client Computer A: Chicago Central Standard Time (US & Canada) 5:00 PM CST
Client Computer B: Salt Lake City Mountain Standard Time (US & Canada) 4:00 PM MST
Client Computer C: Los Angeles Pacific Standard Time (US & Canada) 3:00 PM PST

The steps given below are for creating a data protection schedule for Windows File System iDataAgent, based on a specific time zone. You can use similar steps to create other schedule policies based on the specific time zone:

  1. From the CommCell Browser, navigate to Policies.
  2. Right-click Schedule Policies and click Add.
  3. Type a name for the schedule policy in the Name field.
  4. From the Agent Type list, select the specific agent.
  5. Type an appropriate description in the Description field.
  6. Click the Add button.
  7. Type a name in the Schedule Name box.
  8. Select the appropriate scheduling options.
  9. Type the Start Time to start the schedule.
  10. Click the Options button.
  11. In the Time Zone box, select the desired time zone for example Mountain Standard Time and click Ok.
  12. Click Ok.
  1. Click the Associations tab.
  2. Click and select the Client Computers that you wish to associate with the schedule policy.

    Note that you can associate the schedule policy from the client, backup set and subclient level as well.

  3. Click Ok.


Managing Schedules

Once a schedule policy is created, you can do the following to manage the schedules:

Adding Schedules to a Schedule Policy

Multiple schedules can be added to a schedule policy. It is useful when clients or tasks require same type of operations but on different schedules.

For example:

You may have a data protection schedule policy with a schedule to run full backups once a week on all client computers. You can add another schedule to the same policy to run incremental backups everyday on the same set of client computers.

Use the following steps to add a schedule to an existing schedule policy:

  1. From the CommCell Browser, navigate to Policies | Schedule Policies.
  2. Right-click the <Schedule Policy> in the right pane and click Edit.
  3. Click the Add button.
  4. Type a name in the Schedule Name box.
  5. Select the appropriate scheduling options.
  6. Type the Start Time to start the schedule.
  7. Click Ok.

Deleting a Schedule from a Schedule Policy

Use the following steps to delete a schedule from a schedule policy:

  1. From the CommCell Browser, navigate to Policies | Schedule Policies.
  2. Right-click the <Schedule Policy> in the right pane and click Edit.
  3. From the Task box, select the schedule and click Delete.
  4. Click Yes to confirm deletion.

Run a Schedule from a Schedule Policy On Demand

You can run a schedule from a schedule policy on demand. This allows you to immediately run a job on pre-defined settings.

Use the following steps to run a schedule on demand:

  1. From the CommCell Browser, navigate to Policies | Schedule Policies.
  2. Right-click the <Schedule Policy> in the right pane and click Run Immidiately.
  3. From the Select a Schedule dialog box, select the schedule and click Ok.
  4. You can view the scheduled job running immediately in the Job Controller.

Decoupling a Schedule from a Schedule Policy

You can decouple a schedule from a schedule policy. When it is decoupled the schedule becomes an independent schedule.

Note the following:

Use the following steps to decouple a schedule from a schedule policy:

  1. From the CommCell Browser, right-click the <CommServe>, point to View and click Schedules.
  2. Right-click the <Schedule Policy> in the right pane and click Decouple.
  3. Click Yes to confirm decoupling.

Managing Schedule Policies

One a schedule policy is created, you can do the following to manage it:

Viewing a Schedule Policy

You can view a summarized version of all the schedule policies created within a CommCell from the schedule policy window.

Use the following steps to view the schedule policies:

  1. From the CommCell Browser, navigate to Policies | Schedule Policies.
  2. All existing schedule policies will be displayed in the right pane.

Modifying a Schedule Policy

Once a schedule policy is created, you can modify the following:

Use the following steps to modify an existing schedule policy:

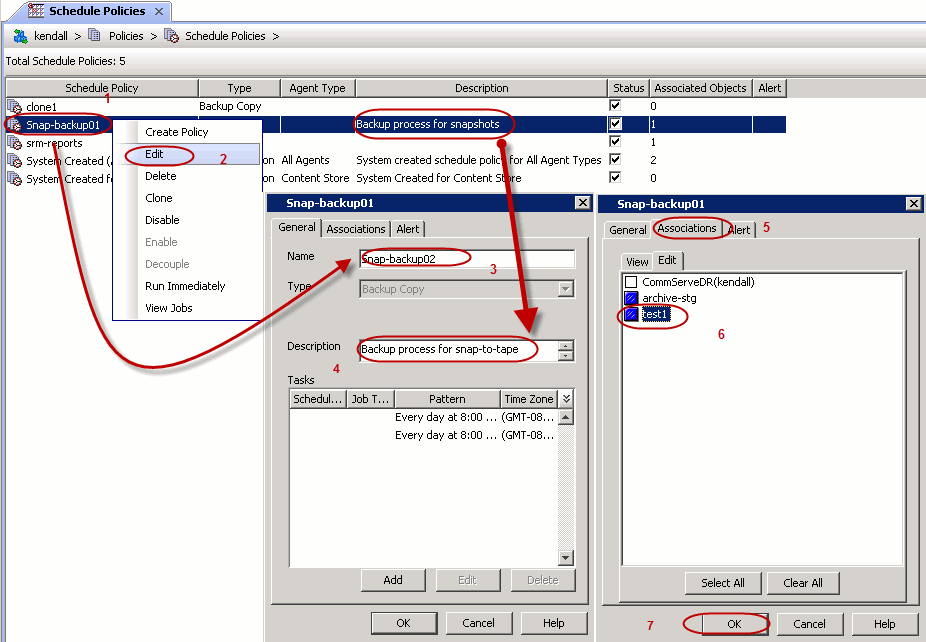
  1. From the CommCell Browser, navigate to Policies | Schedule Policies.
  2. Right-click the <Schedule Policy> in the right pane and click Edit.
  3. Modify the name in the Name filed.
  4. Modify the schedule policy description in the Description filed.
  5. Click the Association tab and click the Edit tab.
  6. Click to select and associate more clients to the schedule policy.
  7. Click Ok.

Deleting a Schedule Policy

Use the following steps to delete a schedule policy:

  1. From the CommCell Browser, navigate to Policies | Schedule Policies.
  2. Right-click the <Schedule Policy> in the right pane and click Delete.
  3. Click Yes to confirm deletion.

Cloning a Schedule Policy

Cloning a schedule policy allows you to create an exact duplicate of an existing policy with all of the properties of the original policy. Once created, you can edit the properties of the policy, as necessary.

This is useful as it saves you the time of creating a new policy manually. By default the cloned storage policy is disabled and can be enabled after making necessary modification.

Use the steps given below to clone a SRM Report schedule policy. You can use similar steps to clone schedule policies.

  1. From the CommCell Browser, navigate to Policies | Schedule Policies.
  2. Right-click the <Schedule Policy> in the right pane and click Clone.
  3. Type a name for the clone in the Name field.
  4. Type an appropriate description in the Description field.
Configure fresh alerts after cloning a schedule policy. The associated alerts are not replicated during the cloning process.
  1. Click the Associations tab.
  2. Click and select the SRM report template from My SRM Reports list that you wish to associate with the schedule policy.
  3. Click Ok.

Enabling/Disabling a Schedule Policy

By default when you create a schedule policy, it is enabled. You can disable it at any point of time.

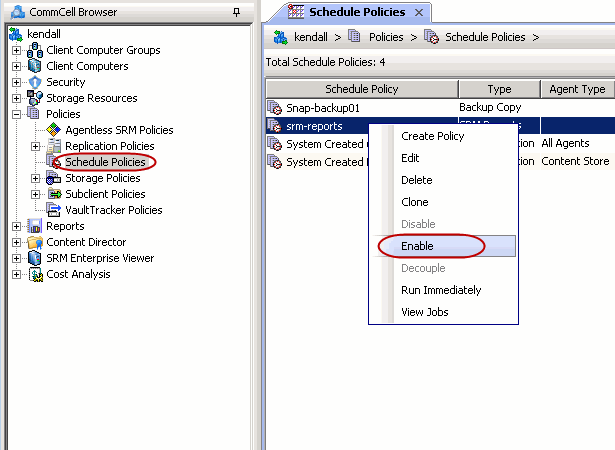
Use the following steps to enable/disable a schedule policy:

  1. From the CommCell Browser, navigate to Policies | Schedule Policies.
  2. Right-click the <Schedule Policy> in the right pane and click Enable/Disable.

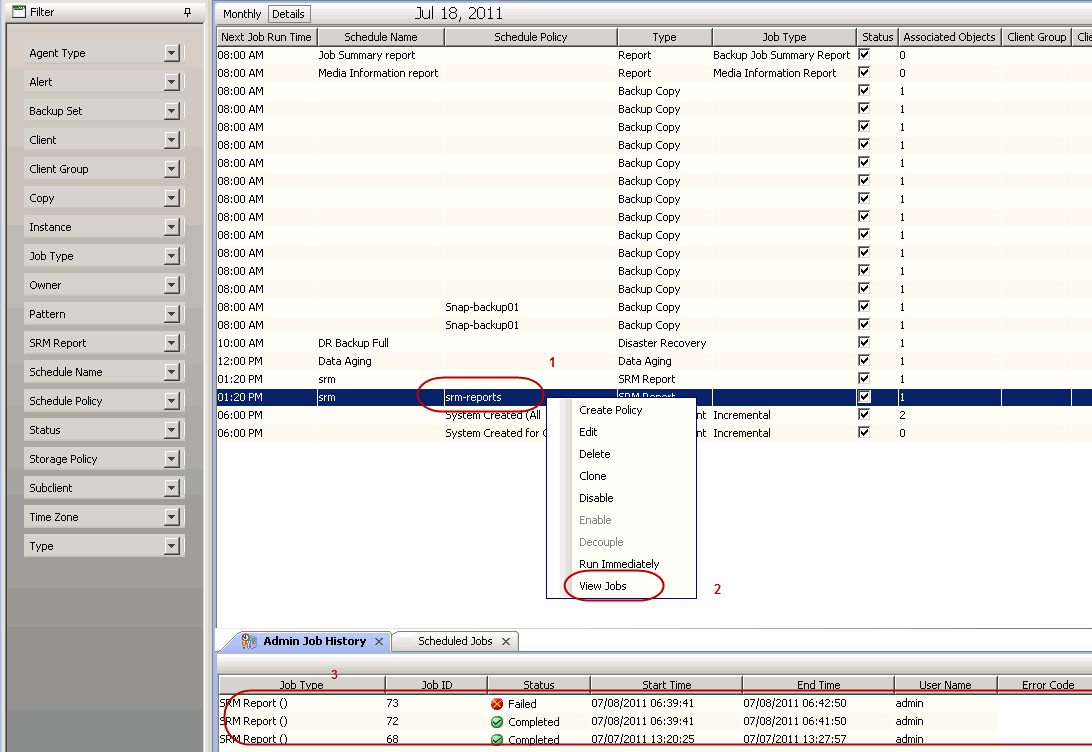
Viewing Jobs Associated with a Schedule Policy

Use the following steps to view a list of jobs that were run for the schedule:

  1. From the CommCell Browser, click the Tool menu and click Scheduler.
  2. Select the schedules for a particular day in the Monthly tab.
  3. Click the Details tab.
  4. Right-click the <Schedule Policy> for which you wish to see the associated jobs and click View Jobs.
  5. Click Ok.
      Minimize the Scheduled Job window to view the associated jobs in the Job History window in the right pane.

Related Reports

Job Schedule Report

The Job Schedule Report provides a list of all the scheduled operations based on the selected filter conditions.

Use the following steps to run a Job Schedule report:

  1. From the CommCell Browser, click the Tools menu and click Reports.
  2. In the Report Selection pane, click Jobs and click Job Schedule.
  3. Click Run.

Command Line Operations

Running Schedules

You can schedule jobs from the command line by using either of the two methods:

  1. Using qcommands
  2. Using the Save As Script

    You can select the necessary options from the CommCell Console and save them as a script file, which can later be executed from the command line using the qoperation execute command.

List All Schedule Policies in the CommCell

  1. Download the all_sched_policy_associations.xml file and save it on the computer from where the command will be executed.
  2. Execute the following command from the <Software_Installation_Directory>/Base folder:

    qoperation execute –af all_sched_policy_associations.xml

List Schedules and Schedule Policies from different CommCell Levels

You can send a request to get the schedules and schedule policy details at the following levels:

At the CommCell Level

  1. Download the schedules_commserve_level.xml file and save it on the computer from where the command will be executed.
  2. Execute the following command from the <Software_Installation_Directory>/Base folder after substituting the parameter values.

    qoperation execute –af schedules_commserve_level.xml

At the Client Level

  1. Download the schedules_client_level.xml file and save it on the computer from where the command will be executed.
  2. Execute the following command from the <Software_Installation_Directory>/Base folder after substituting the parameter values.

    qoperation execute –af schedules_client_level.xml -clientName xxxxx

At the BackupSet Level

  1. Download the schedules_backupset_level.xml file and save it on the computer from where the command will be executed.
  2. Execute the following command from the <Software_Installation_Directory>/Base folder after substituting the parameter values.

    qoperation execute –af schedules_backupset_level.xml -appName xxxxx -clientName xxxxx -backupsetName xxxxx

At the Subclient Level

  1. Download the schedules_subclient_level.xml file and save it on the computer from where the command will be executed.
  2. Execute the following command from the <Software_Installation_Directory>/Base folder after substituting the parameter values.

    qoperation execute –af schedules_csubclient_level.xml -appName xxxxx -clientName xxxxx -backupsetName xxxxx -subclientName xxxxx

Available Command Parameters

When sending the request for a specific CommCell level, you may need to specify the following parameters:

Parameter Description and Parameter Values
clientName Name of the client computer.
appName Name of the Agent. For example, 'File System' for the Windows or Unix File System Agent.
backupsetName Name of the backup set. If the backup set name is not specified in the command query, the default backup set is used by default.
subclientName Name of the subclient.

You can also set filters in the XML files to display specific schedule/schedule policy details. In the XML files provided above, the schedules, isCalendar and policy filters are provided by default:

<filter schedules="1" isCalendar="0" policy="1">

The following table lists all available filter parameters that you can define in the XML file, which you can enable or disable by setting them to '1' or '0' respectively:

Parameter Description
automaticSchedules Filter to display only automatic schedules.
EZPolicyFilter Filter to display only EZ schedules.
isCalendar Filter to display the schedule details in calendar view.
isSRMReports Filter to display only SRM report schedules.
otherReports Filter to display report schedules other than SRM report schedules.
policy Filter to display schedule policy associations.
savedReports Filter to display only schedules from saved reports.
schedules Filter to display schedule associations.