A recovery point is generated whenever you change the hardware or network
configuration of the client and perform a backup. You can use recovery points to
create a virtual machine with an old hardware or network configuration. By
default, the most recent recovery point is used to create the virtual machine.
Before using a recovery point, you can compare the client configurations
associated with various recovery points and then choose a recovery point for
creating the VM. You can generate an xml file for each recovery point. The xml
file contains the client
configuration details. Follow the steps given below to
generate the xml file for a recovery point:
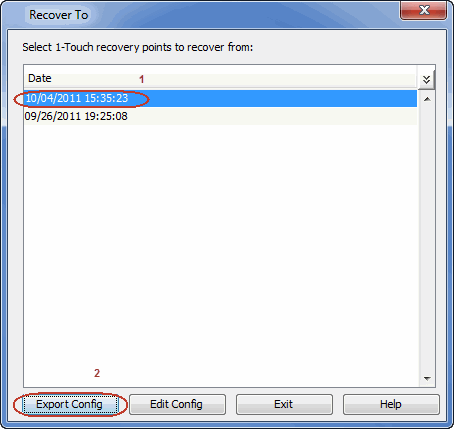
From the CommCell Console, navigate to Client
Computers.
Right-click the <Client> and select All Tasks
| 1-Touch Recovery Point.
Select a recovery point and click Export Config.
Specify the location to save the xml file and click Save.
By default, the the xml file is saved in the
My documents folder on the computer that is running the CommCell
Console.
Open the xml file using any text editor and verify the client
configuration.
Once you choose a recovery point for creating the
VM, follow the steps given below to create a VM using the recovery
point:
From the CommCell Console, navigate to Client
Computers.
Right-click the <Client> and select All Tasks
| Virtualize Me.
Select a vCenter, ESX Server and a Data Store.
Specify the ISO Path on the ESX server.
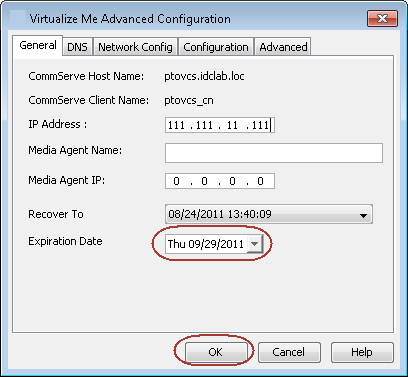
Click Advanced.
Select a date and time of the recovery point from the Recover to list.
A virtual machine will get created using the hardware configuration
which is backed up on the selected date and time. However, the data on the virtual machine will be the data backed up
during the most recent backup.
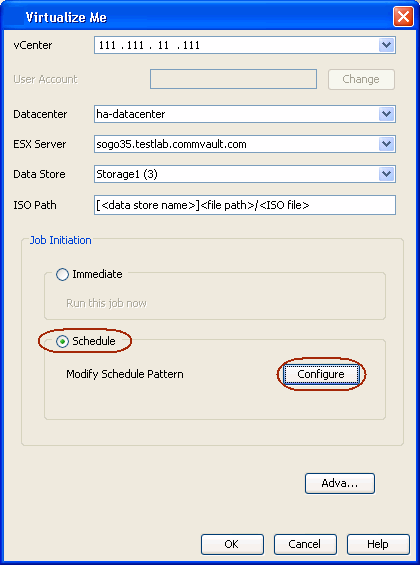
You can set an expiration date for the virtual machine. Follow the steps
given below to set the expiration date of the virtual machine:
From the CommCell Console, navigate to Client
Computers.
Right-click the <Client> and select All Tasks
| Virtualize Me.
Select a vCenter, ESX Server and a Data Store.
Specify the ISO Path on the ESX server.
Click Advanced.
Clear the Never check box and select the Expiration Date.
Click OK.
At the end of expiration date, the virtual machine is powered off and
decommissioned. However, if you have performed regular backups of the
virtual machine using Virtual Server
iDataAgent, you can recover a
decommissioned virtual machine at any time. It is recommended to
perform regular backups for the virtual machine using Virtual Server
iDataAgent.
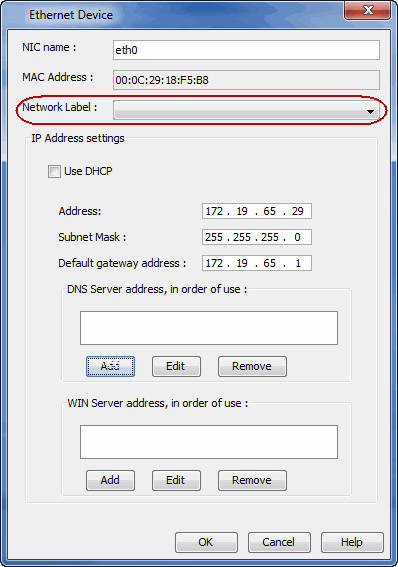
Virtual Center uses labels to identify the virtual network adapter is
associated with a physical network. If you want to associate the network
adapter of the VM with a specific virtual server network, follow the steps given below:
From the CommCell Console, navigate to Client
Computers.
Right-click the <Client> and select All Tasks
| Virtualize Me.
Select a vCenter, ESX Server and a Data Store.
Specify the ISO Path on the ESX server.
Click Advanced.
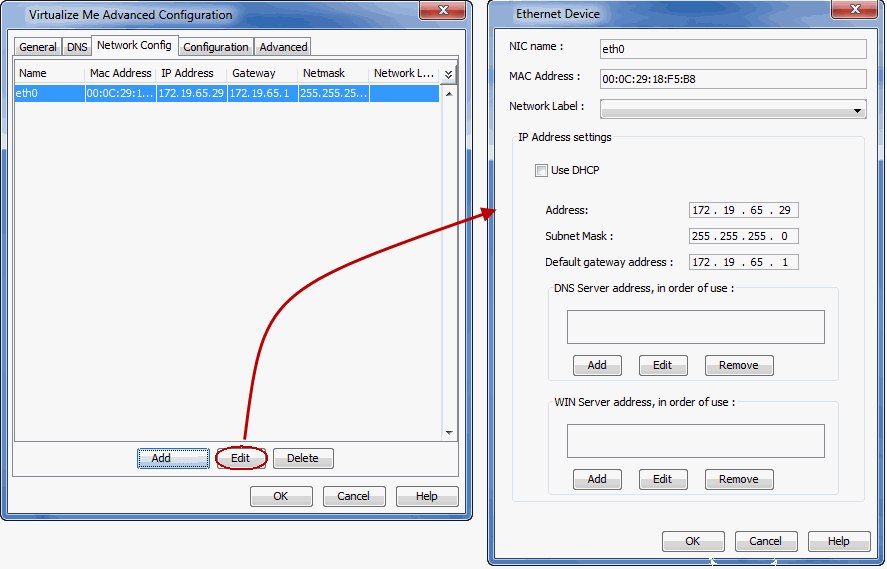
Click the Network Config tab.
Select the network interface and click Edit.
Select a network label from the Network Label list. This list
displays all the network labels available on the ESX server or the
vCenter.
Click OK.
Click OK on the Virtualize Me Advanced Configuration
dialog box.
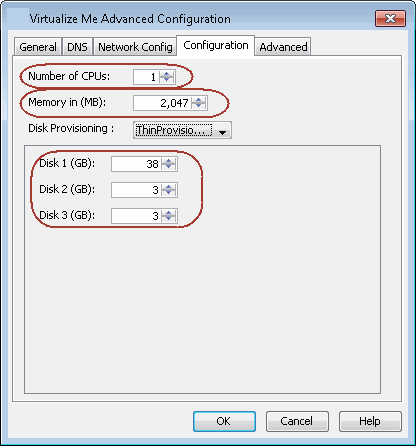
When you convert the client computer into a virtual machine, you can modify
it's hardware configuration such as memory, number of CPUs, disk space etc.
From the CommCell Console, navigate to Client
Computers.
Right-click the <Client> and select All Tasks
| Virtualize Me.
Select a vCenter, ESX Server and a Data Store.
Specify the ISO Path on the ESX server.
Click Advanced.
Click the Configuration tab.
Modify the required hardware configuration as follows:
Number of CPUs - The existing number of CPUs in the
virtual machine are displayed. You can increase the Number of CPUs.
Memory in (MB) - The existing memory of the virtual
machine is displayed. You can increase or decrease the memory.
Disk <n> (GB) - The disk size of existing disks is
displayed. You can increase the disk space for each disk.
The displayed disk size is always larger than the actual disk
size.
For example: If the actual disk size of a disk on the physical machine is
50GB, the disk size appears as 54GB.
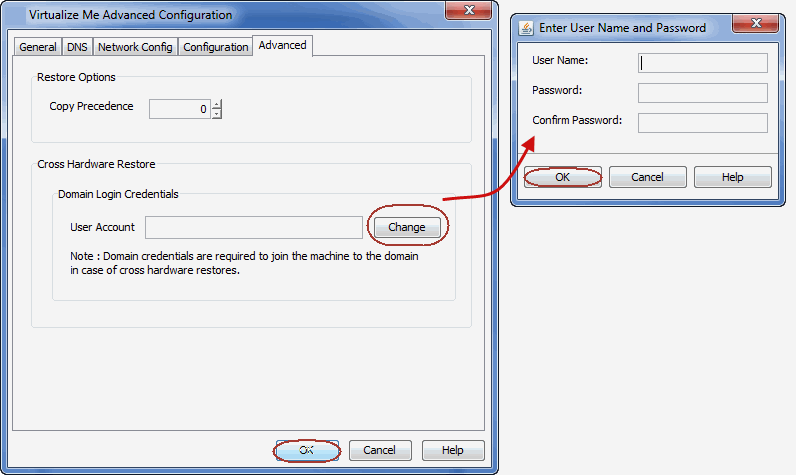
If the client computer is member of a domain,
click Advanced tab.
Click Change and enter the credentials of the domain in
which you want to add the virtual machine.
Click OK.
Click OK on the Virtualize Me Advanced Configuration
dialog box.
Thin Provisioning is a technique of allocating disk storage space in a
flexible manner among multiple users, based on the minimum space required by
each user at any given time. Follow the steps given below to use thin
provisioning for disk space allocation:
From the CommCell Console, navigate to Client
Computers.
Right-click the <Client> and select All Tasks
| Virtualize Me.
Select a vCenter, ESX Server and a Data Store.
Specify the ISO Path on the ESX server.
Click Advanced.
Click the Configuration tab.
Ensure that Thin Provisioning is selected from the Disk
Provisioning list.
You cannot pre-allocate disk space for a virtual machine. Thin
provisioning is always used to allocate disk space even if you select
Thick Provisioning from the Disk
Provisioning list.
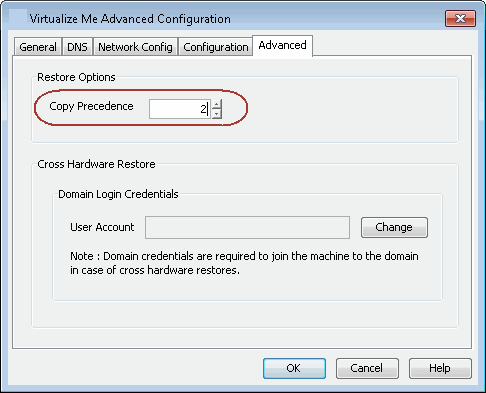
You can use a specific copy of the backup data to
create the virtual machine. By default the virtual machine is created using the
backup data from the storage policy copy which has the lowest copy precedence.
Follow the steps given below to specify the copy precedence of the backup copy:
From the CommCell Console, navigate to Client
Computers.
Right-click the <Client> and select All Tasks
| Virtualize Me.
Select a vCenter, ESX Server and a Data Store.
Specify the ISO Path on the ESX server.
Click Advanced.
Click the Advanced tab.
Enter the Copy Precedence of the copy which you want to use to
create the virtual machine.
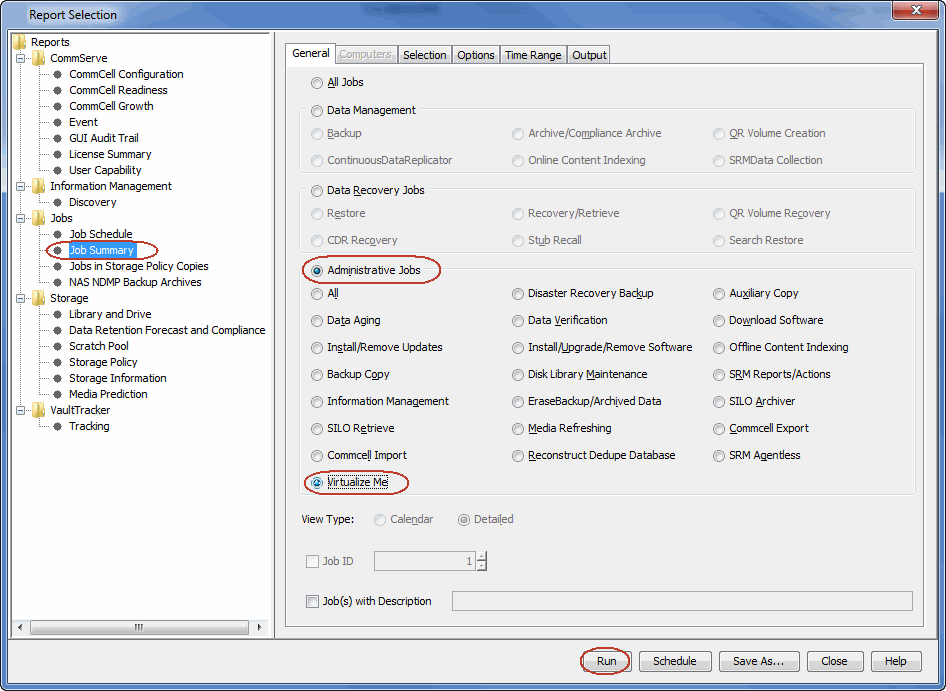
You can use the Virtualize Me Job Summary Report to review information related to all
Virtualize Me jobs that run in the CommCell during the specified time period. This report is useful if you need to
know:
All Virtualize Me jobs with a specified status during a specified time period
The user who set up the job
The client for which the job run
The failure reasons, if applicable
On the CommCell Console toolbar, click the Reports button.
From the Reports pane, select Job Summary.
On the General tab,
select Administrative Jobs, and then select Virtualize Me.