Advanced - Active Directory Configuration

Table of Contents

Understanding the CommCell Console

Creating a Subclient to Backup Specific Organizational Units

Modifying User Accounts for Active Directory

Enabling Restore of Passwords

Configuring Pre/Post Processing for Backups

Setting up Pre/Post Processes

Setting up Pre/Post Processes to Run During Failures

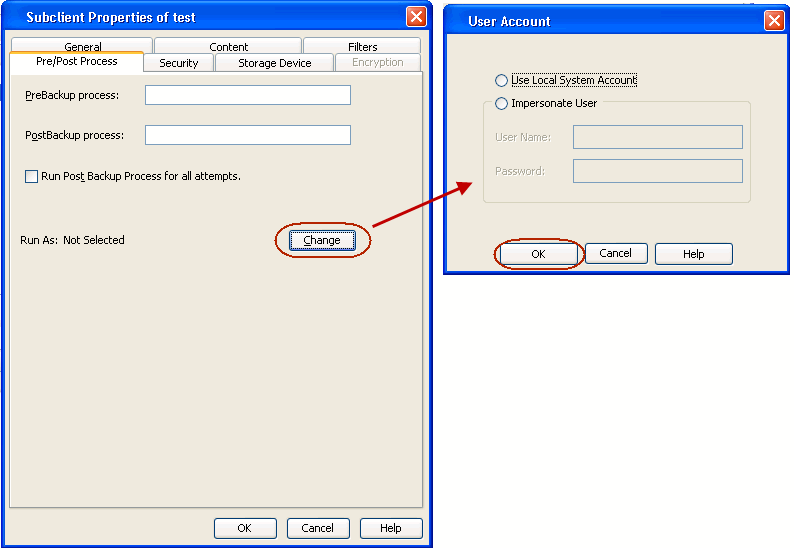
Changing User Account for Executing Pre/Post Commands

Modifying an Agent, BackupSet or Subclient

Deleting an Agent, BackupSet or Subclient

Understanding the CommCell Console

Active Directory iDataAgent uses following main components to perform backup and restore operations from the CommCell Console.

Backup Set - collective information of all the data that needs to be backed up for the client.

Subclient - defines the data to be backed up.

Creating a Subclient to Backup Specific Organizational Units

The default subclient contains the entire active directory database. You can create user defined subclient to manage and back up specific Domain Components (DC), Organizational Units (OU) or Common Names (CN).

  1. From the CommCell Browser, navigate to Client Computers | <Client> | Active Directory | Backup Set.
  2. Right-click the Backup Set, point to All Tasks and then click New Subclient.
  3. In the Subclient Name box, type a name.
  4. Click the Storage Device tab.
  5. In the Storage Policy list, click a storage policy name.
  6. Click the Content tab.
  7. Click Browse.
  8. Select the organizational unit to be backed up and click Add.

    Repeat this step to include all the organizational units to be backed up.

    When you add an organizational unit to a subclient, it is automatically excluded from the default subclient.

  9. Click Close.
  10. Click OK.

Modifying User Account for the Active Directory Server

The Active Directory account information is used to verify the rights to back up and restore data from the Active Directory Server. During the deployment you can specify the user account information. However, if the user account information for the active directory server changes, you must update the user account information.

  1. From the CommCell Browser, navigate to Client Computers | <Client>.
  2. Right-click the Active Directory and click Properties.
  3. Click Change Account.
  4. Enter the username and password for the user account which has rights to back up and restore data from the Active Directory Server.
  5. Click OK.
  6. Click OK.

Enabling Restore of Passwords

You must run adLdapTool.exe on the client before your first backup to enable restores of passwords for Users and Computers. Follow the steps given below to run this utility:

  1. Login to client computer using the user account, which has administrative privileges for the domain and Active Directory Schema.
  2. Open the Command Prompt and navigate to the following location:

    <Install Directory>\Base

  3. Enter the following command:

    adLdapTool.exe <domain_name\domain_administrator_user_name> <password> -hostserver <fully_qualified_directory_host_server_name> -port 389 <LDAP_port_number> -setschema 1

    If you are running the adLdapTool.exe utility on a ADAM or LDS Server, enter the following command:

    adLdapTool.exe <domain_name\domain_administrator_user_name> <password> -hostserver <fully_qualified_directory_host_server_name> -port <instance_LDAP_port_number> -adam -setschema 1

    The adLdapTool sets following values to the searchFlags attributes of "Unicode-Pwd" and "SID-History" found under CN=Schema and Cn=Configuration:

    Value for Unicode-Pwd - 0x00000008

    Value for SID-History0x00000009

    Due to this setting, Active Directory will preserve these two attributes on deletion.

Configuring Pre/Post Processing for Backups

Setting Up Pre/Post Processes

You can add and modify Pre/Post processes for a subclient. These are batch files or shell scripts that you can run before or after certain job phases. For example, you can use an echo command to check the level of a backup. Similarly, you can include a case statement within a script to run specific operations based on the level of the backup job.

A Save As Script file can also be run as a pre/post process, if you include the absolute path of the associated input file in the script file.

  1. From the CommCell Browser, navigate to Client Computers | <Client> | Active Directory | BackupSet.
  2. Right-click the <Subclient> in the right pane, and then click Properties.
  3. Click the Pre/Post Process tab.
  4. Depending on the process you want to set up, click the corresponding Browse button.
  5. Select the batch file or shell script and then click OK.

Setting Up Post Processes To Run During Failures

By default, a specified post process command is executed only on successful completion of the scan or backup operation or if the job is killed.

Use the following steps to run a post process even if the scan or backup operation did not complete successfully. For example, this may be useful to bring a database online or release a snapshot.

  1. From the CommCell Browser, navigate to Client Computers | <Client> | Active Directory | BackupSet.
  2. Right-click the <Subclient> in the right pane, and then click Properties.
  3. Click the Pre/Post Process tab.
  4. Select the Run Post Backup Process for all attempts check box.
  5. Click OK.

Changing User Accounts for Executing Pre/Post Commands

You must specify the user account and password required for executing the Pre/Post commands.

  1. From the CommCell Browser, navigate to Client Computers | <Client> | Active Directory | BackupSet.
  2. Right-click the <Subclient> in the right pane, and then click Properties.
  3. Click the Pre/Post Process tab.
  4. Click Change.
  5. Select one of the following user accounts:
    • Use Local System Account - Select this option to use the local system account on the MediaAgent for executing the Pre/Post Process commands. 
    • Impersonate User - Select this option to use an authenticated user account for executing Pre/Post commands. However, if the specified user account is not available on the MediaAgent, backup jobs using Pre/Post commands will fail.
  6. Click OK.

Modifying an Agent, Backupset or Subclient

The following table describes the properties that can configured from the agent, backup set and subclient levels.

Option Description Related topics
Create New Index on Full Backup

This option accelerates Full or On Demand backups and is enabled by default. Subsequently, when you perform a browse and restore operation, the default browse displays data up to the most recent full backup. To browse and restore older data you have to use the options to browse before or between specific dates.

When disabled, Full or On Demand backups may be slower. However, the default browse displays all data in the entire retention period; not just one full backup cycle.

Use the following steps to configure this option for all subclients. This option can also be set for the individual backups when initiating the job.

  1. From the CommCell Browser, navigate to Client Computers | <Client>.
  2. Right-click the  Active Directory and click Properties.
  1. Click the Index tab.
  2. Select the Create new index on Full Backup check box.
  3. Click OK.
 
Convert to Full Backup on Indexing Failure Use this option to ensure that the backup does not fail if the index is irretrievable. When disabled, the backup will fail if the index is irretrievable.
  1. From the CommCell Browser, navigate to Client Computers | <Client>.
  2. Right-click the  Active Directory and click Properties.
  1. Click the Index tab.
  2. Select the Convert to full backup on indexing failures check box.
  3. Click OK.
 
Change Storage Policies You can modify the storage policies in any of the following situations:
  • To include a different media for the backup operation.
  • To use a storage policy with a different retention criteria.

You can change the storage policies from the subclient level.

  1. From the CommCell Browser, right-click the subclient.
  2. Click Properties.
  3. Click Storage Device.
  4. Select the Storage policy from the drop-down menu.
  5. Click OK.
Refer to Storage Policies.
Rename a Backup Set or Subclient You can rename backup sets and subclients.

Renaming BackupSet:

  1. From the CommCell Browser, navigate to Client Computers | <Client> | Active Directory.
  2. Right-click the <Backup Set>, and then click Properties.
  3. In the Backup Set box, type a name.
  4. Click OK.

Renaming subclient:

  1. From the CommCell Browser, navigate to Client Computers | <Client> | Active Directory | <Backup Set>.
  2. Right-click the <user-defined Subclient>, and then click Properties.
  3. In the Storage Policy list, click a storage policy name.
  4. Click OK.
 
Data Transfer Options You can efficiently configure the available resources for transferring data secured by data protection operations from the subclient level. This includes the following:
  • Enable or disable Data Compression either on the client or the MediaAgent.
  • Configure the transfer of data in the network using the options for Network Bandwidth Throttling and Network Agents.

You can configure the data transfer options.

  1. From the CommCell Browser, navigate to Client Computers | <Client> | Active Directory | BackupSet.
  2. Right-click the <Subclient> in the right pane, and then click Properties.
  1. Click the Storage Device tab.
  2. Click the Data Transfer Option tab.
  3. Choose the appropriate software compression option for this subclient.
  4. Select the Throttle Network Bandwidth check box, and set the required bandwidth.
  5. Click OK.
Refer to Data Compression and Network Bandwidth Throttling.
View Data Paths You can view the data paths associated with the primary storage policy copy of the selected storage policy or incremental storage policy. You can also modify the data paths including their priority from the subclient level.
  1. From the CommCell Browser, navigate to Client Computers | <Client> | Active Directory | BackupSet.
  2. Right-click the <Subclient> in the right pane, and then click Properties.
  1. Click the Storage Device tab.
  2. In the Storage Policy list, click a storage policy name.
  3. Click Data Paths.
 
Configure Activity Control You can enable backup and restore operations from the agent and subclient level. However, you can enable restore operations only from the agent level.
  1. From the CommCell Browser, navigate to Client Computers | <Client>
  2. Right-click the <Client> or <Subclient> in the right pane, and then click Properties.
  3. Click the Activity Control tab and select or clear option(s) as desired.
  4. Click OK.
Refer to Activity Control.
Configure User Security You can configure user security from the agent or subclient level.

You can perform the following functions:

  • Identify the user groups to which this CommCell object is associated.
  • Associate this object with a user group.
  • Disassociate this object from a user group.
  1. From the CommCell browser, right-click the subclient.
  2. Click Properties.
  3. Click Security.
  4. Select the appropriate user groups to which you want to associate to the CommCell object from the Available Groups pane, and then move the user group to the Associated Groups pane.
  5. Click OK.
Refer to User Administration and Security.
Enable/Disable Data Encryption You can enable data encryption from the suclient level.Encryption must be enabled at the client level prior to configuring any instances residing on that client.
  1. From the CommCell browser, right-click the subclient.
  2. Click Properties.
  3. Click Encryption.
  4. Select the desired encryption.
  5. Click OK.
Refer to Data Encryption.
View Software Version and Installed Updates The Version tab, at the Agent level displays the software version and post-release service packs and updates installed for the component.
  1. From the CommCell browser, right-click the agent.
  2. Click Properties.
  3. Click Version.
  4. Click OK.
 
CommCell Configuration Report The CommCell Configuration Report provides the properties of the CommServe, MediaAgents, clients, agents, SRM agents, subclients, and storage policies within the CommCell based on the selected filter criteria.
  1. From the CommCell Browser, double-click Reports icon.
  2. Select CommCell Configuration.
  3. Click Run.
Refer to CommCell Configuration.

Deleting an Agent, Backupset or Subclient

The following sections describe the steps involved in deleting an agent, backupset or subclient.

When you delete an instance or backupset, the associated data is logically deleted and you can no longer access the corresponding data from CommCell Console for recovery purposes.

Refer to the troubleshooting article on Recovering Data Associated with Deleted Clients and Storage Policies for information on how to recover data if you accidentally delete an entity.

Deleting an Agent

You need to uninstall or DeConfigure the agent software from the client computer before deleting from CommCell Browser. After you delete the client software, you can either leave the corresponding data intact for appropriate action or you can remove the data immediately. If you choose to remove the data immediately, you must delete the agent from the CommCell Browser. If you delete the agent, all of the agent's data is irretrievably lost.

  1. From the CommCell Browser, navigate to Client Computers | <Client>.
  2. Right-click the <Agent>, and then click Delete.
  3. A confirmation message is displayed with the following message:

    This operation will permanently delete the data backed up from this level and it cannot be restored.

  4. Click OK to continue with the deletion operation., or click No to abort the deletion.

Deleting a BackupSet

Consider the following before deleting a Backup Set:

  1. From the CommCell Browser, navigate to Client Computers | <Client> | <Agent>.
  2. Right-click the <Backup Set>, and then click Delete.
  3. A confirmation message is displayed, asking if you want to delete the Backup Set.

    Click No to cancel the deletion and retain the Backupset, or click Yes to continue the deletion.

Deleting a Subclient

Consider the following before deleting a subclient:

  1. From the CommCell Browser, navigate to Client Computers | <Client> | <Agent> | <Backup Set>.
  2. Right-click the <subclient> that you want to delete, and then click Delete.
  3. A confirmation message is displayed, asking if you want to delete the subclient.

    Click No to cancel the deletion and retain the subclient, or click Yes to continue the deletion.

Back to Top