Topics | How To | Tools | FAQ | Troubleshoot | Related Topics
Setup Throttling for Subclients
This page provides information on the following:
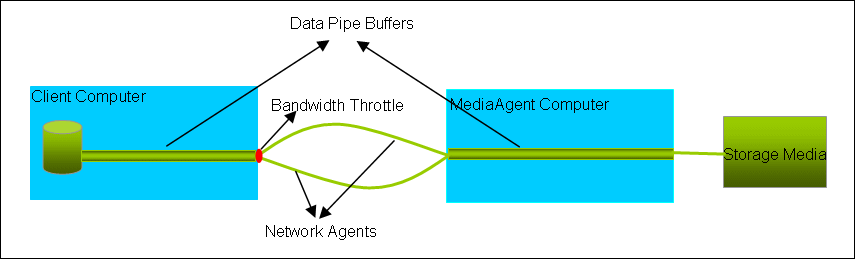
The following diagram provides a visual representation of the above mentioned parameters:
Network Agents are used to establish the data pipes which are used to transfer data to the MediaAgent. By default, the system uses 2 network agents and this may be suitable for 100 megabit networks. Increasing this value may increase the data transfer throughput from the Client. Note that the other network features, such as Network card speed, Network switch speed, etc., will also impact the network throughput and therefore it is recommended that you use this as an experimental parameter, based on your environment, to see if faster data throughput can be accomplished.
For most Agents, network agents can be established from the following dialog boxes:
For the QR Agent:
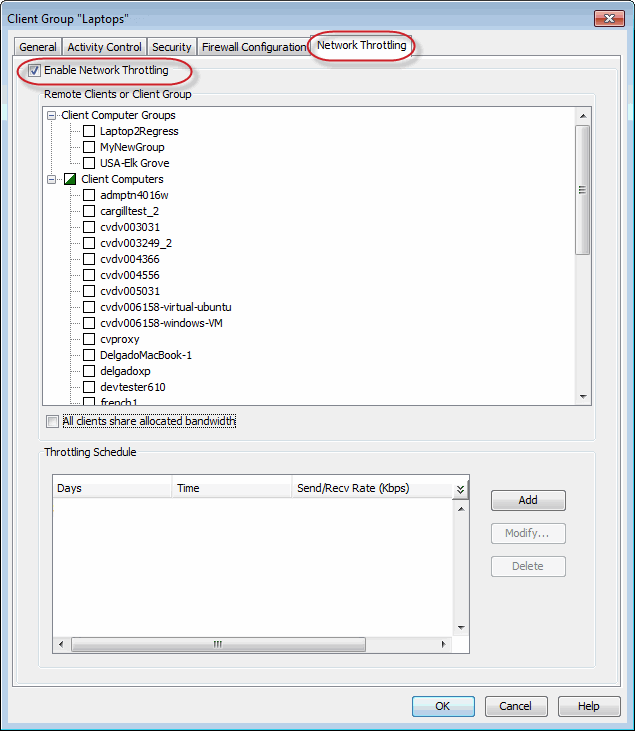
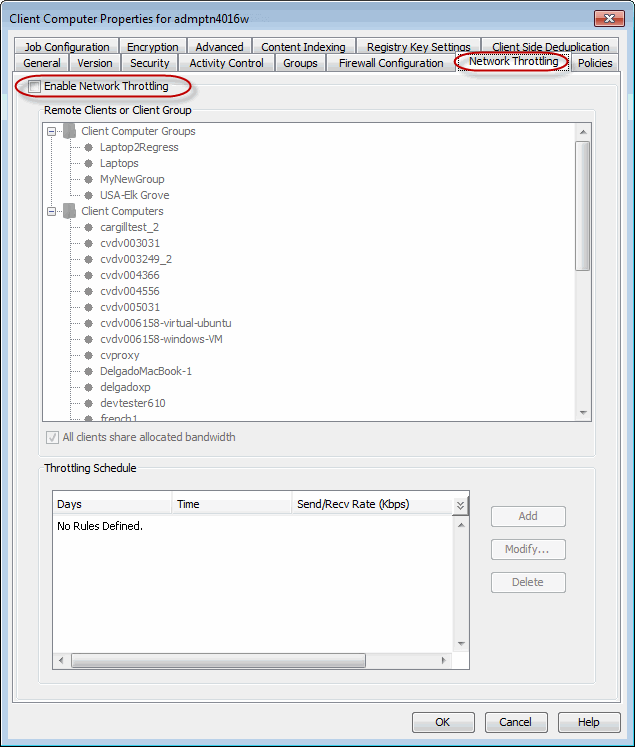
The network traffic for Clients and MediaAgents can be throttled based on the network bandwidth in your environment. This is useful to regulate network traffic and minimize bandwidth congestion.
By default, network throttling is disabled. You can enable the throttling options for an individual client, a client group consisting multiple clients, or a MediaAgent. Once configured, the throttling options are applied to all data transfer and control message operations, such as Data Protection operations including Laptop Backups, Copy operations including DASH copy, Data Recovery Operations, etc.
The throttling values setup in the throttling rule regulates the rate at which the data is sent and received.
You can also setup relative bandwidth throttling to ensure performance when the client machine connects with limited bandwidth. Multiple rules can be created for same client/client group, however the lowest values set up in different rules takes precedence for each time that intersects.
Use the following steps to set up network throttling options for Client Computer Group and thereafter disable throttling from the automatic schedules:
You can setup throttling for the following:
| 1. |
|
 |
||
| 2. |
|
 |
||
| 3. |
|
 |
||
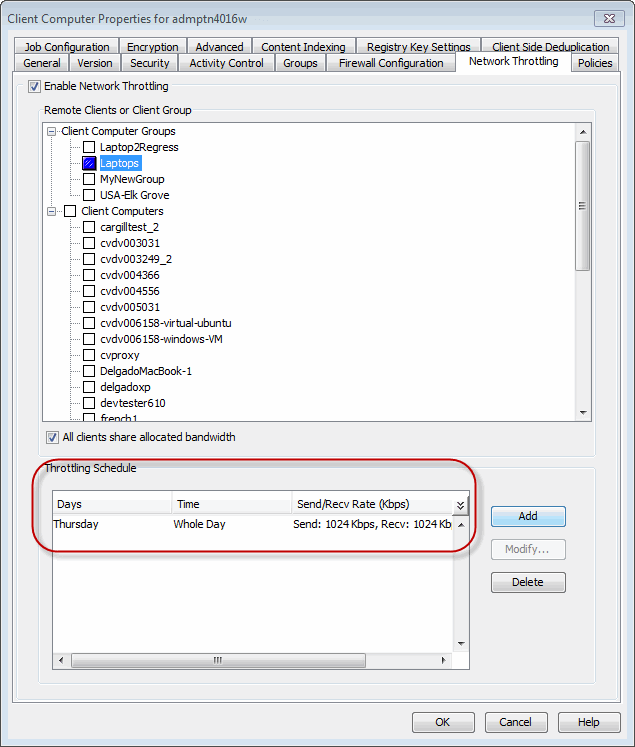
| 4. | Click Add to setup throttling rules.
Click OK. |
 |
||
| 5. | The newly added throttling rules will be displayed in Throttling
Schedule. Click OK. |
 |
||
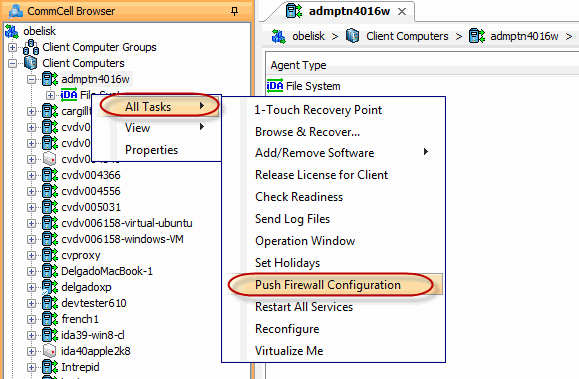
| 6. | From the CommCell Browser, navigate to Client Computer Groups | <Client> | All Tasks and click Push Firewall Configuration. |
 |
||
| 7. | Click Continue. |
 |
| 1. |
|
 |
||
| 2. |
|
 |
||
| 3. |
|
 |
||
| 4. | Click Add to setup throttling rules.
Click OK. |
 |
||
| 5. | The newly added throttling rules will be displayed in Throttling
Schedule. Click OK. |
 |
||
| 6. | From the CommCell Browser, navigate to Client Computer Groups | <Client> | All Tasks and click Push Firewall Configuration. |
 |
||
| 7. | Click Continue. |
|
| 1. |
|
|
||
| 2. |
|
 |
Note that subclient throttling is done on a per Network Agent basis. For most Agents, network bandwidth can be established from the following dialog boxes:
For the QR Agent:
All subclients, except the subclients within NAS iDataAgents support network bandwidth throttling.
Data pipe buffers determines the amount of shared memory allocated on each computer for data pipes. The default size of each buffer is 64K; you can configure this buffer size - see Configure the Application Read Size for more information. By default, the system allocates 30 pipeline buffers on each computer which is used to transfer data between the client and the MediaAgent. (A total of 30 buffers of size 64K each allocates 2 MB of shared memory on each machine.)
You can use the nNumPipelineBuffers registry key to establish additional buffers as needed within the allowable range. Additional pipeline buffers may expedite running dedicated (non-multiplexed) backups to tape devices and therefore improve data transfer performance; on the other hand, allocating additional buffers may take up more shared memory than desired..
Note that this is an advanced feature and we recommend that you exercise extreme caution while modifying this registry key.
You can check whether or not a client is accessible in the CommCell using the Check Readiness option in the CommCell Console.
When selected, this option will display a message indicating whether or not the client is accessible. If the client is not accessible, you can check the Service Control Manager to ensure the client's services are running.
For step-by-step instructions, see Check Client Connectivity.