Advanced - Exchange Database iDataAgent Configuration

Table of Contents

Features for Exchange 2010

Features for Exchange 2007

Features for Exchange 2003

Command Line Operations

Understanding the CommCell Console

Pre-Selecting a Backup Type

Creating User-Defined Subclients

Configuring Event Check During Backups

Configuring Database Availability Group (DAG) Backups

Modifying an Agent or Subclient

Deleting an Agent or Subclient

Configuring to Filter Recovery Databases from Backups

Understanding the CommCell Console

Pre-Selecting a Backup Type

Creating User-Defined Subclients

Configuring Event Check During Backups

Configuring Backups of Locked Databases

Prevent Log Truncation During Backups

Configuring Cluster Continuous Replication (CCR) Backups

Modifying an Agent or Subclient

Deleting an Agent or Subclient

Configuring to Filter Recovery Storage Groups from Backups

Understanding the CommCell Console

Pre-Selecting a Backup Type

Creating User-Defined Subclients

Configuring Event Check During Backups

Configuring Backups of Locked Databases

Prevent Log Truncation During Backups

Modifying an Agent or Subclient

Deleting an Agent or Subclient

Log on to the CommServe

Configure Subclients

List Schedule Policy Association

Understanding the CommCell Console

The Exchange Database iDataAgent uses one main component to perform backup and restore operations from the CommCell Console.

Agent - defines the Exchange Server to be backed up.

Subclient - defines the database to be backed up.


Pre-Selecting a Backup Type

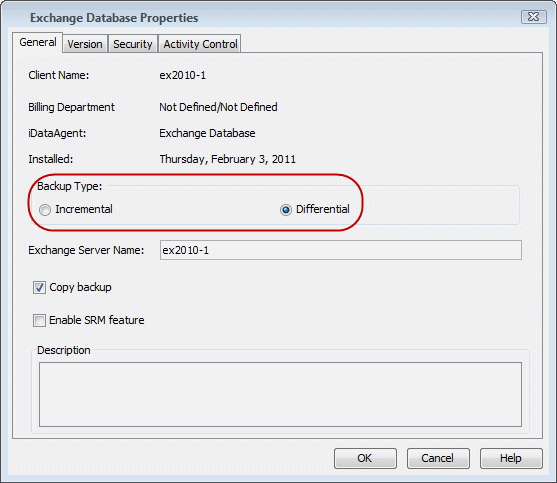
The backup type that was selected during installation can be changed. However, after it is run, note that the next backup must be a Full backup.

  1. From the CommCell Browser, right-click the Exchange Database agent in which you need to change the backup type, and then click Properties.
  2. Click Incremental or Differential and click OK.
    • Differential - Specifies that each non-full Exchange Database backup secures all data that has changed since the last full backup. Transaction lobs are not purged.
    • Incremental - Specifies that each non-full Exchange Database backup secures only that data that has changed since the last backup of any type. Committed transaction logs are purged.
  3. Right-click the Exchange Database agent and click All Tasks | Backup All Subclients.
  4. Click Pre-Selected Backup Type and click OK.

    The next backup that is run must be a Full backup.

Creating User-Defined Subclients

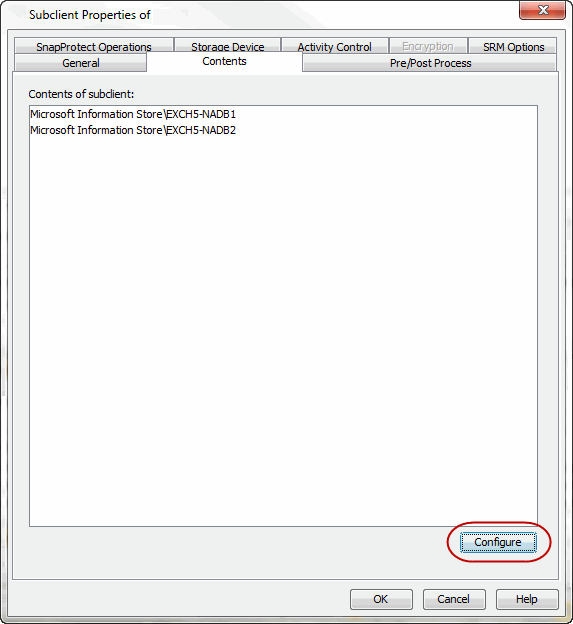
By default, all databases are automatically assigned to the default subclient. However, you can divide databases across one or more user-defined subclients to leverage your backups efficiently. Note, however, that once a database is assigned to a user-defined subclient, it is automatically removed from the default subclient.

  1. From the CommCell Browser, right-click the Exchange Database agent on the source client, and click All Tasks | New Subclient.
  2. Click the Contents tab and then click Configure.
  3. From the Add/Modify Subclients window, click the subclient entry for the database that you want to add to the new subclient.

    Click Discover to display all databases.

  4. Alternatively, you can select and assign a range of databases to the new or existing subclient using the Change all selected databases/storage groups to list.
  5. Click OK.

configuring event check

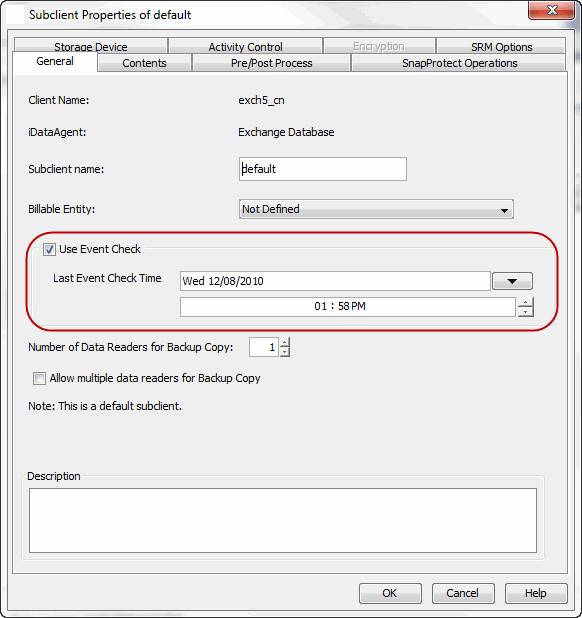
The Event Check option can examine the event logs for the Exchange application to ensure that these errors have not occurred before initiating a backup of the database. Any of these errors occurring in the Exchange application event log before the specified date and time will be ignored, and any found after the specified date and time will cause the backup to fail.

This option can scan for the following file-level damage errors prior to continuing with the backup:

Follow the steps below to enable the event check option:

  1. From the CommCell Browser, right-click the subclient you want to configure for Event Check, then click Properties.
  2. Click Use Event Check.
  3. Specify the date and time in the Last Event Check Time field. This will serve as the starting point to begin checking the Exchange application event log.
  4. Click OK.

Configuring Database Availability Group (DAG) Backups

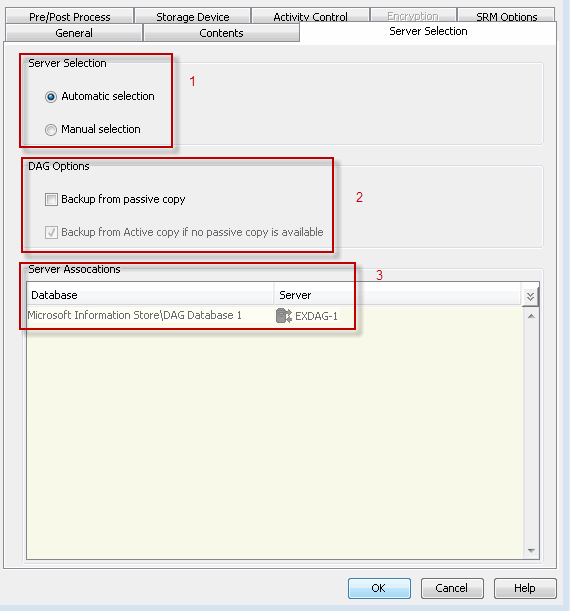
Prior to using the Exchange Database iDataAgent in Database Availability Group (DAG) environments, you must configure a master client and select the appropriate server as follows:

  1. From the CommCell Browser, right-click the Client Computers node and select New Client.
  2. Select Exchange 2010 DAG Client.
  3. Click Discover and enter the Active Directory credentials in the AD Server Credentials dialog. These credentials can be either for the current domain or a pre-configured external domain.

    Click OK. DAG Member Servers are listed with their fully qualified domain name and will appear highlighted if the Exchange Database iDataAgent of the current software release is installed.

  4. Select a server from the DAG Servers drop-down list.
  5. Enter the Client Name.
  6. Click OK.

    The master client is created. All configuration, backup and restore operations will be initiated from the master client.

  1. From the CommCell Browser, navigate to the Master Client's subclient, right-click and select Properties.
  2. Click the Server Selection tab.
  3. Select Auto or Manual.
    • If selecting Auto, then select Backup from passive copy. If a passive copy is not available, then select Backup from Active copy if no passive copy is available.
    • If selecting Manual, a list of all discovered databases will be listed under Server Associations. Select the server to which you want to backup the databases.
  4. Click OK.

Configuring Backups of Locked Databases

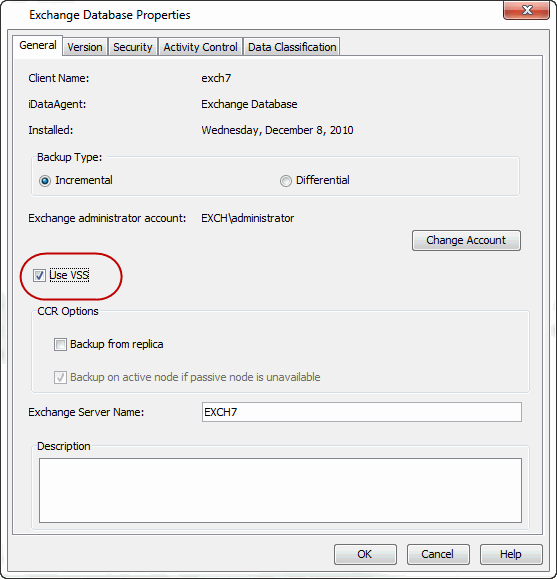
In some cases, it may be desirable to allow write operations on data being backed up to continue while the backup runs. Enabling VSS for backups provides this capability.

During a VSS backup, the free space needed on a volume for the shadow copy is related to the duration of the backup and the amount of changes being made to the data objects (files, databases) that are being backed up. VSS snapshots capture and copy disk blocks that are being changed by other processes while the backup for a particular object is running. If the backup runs longer, or there is a lot of disk activity (files or databases being changed). This causes VSS to copy more data blocks and therefore, use more disk space.

VSS can be enabled for backups of local volumes in both clustered and non-clustered environments. If the operating system fails to create a shadow copy of the data a traditional backup of the data will be performed, and a corresponding message will appear in the Event Viewer. A consistency check of the database integrity will be performed by the system prior to backing up the data, and if the integrity check fails then the backup will fail.

  1. Ensure the Exchange database is mounted.
  2. From the CommCell Browser, navigate to Client Computers | Exchange Database | Subclient.
  3. Click Properties.
  4. Select Use VSS.
  5. Click OK.

Preventing Log Truncation During Backups

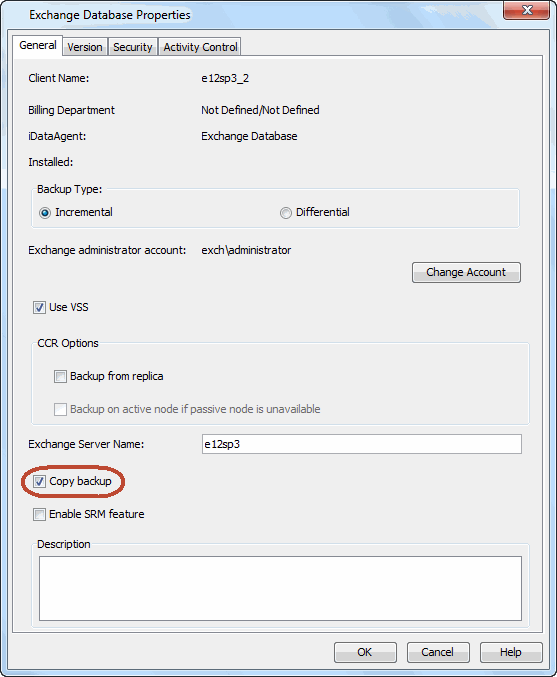
By default, log files are truncated during backups. However, it may be desirable to keep log files from being truncated to preserve their original state if needed during a restore. This can be accomplished using the Copy Backup feature.

  1. From the CommCell Browser, right-click the Agent for the Exchange Database , and then click Properties.
  2. Click Copy Backup.
  3. Click OK.

Configuring Cluster Continuous Replication (CCR) Backups

CCR backups continuously replicate the Exchange Database transaction logs residing on the active node of a CCR cluster to the passive node. In the event of failover, the replicated database will be available to users, which reduces the frequency at which full backups must be taken and the volume of backup data and media usage, as well as shortening the time it takes to recover from failure. No resources are shared and  and only one virtual server is used.

Follow the steps below to enable cluster continuous replication backups:

  1. From the CommCell Browser, right-click the Agent for the Exchange 2007 Database that you want to configure for CCR backups, and then click Properties.
  2. Click the Use VSS and Backup from replica check-boxes.

    Select Backup on active node if passive node is unavailable if appropriate for your environment and if you intend to use backups from the active node to perform a CCR seeding operation of data to the passive node.

  3. Click OK.

    CCR options are configured. Subsequent backups for the agent will use VSS to perform a Shadow Copy backup of the replica database on the passive node of a CCR cluster.

Modifying an Agent or Subclient

There are several configurable properties available for your agent that can be modified from the agent or subclient level as per need.

It is recommended that that you do not modify the properties of a subclient when a job is in progress for that specific subclient. If a job is in progress, either wait for the job to complete or kill the job from the Job Controller.

The following table describes the properties that can configured from the agent and subclient levels.

Option Description Related topics
Change the Exchange Server Name You can modify the name of the Exchange Server. However, the exchange server name should not be the same as Client or Host Name.
  1. From the CommCell browser, right-click the Exchange Database Agent.
  2. Click Properties.
  3. Select General.
  4. Type the Exchange Server Name.
  5. Click OK.
 
Enable SRM Feature You can enable the SRM feature to generate the Exchange Database Summary Reports.
  1. From the CommCell browser, right-click the Exchange Database Agent.
  2. Click Properties.
  3. Select General.
  4. Select Enable SRM Feature.
  5. Click OK.
Refer SRM Exchange
Change Storage Policies You can modify the storage policies in any of the following situations:
  • To include a different media for the backup operation.
  • To use a storage policy with a different retention criteria.

You can change the storage policies from the subclient level.

  1. From the CommCell Browser, right-click the subclient.
  2. Click Properties.
  3. Click Storage Device.
  4. Select the Storage policy from the drop-down menu.
  5. Click OK.
Refer to Storage Policies.
Rename a Subclient

You can rename a subclient:

  1. From the CommCell Browser, right-click the subclient.
  2. Click Properties.
  3. Type the new name in the  Subclient name field.
  4. Click OK.
 
Data Transfer Options You can efficiently configure the available resources for transferring data secured by data protection operations from the subclient level. This includes the following:
  • Enable or disable Data Compression either on the client or the MediaAgent.
  • Configure the transfer of data in the network using the options for Network Bandwidth Throttling and Network Agents.

You can configure the data transfer options.

  1. From the CommCell Browser,right-click the subclient.
  2. Click Properties.
  3. Click Storage Device.
  4. Click Data Transfer Option tab.
  5. Choose the appropriate software compression option for this subclient.
  6. Select Throttle Network Bandwidth and set the required bandwidth.
  7.  Click OK.
Refer to Data Compression and Network Bandwidth Throttling.
View Data Paths You can view the data paths associated with the primary storage policy copy of the selected storage policy or incremental storage policy. You can also modify the data paths including their priority from the subclient level.
  1. From the CommCell browser, right-click the subclient.
  2. Click Properties.
  3. Click Storage Device.
  4. Select Storage Policy from the drop-down menu.
  5. Click Data Paths.
 
Number of Data Readers for a Backup Copy Use this option to specify the number of simultaneous backup data streams allowed for this subclient. You can specify multiple data readers for backup copy from this subclient.
  1. From the CommCell browser, right-click the subclient.
  2. Click Properties
  3. Select the Number of Data Readers.
  4. Select Allow multiple data readers for Backup Copy
  5. Click OK.
Refer to Streams.
Configure a Subclient for Pre/Post Processing of Data Protection You can add, modify or view Pre/Post processes for the subclient. These are batch files or shell scripts that you can run before or after certain job phases.
  1. From the CommCell browser, right-click the subclient.
  2. Click Properties.
  3. Click Pre/Post Process.
  4. Click one of the following phases and type the full path of the process that you want to execute during that phase. Alternatively, click Browse to locate the process (applicable only for paths that do not contain any spaces).
    • PreBackup Process
    • PostBackup Process
    • PreSnap Process
    • PostSnap Process
  5. Click OK.
  6. Select Run Post Backup Process for all attempts to run a post backup process for all attempts.
  7. For subclients on Windows platforms, Run As displays Not Selected.

    If you want to change the account that has permission to run these commands, click Change.

    1. In the User Account dialog box, select Use Local System Account, or select Impersonate User and enter the user name and password. Click OK.
    2. If you selected Local System Account, click OK to the message advising you that commands using this account have rights to access all data on the client computer.
Refer to Pre/Post Processes.
Configure Activity Control You can enable backup and restore operations from the agent and subclient level. However, you can enable restore operations only from the agent level.
  1. From the CommCell browser, right-click the subclient.
  2. Click Properties.
  3. Click Activity Control, select or clear option(s) as desired.
  4. Click OK.
Refer to Activity Control.
Configure User Security You can configure user security from the agent or subclient level.

You can perform the following functions:

  • Identify the user groups to which this CommCell object is associated.
  • Associate this object with a user group.
  • Disassociate this object from a user group.
  1. From the CommCell browser, right-click the subclient.
  2. Click Properties.
  3. Click Security.
  4. Select the appropriate user groups to which you want to associate to the CommCell object from the Available Groups pane, and then move the user group to the Associated Groups pane.
  5. Click OK.
Refer to User Administration and Security.
Enable/Disable Data Encryption You can enable data encryption from the suclient level.Encryption must be enabled at the client level prior to configuring any instances residing on that client.
  1. From the CommCell browser, right-click the subclient.
  2. Click Properties.
  3. Click Encryption.
  4. Select the desired encryption.
  5. Click OK.
Refer to Data Encryption.
View Software Version The Version tab, at the Agent level displays the software version of the component.
  1. From the CommCell browser, right-click the agent.
  2. Click Properties.
  3. Click Version.
  4. Click OK.
 
CommCell Configuration Report The CommCell Configuration Report provides the properties of the CommServe, MediaAgents, clients, agents, SRM agents, subclients, and storage policies within the CommCell based on the selected filter criteria.
  1. From the CommCell browser, click Reports icon.
  2. Select CommCell Configuration.
  3. Click Run.
Refer to CommCell Configuration.

Deleting an Agent or Subclient

The following sections describe the steps involved in deleting an agent or subclient.

When you delete an instance or backupset, the associated data is logically deleted and you can no longer access the corresponding data from CommCell Console for recovery purposes.

Refer to the troubleshooting article on Recovering Data Associated with Deleted Clients and Storage Policies for information on how to recover data if you accidentally delete an entity.

Deleting an Agent

You need to uninstall or DeConfigure the agent software from the client computer before deleting from CommCell Browser. After you delete the client software, you can either leave the corresponding data intact for appropriate action or you can remove the data immediately. If you choose to remove the data immediately, you must delete the agent from the CommCell Browser. If you delete the agent, all of the agent's data is irretrievably lost.

  1. From the CommCell Browser, navigate to Client Computers | <Client>.
  2. Right-click the <Agent>, and then click Delete.
  3. A confirmation message is displayed with the following message:

    This operation will permanently delete the data backed up from this level and it cannot be restored.

  4. Click OK to continue with the deletion operation., or click No to abort the deletion.

Deleting a Subclient

Consider the following before deleting a subclient:

  1. From the CommCell Browser, navigate to Client Computers | <Client> | <Agent> | <Backup Set>.
  2. Right-click the <subclient> that you want to delete, and then click Delete.
  3. A confirmation message is displayed, asking if you want to delete the subclient.

    Click No to cancel the deletion and retain the subclient, or click Yes to continue the deletion.

Configuring to Filter Recovery Databases from Backups

By default the Recovery Databases are auto discovered along with the other databases, but they should not be backed up as the backups will fail. To filter Recovery Databases from backups follow the steps given below:

  1. From the CommCell Browser, right-click the Exchange Database agent on the source client, and click All Tasks | New Subclient.
  2. Click the Contents tab and then click Configure.
  3. From the Add/Modify Subclients window, click the subclient entry for the database that you want to add to the new subclient.

    Click Discover to display all databases.

  4. Select the Recovery Databases and assign to the new subclient using the Change all selected databases/storage groups to list.
  5. Click OK.
  Ensure that the subclient with Recovery Databases as its content is not scheduled for backups.

Configuring to Filter Recovery Storage Groups from Backups

By default the Recovery Storage Groups are auto discovered along with the other databases, but they should not be backed up as the backups will fail. To filter Recovery Storage Groups from backups follow the steps given below:

  1. From the CommCell Browser, right-click the Exchange Database agent on the source client, and click All Tasks | New Subclient.
  2. Click the Contents tab and then click Configure.
  3. From the Add/Modify Subclients window, click the subclient entry for the database that you want to add to the new subclient.

    Click Discover to display all databases.

  4. Select the Recovery Storage Groups and assign to the new subclient using the Change all selected databases/storage groups to list.
  5. Click OK.
  Ensure that the subclient with Recovery Storage Groups as its content is not scheduled for backups.

Command Line Operations

You can add, modify or delete several configurable properties for the Exchange Database iDataAgent from command line.

Command line configuration enables you to:

The following sections describe the available command line configurations:

Log on to the Commserve

To run command line operations you must first login to the CommServe as follows:

Configure Subclients

Create Subclient

Use the following steps to create subclients from the command line. This operation is not supported for DAG configuration.

  1. Download the create_subclient_template.xml file and save it on the computer from where the command will be executed.
  2. Execute the following command from the <Software_Installation_Directory>/Base folder after substituting the parameter values.

    qoperation execute -af create_subclient_template.xml -appName 'Exchange Database' -clientName xxxxx -subclientName xxxxx

Get Subclient Properties

  1. Download the get_subclient_properties_template.xml file and save it on the computer from where the command will be executed.
  2. Execute the following command from the <Software_Installation_Directory>/Base folder after substituting the parameter values.

    qoperation execute -af get_subclient_properties_template.xml -appName 'Exchange Database' -clientName xxxxx -subclientName xxxxx

Modify Subclient

  1. Download the update_subclient_add_template.xml file and save it on the computer from where the command will be executed.
  2. Execute the following command from the <Software_Installation_Directory>/Base folder after substituting the parameter values.

    qoperation execute -af update_subclient_add_template.xml -appName 'Exchange Database' -clientName xxxxx -subclientName xxxxx

Delete Subclient

  1. Download the delete_subclient_template.xml file and save it on the computer from where the command will be executed.
  2. Execute the following command from the <Software_Installation_Directory>/Base folder after substituting the parameter values.

    qoperation execute -af delete_subclient_template.xml -appName 'Exchange Database' -clientName xxxxx -subclientName xxxxx

Available Command Parameters

The following table displays all the parameters you can use with the commands mentioned in the above sections. To add a parameter to your command, use the following syntax: (Some examples are provided at the end of the table.)

qoperation execute -af <template XML file> -<parameter name> <value>

Parameter Description of parameter values
clientName Name of the client computer.
backupsetname Name of the backup set.
appName Name of the application. In this case it would be 'Exchange Database'.
subclientname Name of the subclient.
enableBackup Option to enable/disable backup.

Valid values are True/False.

encryptionFlag Option to set the encryption points during backups. Valid values are:
  • ENC_MEDIA_ONLY, to encrypt the backup data after transmission and prior to storage on the media.
  • ENC_NETWORK_AND_MEDIA, to encrypt the backup data before transmission. The data is stored encrypted on the media.
  • ENC_NETWORK_ONLY, to encrypt the backup data for transmission and then decrypt the data prior to storage on the media.
  • ENC_NONE, to disable data encryption.
networkAgents Number of Network Agents.
softwareCompression Option to enable compression on the Client or MediaAgent computer. Valid values are:
  • ON_CLIENT, to enable software compression on the client.
  • ON_MEDIAAGENT, to enable software compression on the MediaAgent.
  • OFF, to disable software compression.
throttleNetworkBandwidth Enhancing backup performance by reducing network bandwidth overhead.

Valid values are 0/1.

enableDeduplication Option to enable deduplication on subclient.

Valid values are True/False.

generateSignature A component of deduplication performed on the client or MediaAgent computer. Valid values are:
  • ON_CLIENT, to enable signature generation on the client.
  • ON_MEDIA_AGENT, to enable signature generation on the MediaAgent.
  • OFF, to disable signature generation.
storagePolicyName Name of the Storage Policy to be associated for backup.
useGlobalFilters Option to enable the use of global filters. Valid values are:
  • ON, to enable global filters for the subclient.
  • USE_CELL_LEVEL_POLICY, to enable the use of global filters if the Use Global Filters on All Subclients option is enabled on the Control Panel (Global Filters) dialog. If the option is disabled, USE_CELL_LEVEL_POLICY will disable global filters for the subclient.
  • OFF, to disable global filters.
useVSS Option to enable/disable VSS for backing up the file system data.

Valid values are True/False.

useVSSForSystemState Option to enable/disable VSS for backing up the system state.

Valid values are True/False.

backupSystemState Option to enable/disable back up of the system state.

Valid values are True/False.

postBackupCommand Path to the post process script that will be run after the backup.
postScanCommand Path to the post process script that will be run after the scan phase
preBackupCommand Path to the pre process script that will be run before the backup.
preScanCommand Path to the pre process script that will be run before the scan phase
runAs Option to specify the user name who has permissions to run the pre/post process scripts. Valid values are:
  • USE_IMPERSONATION, to specify a user with enough privileges to run the scripts. When using this value, you also need to provide the user credentials:

    -prepostUserName/userName <user name> -prepostUserName/password <password>

  • USE_LOCAL_SYS_ADMIN, to use the administrator account to run the scripts.
content/path Location of the content to be backed up. This parameter must be used along with the contentOperationType parameter, for example:

-contentOperationType <value> -content/path '<path value>'

content/excludepath Location of the content to be excluded from backup. This parameter must be used along with the contentOperationType parameter, for example:

-contentOperationType <value> -content/excludepath '<path value>'

content/includepath Location of the content to be included in the backup from the excluded list. This parameter must be used along with the contentOperationType parameter, for example:

-contentOperationType <value> -content/includepath '<path value>'

contentOperationType Modification type. Valid values are
  • ADD, to add content to the subclient
  • OVERWRITE, to overwrite contents to the subclient.
  • DELETE, to delete the contents from the subclient.

The following examples show how to add a parameter for a command:

Adding Content To update the location for the subclient content use the following command:

qoperation execute -af update_subclient_add_template.xml -appName 'Exchange Database' -clientName client1 -subclientName subclient1

Setting a Storage Policy To assign a storage policy to a subclient, add the 'storagePolicyName' parameter to the following command:

qoperation execute -af update_subclient_add_template.xml -appName 'Exchange Database' -clientName client1 -subclientName subclient1 -storagePolicyName sp1

For detailed information on the Subclient parameters see Subclient Properties.

Change the Exchange Administrative Details

User credentials are required for Exchange database restore.  Execute the following command from the <Software_Installation_Directory>/Base folder after substituting the parameter values.

qoperation execscript -sn SetExchangeDBIDAProp -si @clientName=’client1' -si @userName=’domain\user1’ -p2 @password=’password’ -si  @backupType='Incremental' -si @useVss='true' -si @backupFromReplica='true' -si @backupOnActiveNode='true' -si @serverName=’server1' -si @copyBackup='true'

where:

ClientName is the short name of the Exchange Server.

UserName and Password are the user credentials that you want to define for the account.

List Schedule Policy Association

  1. Download the sched_policy_association_template.xml file and save it on the computer from where the command will be executed.
  2. Execute the following command from the <Software_Installation_Directory>/Base folder after substituting the parameter values.

    qoperation execute –af sched_policy_association_template.xml –taskName mypolicy

Parameter Description of Parameter Values
taskName Name of the Schedule Policy to be associated.