The default subclient has the root directory as the subclient content. Therefore
a backup and the archive job run on the default subclient results in backing up
the entire root directory. In order to run a backup and archive of selective data
files, a user defined subclient with specific content can be created.
Follow the steps given below create a user defined subclient:
1.
From the CommCell Browser, navigate to <Client> | File
System | Default Backup Set.
Right-click Default Backup Set | All Tasks
Click New Subclient.
2.
Enter Subclient Name.
3.
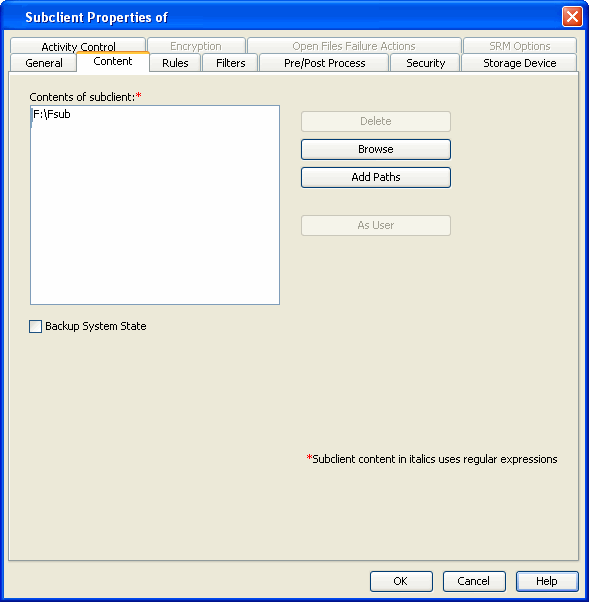
Click the Content tab.
Browse to the folder that has files to be backed up.
Select the folder and click Add.
Click Close.
4.
Click the Storage Device tab.
Select the Storage Policy from the drop down list.
The backed up files can be stubbed based on the available free space on the volume.
During a backup job if the free space on the volume is less than this value, files
matching the remaining rules will become candidates for stubbing.
From the CommCell Console, navigate to Client Computers |
File System.
Right-click the Subclient and click Properties
Select Rules tab.
Enter the low watermark value for the volume in Begin scan for
file selection when free volume is less than n%.
Enter the high watermark value for the volume in End scan if
volume is freed to n%.
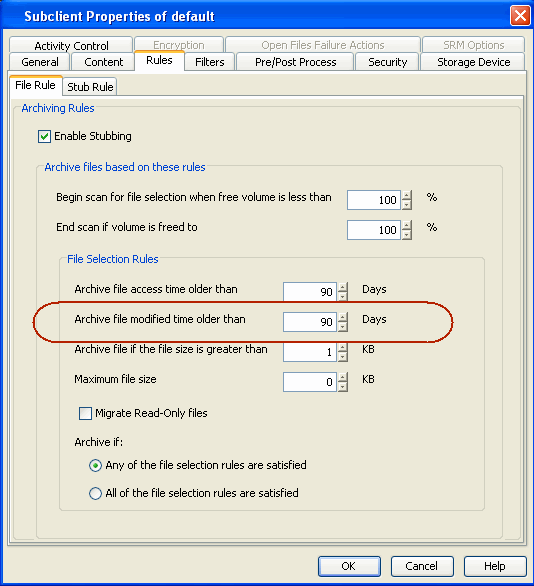
This configuration will stub files based on the last accessed date of each file
within the volume or folder/directory. In case it is older than the number of days
specified, the files will get stubbed.
From the CommCell Console, navigate to Client Computers |
File System.
Right-click the Subclient and click Properties.
Select Rules tab.
Enter the number of days elapsed since the file was last accessed
Archive file access time older than n Days.
Select Any one of the file selection rules are satisfied.
Click OK.
File Access Time for Windows Vista and Windows Server 2008
For Windows Vista, Windows Server 2008 and newer versions of Windows operating
system, by default the access time is not updated for any files and folders.
If you want to archive files based on access time, perform the following:
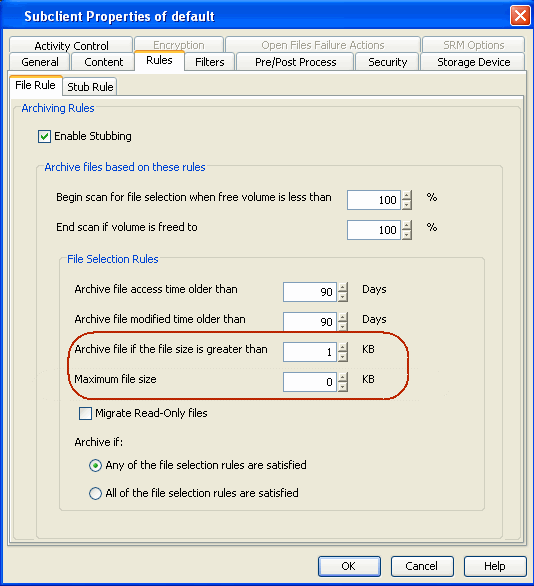
This configuration will stub files based on the file size. If a file size within
a scanned volume or folder/directory is in between the two limit values set, it
will get stubbed. Follow the steps given below to stub files based on their size:
From the CommCell Console, navigate to Client Computers |
File System.
Right-click the Subclient and click Properties.
Select Rules tab.
Enter the minimum file size in Archive file if size is greater
than n KB.
Enter the maximum file size in Maximum file size.
These options can be used individually or in
combination to specify a range.
Select All of the file selection rules are satisfied.
Click OK.
For Example:
To archive files more than 5KB but less than 20KB:
Enter 5 KB in Archive file if size is greater than n KB.
By default, the stubs are deleted 730 days from the day of stubbing when you
enable the Prune archived items option. However,
you can set the number of days after which the stubs will be pruned using the
following steps:
From the CommCell Console, navigate to Client Computers |
File System.
In the right pane right-click the Subclient and click
Properties.
Click the Rules tab.
Select the Stub Rule tab and make sure that the Prune archived
items checkbox is enabled.
You can enter the number of days after which the stubs will be pruned.
Archived data is pruned and secondary storage space is reclaimed based on the
stub retention setting and the storage policy cycle - based retention criteria.
. Running a synthetic full backup can reduce space on the secondary storage for
deleted stubs that meet the expiration criteria. Running data-aging can reclaim
space on the secondary storage by pruning the expired backup jobs. The following
sections describe two scenarios for space reclamation:
By default stub retention is set to 730 days from the Stub Rules tab and the
Storage Policy retention is set for 2 cycles and 15 days. The following procedure
demonstrates the reduction in the secondary storage usage using stub retention
rules:
1.
Run a few backup jobs. This will lead to stub generation of the
data meeting
the defined archiving rules. The subsequent incremental backup will
backup these stubs.
Delete a few stubs.
Perform an incremental backup operation. The time-interval
between this incremental backup and the subsequent synthetic full
will be calculated as the number of days specified in the retention
criteria. The deleted stubs
meeting the retention criteria will get expired. For example, if a
user has set 20 days for pruning archived items, the deleted stubs
will expire after 20 days of initiating this incremental backup.
Run synthetic full backup with Check for Deleted Stub
option selected in the advanced tab. The expired stubs and the
corresponding data would not get backed up in this operation.
From the backup job history, verify the backup file list. Ensure
that the deleted stubs and their corresponding data are no longer included
in the synthetic full backup image.
Note that space on secondary storage has been freed up by pruning
of expired stubs and their corresponding data by running a synthetic
full backup.
2.
The following procedure demonstrates the reclamation of
secondary storage space:
Run backup jobs to generate 2 backup cycles.
Wait for the last job of the first cycle to expire (based on the
Storage Policy retention, which is 15 days by default).
Run a Synthetic full backup. This is considered as a third
backup cycle and therefore the stubs that meet the retention
criteria in the first backup cycle will get pruned.
Running the synthetic full job will start the third backup cycle
and will render the first cycle prune-able.
Run a data aging job. Notice that the secondary storage space
occupied by the first backup cycle has been reclaimed as the stubs
have been pruned freeing up space.
Prior to archiving the files, you can set filters to prevent specific type of
files from being archived. Filters can also be used to exclude certain
system-related files and database application files which consistently fail
during a archive operation and are not integral to the operation of the system
or application.
You can manually set filters on selected file types, folders or files to be
excluded from archiving. For example if you specify *.txt in the filters then
all the text files will be excluded from being archived.
From the CommCell Console, navigate to Client Computers |
File System.
In the right pane right-click the Subclient and click Properties.
Click the Filters tab.
Click Add from the Exclude these files/folders/patterns group.
Enter the complete path of the file, folder, or directory that you want
to exclude from the archiving operations
or
Click the Browse and expand the file system of the client
computer. Click the file, folder, or directory that you want to exclude from
the archiving operations and then click Add.
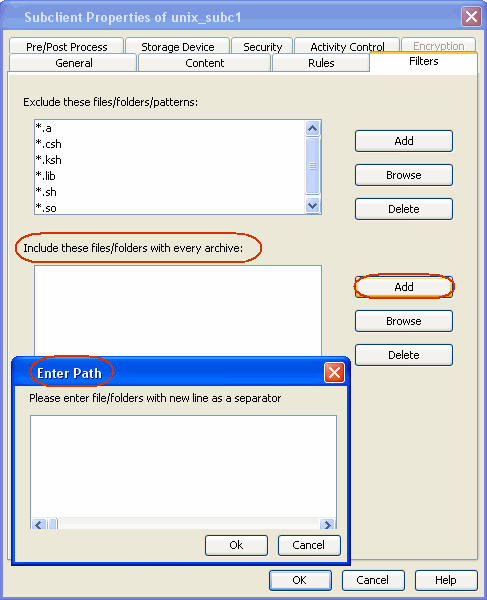
When excluding files from archiving, you can also provide exceptions to the
data that you are excluding. For example, if you want to exclude all the files in the My
Documents folder except the Downloads
sub-folder, you can add a subclient filter to exclude the
My Documents directory from being archived and also
add a corresponding subclient filter to allow the
Downloads sub-folder to be
archived.
From the CommCell Console, navigate to Client Computers |
File System.
In the right pane right-click the Subclient and click
Properties.
Click the Filters tab.
Click Add from the Include these files/folder/patters:
group.
Enter the complete path of the file, folder, or directory that you want
to be included in the archiving operation.
or
Click the Browse and expand the file system of the client
computer. Click the file, folder, or directory that you want to be included
in the archiving operation. and then click Add.
Use the following steps to recall stubs from the PolyServe cluster:
Make sure that the OnePass Agent is installed on the physical nodes
of Polyserve cluster.
Make sure that the Use Classic File Scan option is enabled in the
backupset as described in
Setting up the Backupset.
Make sure that the Use VSS option is not selected from the subclient
used to perform the PolyServe cluster backup as described in
Setting up
the Subclient.
In order to recall the stubs that reside on the PolyServe File System, you need
to add the
EnableThirdPartyFS registry key on the physical nodes Use the following steps
to enable the registry key:
Click Start, click Run, type regedit, and then click
OK.