|
|
General
- Verify that the tape drive and media changer, if attached to the NAS
file server, is detected by the file server. For information on
verifying tape drive(s) and media changer, refer to your vendor
documentation.
- You can add and configure NDMP drives after installing the
MediaAgent.
NetApp
- Verify that the NDMP service is enabled on the NetApp file server.
|
|
|
|
|
|
|
|
1. |
Display
the Library and Drive Configuration window.
|
|
|
2. |
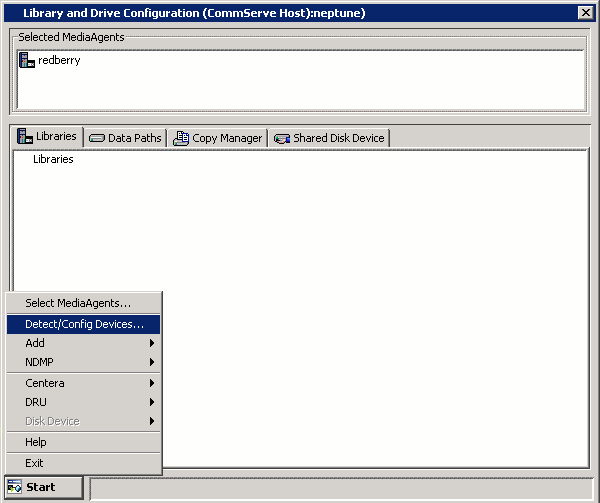
From the Library
and Drive Configuration window, click the Start
menu and choose Detect/Config Devices.
|
 |
|
3. |
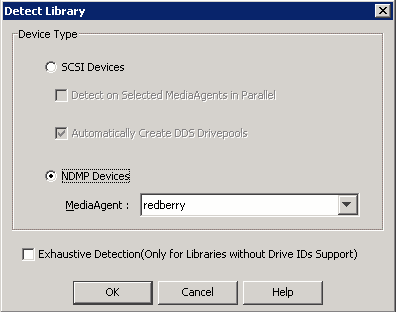
Select the NDMP Devices and the MediaAgent that will control
the library. Select the Exhaustive Detection option.
Click OK.
NOTES
- The exhaustive detection process accurately maps the drives in a
library. During this process, the system attempts to mount a tape in
each of the selected drives and determines the correct drive to
library mapping. Due to the nature of this operation and depending
on the number of drives, this operation may take several minutes to
complete.
- As this operation involves the mounting of a tape in a drive,
ensure that there are some media in the library to mount. If you do
not select Exhaustive Detection, the system still attempts to
discover the media changer and drives connected to the selected NDMP
host, but the system will not mount tapes in those drives to confirm
the correct drive mapping.
- For cluster, select the cluster virtual server as the
MediaAgent.
|
 |
|
4. |
A prompt appears informing you that the exhaustive detection will unload
all drives and hence may interfere with backup/restore jobs.
Click
Yes. |
|
|
5. |
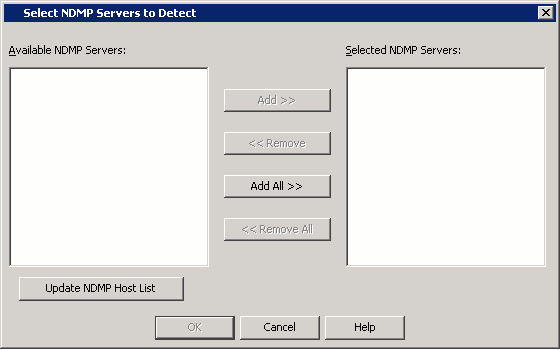
Select the File Server from which you wish to detect the library and click
OK.
NOTES
- If the server on which you want to detect a library is in the list
of Available NDMP Servers, skip to Step 10.
- If the server on which you want to detect a library is not on
the list, click the Update NDMP
Host List button and go to Step 6.
|
 |
|
6. |
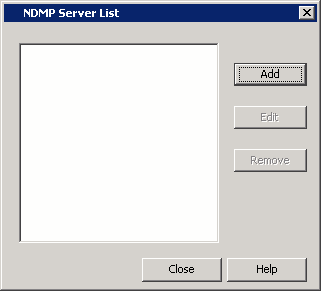
Select a server from the list and click the Add button.
|
 |
|
8. |
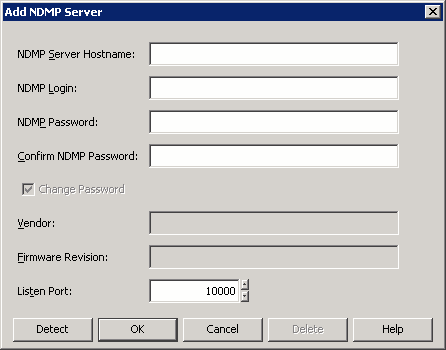
Enter or edit the following information in the
Add NDMP Server dialog and then click OK. NDMP Server Hostname:
The long name of the NAS file server.
NDMP Login: The user account through which
the system will access the filer.
NDMP Password: The password for the NDMP
Server Login account.
Confirm NDMP Password: The password for the
NDMP Server Login account, for confirmation.
Click the Detect button. The system automatically populates
the Vendor, Hardware OS Revision and Listen Port information.
NOTES
- If the NAS file server version does not support detection,
you
will have to enter the Vendor and Firmware Revision
information manually.
- Note that this will create a NAS client for the NDMP server
added. If there are no available licenses for this NAS client type,
this action will fail.
- Use the following accounts for NDMP Login:
- For BlueArc, this account is user-defined.
- For EMC Celerra, this account must be ndmp.
- For Hitachi NAS, this account is user-defined.
- For NetApp, this account must be root.
|
 |
|
9. |
Click Close to complete the process.
OR
Return to Step 6 to select another server.
|
 |
|
10. |
Select the File Servers to which the library(ies) you wish to detect are attached. Click Add to select a single server or
click Add All to select all the servers listed.
Click OK. |
 |
|
11. |
Click Yes to start the device
detection process.
NOTES
- The system attempts to detect the devices and mount the media in the
drives to verify the correct drive-to-library mapping.
|
 |
| 12. |
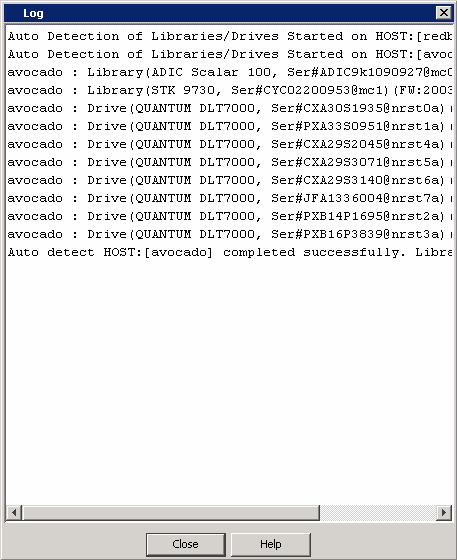
When the exhaustive detection process is completed, the log file is
displayed. Note the log file contents and click Close to proceed. |
 |
|
13. |
An Information prompt appears, informing you to right-click the
device to continue the configuration. Click OK to proceed |
 |
|
14. |
When the Exhaustive Detection is completed, the system displays the
devices in the Library and Drive Configuration window. NOTES
- New detected devices are not configured at this point, and the
configuration information will not be saved when you exit from the
Library and Drive Configuration window until those devices are
configured.
Right-click the library and then click Configure.
|
 |
|
15. |
Choose one of the following:
- Library only - if you want to
configure the drives individually. For more information on
individually configuring drives,
refer to
Configuring a Drive.
- Library and all drives - if you
want to configure all the drives within the library (e.g., if you are
doing a typical library installation)
Click OK. |
 |
|
16. |
Click one of the following:
- Yes - if the library has a
barcode reader. (sighted library)
- No - if the library does not
have a barcode reader. (blind library)
|
 |
|
17. |
Select one of the following:
- Yes - to automatically discover the media in the library.
- No - to manually discover the media.
NOTES
- For more information on discovering media in a library, see
Discover Media.
|
 |
|
18. |
If you have configured the library, the status of the library changes to
configured. If you chose to configure all associated drives, the
status of the drives, the master drive pool, and drive pool that
contains the drives changes to configured.
The Library tab provides
the physical view of the devices (library and drives).
|
 |
|
|
The Data Paths tab provides a logical view of the data path used to access
the devices - library, master drive pool, drive pool, drive.
|
 |
|
|
General
- Verify that the tape drive and media changer, if attached to the NAS
file server, is detected by the file server. For information on
verifying tape drive(s) and media changer, refer to your vendor
documentation.
- You can add and configure NDMP drives after installing the
MediaAgent.
NetApp
- Verify that the NDMP service is enabled on the NetApp file server.
|
Before You Begin
|
|
|
|
|
|
1. |
Display
the Library and Drive Configuration window.
|
| 2. |
Click the Start button, point to NDMP, and then Add
Library... from the short-cut menu. |

|
|
3. |
Enter the following information: MediaAgent:
The name of the MediaAgent that will control the library attached to the
filer.
NOTES
- For cluster, select the cluster virtual server as the
MediaAgent.
NDMP Server Hostname: The name of the NAS file
server. Keep in mind that you must add at least one host before
selecting a host from this field.
NOTES
- The "..." button: Opens the
NDMP Server List dialog box which
allows you to add or edit existing hosts
NDMP Server Device Name: The access path through which the
filer communicates with the media changer in the library. A typical
value for the first device (media changer) is mc0.
Click Detect Library Data. The system automatically populates
the Library Data (Vendor, Model, Firmware, Base Address and Drive
Count).
NOTES
- If the library is not supported by the NAS device, an error
message is displayed when you click the Detect Library Data button.
Contact your software provider for a list of supported storage
devices.
Click OK. |
 |
|
4. |
The library information is displayed, with "not configured" status,
and place holders for the drives in the library. Click the Start button, point to NDMP, and then
Add Drive... from the short-cut menu. |

|
|
5. |
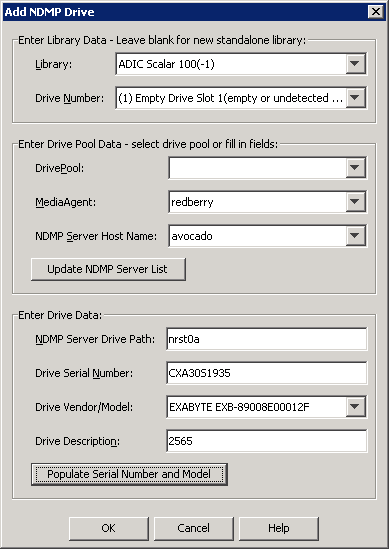
Enter the following information: Library:
The name of the library containing the drive.
Drive Number: The physical location
of the drive.
DrivePool: If you are adding the
first drive for the library, leave the field blank; if a drive pool has
already been created for this NAS file server, select the name of the drive pool
from the list.
MediaAgent: The name of the
MediaAgent that controls the library’s media changer.
NDMP Server Host Name: Select the
name of the NAS file server from the drop-down menu. Keep in mind that you must
add the host to which the library is connected before selecting the host
from this field.
- Click the Update NDMP Server List button to add or edit
existing hosts through the NDMP Server List dialog box.
NDMP Server Drive Path: The access
path through which the NAS file server communicates with the drive.
Click the Populate Serial Number and Model button. This
automatically populates the Drive Serial Number and Drive Vendor/Model
fields. If they do not display automatically, you have to add the
information manually.
Drive Description: The description of the drive (e.g., NetApp filer ADIC
drive 1) is optional.
Click OK.
Repeat this process (Steps 4 and 5) until all drives are added. |
 |
| 6. |
Configure the library as described in
Configure Devices.
The task is now complete. |
|
|
General
- Verify that the tape drive and media changer, if attached to the NAS
file server, is detected by the file server. For information on
verifying tape drive(s) and media changer, refer to your vendor
documentation.
- You can add and configure NDMP drives after installing the
MediaAgent.
NetApp
- Verify that the NDMP service is enabled on the NetApp file server.
|
|
|
|
|
|
|
|
1. |
Display
the Library and Drive Configuration window.
|
|
2. |
Click the Start button, point to NDMP, and then Add
Drive from the short-cut menu. |
 |
|
3. |
Enter the following information: Library:
The name of the library containing the drive.
Drive Number: The physical location
of the drive.
DrivePool: If you are adding the
first drive for the library, leave the field blank; if a drive pool has
already been created for this filer, select the name of the drive pool
from the list.
MediaAgent: The name of the
MediaAgent that controls the library’s media changer.
NOTES
- For cluster, select the cluster virtual server as the
MediaAgent.
NDMP Server Host Name: Select the
name of the filer from the drop-down menu. Keep in mind that you must
add the host to which the library is connected before selecting the host
from this field.
NOTES
- Click the Update NDMP Server List button to add or edit
existing hosts through the NDMP Server List dialog box.
NDMP Server Drive Path: The access path through which the
filer communicates with the drive.
Click the Populate Serial Number and Model button. This
automatically populates the Drive Serial Number and Drive Vendor/Model
fields. If they do not display automatically, you have to add the
information manually.
Drive Description: The description of the drive (e.g., NetApp filer ADIC
drive 1) is optional.
Click OK. |
 |
|
4. |
The system creates a stand-alone library tree for the drive.
NOTES
- If the drive is not configured at this point, the
configuration information will not be saved when you exit from the
Library and Drive Configuration window.
Right-click the drive and then click Configure. |
 |
|
5. |
The
status of the drive, drive pool, master drive pool, and the stand-alone
library changes to configured. The task is now complete.
|
 |
The following procedure explains the steps involved in configuring a
NAS-attached library
which is shared in the SAN environment by multiple NAS file servers and/or
MediaAgents.
|
|
|
|
|
|
| 1. |
You must first configure the library from any one of the MediaAgents
that share the library across a SAN. Use one of the following
procedures to configure the library for the first time:
Once you have configured the library for the first time you can
use the following procedure to configure the librray from a NAS file
server. |
| 2. |
Display
the Library and Drive Configuration window.
|
| 3. |
If necessary, select a new MediaAgent that must be used by the File
Server to communicate. To select a new MediaAgent, click the Start
button and then click Select MediaAgents. Select the
appropriate MediaAgent from the Select MediaAgent dialog box
and click OK. |
|
4. |
Click the Start button, and then select Detect/Configure Devices.
|
 |
|
5. |
Select the NDMP Devices and the MediaAgent that will control
the library. Select the Exhaustive Detection option.
Click OK.
NOTES
- The exhaustive detection process accurately maps the drives in a
library. During this process, the system attempts to mount a tape in
each of the selected drives and determines the correct drive to
library mapping. Due to the nature of this operation and depending
on the number of drives, this operation may take several minutes to
complete.
- As this operation involves the mounting of a tape in a drive,
ensure that there are some media in the library to mount. If you do
not select Exhaustive Detection, the system still attempts to
discover the media changer and drives connected to the selected NDMP
host, but the system will not mount tapes in those drives to confirm
the correct drive mapping.
- For cluster, select the cluster virtual server as the
MediaAgent.
|
 |
|
6. |
A prompt appears informing you that the exhaustive detection will unload
all drives and hence may interfere with backup/restore jobs.
Click
Yes. |
|
|
7. |
Select the File Server from which you wish to detect the library and click
OK.
|
 |
|
8. |
Click Yes to start the device
detection process.
NOTES
- The system attempts to detect the devices and mount the media in the
drives to verify the correct drive-to-library mapping.
|
 |
| 9. |
When the exhaustive detection process is completed, the log file is
displayed. Note the log file contents and click Close to proceed. |
 |
|
10. |
An Information prompt appears, informing you to right-click the
device to continue the configuration. Click OK to proceed |
 |
|
11. |
When the Exhaustive Detection is completed, the system displays the
devices in the Library and Drive Configuration window. NOTES
- New detected devices are not configured at this point, and the
configuration information will not be saved when you exit from the
Library and Drive Configuration window until those devices are
configured.
Right-click the library and then click Configure.
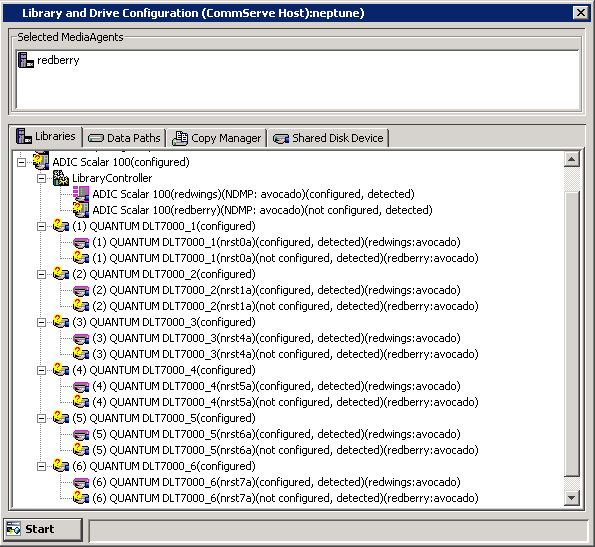
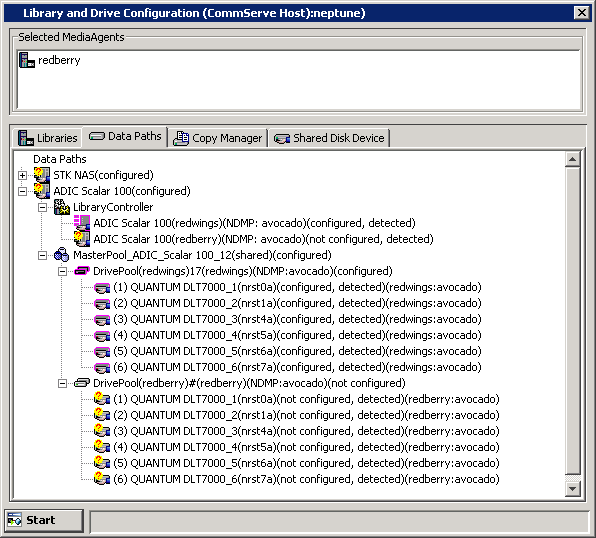
The Library tab provides
the physical view of the devices (library and drives).
|
 |
|
|
The Data Paths tab provides a logical view of the data path used to access
the devices - library, master drive pool, drive pool, drive.
|
 |
| 12. |
Configure the library as described in
Configure Devices.
|
|
| 13. |
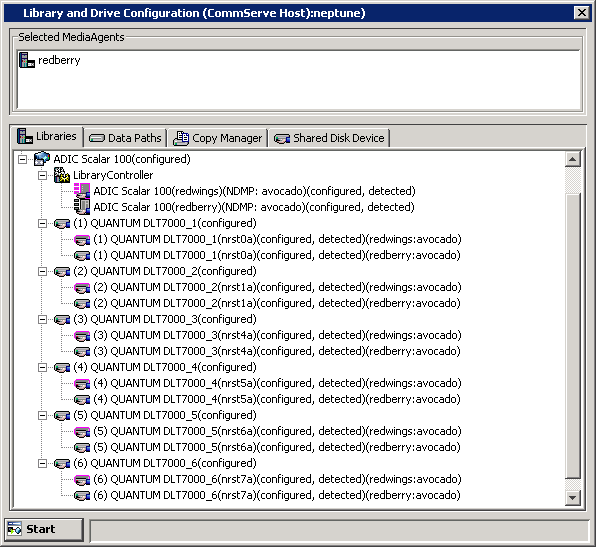
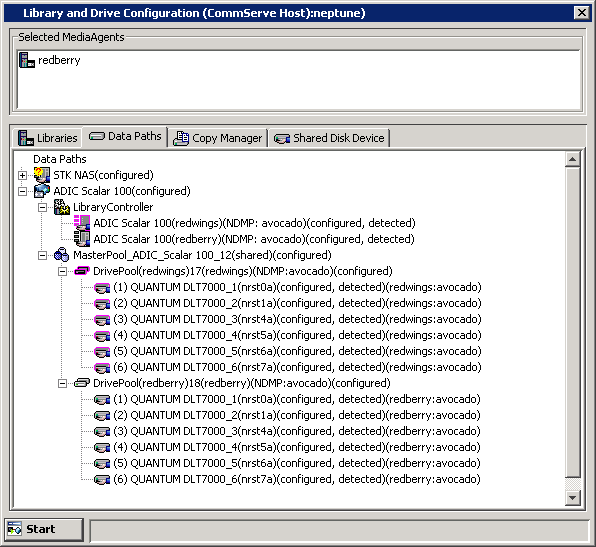
If you have configured the library, the status of the library
changes to configured.
If you chose to configure all associated drives, the status of the drives,
the master drive pool, and drive pool that contains the drives changes to
configured.
If you do not need to configure any other libraries, exit now.
NOTES
- If there are additional unconfigured libraries shown that you do
not need, you can delete them.
The Library tab provides
the physical view of the devices (library and drives).
|
 |
| |
The Data Paths tab provides a logical view of the data path used to access
the devices - library, master drive pool, drive pool, drive.
This task is now complete.
|
 |


