
Topics | How To | Full System Restore | Related Topics
Apply SQL Server Transaction Logs (Step Restore)
Restore SQL Server Databases to a Point in Time
Restore SQL Server Databases to a Transaction Mark
Partial ("Piecemeal") Restore SQL Server 2005 and later
Restore Latest Backup Data (Warm Database Restore)
Unconditionally Overwrite Existing Database or Files
Set the VDI Timeout Value for Large SQL Database Restores
Restore Multiple SQL Server Databases to a Consistent Time
Restore Considerations for this Agent
The following page describes the agent-specific restore options. Additional restore options are accessible from the Related Topics menu.
The SQL Server iDataAgent restores:
Additionally, the SQL Server iDataAgent restores:
The SQL Server iDataAgent has additional restore options to facilitate the customization of your restores.
- Recover: database is online, up and running, and available for use
- Standby: database is up and readable, but not fully online and write protected
- NoRecover: database is offline and not accessible.
SQL Server iDataAgent restores for upgraded versions:
When you browse or restore data, the system by default returns the requested data based on the latest backups available. This is usually the information that users are interested in. The system does this by using the current date and time as the effective date. The following example discusses how databases are restored.
In the examples that follow, assume that backups are scheduled daily with the first backup occurring on May 10. (The clock times of the backups are unimportant for our purposes.) The figures show which data objects have changed and consequently have been backed up over time.
Assume that on May 16 we request the restoration of the database as it existed in its most recent state (i.e., the default). In response, the system retrieves the most recent full, most recent differential, and all subsequent transaction log backups that occurred prior to the effective date for each database comprising what we refer to as the restore chain. The system then restores these backups for all selected databases.
In this case, the job would return:
The default manner of the restore job (i.e., restoring data from the current full backup cycle) may not meet your needs in all circumstances. It can only restore the database(s) to the time of the most recent backup. Further, if the requested data was deleted before the most recent full backup, it cannot be restored by the default mode of operation.
The system provides various restore options which extend its restore capabilities and allow you to control the browse and restore processes.
Once you pick a restore time, the system determines the optimal combination of full, differential and log backups necessary to bring back the database(s) to the selected time. This combination of backups is the restore chain.
For basic database restores, the restore chain consists of the most recent full, the latest differential (if any), and all subsequent log backups (if any) taken prior to the selected restore time.
When restoring databases to a Transaction Mark or when using a Point in Time restore, the restore chain consists of the most recent full, the latest differential (if any), all subsequent log backups taken prior to the selected browse time, and, transparently, the next log backup after the browse time. The transparent inclusion enables restores to a selected point in time.
In the event of a SQL Server database failure, if it is unacceptable to lose changes made to your database since the last backup, it is possible to restore your database to the very moment of failure.
Determine your recovery needs, and select the appropriate restore operation. For any of these operations, you must Back up the Tail of the Transaction Log as a prerequisite.
For SQL Server you can:
|
When restoring the master database, the SQL Server service must be stopped and restarted in single-user mode. The system informs you of this and gives you the option to continue (i.e., stop and restart the SQL Server service in single-user mode, or to cancel the restore job). If you continue the restore job, the system stops and restarts the SQL Server service in single-user mode as part of the restore job.
When restoring the msdb database on a SQL Server, the system displays a message stating that the SQL Server Agent service cannot be running during the restore.
| In a clustered environment, the SQL Server Agent service should be stopped from the Cluster Administrator. |
File/File Group restores give you the ability to restore only the files that have been compromised in the event of a failure. The system enables you to restore specific files and file groups from both:
As part of a File/File Group restore job, the system applies all necessary Transaction Log backups. If you will be executing File/File Group restore jobs, plan to back up Transaction Logs regularly, because File/File Group restores cannot run without them.
In addition, File/File Group restore jobs can be used to recover the database in its entirety. See Restore the Entire Database at the File/File Group Level for step-by-step instructions.
File/File Group restores are commonly used for situations in which perhaps only individual data files on a database has become damaged. Imagine the time savings in being able to restore only one 100 gigabyte file group versus the entire 1,000 gigabyte database.
To restore files and file groups, the databases on which the file/file groups reside must be configured for transaction log backups. The system restores the most recent full and differential backups, then replays the transaction logs up to the specified restore time.
For a single data file, the file/file group restore chain consists of the most recent full backup, the most recent differential (if any), and all subsequent transaction log backups that occurred prior to the restore time. See Restore one or more Files or File Groups for step-by-step instructions.
For multiple files or file groups, the same rules apply for each data file, and the log backups to be restored will be determined by the file requiring the oldest log.
SQL Server requires that the primary data file (.mdf) be present when restoring a secondary (.ndf) file. When data files are backed up having the .mdf and .ndf extensions, the system automatically restores the primary (.mdf) file first, and then the secondary (.ndf) files. If no .mdf file is present or if you have changed the database naming scheme, you will need to restore the files in two steps, the primary data file first followed by the secondary files.
Keep in mind that for file and file group restores, it is the transaction log that determines the end point of the restore.
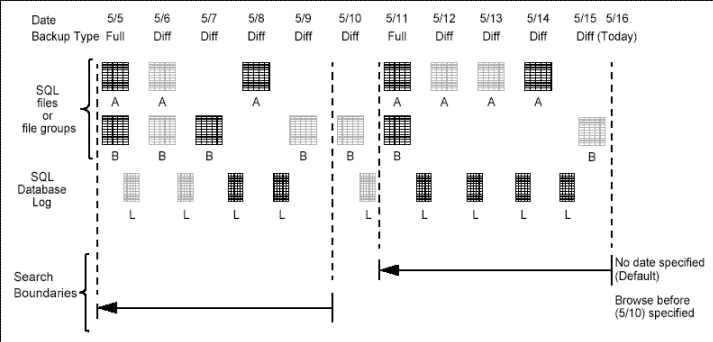
In this example, if you browse data before 5/10 and restore from that same browse time, the system:
Since the file and file group browse searches back in time to the most recent full, when the system presents the results of its browse operation, the tree will include files that existed as of that most recent full even if those items were later deleted. If you are aware of these deletions and do not need the data as part of your restore, you do not have to include those files when selecting what is to be restored. It is in the replaying of the logs that file deletions are captured and removed from the database. Conversely, if a file had not yet been created as of the most recent full backup, the browse results will not present this file for selection. It is the transaction log that will re-create this file for you as part of the restore.
When you run a SQL database restore job, you can select the state in which the database is to be left:
By recovering a database you can change the state of that database from No Recover or Standby to Recover. This puts the database back into production mode where it is fully accessible and consistent.
Recover status is reflected in the SQL Restore dialog box when the database or SQL Server state reads ONLINE.
For example, suppose you are applying transaction logs to a database and have decided that the transaction log you just applied is the last you want to apply. To make the database available to the users, restore the database to a RECOVER recovery type. You can recover a single database or all configured databases in a single instance.
The SQL Server iDataAgent allows you to apply transaction logs to a database that was previously restored to a standby state without having to reapply all previous backups. This type of restore job is called a Step Restore.
A Step Restore can be used when you are not sure at what time an event took place. It allows you to restore a transaction log and then view the database offline to determine whether to apply additional logs. If you decide to apply another log, you start the next restore where the last left off.
This option is available only under the following conditions:This option is not available for:
A point in time restore job allows you to restore your database to a specific point in time, and, typically, this point in time would be just before an undesired transaction or update to your database. In order to restore a database to a point in time, a transaction log backup must exist.
See Transaction Log Backups for step-by-step instructions for performing a Transaction Log backup.
When you select the Point in Time option, all necessary backups that are required to restore the database to the indicated time are restored. No further actions are necessary. The database is automatically set to a recovered state.
When restoring multiple databases, the Point in Time functionality will apply only to databases that have log backups that include the selected Point in Time. Other databases have to use the most recent backup prior to the selected time. All databases are recovered.
If you have changed a storage policy for a default subclient, and want to restore to a point in time prior to the change (i.e., restore from previous storage policy), perform a Full backup of the database as soon as possible. Data on the old storage policy is not considered as the most recent cycle and when it exceeds its retention period, it can be pruned.
For SQL Server clients, the agent provides the ability to restore databases to transaction log marks. This can be useful in situations where a transaction has caused undesirable results on a database and you need to go back to the point before that occurred.
For any databases that have transaction marks in the transaction log, you can restore to a point directly before a transaction mark or at the marked transaction. When you select a transaction mark, the system restores all necessary backups to restore the database(s) to the indicated transaction mark. No further restores are necessary.
Partial restores, known as "Piecemeal Restore" in SQL Server 2005 and later, allow databases that contain multiple filegroups to be restored and recovered in stages. The process starts with a restore of the primary filegroup using the Partial Restore option, then a restore or recover of one or more secondary filegroups.
For more information, refer to SQL Restore Options (General).
The system allows you to perform restores of the latest backup data of one or more non system secured databases in the SQL Server. This functionality enables you to easily maintain a spare of one or more databases (hot standby server) in the event of a database or server failure of the main SQL Server computer.
You can also schedule these latest backup restores so that they automatically occur at a specified interval. Matching the restore schedule with a backup schedule on the source database keeps the restored databases up to date automatically.
Restore Latest Backup Data works by restoring the most recent full backup and then performing a search to determine if any further backups exist. If any further backups do exist, they are applied in order. If the discovered backup is a transaction log, then the log is applied. If the discovered backup is a differential, then all transaction logs between the full and the differential are ignored. So long as a new full database backup is not discovered, only Transaction Log and or Differential backups are applied to the database.
See Restore Latest Backup Data (Warm Database Restore) for more information.
Select this option to NOT restore the last full backup since the specified date and time, but to instead restore only the transaction log backups. This option can be useful if the latest full backup has already been restored by third-party software and thus a restore of the SQL iDataAgent full backup is not necessary. Note that in such a case, this option only needs to be selected if a SQL iDataAgent full backup exists which is later than the full backup currently restored on the client by a third-party software.
See Skip Full Backup for step-by-step instructions.
When this option is checked, data being restored is unconditionally written to the specified location and will overwrite the files of any database that is currently using the database name specified by you. This implements the T-SQL REPLACE command.
When the option is unchecked, restore prevents the accidental data files overwrite by failing the job.
See Unconditionally Overwrite Existing Database or Files for step-by-step instructions.
For SQL Server, you may have to administer this value during the restore of a SQL database that has been dropped or does not exist on the SQL server. This is especially true for large databases. The VDI Timeout setting is applied to all SQL Server Agents on the affected client.
During the restore of a SQL database that has been dropped or does not exist on the SQL Server being restored to, the SQL Server automatically re-creates and initializes the database files before any data is actually read from the tape and written to the database. This file re-creation time can take as long as the initial time to create the database. This is due to the Windows operating system C2 requirement of initializing the file during creation. Re-creation times of database files for a 30gig database of nearly one hour have been seen. (This depends greatly on your hardware.) The actual restore of data occurs after this initialization.
The system uses the API (application interface) called VDI (Virtual Device Interface) to communicate with the SQL server for all backup and restore operations. When restoring a database, the VDI timeout represents the time the system must wait for the SQL server to become ready to accept data into the database. If the database files do not exist, a restore command to the SQL server will automatically create them. The time required to create the file(s) will be the same as when you first created the database or altered the database and added the file(s).
When issuing a VDI command to the SQL server, the system software must wait for the command to complete before issuing another command. By default, the system will wait 50 minutes (10 retries of five minutes each) for the SQL server to respond to a VDI command before giving up. If the SQL server takes longer then this timeout value, the system assumes that the command failed, and it aborts the operation.
If the database you are attempting to restore is particularly large, it may become necessary to increase this time-out value. (This can be seen by observing VDI time-outs in the cvsqlcommand.log file located in the install\Log Files directory on the SQL Client computer).
For some SQL server environments, you may have multiple databases for which absolute synchronization of the databases after a restore is critical.
Transaction Mark restores and Point In Time restores are two means of keeping your databases in sync.
For transaction mark restores, you must administer and maintain your Microsoft SQL server transaction marks so that they are available for use by the SQL iDataAgent.
Point in time restores use log backups to get your databases back to a specific minute and second. Backing up the tail of the log will be critical if you are restoring to just before the point of failure.
Before performing any restore procedures for this agent, review the following information.
Keep in mind that for this or any SQL restore to take place, you must first have a SQL server instance up and running.
If the database is installed on the system drive, non-system databases will need to be manually brought back online after the restore.
Instance Restore. If you perform an instance restore, all the databases are restored in one simultaneous job. If your instance has never had its system databases backed up and you perform an instance restore, the remaining databases are restored as individual jobs.
Multiple Database Restores. If you select all the databases of an instance, the restore is one simultaneous job. If you select multiple databases that are not system databases, they restore as multiple jobs.
If the database is upgraded, the next backup that is run detects the new version. The version is refreshed and displayed in the instance Properties dialog box and for the SQL Server iDataAgent, it is displayed during a browse operation. For more information, see Browse Databases.
The default time allocated for backup and restore operations of SQL databases is 0 (infinite). If a backup or restore operation fails due to a timeout being reached, you can configure the nSqlQueryTimeout registry key to increase the amount of allocated time for backup or restore operations.
By default, the SQL Server iDataAgent restores data to the client computer from which it originated; this is referred to as an in-place restore. You can also restore the data to another Client computer in the CommCell. Keep in mind the following considerations when performing such restores:
The following section enumerates the types of restore destinations that are supported by the SQL Server iDataAgent. See Restore/Recover/Retrieve Destinations - Support for a list of Agents supporting each restore destination type.
Keep in mind that out-of-place restore operations are also subject to the conditions described in Cross-Application Restores.
Support for restoring/recovering/retrieving data from one application version to another generally follows the same compatibility support provided by the associated third-party application vendor, unless otherwise noted.