The following section describes the steps involved in installing
the Content Indexing Engine and Windows File System
iDataAgent on multiple nodes - first on the Admin node followed by
steps for installing Index/Storage nodes.
Consider the following before you install the Content Indexing Engine in multiple
nodes:
During the installation you will be prompted to create
an Install Profile which will be used by all the other nodes in this setup. As this
is a critical step in the multi-node installation, it is strongly recommended that
you complete all the analyses and planning required for your environment before
you start this installation.
| 1. |
Log on to the client as an administrator or as a member
of the Administrators group on that computer. Make sure that this account
has the Log on as a service privilege. The password must not have
any special characters.
|
|
| 2. |
Run Setup.exe from Disc 2.
Select the required language. Click Next.
|
|
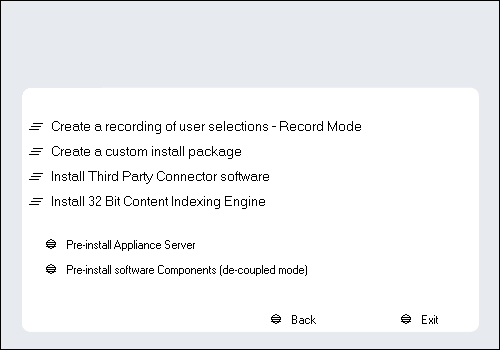
| 3. |
Click Advanced
options.
|
 |
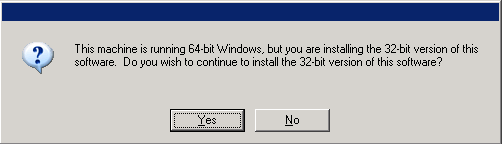
| 4. |
Click Install 32 Bit Content Indexing Engine. Click
Yes. |
|
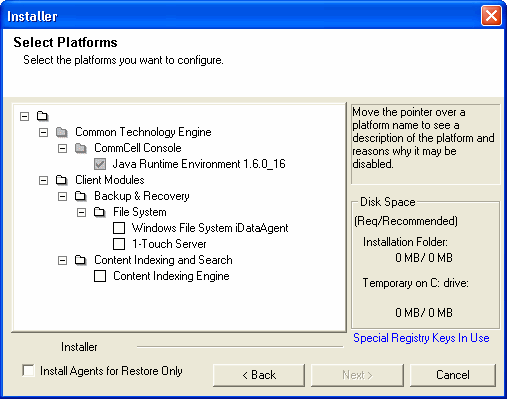
| 5. |
Expand Client Modules | Content Indexing and Search
and then click Content Indexing Engine. Click Next.
|
 |
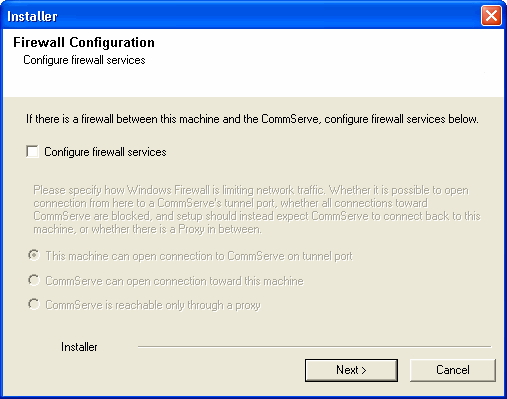
| 6. |
If this computer and the CommServe is separated by a firewall, select the Configure
firewall services option and then click Next.
For firewall options and configuration instructions, see
Firewall
Configuration and continue with the installation.
If firewall configuration is not required, click Next.
|
 |
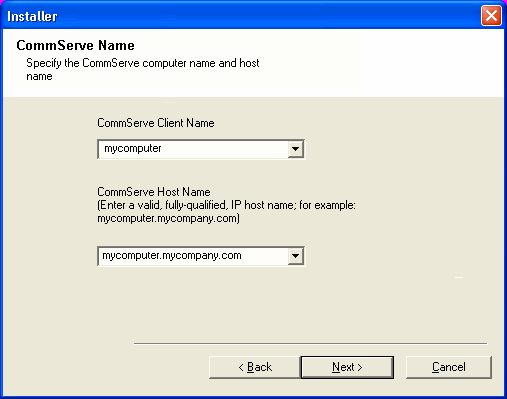
| 7. |
Enter the fully qualified domain name of the CommServe
Host Name. Click Next.
| |
Do not use space and the following characters when specifying a
new name for the CommServe Host Name: \|`~!@#$%^&*()+=<>/?,[]{}:;'"
|
|
 |
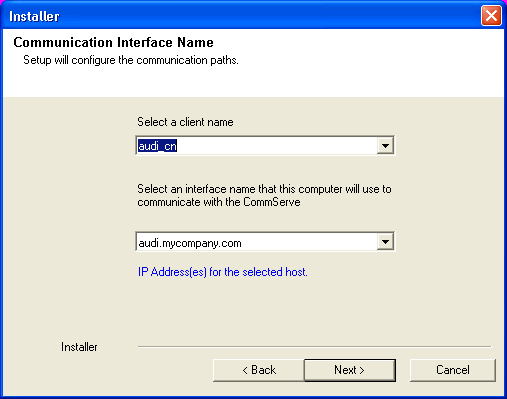
| 8. |
Type the fully qualified domain name of the client
computer. For example: apple.domain.company.com
Click Next. |
 |
| 9. |
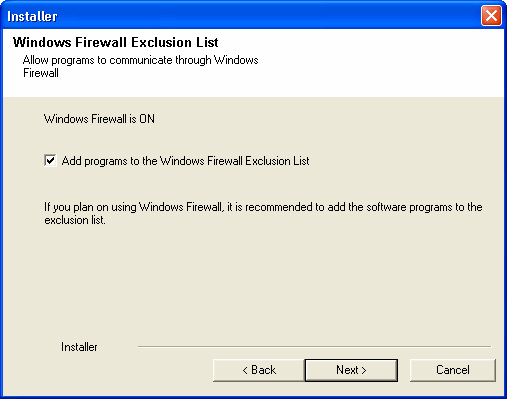
Select Add programs to the Windows Firewall Exclusion
List, to add CommCell programs and services to the Windows Firewall
Exclusion List. Click Next.
| |
This option enables CommCell operations across Windows firewall
by adding CommCell programs and services to Windows firewall
exclusion list. It is recommended to select this option even
if Windows firewall is disabled. This will allow the CommCell
programs and services to function if the Windows firewall is
enabled at a later time. |
|
 |
| 10. |
Verify the default location for software installation. Click Browse to change the default location.
Click Next.
|
 |
| 11. |
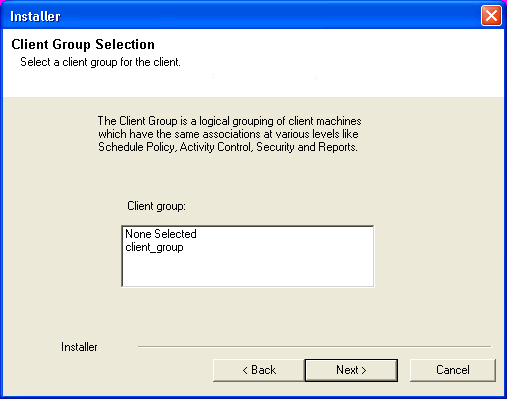
Select a Client Group from the list. Click Next.
|
This screen will be displayed if Client Groups are configured in
the CommCell Console.
|
|
 |
| |
Select the default options for the following steps and
click Next till you reach step 12. |
|
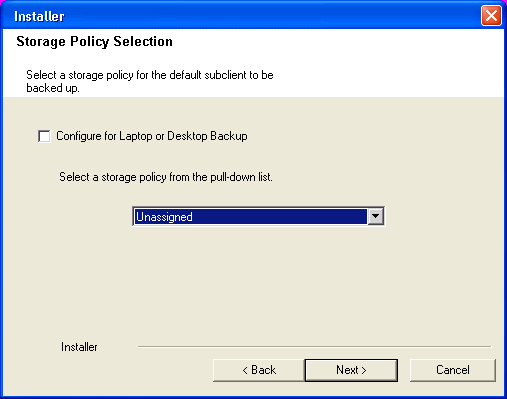
| 12. |
Select a storage policy from the Storage Policy
list. Click Next.
|
 |
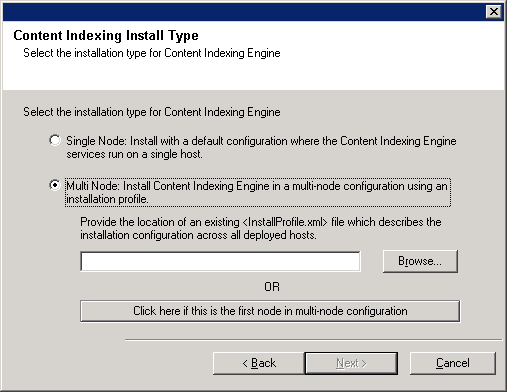
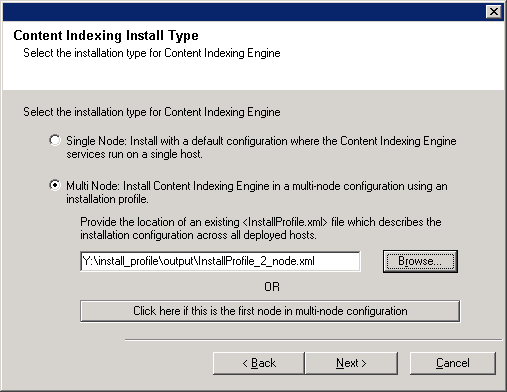
| 13. |
Select Multi Node: Install Content Indexing Engine on
a multi-node configuration using an installation profile. Click the
Click here if this is the first node in multi-node configuration
button.
|
 |
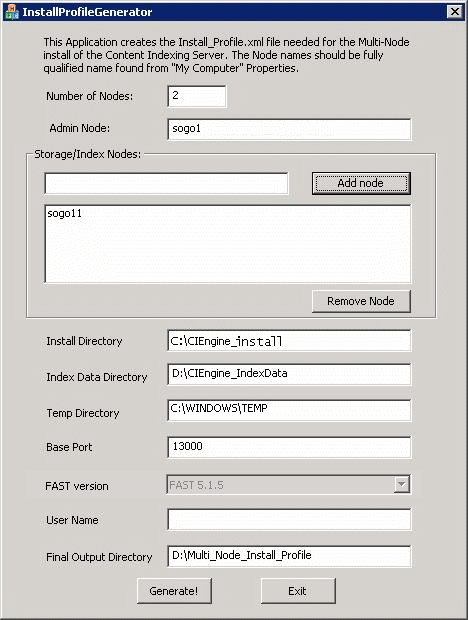
| 14. |
Enter the following information and click Generate
to continue.
|
This is an important and crucial step for
the multi-node setup. Ensure that the information provided in this
dialog box is accurate. |
Number of Nodes: Indicate the total number of nodes in this content
indexing server.
Admin Node: Indicate the fully-qualified name of the Admin Node.
For example, angel.<mydomain>.<mycompany>.com.
Storage/Index Nodes: Add the fully-qualified name of each of the
Storage/Index nodes and click the Add Node button to list it in the
large box. Repeat this process to add all the nodes.
Install Directory: Specify the location for installing the Content
Indexing Engine. This location will be the same on all the nodes - both
the drive letter and the folder path. e.g., C:\CIEngine_install.
| |
- This path is used for hosting the Content Indexing software.
- Verify and ensure that all the nodes in the cluster have
sufficient disk space before providing the path.
- If you choose another installation directory, ensure that
the location name does not contain spaces.
|
Index Data Directory: Specify the location for the content indexed
data. This location will be the same on all the nodes - both the drive letter
and the folder path. e.g., D:\CIENGINE_IndexData.
Temp Directory: Specify the location that will be used as a temporary
folder by the content indexing engine install. This location will be the
same on all the nodes. - both the drive letter and the folder path. e.g.,
C:\WINDOWS\TEMP.
| |
- This path is used as a temporary staging location for hosting
the Content Indexing install files.
- Verify and ensure that all the nodes in the cluster have
sufficient disk space before providing the path.
|
Base Port: Enter the starting number for the range of ports that
will be used by the Content indexing Engine.
User Name: Enter the Username for the Content Indexing Services.
The username must be the same in all the nodes.
Final Output Directory: Specify the location for saving this Install
Profile.
| |
Note down this location - This Install
Profile must be used during the installation of all the other nodes. |
|
 |
| 15. |
Click OK. |
 |
| 16. |
Verify the path to the install profile file and then click
Next.
| |
The name and path to the install profile
depends on the names provided in the previous step and may look
different from the example shown. |
|
 |
| 17. |
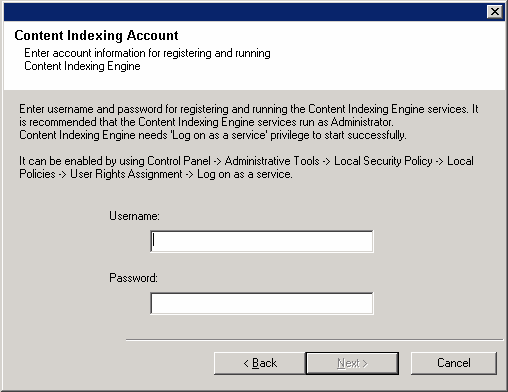
Enter the Username and Password for the Content Indexing
Services. The user should belong to the domain to which the computer
belongs or the user should be the local user on that computer.
For example: <my_domain>\<user> or <computer_name>User
Click Next.
| |
- Users from other domains will not be able to proceed
with the next installation steps.
- It is strongly recommended that the user is setup with no
password expiration.
- The user name should be the same user name provided when
generating the install profile.
- The same user credentials must be used in all the nodes.
|
|
 |
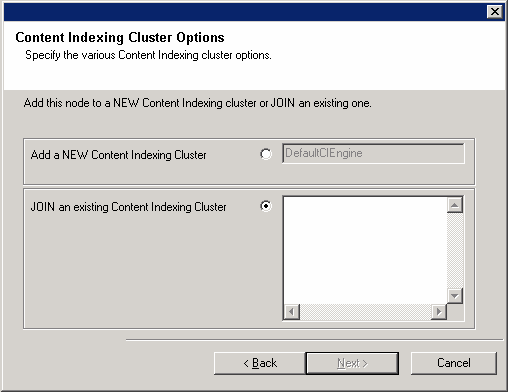
| 18. |
Select Add a NEW Content Indexing Cluster to add
this node to a new content indexing cluster. Click Next.
|
 |
| |
Select the default options for the following steps and
click Next till you reach step 19. |
|
| 19. |
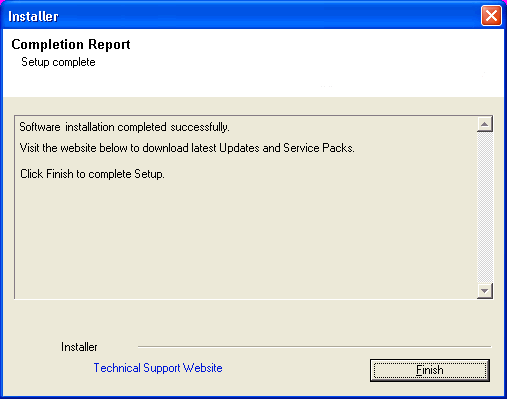
Click Finish. |
 |
| 20. |
Copy the folder containing the Install Profile file to
a shared location/disc. (The folder name specified during the creation
of the Install Profile) This will be required for installing
the index/storage nodes. |
|
Ensure that you have a copy of the Install Profile that was created during the
installation of the Admin Node. You need to copy the folder containing the Install
Profile file to the same location and path (drive letter: folder path) that was
used in the Admin Node.
| 1. |
Log on to the client as an administrator or as a member
of the Administrators group on that computer. Make sure that this account
has the Log on as a service privilege. The password must not have
any special characters.
|
|
| 2. |
Run Setup.exe from Disc 2.
Select the required language. Click Next.
|
|
| 3. |
Click Advanced
options.
|
|
| 4. |
Click Install 32 Bit Content Indexing Engine. Click
Yes. |
|
| 5. |
Expand Client Modules | Content Indexing and Search
and then click Content Indexing Engine. Click Next.
|
|
| 6. |
If this computer and the CommServe is separated by a firewall, select the Configure
firewall services option and then click Next.
For firewall options and configuration instructions, see
Firewall
Configuration and continue with the installation.
If firewall configuration is not required, click Next.
|
|
| 7. |
Enter the fully qualified domain name of the CommServe
Host Name. Click Next.
| |
Do not use space and the following characters when specifying a
new name for the CommServe Host Name: \|`~!@#$%^&*()+=<>/?,[]{}:;'"
|
|
 |
| 8. |
Click Next. |
|
| 9. |
Select Add programs to the Windows Firewall Exclusion
List, to add CommCell programs and services to the Windows Firewall
Exclusion List. Click Next.
| |
This option enables CommCell operations across Windows firewall
by adding CommCell programs and services to Windows firewall
exclusion list. It is recommended to select this option even
if Windows firewall is disabled. This will allow the CommCell
programs and services to function if the Windows firewall is
enabled at a later time. |
|
|
| 10. |
Verify the default location for software installation. Click Browse to change the default location.
Click Next.
|
|
| 11. |
Select a Client Group from the list. Click Next.
|
This screen will be displayed if Client Groups are configured in
the CommCell Console.
|
|
|
| |
Select the default options for the following steps and
click Next till you reach step 12. |
|
| 12. |
Select a storage policy from the Storage Policy
list. Click Next.
|
|
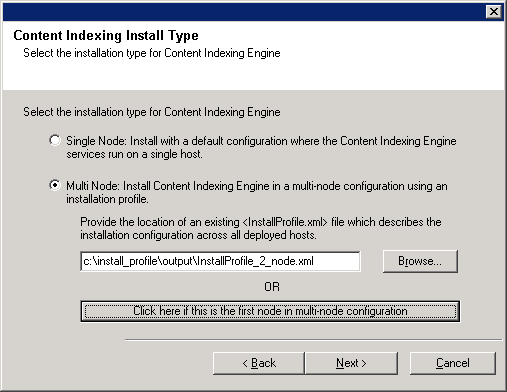
| 13. |
Select Multi Node: Install Content Indexing Engine on
a multi-node configuration using an installation profile. Click the
Browse button and select the Install Profile from the local drive.
See Index Profile for more information.
|
 |
| 14. |
Enter the Username and Password for the Content Indexing
Services and then click Next.
| |
- It is strongly recommended that the user is setup with no
password expiration.
- The user name should be the same user name provided when
generating the install profile.
- The same user credentials must be used in all the nodes.
|
|
|
| 15. |
Select JOIN and existing Content Indexing Cluster
to join this node to an existing content indexing cluster. Click Next.
|
|
| |
Select the default options for the following steps and
click Next till you reach step 16. |
|
| 16. |
Click Finish. |
|
Install post-release updates or Service Packs that may have been released
after the release of the software. When you are installing a Service Pack,
ensure that it is the same version as the one installed in the CommServe Server.
Alternatively, you can enable
Automatic Updates for quick and easy installation
of updates in the CommCell component.