

|
|
Once External Data Connector is installed on the NetBackup Server, information about each NetBackup client can be incorporated into your CommCell by performing a discovery operation. The discovery process collects information from the NetBackup master server and transfers this information to the CommServe database. Once complete, the CommServe creates CommCell entities that correspond to the original NetBackup entities. Discovery is performed at the subclient level and can be run on-demand or scheduled to run at a specified time.
|
When run for the first time, the discovery process is performed in full, collecting information on every NetBackup client as well as the operations and settings associated with them. Subsequent discovery operations can later be performed incrementally, collecting only new or changed information.
| 1. |
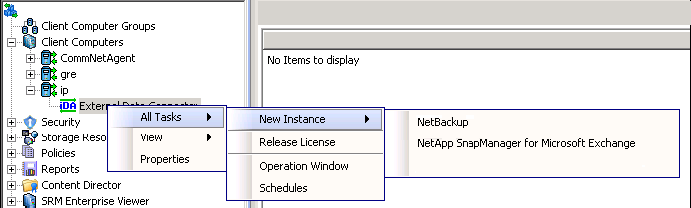
From the CommCell Console, right-click on the External Data Connector
node, select New Instance, and select the desired instance type.
|
 |
||
| 2. |
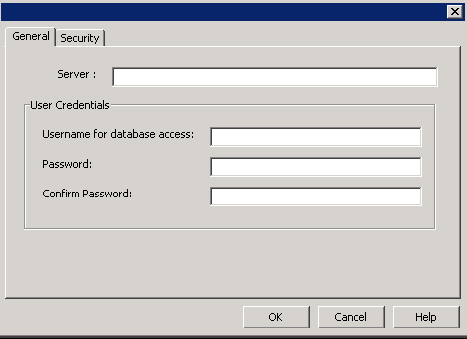
From the General tab of the External Data Connector dialog box, enter the following information:
An instance, default backup set, and subclient are now created and ready for the discovery process. |
 |
||
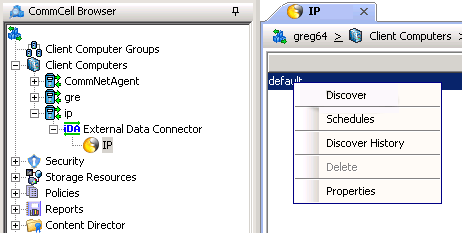
| 3. | Right-click the subclient for which you want to discover NetBackup data and click Discover. |
 |
||
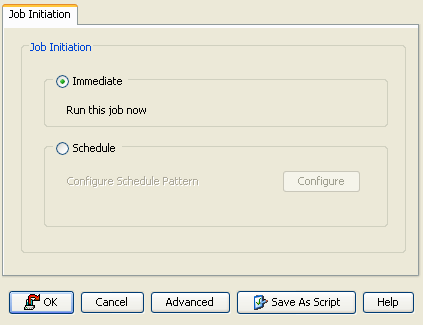
| 4. | From the Job Initiation tab of the Discovery Options dialog box, select Immediate. |
 |
||
| 5. |
Click OK.
You can track the progress of the backup job from the Job Controller window. When the backup has completed, the Job Controller displays Completed. |
| 1. | From the CommCell Console, right-click on the External Data Connector node, select New Instance, and select the desired instance type. |
|
| 2. |
From the General tab of the External Data Connector dialog box, enter the following information:
An instance, default backup set, and subclient are now created and ready for the discovery process. |
|
| 3. | Right-click the subclient for which you want to discover NetBackup data and click Discover. |
|
| 4. | From the Job Initiation tab of the Discovery Options dialog box, select Schedule. |
|
| 5. | From the Schedule Details dialog box that appears, select the appropriate scheduling options. |
 |
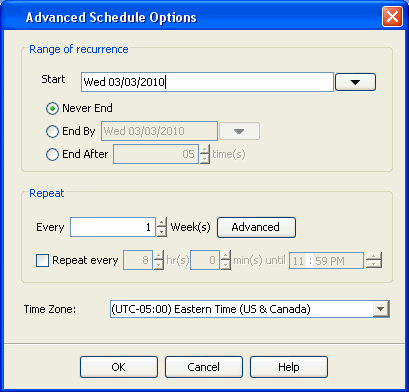
| 6. |
Click Options to view the
Advanced
Schedule Options dialog box.
Specify the following options:
You can also confirm and/or edit (where applicable) your choices from the Job Summary tab. For a monthly or yearly schedule, you can select either a standard calendar or a custom calendar. Click OK once all the desired options have been configured. |
 |
| 7. |
Click OK. Your discovery operation will execute according to the specified schedule. You can track the progress of the backup job from the Job Controller window. When the backup has completed, the Job Controller displays Completed. |
The discovery process occurs in two phases:
During the Query phase, information about the vendor's backup jobs, policies, and associated clients, schedules, libraries, and media are compiled in the form of .xml files for the data type selected during installation. This data is then transferred to the CommServe computer. Discovery jobs may be restarted from the beginning of the transfer phase if necessary.
During the Merge phase, External Data Connector maps each NetBackup component, such as client computers, backup schedules, and media, to the appropriate CommCell entity. In cases where there is no direct match between a NetBackup component and CommCell component, External Data Connector will incorporate as much information as possible into a CommCell entity that most closely resembles the original NetBackup entity.
Once a discovery job has been run, you can migrate NetBackup clients to the CommCell by installing the desired CommCell software components, such as the File System, Exchange, or SQL iDataAgents. After the software installation, the CommCell Console creates a new set of entities, such as backup sets, for the client computer which can be configured to perform future data protection operations. Once migrated, you can perform data protection and recovery operations for the client computer.
The migration process consists of the following phases:
Once these phases are complete, you are ready to run backups and restores for the client computer. Refer to the documentation for your components for detailed information on protecting and recovering data.
| Prior to running backups, ensure that the subclients created do not contain any duplicate content. |
The first step in migrating NetBackup clients to a CommCell is to install CommCell components on the NetBackup client computer. These installations can occur in two ways:
Refer to the Installation documentation for complete details on installing CommCell components.
| By default, all discovered NetBackup client computers migrate in a disabled state. This means that no CommCell licenses are consumed during the discovery process. When installing CommCell components onto the discovered client computers, the appropriate component license will be consumed during the installation process. |
Next, you must associate the storage policy you designated during the software installation to the appropriate subclient. To do so:
Next, data protection and recovery must be enabled for the client computer to begin running jobs. To do so:
Finally, enable schedules and schedule policies if they are not currently enabled for your client.
Once you have migrated your NetBackup clients to the CommCell and have run your first backups, you may want to view specific historical information about the jobs, such as the following:
This information can be viewed in the Job History window, which is accessible at the client computer, iDataAgent, instance, or subclient level in the CommCell Console.
The history depends on the entity from which the job history is viewed. For example, viewing job history from the subclient level will yield information for only the jobs performed in that subclient. Conversely, viewing job history from the backup set level will yield information for jobs run from all subclients within the backup set.
To view job history:
Once you have chosen your filter options, they are displayed in the Job History window.
To view the additional options discussed above, right-click the desired job choose the appropriate option.
you have now finished your first discovery and migration
|
|