Recover CommServe Disaster Recovery Data Using Media Explorer
Table of Contents
Overview
Recover Disaster
Recovery Backup
Before You Begin
Catalog the Media
Post Catalog Check
Recover
CommServe Database
Install the CommServe
Restore the
Disaster Recovery Backup
Data Encryption
Media Explorer is a utility that enables you to recover
the CommServe Disaster Recovery data in events such as:
- When a CommCell has been rendered unusable or inaccessible
- CommCell is not functional and you have a CommServe Disaster Recovery
Backup on the media
Media Explorer allows you to recover CommServe meta data. It helps to recover Disaster
Recovery backups (which secure all data protection metadata) performed on any supported
media, which can help in the complete infrastructure recovery of the CommCell. To
run Media Explorer, agent software is not required on the machine. The Media Explorer
on Windows software should be installed on the computer to which the data will be
recovered. In all cases, this computer should be the CommServe itself.
How Does It Work?
Media Explorer uses a cataloging process to recover from either
tape media or disk volumes. This process involves the following steps:
-
Physically locate the proper media from which you will be recovering
data.
-
Obtain information about the files stored on your media (i.e.,
via catalog for Windows platforms).
-
Select the appropriate archive file entries and recover the
files that were secured by data protection operations on your media.
Applies to
Environment where CommCell is not functional and you have only
CommServe DR backup on tape media or disk volume.
|
Data from deleted subclients or storage policies cannot be recovered. Catalog
operations are not supported for this type of data.
|
Media Explorer supports data from the following:
What Can Be Recovered?
Media Explorer is supported only to recover CommServe
Disaster Recovery backup.
What Cannot Be Recovered?
- Recovery of all agents backup is not supported
even if the help says it is supported.
- Media Explorer is not supported to recover Deduplicated and Silo data.
This section explains the following:
- Catalog the Media
Media Explorer uses
the cataloging process to obtain information about the files secured by data
protection operations and stored on your media.
- Recover CommServe Database
After cataloging your media, Media Explorer creates
a local catalog database of media archive file entries through which you manually
select the archive files containing the data you need to restore.
- See System Requirements - Media Explorer
- Make sure no other applications or services are attempting to access the
library
- Have your encryption pass-phrases available if applicable
- Have your Media Information and CommCell Configuration reports at hand to
help you identify and locate media archive files
|
Regularly running the above reports prior to
the need for a disaster recovery will help you identify and locate media
archive files. |
| 1. |
Install Media Explorer from the installer.
|
Media Explorer is supported on both 32-bit
and 64-bit machines. |
|
See
Install
Media Explorer for step-by-step instructions. |
| 2. |
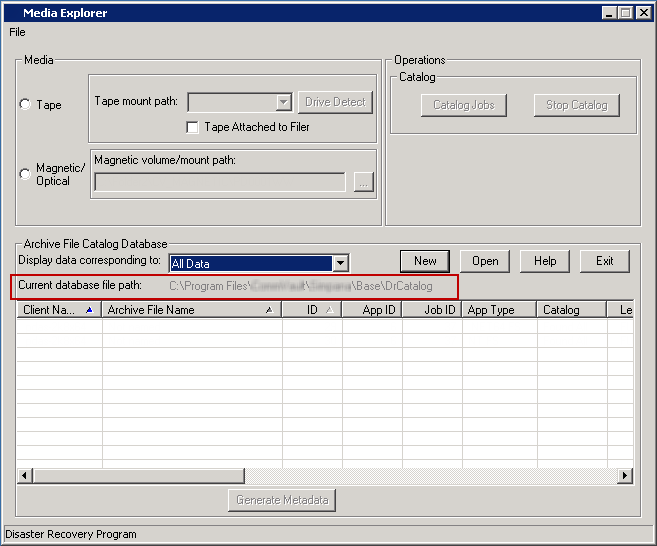
From the installation directory run MediaExplorer.exe
The Current database file path is created and defaults to the
DrCatalogDb.dat as indicated in the Media Explorer window.
|
It is possible to perform a recovery using
only the default archive database. However, if recovering large
numbers of or many types of archive files makes locating files cumbersome,
you can create additional database file paths using the New
button. The New and Open buttons can be used to
start cataloging to a new catalog or to open an existing catalog
database. This is useful in situations where you would like to use
Media Explorer over multiple sessions and not overwrite previous
catalog operations.
|
|
 |
| 3. |
Detecting the Media - Selecting the tape or disk media
option. Use the Media Information and CommCell Configuration reports to
assist you in determining from which media it will be necessary to restore.
If you do not have any reports saved, you will have to manually determine
the required media. This involves finding the correct (latest) archive file(s)
for backups you want to restore.
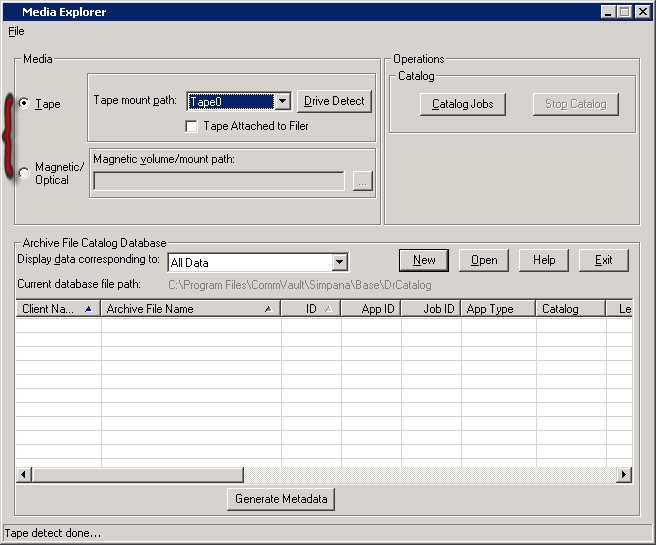
For a locally-attached tape drive/library:
- Manually load the media into the drive
- Select the Tape option
- Click Drive Detect to populate the tape mount paths in this
field (i.e., tape0, tape1, tape2, etc., depending on your SCSI settings).
The drive shown matches the SCSI ID setting for the device.
- Select the drive on which it is loaded
- Identify the Media Type by selecting from the list
|
A full DLT 7000 tape will take approximately
two hours to catalog. Be certain you have enough disk space
on your local computer to accommodate the files. |
For a disk volume:
- Select the Disk option
- Browse to or type the drive path for the disk volume path. (i.e.,
F:\, where
F is the drive that holds the disk volume)
- Directly beneath CV_magnetic folder,
select the volume folder (V_nnn) in which the archive files reside,
and click OK to continue. You can specify the entire mount path
to enumerate multiple volumes and later catalog volumes one by one for
catalog operation.
- The CV_MAGNETIC
folder structure represents the top level of the disk mount
path.
- The V_nnn folder represents
a volume that is equivalent to a storage policy copy.
- The AF_nnn folders represent
the individual archive files within a volume. Each backup creates
one or more archive files, depending on the
iDataAgent.
|
 |
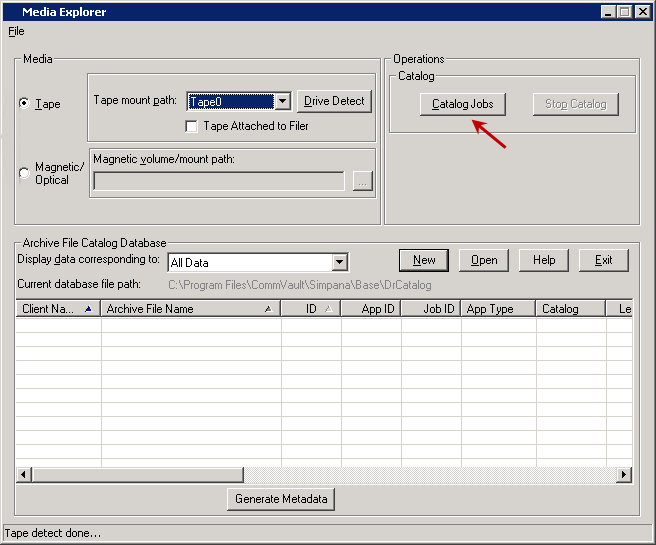
| 4. |
Click Catalog Jobs. The catalog operation reads
the media for archive file information and displays below.
|
- You may be asked to provide a media password. Type the password
and click OK. If you do not know the media password,
contact your software provider for assistance.
- If data was encrypted using a pass-phrase, you are prompted
to enter the pass-phrase used at the time of the data protection
operation.
|
|
 |
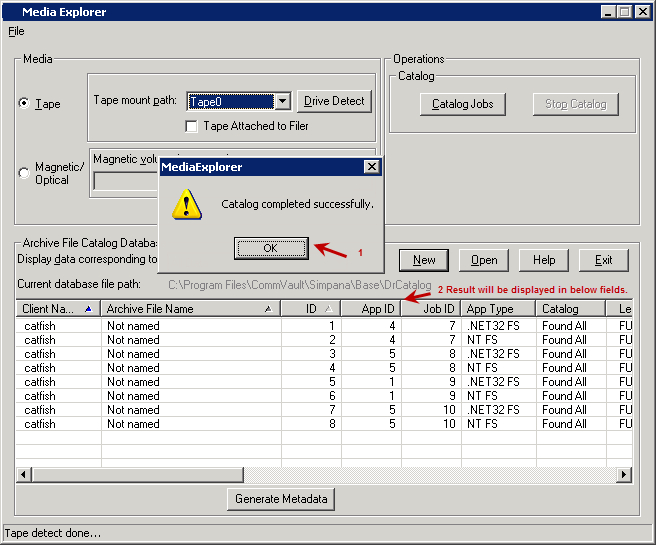
| 5. |
The status bar reflects the cataloging process as it is
occurring. A message appears when cataloging is complete. Click OK.
You can check for details in the DrRecovery.log
located in the local Media Explorer folder.
|
An archive file will sometimes span across
several tapes during the course of normal backups. In this case,
when a catalog operation is run on the first media, the information
on the second media may not appear to have been cataloged. However,
when you perform a recovery from the first tape, Media Explorer
asks you to load the second tape manually to continue the recovery. |
|
 |
| 6. |
For multiple tapes, return to Step 2 and continue cataloging
all media to be used in the restore. |
|
Recovering Data that Span Media
In some cases, a data protection operation will start on one media and complete
on another. This we refer to as a spanned job . At most, there can be one spanned
job per any given media.
If after cataloging a media you see an archive file for which the Catalog
column does not display Found All and the Catalog State column displays
Partial, this indicates the archive file is spanned to another media. In
this case, you need to locate that other media and catalog it as well. Once the
last media that contains the spanned archive has been reached, you will be prompted
to reinsert all the media (starting with the first) necessary to finish the cataloging
process for the spanned job.
Once all media has been successfully cataloged, the Catalog column should
display Found All and the Catalog State column should display Complete,
and the recovery may take place like any other recovery. During the recovery of
this archive file, you will be prompted to insert the media as required to complete
the recovery.
|
Media Explorer stores cataloged media information
in its database on your local hard drive for future reference. Once your
files have been cataloged, you can go back and obtain this information without
running the catalog operation again. To have the information available on
another computer, however, you would need to run a catalog on that computer. |
Using the Chunk Details Window
You can click View Chunks from the File menu to display the Chunk
Details window. This window provides Media Explorer database details that may be
helpful to you.
After cataloging your media, you are ready to select the appropriate archive
file entry to recover from your media.
Before You Begin
- Catalog your media.
- Make sure no other applications or services are attempting to access the
library.
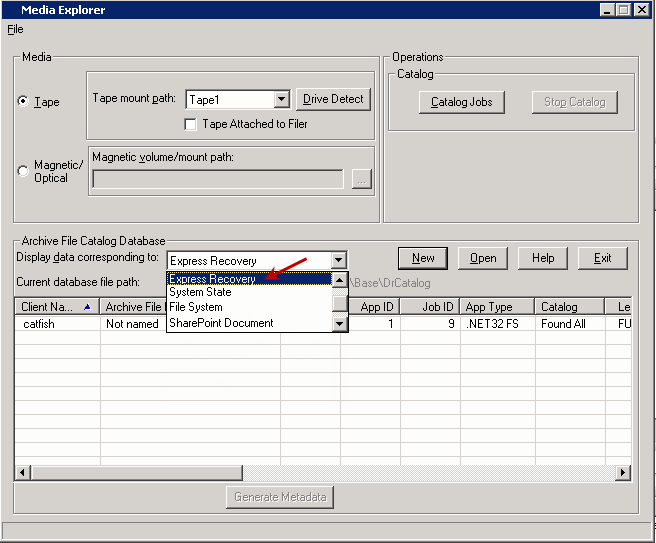
| 1. |
From the Display data corresponding to list, select
Express Recovery. This filters the data in the catalog pane to
show only the desired archive files, and instructs Media Explorer which
application's rules to enforce.
| |
Disaster recovery backups may be backed up as
File System backups in some cases. Therefore, if you select
Express Recovery and the disaster recovery backup is not
displayed, then select File System instead from the drop-down
list. |
|
 |
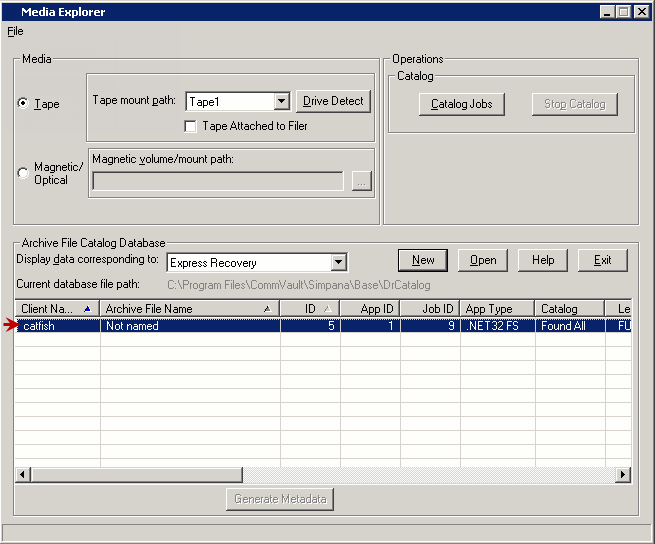
| 2. |
For a Disaster Recovery backup restore operation, select
the archive file entry from the Catalog database pane for the latest Full
data protection operation. In the Catalog Database pane:
- Use File Name to determine the entry type
- Use the Level information to determine backup types.
- Use the JOB ID and Backup Time information
to determine chronology.
- Scroll right to use the App ID column to determine subclient
identity.
|
 |
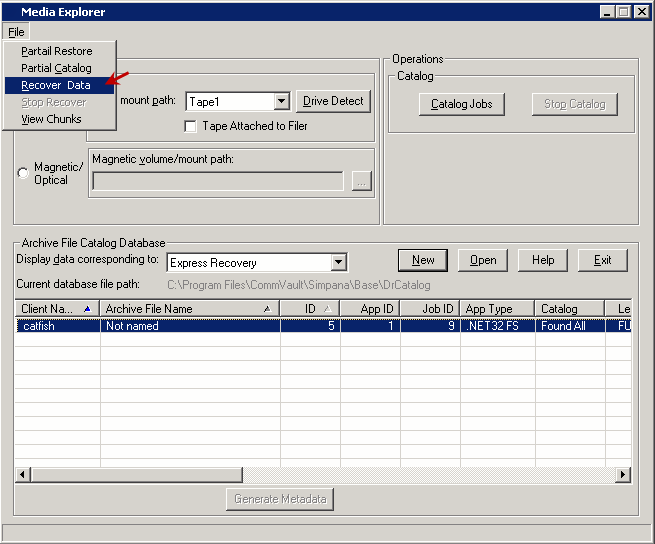
| 3. |
From the File menu, click Recover Data. |
 |
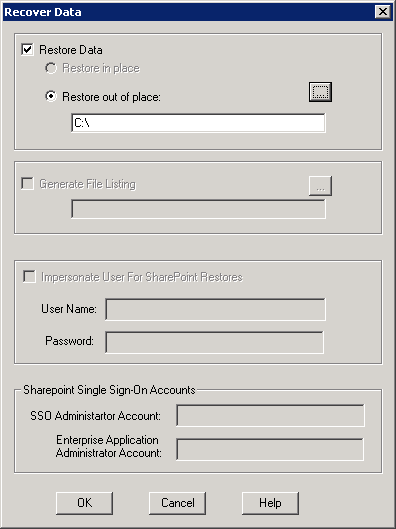
| 4. |
- By default, Restore Data check box and Restore out of
place option is selected.
- Type or browse the path to which you want to recover. You need write
privileges for the destination folder for a remote computer.
- Click OK to continue.
Note that Disaster Recovery backup recoveries always require out-of-place
restores.
|
 |
| 5. |
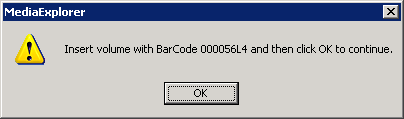
The status bar indicates which files Media Explorer is
restoring. While the data recovery operation is in progress, if the data
crosses to a new tape, you may see the message:
Insert volume with BarCode number and then click
OK to continue.
The archive file entry you selected, is recovered to the designated location.
|
 |
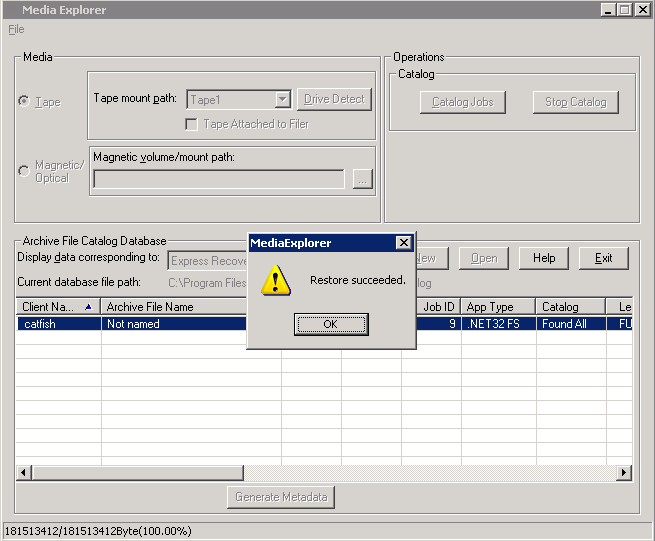
| 6. |
When the data recovery is done, click OK to the
Restore succeeded message.
|
A file space shortage may cause the data
recovery operation to fail. For information on the failure, you
can go to the DrRecovery.log file
which is located in the local folder containing the
MediaExplorer.exe. After fixing
your space problem, you can simply start over. You do not have to
clear the environment. |
This completes the Media Explorer data recovery operation. The files are now
available and can be moved to the CommServe.
|
 |
| 1. |
Install the CommServe software.
|
During CommServe installation, in the
Select Platforms dialog box, select CommServe only. |
|
See
Install CommServe for step-by-step instruction. |
Perform the following
steps to restore a recovered disaster recovery backup:
| 1. |
- From the Windows Explorer, navigate to the
<software installation path>\base
folder.
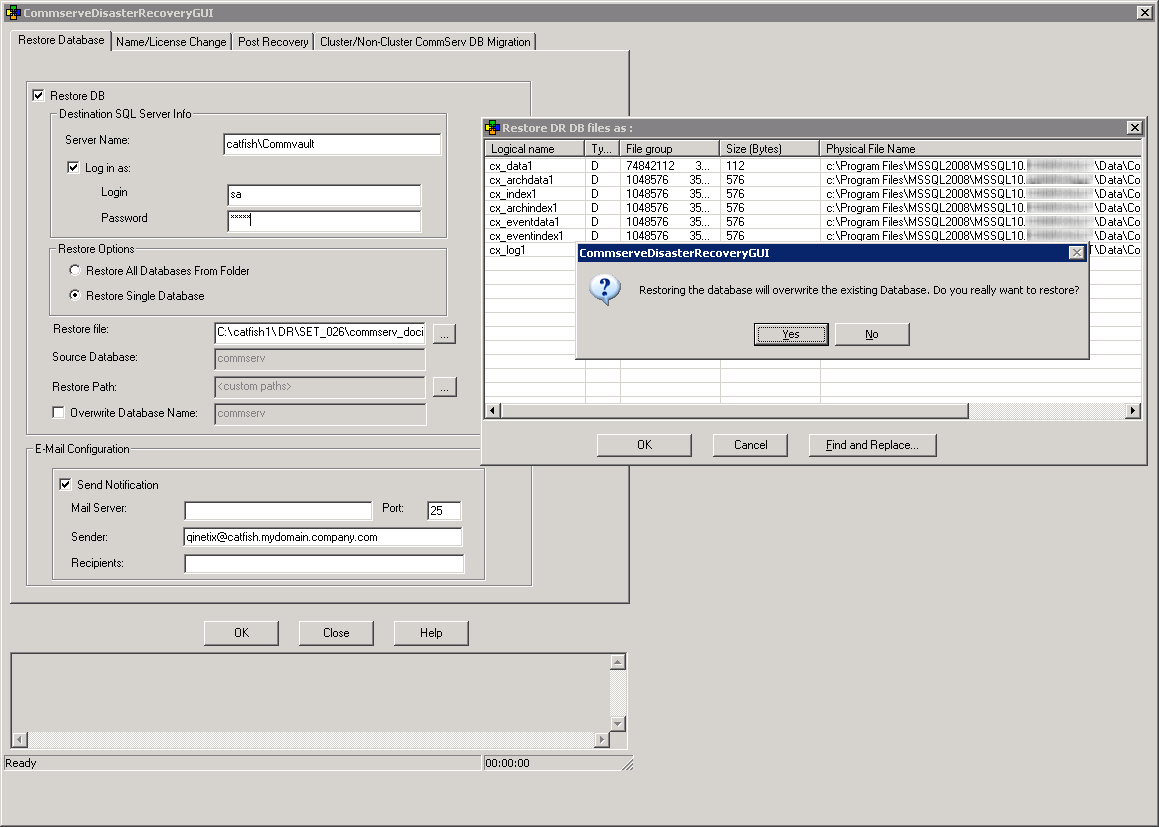
- Double-click CommserveDisasterRecoveryGUI.exe. This will
launch the CommServe Disaster Recovery Tool.
- Select the Restore DB check box.
- In the Destination SQL Server Info, select Log in as:
check box and provide the SQL Server user account credentials.
- Select one of the restore options:
- Click Restore All Databases From Folder to restore multiple
databases from the specified folder containing the dump files.
- Click Restore Single Database to restore a single dump
file containing the database.
- In the Restore file box, type or browse the name of the Disaster
Recovery Backup file or folder where the dump files are located.
- In Restore Path, click the Browse [...] button to
change the target location of the files from the Restore DR DB file
as: dialog box.
To change the target perform the following:
- In the Physical File Name column, click a row, type the
new location and then click Find and Replace.
- You will be prompted Do you want to replace all physical
file locations to c for the restore, click Yes.
- Click OK.
- Click Yes to overwrite the existing Database.
- In the Mail Server box, specify a valid mail server name to be used for e-mail
messages.
- In the Port box, specify the port number. The default
Mail Server port number is 25.
- In the Sender box, specify a valid e-mail address that displayed in the mail generated from the
software.
- In the Recipients box, specify a valid e-mail address of the recipient that will receive an
e-mail message indicating that the restore operation has completed.
- Click OK.
|
 |
Your CommServe is Now Successfully Restored.
With Media Explorer, data is encrypted according to the method you select while
you configure the client for Data Encryption. When restoring data that was encrypted
using a pass-phrase, you must provide the pass-phrase that was in use at the time
the data protection operation was run. If you do not provide the pass-phrase, the
restore will hang and a message will appear in the DrRecovery Log. For more information,
see the information for Data Encryption.
Back To Top