Global Repository Cell (GRC)

What is GRC Requirements Post Migration Setup GRC Troubleshooting FAQ

Setting up GRC

1.
  • From the CommCell Browser, right-click the CommServe icon.
  • Navigate to All Tasks | CommCell Migration.
  • Select Import From POD Cell.

    The term POD Cell refers to the source CommCell.

  Make sure you have enough privileges to run this wizard.
2.
  • Type or select the CommServe host name of the source CommCell from the drop-down combo box.
  • Type the Login Name and Password of the source CommCell under CommCell Login area.
  • Click Next.
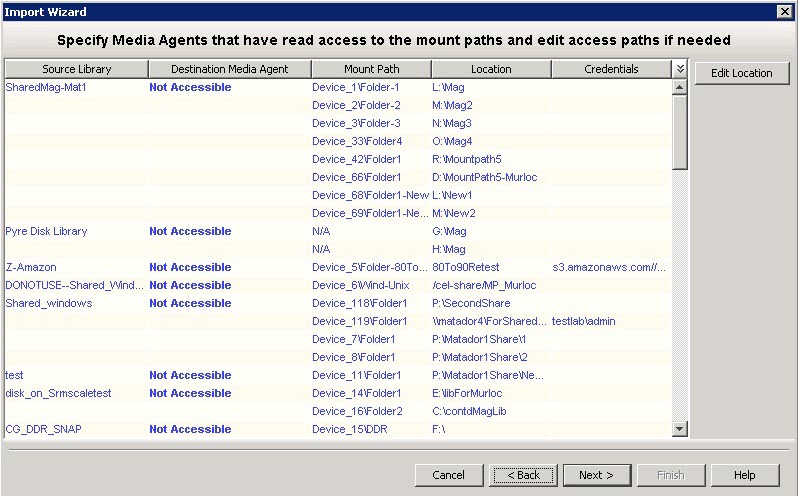
3. The library and device information of migrated data and the available MediaAgent on the destination CommCell will be loaded automatically.
  • Select the libraries that you plan to use and make sure they are accessible to the selected MediaAgent and select Not Accessible for the libraries you do not plan to use.

    Make sure datapaths selected to migrate are accessible to the selected MediaAgent for that library.

      You can change the Location to a shared folder or a network path accessible to both, the destination and source CommCell.

    Select the Library and click Edit to change the location.

  • Click Next.
     
    • Already merged paths will be shown in Black whereas paths that are not merged or migrated will be marked Blue.
    • Edit operation is disabled on already merged mount paths.
4. Select one of the following options as per your setup, else click Next to continue without making any changes:
  • Enter the number of months and days for which the data needs to be exported in Export Data from Last.
  • Under Export Type select Always Perform Complete Export.
     
    • If this option is selected, a complete export is performed each time the wizard is run, else only changed data gets exported.
    • All options selected in First Export section will be overridden by selecting this option.
  • Click Use Intermediary MediaAgent if you plan to use the shared MediaAgent for storing the export dump.
      Make sure the same MediaAgent has different instances pointing to the source and destination CommCell.

    The export dump will be stored in Job Results Directory of the Shared MediaAgent.

    • Select the MediaAgent name of the destination CommCell from Select GRC Media Agent Client Name for Export Files Destination.
    • Select the MediaAgent name of the source CommCell from Select/Enter Equivalent Podcell Media Agent Client Name For Communication.
  • Click Next.
5. Select one of the following:
  • Click Schedule to configure the default schedule for export operation.
  • Click Immediate to run the job immediately.

This will initiate Export job at the remote CommCell.

Click Next.

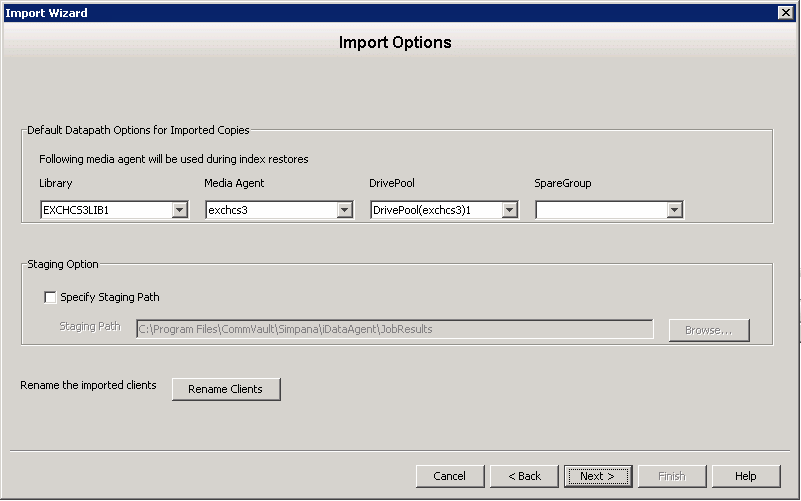
6. Select valid MediaAgent to be used for index restores and make sure the correct datapath is selected as it is required to set default copy properties.
  Select the Staging Option if you wish to change the path specified to stage the CommCell migration database. Click Browse to locate the folder or enter the complete path.

Click Next.

7. Select one of the following:
  • Click Schedule to configure the default schedule for import operation.
  • Click Immediate to run the job immediately.
      If you select Immediate, import will wait for the export job to finish.
  • Select Rename Clients.
    • Enter a New Client Name and New Client Host Name for the imported clients.
    • Click OK.

Click Next.