Backup jobs from Virtual Server iDataAgent will be displayed as "Completed w/ one or more errors" in the Job History in the following cases:
If the virtual machine, virtual machine disk, or virtual machine configuration file fails to back up.
If one or more virtual machines in a backup job fail to back up.
If communication fails with vCenter.
If a disk included in a backup is not supported (i.e., independent disks or physical RDM).
If the meta data collection operation fails during a snap backup job, the job will be displayed as "Completed" in the Backup Job History of the subclient. You can create the bCWEJobMDataFails registry key if you want to display the status as "Completed w/ one or more errors" in such scenario.
To get the file level details of a Linux VM, follow the steps given below:
If the virtual machine under backup includes independent disks/physical RDMs, these disks will be skipped. During a full restore the independent disk/Physical RDM gets restored with 0MB, and the virtual machine cannot be powered on. As a work around, prior to powering on, manually remove the independent disks/Physical RDMs and then power on the restored virtual machine.
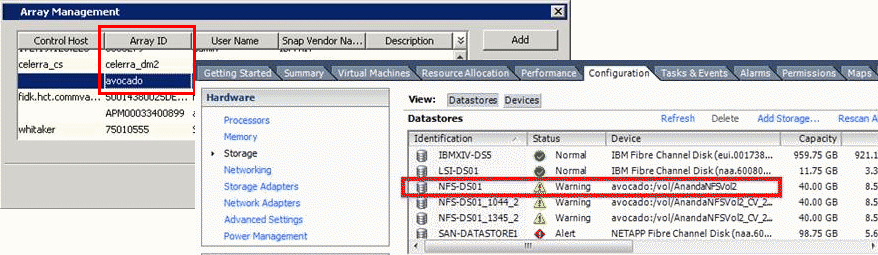
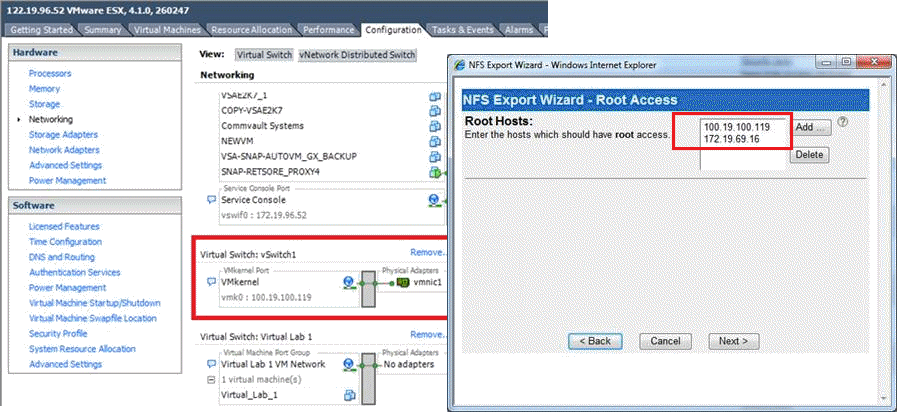
When performing SnapProtect operations on VMware using NFS file-based protocol, ensure the following:
| The NetApp storage device name specified in Array Management matches that on the ESX Server. |
|
| The VMkernel IP address of all ESX servers that are used for mount operations should be added to the root Access of the NFS share on the source storage device. This needs to be done because the list of all root hosts able to access the snaps are inherited and replicated from the source storage device. |
|
The Revert job may go to Pending state with the following error:
File level revert is not supported for a Virtual Machine [%VMNAME%] which is on VMFS datastore. [Datastore(s) [%DatastoreName%] does not support file level revert.
The virtual machine may have NFS and iSCSI disks. Ensure that all the disks reside on the NFS data store. If the data does not reside on the NFS data store, you cannot perform the revert operation.
Perform the conventional Container Restore to bring the data back to the point-in-time.
Before starting the revert operation, ensure that the Snapshot which you are using to perform the revert operation is not mounted.
Exchange Snap Mining operation may fail if SAN mode is used to perform the backup and snapshots were exposed in read-only mode.
It is recommended to use NBD mode for Exchange Snap Mining backup. However, if you want to use SAN mode, ensure that all the disks exposed to the proxy computer have read and write permissions.
Follow the steps give below to clear read-only attributes of any SAN shared disk:
Enter the following commands:
diskpart
san policy=onlineallDuring the backup copy operation, the registration of a virtual machine fails with the following error:
The Operation is not allowed in the current state
The ESX server which hosts the virtual machine is in the maintenance mode.
Before initiating the backup copy operation, ensure that the ESX server is not in the maintenance mode. If you are performing an inline backup copy, before initiating the SnapProtect operation, ensure that the any host involved in the backup, is not in the maintenance mode.
The SnapProtect backup job goes to pending state.
You cannot perform the SnapProtect backup of a template virtual machine. If the subclient for which you are performing the SnapProtect backup, contains the template virtual machine, the backup job goes to pending state.
Set the SkipTemplateVM registry key to 1 and perform the backup of the subclient which contains the template virtual machine. The template virtual machine will not be included in the backup and the backup job will complete successfully.
You may get following error when you are restoring files and folders from a virtual machine:
Failed to download config file
Disable the Symantec End Point Protection on the computer where you have installed Virtual Server iDataAgent and MediaAgent and perform the file level restore.
The backup operation fails with a error: Unable to download config files.
The name of the datastore contains + or @.
When you are mounting any snapshot on a host, you may get following error:
Discovery Failed. Unable to access host
The Snaps created during SnapProtect operation dialog box displays a list of all the snapshots on a storage array. If you open the Snaps created during SnapProtect operation dialog box by one of the following methods, you can only view the list of snapshots and cannot mount the snapshots:
For more information about correct method mounting a snapshot, refer to Mount Snapshots.
Successfully mounted datastore becomes inaccessible when the browse operation is performed or data is accessed.
This issue is caused by incorrect MTU settings between ESX proxy host and NFS storage.
To check if the issue is occurring due to incorrect MTU settings, use ping command with DF “do not fragment” option by providing different MTU values and check if Ping is working as expected.
A file-level restore fails when restoring from an IntelliSnap backup to a destination client that has a media agent.
When mounting the virtual machine, the restore operation tries to use the media agent on the destination client rather than the media agent on the source client, and the mount fails.
When the source media agent is used, the mount succeeds and the file-level restore completes successfully.
When viewing virtual machines in the Client Computers list, you may see duplicated client names (for example, <ClientName> and <ClientName>_1).
Virtual machine information is added to the database during the discovery phase of a backup. If information changes, a new client is discovered during the discovery phase.
Making changes to information such as the virtual machine fully qualified domain name (FQDN), the GUID, or the host name can cause this issue.
Use the install software option for the client level in the CommCell Console (rather than interactively installing software to the virtual machine Guest Operating System).
If duplicate clients are created with '_1" appended to the original client name, you can perform the following steps to merge the duplicate client back into the original:
qoperation execscript -sn QS_SetVMClient -si @sourceClient='<ClientName>_1' -si @destClient='<ClientName>'
where <ClientName> is the original client name and <ClientName>_1 is the duplicate.
This script reassigns all backup history from <ClientName>_1 to <ClientName>. This enables you to view backup history, and to generate Job Summary Reports with the Include Protected VMs option enabled.
When a virtual machine has been replicated in vSphere and backed up, and a full VM restore is performed from the backup, the following status message might be displayed in vCenter:
Failed to start the virtual machine.
If the Power ON Virtual Machine After Restore option is selected when performing a full VM restore, VMware attempts to power on the restored VM before disabling replication.
Clear the Power ON Virtual Machine After Restore option when initiating the restore. VMware automatically disables replication when the restore is completed, and you can power on the virtual machine manually.
A user is unable to browse files on a snapshot for a Windows 2008 R2 virtual machine (ESXi or ESX 4.1 and higher).
The following message appears in the cvd.log file:
Disk:[<Name>] filtered during snap protect operation
File-level browse of a virtual machine snapshot fails if the page files for the VM are filtered out. The virtual machine snapshot cannot be mounted because it needs the page file for the VM. The page file is unavailable because it resides on a datastore that is filtered for backup.
This issue occurs when the disk.EnableUUID attribute is set to true for the virtual machine. The disk.EnableUUID attribute enables application-level quiescing. If the UUID is not enabled, VMware performs file-system consistent quiescing.
During the restore, file-level browsing succeeds if the user selects a MediaAgent that has the Virtual Server Agent installed and has access to the datastore that contains the page files. On the Advanced Restore Options dialog, go to the Data Path tab to specify a MediaAgent.
To resolve this issue, set the disk.EnableUUID attribute to false and run the IntelliSnap backup again on the virtual machines where page files were filtered.
To modify the UUID setting in vSphere 5.1:
As long as there is not a backup copy or auxiliary copy in progress, users should be able to browse files from the VM snapshot.
Disabling the UUID attribute does not affect applications that do not use Volume Shadow Copy Services (VSS), such as Microsoft SQL, Microsoft Exchange, or Active Directory.
See the following articles:
When restoring from a backup of a Windows 2012 virtual machine that has deduplication enabled, a file-level restore completes successfully but only creates stub files.
File-level restores are not supported for deduplicated volumes from a Windows 2012 VM.
To retrieve files from a backup for a Windows 2012 VM using deduplication, restore the disk that contains the file.
Alternatively, you can install a local file system agent on the Windows 2012 VM to enable file-level restores.
When mounting a snapshot to an existing datastore for a Backup Copy job, the mount operation fails with the following error:
Unable to mount the volumes.
When mounting a snapshot to an existing datastore, the string '_gx_backup', the job ID. and the archive file ID are added to the datastore name.
If the combined name is more than 42 characters, the mount operation fails.
Ensure that the combined name is less than 42 characters. In most cases, if the datastore name is 20 characters or less, the combined name will be under 42 characters.
SnapProtect Backup operations fail if the database is in the NOARCHIVELOG mode. Alter the database to ARCHIVELOG mode and then perform the SnapProtect backups.
SQL>startup mount;
SQL>alter database archivelog;
SQL>alter database open;
Sometimes, the SnapProtect backup operations may fail if you enable the SSKIPBACKUPBROWSE registry key. Ensure to disable it.
SnapProtect Backup operations run indefinitely if the archive log location is full. In such cases, you have to either clear the archive logs to make enough space available or specify a different archive log location.
When performing an Oracle RMAN incremental snap to tape copy, note the following:
sqlplus <username/password@servicename> as sysdba << EOF
Create pfile from spfile;
Exit;
EOF
Copy the pfile init<instance name>.ora to the proxy computer and the destination location should be $ORACLE_HOME/dbs/ with oracle user permissions. Also, copy the oracle password file from the source to the proxy computer's $ORACLE_HOME/dbs/ directory.
Note that for incremental backup, snap clone will be mounted in the same location as the source mount-point of the source database. For example, if the data mount-point is /netapp/data then on the proxy too it will be mounted in /netapp/data, similarly for the archive log location chosen for the SnapProtect backup. Therefore, ensure that on the proxy this mount-point is free and there is no such directory existing on the proxy computer ( even if it exists it should be empty).
When performing SnapProtect operations on a backup copy of an Oracle ASM database, note the following:
> srvctl status asm
PRCR-1001 : Resource ora.asm does not exist
> srvctl add asm -p $ORACLE_HOME/dbs/init${ORACLE_SID}.ora
> srvctl status asm
ASM is not running.
> srvctl start asm
or
> sqlplus "/ as sysasm"
startup
> srvctl status asm
ASM is running on <proxy>
Example:
If RMAN configuration parameters contain $s as shown below:
RMAN> show all;
RMAN configuration parameters for database with db_unique_name CVLT are:
CONFIGURE RETENTION POLICY TO RECOVERY WINDOW OF 0 DAYS;
CONFIGURE BACKUP OPTIMIZATION ON;
CONFIGURE DEFAULT DEVICE TYPE TO DISK; # default
CONFIGURE CONTROLFILE AUTOBACKUP OFF;
CONFIGURE CONTROLFILE AUTOBACKUP FORMAT FOR DEVICE TYPE DISK TO '$ORACLE_BKUP/$ORACLE_SID/controlfile%F.f';
CONFIGURE DEVICE TYPE DISK PARALLELISM 2 BACKUP TYPE TO COMPRESSED BACKUPSET;
CONFIGURE DATAFILE BACKUP COPIES FOR DEVICE TYPE DISK TO 1; # default
CONFIGURE ARCHIVELOG BACKUP COPIES FOR DEVICE TYPE DISK TO 1; # default
CONFIGURE CHANNEL DEVICE TYPE DISK FORMAT '$ORACLE_BKUP/$ORACLE_SID/%d_df_%t_b%s_p%p.rmf' MAXPIECESIZE 2000 M;
CONFIGURE MAXSETSIZE TO UNLIMITED; # default
CONFIGURE ENCRYPTION FOR DATABASE OFF; # default
CONFIGURE ENCRYPTION ALGORITHM 'AES128'; # default
CONFIGURE COMPRESSION ALGORITHM 'BASIC' AS OF RELEASE 'DEFAULT' OPTIMIZE FOR LOAD TRUE ; # default
CONFIGURE ARCHIVELOG DELETION POLICY TO NONE; # default
CONFIGURE SNAPSHOT CONTROLFILE NAME TO '$ORACLE_BKUP/$ORACLE_SID/snapcf_CVLT.f';
ORA-7217 sltln: environment variable cannot be evaluated
Perform one of the the following steps to resolve this issue:
RMAN-03002: failure of backup command at 04/11/2012 13:44:03
RMAN-06004: ORACLE error from recovery catalog database: RMAN-20220: control file copy not found in the recovery catalog
RMAN-06090: error while looking up control file copy: +DATA/backup.ctl.galaxy
RMAN>
Perform the following to resolve this failure:
Description: Oracle Backup [GetASMLogDisks Failed.]
Description: Oracle Backup [Mounting snap or renaming ASM DiskGroup operation failed with an error. Please check the logs for more details.]
30156 f48b7410 04/18 13:00:37 97550 OraObject::GetOraMode() - oraMode = SHUTDOWN.
30156 f48b7410 04/18 13:00:37 97550 OraObject::GetOraMode() - oraMode = SHUTDOWN: return Error.
30156 f48b7410 04/18 13:00:37 97550 OraInfoBase::GetInfo() - CheckOraMode() failed: oraError=301989906
30156 f48b7410 04/18 13:00:37 97550 ASMSnapUtil::runSqlWithScript() - Failed while getting the Oracle version
30156 f48b7410 04/18 13:00:37 97550 ASMSnapUtil::runSqlWithScript() - Writing
into file [@/opt/calypso/Base/Temp/tmp_asm_30156.sql] sql = [select 'U,'|| state
from v$asm_diskgroup where name = 'DATADG1'
/
]
30156 f48b7410 04/18 13:00:37 97550 ASMSnapUtil::runSqlWithScript() - Executing
SQL select 'U,'|| state from v$asm_diskgroup where name = 'DATADG1'
/
failed with an error Database is in SHUTDOWN mode
30156 f48b7410 04/18 13:00:37 97550 ASMSnapUtil::isASMDiskGroupMounted() -
Failed while executing the sqlscript [select 'U,'|| state from v$asm_diskgroup
where name = 'DATADG1'
/
] output = []
30156 f48b7410 04/18 13:00:37 97550 ASMDiskGroup::renameASMDiskGroup() - Child
change user=oracle, gid=501, uid=501
30156 f48b7410 04/18 13:00:37 97550 ClOraSnapAgent::RenameAndMountASMDiskGroup()
- Successfully Renamed ASM DISK GROUPS
30156 f48b7410 04/18 13:00:37 97550 OraObject::GetOraMode() - strictSID = 0
30156 f48b7410 04/18 13:00:37 97550 OraChildProcess::SetPostForkParam() - Parent
path = /oracle11gr2/product/11.2.0/dbhome_1/bin/sqlplus
30156 f48b7410 04/18 13:00:37 97550 OraChildProcess::SetPostForkParam() - Parent
oraUser = oracle
Perform the following to resolve this failure:
On Oracle version 11.2.02, there is a latency for releasing filedescriptors by ASM instance during dismounting of ASM diskgroups.
Apply the following patch on Oracle version 11.2.02 to resolve the latency issue:
Patch:11666137
https://updates.oracle.com/download/11666137.html
if you perform a SnapProtect operation without disabling the Snap Integrity for persistent snap engines, the following error is displayed:
19935 b7f476d0 03/01 12:20:03 11972 ASMDiskGroup::mountASMDisk() - Failed while excuting sql [alter system set asm_diskstring='/ora_snap*/asm*','/ora_snap*/*'
/
alter diskgroup DATA mount
/
] output = [ SQL*Plus: Release 11.2.0.1.0 Production on Thu Mar 1 12:20:03 2012,Copyright (c) 1982, 2009, Oracle. All rights reserved.,SQL> SQL> SQL> SQL> Connected.,SQL> SQL> SQL> SQL> SQL> SQL> SQL> ,System altered.,alter diskgroup DATA mount,ERROR at line 1:,ORA-15032: not all alterations performed,ORA-15017: diskgroup "DATA" cannot be mounted,ORA-15063: ASM discovered an insufficient number of disks for diskgroup "DATA",SQL> SQL> Disconnected from Oracle Database 11g Enterprise Edition Release 11.2.0.1.0 - Production,With the Automatic Storage Management option,]
19935 b7f476d0 03/01 12:20:03 11972 ASMDiskGroup::mountASMDisk() - One of the diskgroups could not be mounted
19935 b7f476d0 03/01 12:20:03 11972 ClOraSnapAgent::RenameAndMountASMDiskGroup() - mountASMDiskGroup failed
Perform the following steps to resolve this issue:
/opt/calypso/Base/diskgroup_rename.pl -y <original source diskgroup name> <mounted disk path>
For example, if snap is mounted on /tmp and the original diskgroup name is DATA01, then perform the following command:
[oracle@Hindu ~]$ /opt/calypso/Base/diskgroup_rename.pl -y DATA01 /tmp/volume_1335990104/DATA01
renaming disks to: DATA01
current name for /tmp/volume_1335990104/DATA01: DS2995770
new name for /tmp/volume_1335990104/DATA01: DATA01
Unmount the Snap. Perform the same for all the snaps in that SnapProtect operation.
The RMAN backup copy operation using sRMANDATAFILECOPY registry key will fail on proxy, if a block track change file exists for the source database.
You should manually create the block track change file in the same location as source on proxy and resume the backup copy operation.
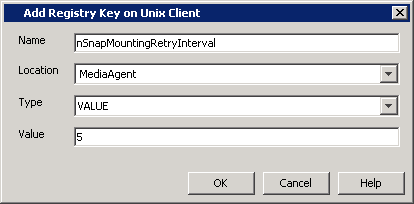
If you see Volume Operation in Progress error for backup copy, then on the proxy computer configure either the count of the retries for mounting the snapshots or the interval between two retries for mounting the snapshots.
Follow the steps given below to configure the number of retries for mounting the
snapshots:
|
 |
Follow the steps given below to configure the time interval between two retries
for mounting the snapshots:
|
 |
When you see ORA-01145: offline immediate disallowed unless media recovery enabled error when recovering the no archivelog database, verify whether the catalog is in sync with the database. If the catalog is not in sync with the database, perform a resync.
During the proxy setup the following error may occur after the Oracle password file is copied over the proxy
SQL> conn sys/<password>@orcl as sysdba;
ERROR:
ORA-01031: insufficient privileges
The listener uses the dynamic service information about the database and
instance before using statically configured information in the listener.ora
file. Configuration of static service information is necessary if you require
remote database startup from a tool other than Oracle Enterprise Manager, or you
have Oracle Database releases earlier than Oracle8i.
Also please note that the SID_NAME is case sensitive. Listener.ora file on proxy
Cause:
SID_LIST_LISTENER=
(SID_LIST=
(SID_DESC=
(ORACLE_HOME=/u01/app/oracle/rdbms/11.2.0.3/dbhome_1)
(SID_NAME=prd1)
)
(SID_DESC=
(ORACLE_HOME=/u01/app/oracle/rdbms/11.2.0.3/dbhome_1)
(SID_NAME=orcl)
)
)
Solution:
SID_LIST_LISTENER=
(SID_LIST=
(SID_DESC=
(ORACLE_HOME=/u01/app/oracle/rdbms/11.2.0.3/dbhome_1)
(SID_NAME=PRD1)
)
(SID_DESC=
(ORACLE_HOME=/u01/app/oracle/rdbms/11.2.0.3/dbhome_1)
(SID_NAME=ORCL)
)
)
Verification:
SQL> conn sys@ORCL as sysdba
Enter password:
Connected.
During SnapProtect backup job, you may notice the following catalog errors:
File Name: /opt/calypso/MediaAgent/SnapVolumeMounts/SnapMnt_1_2_26099/oradata/ONLINE/dbconf.cfg
RMAN-07517: Reason: The file header is corrupted
File Name: /opt/calypso/MediaAgent/SnapVolumeMounts/SnapMnt_1_2_26099/oradata/ONLINE/initONLINE.ora
RMAN-07517: Reason: The file header is corrupted
File Name: /opt/calypso/MediaAgent/SnapVolumeMounts/SnapMnt_1_2_26099/oradata/ONLINE/spfileONLINE.ora
RMAN-07518: Reason: Foreign database file DBID: 0 Database Name:
File Name: /opt/calypso/MediaAgent/SnapVolumeMounts/SnapMnt_1_2_26099/oradata/ONLINE/GalaxyControlFile.Conf
RMAN-07517: Reason: The file header is corrupted
These error messages can be ignored. As part of the backup job, files such as spfile, pfile and backup controlfiles are copied to the archive log location. Oracle does not recognize these files as archive log files and hence displays the error messages.
When restoring Oracle database on Linux clients, if the Switch database mode for restore option is selected to keep database in correct mode during restore, the database may not restart after switching the database mode. Also, the restore operation may fail with the following error message.
RMAN Script execution failed with error [RMAN-04014: startup failed: ORA-27137: unable to allocate large pages to create a shared memory segment]. Please check the Logs for more details.
This issue occurs if the oracle user has a higher ulimit configuration than the root user. To resolve this issue, apply the ulimit value of Oracle user for the restore using the following steps:

When you perform SnapProtect backup operation, snaps are performed twice on sapbackup directory, dbs folder etc. However, there is a limitation with Hitachi Data System (HDS). You can only create 3 S-VOL for a given P-VOL when you are using HDS shadow image snap engine. If we have the entire SAPDATA_HOME on a single volume, all the 3 available S-VOL's may be exhausted.
Hence, you need to perform the following for SAP HDS:
When you configure a physical file server (vfiler0) as a NAS client and define vFiler volumes in the subclient content, auxiliary copy operations will fail to create the SnapVault/SnapMirror copies. You can resolve this issue by configuring each vFiler as a NAS client. During the client configuration, ensure not to include the vFiler root volume in the subclient content. You can also perform mount and revert operations with the snapshot.
Restore operations from a snapshot are not supported if you selected the Skip Catalog phase for SnapProtect option in the Advanced Backup Options dialog box during backup. To restore your backed up data, you must create a backup copy as explained in the Snap Movement to Media procedure and restore your data from the backup copy.
Restore operations will fail with the following error code if the file server used to backup Vault or Mirror copies is not added as a NAS client:
[39:279] The host <file_server_name> could not be found in the list of NAS Clients. Please add this host as NAS Client.
To resolve this issue, add the file server as a NAS client as well as any other NAS storage device used to back up secondary storage data.
You can resolve this issue by temporarily suspending the virtual machine during the SnapProtect operation.
If the storage policy uses a Media Agent that does not have access to the storage device where the snapshot was created, an additional step is required while selecting the options in the Restore Options for all selected items window.
The virtual machine may have been in a running state during the SnapProtect backup. Consequently, the virtual machine is restored in a saved state. To resolve this issue:
The restore operation fails when you are restoring files or folders from a Disk Level backup. The restore will fail if the Enable Granular Recovery option is not selected before performing the backup or the Granular Recovery operation fails.
In such scenario, you can use following procedure to restore files and folders from a disk level backup:
When restoring from a backup of a Windows 2012 virtual machine that has deduplication enabled, a file-level restore completes successfully but only creates stub files.
File-level restores are not supported for deduplicated volumes from a Windows 2012 VM.
To retrieve files from a backup for a Windows 2012 VM using deduplication, restore the disk that contains the file.
Alternatively, you can install a local file system agent on the Windows 2012 VM to enable file-level restores.
You have two logical volumes on the same physical volume group. After performing a SnapProtect backup on a subclient which has both logical volumes as content, you proceed to mount each logical volume. After successfully mounting the first volume, an error will be displayed while trying to mount the second one saying the mount operation failed during the volume group recreation. Although the mount operation was not successful, the second logical volume will show as mounted in the Snaps created during SnapProtect operation window of the CommCell Console. In this scenario, proceed to unmount the second logical volume.
To avoid this issue on future mount operations, it is recommended to mount one of the logical volumes, and not both.
When running a SnapProtect backup on an IA64 machine running HP-UX 11.23, the below ioscan error in the logs can be safely ignored.
5774 16 02/14 14:14:57 ##### UXScsi::scanAgile() - "/usr/sbin/ioscan -kFnN" failed: ioscan: illegal option -- N
On an IA64 machine running HP-UX, SnapProtect job may fail at the vgimport phase with an error message if the maximum number of volume groups allowed on the machine is exhausted. For example,
<Failure during recreate VG. Error [Failed import: vgimport -v -m /opt/calypso/Base/Temp/vg_test_1360887863.map /dev/vg_test_1360887863 /dev/dsk/c20t0d2 14672 Error: vgimport: Cannot open the control file "/dev/vg_test_1360887863/group":
In such cases, use the following steps to increase the maximum number of volume groups and resume the job:
kctune -v maxvgs
ls -l /dev/vg_test_1360887863
crw-r----- 1 root dba 128 <0xNN0000> Dec 17 16:00 group
kctune maxvgs=50