The browse operation provides the capability to see the snapshots created for
an agent, job, or a snapshot copy. The list of the snapshots displayed is corresponding
to the entity selected for the browse operation, for e.g., browsing the snapshots
for an agent will display all the snapshots created for the selected agent. You can
view volume or disk related information for the snapshots. Follow the steps given
below to browse snapshots.
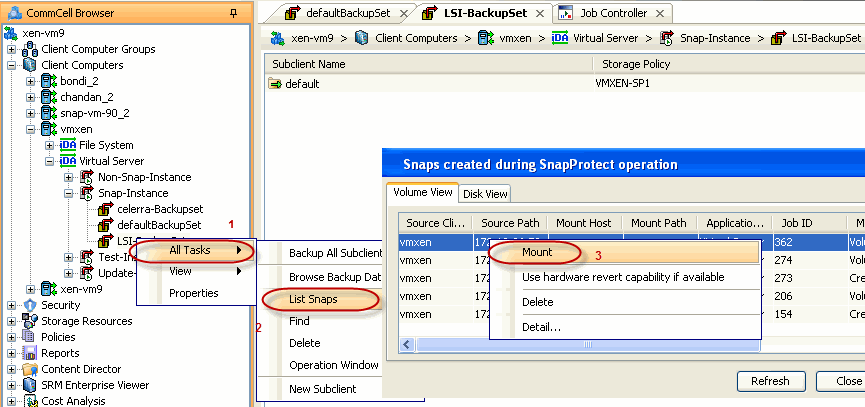
From the CommCell Browser, navigate to Client Computers |
Virtual Server | <Instance>.
Right-click <backup set> and click All Tasks | List Snaps.
The Snaps created during SnapProtect operation dialog box displays a list of
all the snapshots created for the selected subclient. It also displays important
information about each snapshot, including the source month path, snap mount
path, the storage array, and the source client.
Click the Disk View
tab to display the snapshot name, e.g.
SP_2_79_1286222629.
You can mount any available snapshot to access the data included in the
snapshot. It is recommended that you select the option to protect a snapshot
when it is mounted, as this will ensure that the changes made to the snapshot
when it is mounted are not retained when you unmount the snapshot and the
snapshot is usable for data protection operations. Follow the steps given below
to mount snapshots:
If the
niSCSIEnable registry key is configured, SnapProtect backup
will always try to mount using iSCSI method. If this key is not
configured, SnapProtect backup will try to mount using the FC method
first.
From the CommCell Browser, navigate to Client Computers |
Virtual Server | <Instance>.
Right-click <backup set> and click All Tasks | List Snaps.
From the Snaps created during SnapProtect operation dialog
box, right-click the snapshot that you wish to mount and select Mount.
You can also open the Snaps created during SnapProtect operation
dialog box by right clicking the snapshot copy in a storage policy.
However, if you open the dialog box by this method, you can only view
the list of snapshots and cannot mount the snapshots.
From the Mount Path dialog box, you can select a different
ESX server for mounting the snap by choosing the Select ESX server
for snap mount option.
Select the appropriate ESX server from the Browse for ESX Server
dialog box.
Click OK to close the Browse for ESX Server dialog
box.
Click OK to close the SubclientProperties
dialog box.
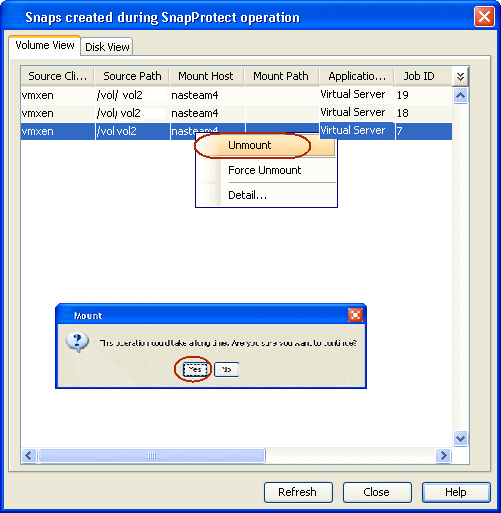
Unmount Snapshots
Follow the steps given below to Unmount Snapshots:
From the CommCell Browser, navigate to Client Computers |
Virtual Server | <Instance>.
Right-click <backup set> and click All Tasks | List Snaps.
Right-click the snapshot you
wish to unmount and click Unmount.
Click Yes when prompted if you want to continue.
If the snapshot does not get unmounted,
select the Force Unmount option to mark the snapshot as
unmounted.
While performing mount operations you can use a temporary ESX server to reduce the load on the production server.
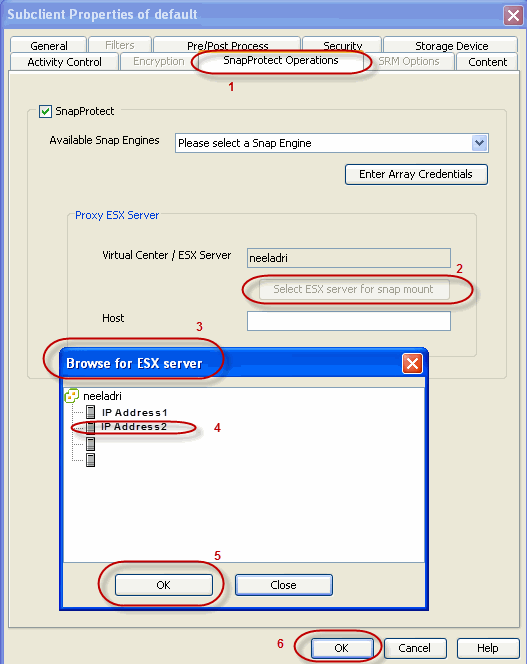
From the CommCell Console, right-click the subclient for
which you wish to perform a SnapProtect backup and click Properties.
Click the SnapProtect Operations tab.
Select the SnapProtect option to enable SnapProtect backup for
the selected subclient.
You can select a different ESX server for mounting the snap by choosing
the Select ESX server for snap mount option.
Select the appropriate ESX server from the Browse for ESX Server
dialog box.
Click OK to close the Browse for ESX Server dialog
box.
Click OK to close the SubclientProperties
dialog box.
By default the snapshot will be exposed to
the first Host Bus Adapter (HBA) on the ESX Server. If you want
to expose the snapshot to a specific HBA, configure the
sPortInfo registry key.
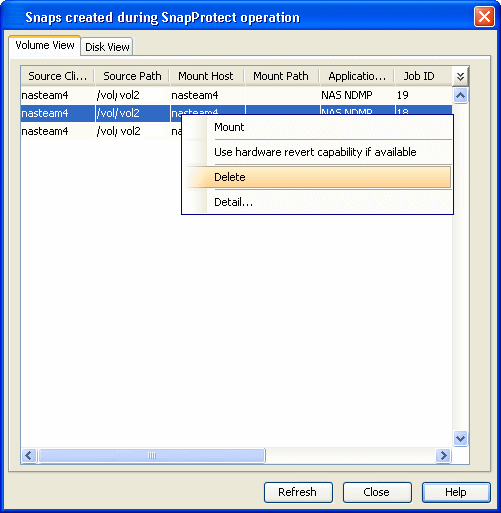
Snapshots can either be deleted using job-based pruning or from the list of
displayed snapshots when browsing snapshots. Data Aging can also be used to
define the retention rules and pruning of snapshots. Follow the steps given
below to delete snapshots:
Manual deletion of snapshots is not recommended. When a
snapshot is deleted, it is no longer possible to perform data
recovery operations from the snapshot copy. However, if a backup
copy was created from the snapshot, data recovery operations can
be performed from the backup copy.
Ensure that the snapshot to be deleted is not mounted.
From the CommCell Browser, navigate to Client Computers | <Client>
| <Agent>.
Right-click the subclient and click List Snaps.
Right-click
the snapshot you wish to delete.
Ensure all snapshots with the same Job ID
are selected for a successful deletion operation.
Click Delete.
Enter the confirmation
text string, erase snapshots.
You can use the revert operation to bring the data back to the point-in-time
when the snapshot was taken. This operation overwrites any modifications to the
data since the time when the snapshot was created.
Revert operations for a virtual machine are supported on NetApp File Servers but
not from SnapVault or SnapMirror snapshots.
Other file servers are not supported. To perform a revert operation, the SnapRestore license is required on the NetApp file server.
Before performing revert operation, ensure that all the disks reside on the NFS
data store. If the data does not reside on the NFS data store, you cannot
perform the revert operation.
It is recommended to verify the
contents of the backup and ensure that you want to perform a revert operation
as it is an irreversible operation.
From the CommCell Browser, navigate to Client Computers |
Virtual Server | <Instance>
Right-click <backup set> and click All Tasks | Browse Backup Data.
From the Browse Options dialog box, select Container Restore
and click OK.
Select the virtual machine that you want to revert and click Recover All Selected.
From the Restore Options dialog box, click Advanced.
Select the Use hardware revert
capability if available
option.
Click OK to confirm the revert operation.
Click OK from the Advanced Restore Options dialog box.
Click OK to start the revert.
For NetApp NFS configurations:
This operation reverts all data on the file server volume,
not just the data that is associated with the snapshot.
A volume revert deletes all snapshots that were created
after the snapshot to which you are reverting.
If you perform a volume revert on the source for a SnapVault/SnapMirror
copy, and the snapshot to which you are reverting was created
before the most recent snap moved to the SnapVault/SnapMirror
copy, then the SnapVault/SnapMirror copy operation no longer
works.
You can create a separate account for backup and restore operations. When you
are create a user account, following system privileges are automatically added
to account:
Category
Available Permissions
System
Anonymous
Read
View
Ensure that the following
permissions are assigned to the user account:
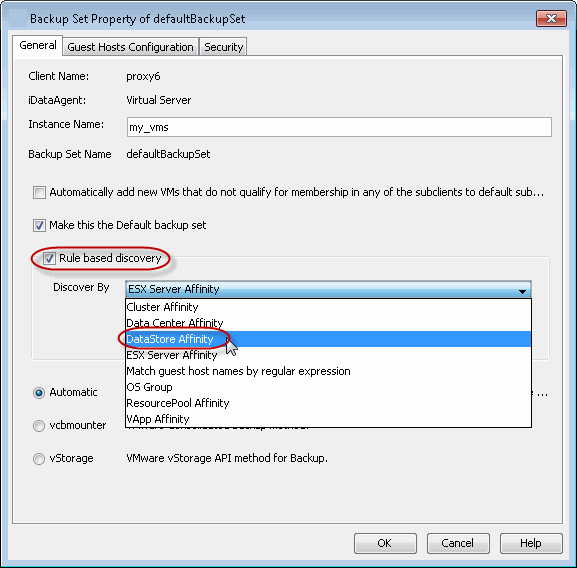
It is recommended to configure automatic discovery of virtual machines by data store affinity
if you have a large VMware environment with many virtual machines, ESX servers
and datastores.
When configured, new virtual
machines found in the datastore are automatically assigned to the desired subclient
and backed up when backup operations on the subclient are performed.
From the CommCell Browser, right-click the backup set for which you want
to discover guest hosts and then click Properties.
Select Rule-Based Discovery.
Click Discover By drop-down box and
select DataStore Affinity.
Click Configure.
From the Datastore Configuration for Auto
Discover dialog box, click Discover Data Stores.
From the Auto Discover Data Stores dialog box, locate
the datastores you wish to configure for auto discovery and select the subclient
you wish to associate each with.
To exclude a select number of datastores from
being backed up, choose the Do Not Backup option in the Subclient
column.
Click OK to save your changes.
Click OK from the Datastore Configuration for Auto
Discover dialog box.
Select the operation that you want to run from the sections below, and
execute the command from the
<Software_Installation_Directory>/Base folder after substituting the
parameter values.
The following table describes the parameters used in the above sections.
Parameter
Description of Parameter
values
clientName
Name of the client computer.
backupsetname
Name of the backup set. If the backup set name is
not specified in the command query, the default backup set is used
by default.
appName
Name of the application. In this case it would be
'Virtual Server'.
subclientname
Name of the subclient.
backupType
Option to set the backup level at which the
SnapProtect backup should run. Valid values are:
FILE_LEVEL
VOLUME_LEVEL
DISK_LEVEL
useProxy/clientName
Name of the client computer that will behave as
the proxy. This is useful when you want a different computer to
perform the backups.
transportModeForVMWare
Option to set the transport mode of your
environment. Valid values are:
AUTO, to allow the software to automatically set the
transport mode based on your setup.
SAN
HOT_ADD
NAS
NBD_SSL
NBD
isSnapBackupEnabled
Option to enable the SnapProtect configuration on
the subclient.
Valid values
are true/false.
backupForGranularRecovery
Option to enable the application aware backup
operation to allow granular recovery of files. Valid values are
true/false.
When this option is set to true, you can also
truncate the Exchange Database logs using the truncateExDBLogs
parameter. Valid values for this parameter are true/false.
useSeparateProxyForSnapToTape
Option to enable the use of a proxy computer to
perform SnapProtect operations in a different Virtual Server client.
Valid values are true/false.
When this option is set to true,
you also need to specify proxy computer using the
separateProxyForSnapToTape/clientName parameter.
snapShotEngineName
Name of the storage array to be configured with
the subclient. Valid values are:
The name of the storage array should match
with the name displayed in the Available Snap Engine list
in the subclient properties.
When you are using Virtual Server iDataAgent to create the snapshot of a SQL
server, you can truncate the SQL server database logs before creating the
snapshot. Follow the steps given below to truncate the SQL server database logs:
Install the Microsoft SQL Server iDataAgent
for restore only on the virtual machine which has the SQL
server. For more information, refer to
Installing Restore Only Agents.
Once you install the agent, the CvSQLBackupUtility
will be available in the <Base> folder under <Installation Directory> on the
virtual machine. This utility will be used to truncate the SQL server
database logs.
Create batch file with name <post-thaw-script.bat > and type the
following command in the batch file. as below
When you perform the SnapProtect backup of the SQL server, the batch file
will be executed while creating the snapshot and the SQL database logs will
be truncated.
You can verify a backup to ensure that you can restore the virtual machine.
The recovery verification recreates the virtual machine to ensure backed up
application and data are available as expected.
Mount the snapshot
From the CommCell Browser, right-click the subclient that contains
the virtual machine backup that you want to verify, click All Tasks
| List Snaps.
Right-click the snapshot that you wish to verify and select Mount.
From the Mount Path dialog box, click the Select ESX server
for snap mount option.
Select an ESX server from the Browse for ESX Server
dialog box.
As this ESX server will be used to create the virtual
machine, it is recommended that you select a non-production
server.
Click OK.
Browse the data
From the CommCell Browser, right-click the subclient that contains the
backup that you want to verify and click All Tasks | Individual
files/folders.
Click OK.
BROWSE NEW DATASTORE AND REGISTER THE VIRTUAL MACHINE
From the VI client, ensure that the new virtual machine from the backup is registered.
The virtual machine name will be in the [OriginalVMName]_[BackupJobID]_GX_BACKUP
format.
If the virtual machine is not registered, follow the steps given
below to browse the new datastore that is created and register the
virtual machine.
Click the virtual machine you want to register and click the
Summary tab to see the datastore name.
Click the ESX server you selected in Step 4, and click the
Storage option.
Identify the new datastore created after mounting the snapshot and
register the virtual machine. The new datastore will have the following
name:
[OriginalDatastoreName]_GX_BACKUP_[BackupJobID]
Specify a name for the virtual machine.
Verify the data using VI client
Right-click the virtual machine and select Edit Settings.
Click Network adapters.
Clear the Connect at power on checkbox in the Virtual Machine Properties
dialog box for all the available network adapters.
Click OK.
Turn on the virtual machine.
Click the Summary tab and select the I moved it option.
Login to the virtual machine and verify the applications and
data.
After verification is complete, power off the virtual machine.
Right-click the virtual machine and select the Remove from inventory
option.
unmount the snapshot
From the CommCell Browser, right-click the entity that contains
the snapshots you want to browse, click All Tasks | List Snaps.
Right-click the snapshot that you wish to unmount and select Unmount.
When restoring VMware data, it is important to consider the backup level that
was originally performed. The following table illustrates the types of restores
available for each backup level:
Backup Level
Restore Level from Snap
Restore from Tape
Notes
Disk-Level
Disk-Level (as virtual machine)
Disk Level (as VMDK file)
Disk-Level (as virtual machine)
Disk Level (as VMDK file)
Disk-Level with Enable Granular Recovery enabled
Disk-Level (as virtual machine)
Disk-Level (as VMDK file)
Volume-Level (as physical volume)
Volume-Level (as VHD)
Volume-Level (as VMDK)
File-Level
Disk-Level (as virtual machine)
Disk-Level (as VMDK file)
File-Level
Volume-Level
Disk-Level (as virtual machine)
Disk Level (as VMDK file)
Volume-Level (as physical volume)
Volume-Level (as VHD)
Volume-Level (as VMDK)
Supported only with volumes formatted with the NTFS file system.
Volume-Level with Enable Granular Recovery enabled
Disk-Level (as virtual machine)
Disk-Level (as VMDK file)
Volume-Level (as physical volume)
Volume-Level (as VHD)
Volume-Level (as VMDK)
File-Level
Volume-Level (as physical volume)
Volume-Level (as VHD)
Volume-Level (as VMDK)
File-Level
Supported only on Windows-based VMware virtual servers formatted with the
NTFS file system.
File-Level
File-Level
Disk-Level (as virtual machine)
Disk-Level (as VMDK file)
Volume-Level (as physical volume)
Volume-Level (as VHD)
Volume-Level (as VMDK)
File-Level
For file level restores, select Enable Granular Recovery option.
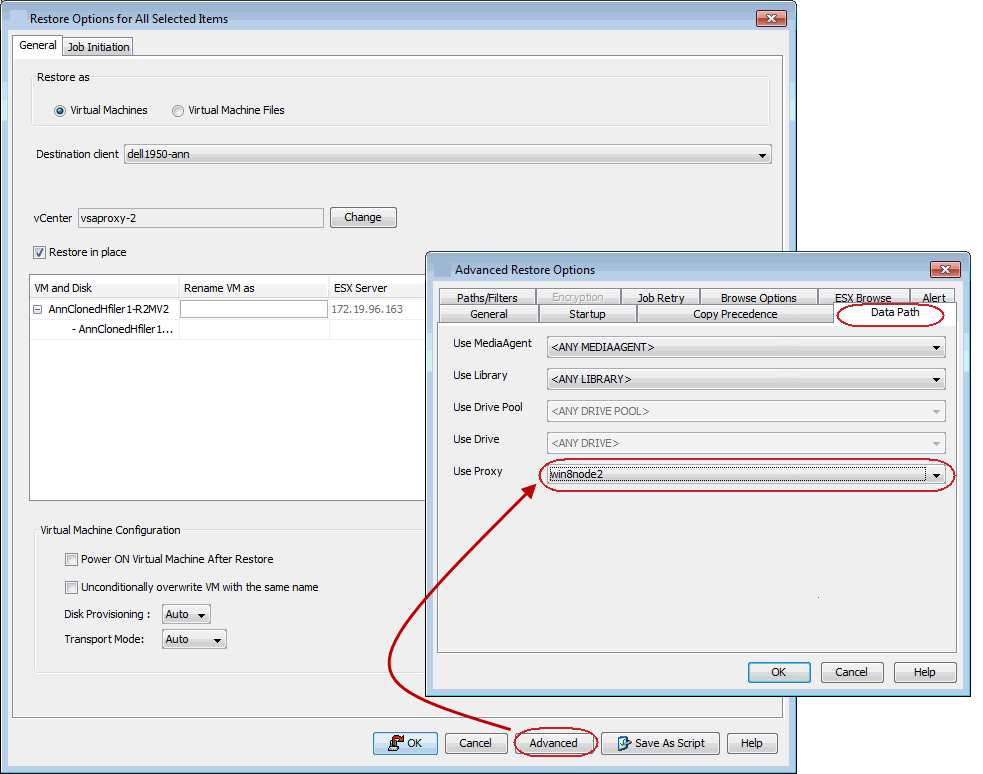
You can override the default restore selection by choosing a different
Virtual Centre or ESX Server to restore, by following the steps given below:
From the CommCell Console, right-click the Subclient and
select Browse Backup Data.
Click OK and selectthe virtual machine under the
backupset. Its entire contents will be automatically selected in the
right pane. Click Recover All Selected.
Click Advanced from the Restore Options dialog
box.
Select the ESX Browse tab.
The Default Selection has the IP address of the ESX Server
pre-populated.
Select Override Default Selection to locate a different destination.
Enter appropriate credentials to logon to the server using Configure
Password button.
Click Browse VirtualCentre/ESX Servers for destination toprovide the ESX Server path to which the virtual machine will be
restored.
Select the appropriate ESX server.
Click OK to close the Browse for ESX Server dialog
box.
Click OK to close the Advanced Restore Options dialog
box.
To restore files and folders to a Windows client, the client must have one of
the following components installed:
Windows File System
iDataAgent
Restore Only Agent for Windows File System.
Consider that the following before restoring files and folders from a virtual
machine:
The virtual machine has the MBR partition. If the virtual machine
has GPT partition, you can restore files from a backup copy. For more
information, refer to
Restore
Data from a Backup Copy.
You cannot restore any archived files and folders.
It is recommended to perform the file-level restores from disk or
volume-level backups only when you are restoring small files. For example,
restoring a 2GB file from a disk-level backup is not recommended.
You can restore files from NTFS file systems with the following limitations:
The formatted cluster size (allocation unit) must be 1024 or greater.
You cannot restore any archived files and folders.
You cannot restore any file that has zero bytes, symbolic links, or hard
links associated with it.
You cannot restore files that have been dehydrated by Windows 2012 dedup.
You cannot restore files from volumes created on Windows Storage Spaces.
If you cannot restore a file, you can restore the complete virtual
machine or the disk that contains the file.
When restoring a file or folder on a virtual machine, the Enable Granular Recovery
must have been selected when the backup was performed.
From the CommCell Console, perform a Browse and Restore
operation.
In the Browse Options window, click Individual files/folders.
Click OK.
In the Browse window, click a file or folder in the right pane,
and then click Recover All Selected.
From the General tab, specify a Staging Path. This is the
destination path to which the file will be restored.
Click OK.
The Preserve Source Path/Remove Source Path
feature is supported for File level restores from File level backup
jobs. It is not relevant for Volume Level and Disk Level backups and restores.
You can restore files and folders from a snapshot when a backup is performed without enabling the Enable Granular Recovery
advanced backup option.
Before performing the browse and restore from a snapshot, note the following:
This feature is available for Windows-based VMware virtual machines but
not available for any other operating
system.
This feature is available for the MBR partition. If the virtual machine
has GPT partition, you can restore files from a backup copy. For more
information, refer to Restore
Data from a Backup Copy.
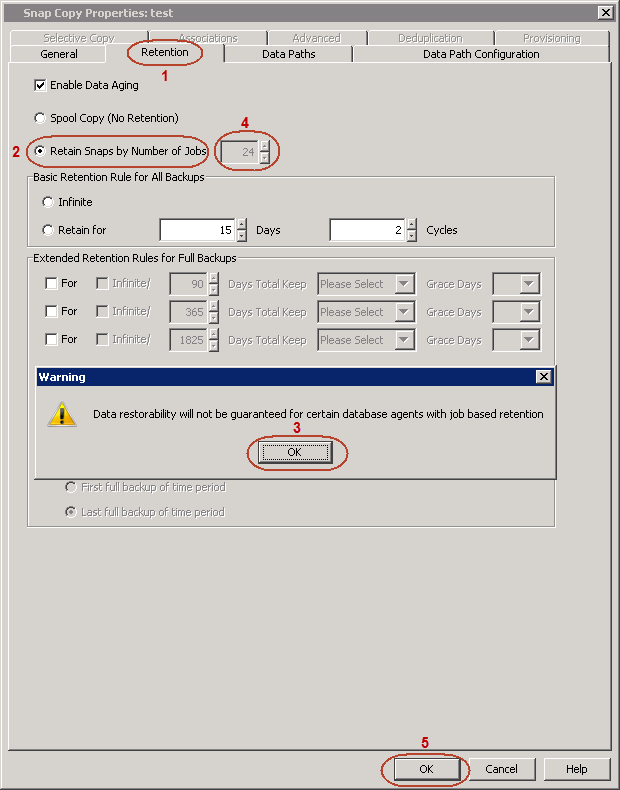
The following procedures describe the available retention
configurations for snapshots. For movement to media retention, refer to
Data Aging - Getting Started.
By default, snapshots are pruned based on the number of retention days and
cycles specified in the storage policy. You can configure your snapshot
copy to retain a defined number of SnapProtect backup jobs. When the total
number of jobs goes above the specified retention number, the remaining jobs
will be pruned. This configuration is recommended for File System and File
System like Agents. This feature is supported for SnapProtect operations
performed using the NetApp storage array.
The NetApp Snap Management license is required for retaining snaps by number of jobs.
1.
From the CommCell Console, navigate to Policies |
Storage Policies | <Storage Policy>.
Right-click the primary snapshot copy and click Properties.
2.
Click the Retention tab.
Click Retain Snaps by Number of Jobs.
Click OK to the warning dialog box.
Specify the number of jobs to be retained for the primary copy.
The following options are not supported for SnapProtect backup for Virtual
Server
iDataAgent - VMware:
Physical RDMs.
Virtual RDMs
Virtual machines including Local disks.
Virtual machines should have all disks on the same storage array, e.g. if you are using NetApp as the
storage array, then all disks of
the virtual machine under backup should reside on the NetApp file server.
The backup copy is an additional standby copy of data. It can be created
during the SnapProtect backup or at a later time. You can use a separate proxy
client and ESX Server to create a backup copy. If you want to reduce the time
required for mounting the snapshot, you must use a local Proxy
client and ESX server for backup copy operations.
The backup copy can be an inline backup copy, offline backup copy or netapp’s
vault or mirror copies.
For example: The default proxy client and ESX Server is in location A and you
want to use the backup copy of the data from location B. In such scenario, you
can use an ESX server in location B for creating backup copy and then restore
virtual machines from the backup copy.
Follow the steps given below to use a separate proxy for creating the backup
copy:
From the CommCell Browser, navigate to Client Computers | <Client>
| Virtual Server | <Instance>.
Right-click the subclient and select Properties.
Click the
SnapProtect Operations tab.
The Proxy ESX Server section will display the
Primary proxy client and Primary ESX
Server.
Click Use Separate Proxy for Snap To Tape check box.
Select a Proxy client from the Proxy list.
Click OK.
The selected Proxy client will be treated as a
secondary proxy client. It will be used to perform the Inline Backup copy,
Offline Backup copy, NetApp Vault or NetApp Mirror operations.
You can use the default ESX Server to create backup copy or you can specify a
secondary ESX Server for the backup copy.
Quiescing indicates pausing or altering the state of running processes on a
computer, particularly those that might modify information stored on disk during
a backup, to guarantee a consistent and usable backup.
For windows Microsoft VSS inside the guest will be used to quiesce the file
system and applications. This ensures that the data consistency of the file
system and all VSS supported applications. By default VMware will engage all of
the VSS writers that are configured inside the guest. If it is necessary to
exclude a writer please refer to
http://kb.vmware.com/kb/1031200
For Linux, the vmsync driver will be used to quiesce the file system and
applications. This is included with VMware tools. The vmsync driver
ensures that the file system is in a consistent state prior to the vmware
snapshot being created. The vmsync driver is only supported with vSphere 5.0 and
above.
Consider the following before enabling or disabling the quiescing during the backup:
Hardware Snapshot with Quiescing - When you perform the IntelliSnap backup of a subclient,
a hardware snapshot of all the virtual machines is created. Before the
snapshot creation, the quiescing will be performed automatically for the
operating system and applications on all the virtual machines in the
subclient.
Crash consistent hardware snapshot - The backup process may slow down because of the quiescing. If you do not want to perform quiescing
before the snapshot creation, you can disable the quiescing. If you disable
the quiescing, the crash consistent hardware snapshot will be created.
You can disable quiescing to reduce the backup time. If you disable quiescing,
you can perform backup of the virtual machines which has .vmdks with same name.
From the CommCell Browser, navigate to Client Computers.
Right click the Proxy client and click Properties.
You can use the VMware tools to perform the any operations before or after the
backup.
For example: A virtual machine hosts a oracle database and you want to enable
the Hot backup of the database before performing the backup, you can run a
script using the VMware Tools.
On the Linux virtual machines, the script /usr/sbin/pre-freeze-script will be
executed when the software snapshot is created and /user/sbin/post-freeze-script
will be executed when the software snapshot is removed. Ensure that these
scripts are executable by the VMware tools user.
The following scripts are available to
perform the Pre/Post processes using VMware tools:
Operation
Procedure
Scripts
The scripts can be used to take snapshot of a VM with DB2
Application. This script allows VMWARE to suspend I/O updates to DB2
database till VMWARE LINUX guest snap shot is completed.
On a Linux virtual machine, copy the pre-freeze-script and
post-thaw-script to /usr/bin directory.
Copy write_suspend and write_resume scripts to a location where
DB2 database can execute it. (Preferably to a directory under DB2
home)
The scripts can be used to take snapshot of a VM with
MAXDB
Application. This script allows VMWARE to suspend I/O updates to MAXDB
database till VMWARE LINUX guest snap shot is completed.
On a Linux virtual machine, copy the pre-freeze-script and
post-thaw-script to /usr/bin directory.
Copy suspend_logwriter and resume_logwriter scripts to a location where
MAXDB database can execute it. (Preferably to a directory under
MAXDB
home)
The scripts can be used to take snapshot of a VM with
Oracle
Application. This script allows VMWARE to suspend I/O updates to Oracle
database till VMWARE LINUX guest snap shot is completed.
On a Linux virtual machine, copy the pre-freeze-script and
post-thaw-script to /usr/bin directory.
Copy pre-freeze-script.sql and post-thaw-script.sql scripts to a location where
Oracle database can execute it. (Preferably to a directory under
Oracle
home)
These scripts change the entire database to backup mode.
If the virtual machine has Oracle iDataAgent installed on it, you can
also use the consistent-archivelog-backup.rman script as a sample to run
archivelog backup. This will get a consistent snap and also all the
latest archived logs and current control file.
The scripts can be used to take snapshot of a VM with
Sybase
Application. This script allows VMWARE to suspend I/O updates to Sybase
database till VMWARE LINUX guest snap shot is completed.
On a Linux virtual machine, copy the pre-freeze-script and
post-thaw-script to /usr/bin directory.
Copy pre-freeze-script.sql and post-thaw-script.sql scripts to a location where
Sybase database can execute it. (Preferably to a directory under
Sybase
home)
These scripts execute sybase quiesce commands which will
stop updates to databases.
Several additional options are available to further refine your backup and
restore operations.
The following table describes the additional options:
Option
Description
Related topics
Job Results Directory
Ensure that the full path name for the Job Results Directory, combined
with the VMDK file name, is no
greater than 255 characters in length.
From the CommCell Browser, right-click the icon of the client
computer whose job results path you want to change, then click
Properties.
From the Job Configuration tab of the Client Computer
Properties dialog box, click User Name/Password to
establish or change the Impersonate User account to access the Job
Results Directory. Click OK once you have administered the
account.
From the Job Configuration tab, type a new job results
path in the Job results path field.
You can also click Browse to browse to a new job results path
from the Browse for Job Result Path dialog box. Click OK.
The Pre/Post commands for SnapProtect backup
can either be executed on the proxy or the source computer. You can use
the Pre/Post Process tab of the Subclient Properties dialog
box to select where you wish to execute the Pre/Post commands. SnapProtect
backup supports Pre/Post commands for the agents that support it.
Use of Pre/Post Snap commands is not supported when using Data Replicator as the storage array.
For more information on using the Pre/Post
commands, see
Pre/Post
Processes.
View Snapshot Details
You can view the details of a snapshot for an agent, job,
or a snapshot copy. When you right-click any of these entities, you will
be able to browse all the snapshots corresponding to the selected entity.
From the CommCell Browser, right-click the entity that contains
the snapshots you want to browse, and click All Tasks |
List Snaps.
The Snaps created during SnapProtect operation dialog box displays
a list of all the snapshots created for the selected entity and displays important information about each snapshot, including the source
mount path, snap mount path, the storage array, and the source client.
Right-click the snapshot and click Details to view the snapshot
properties.
Select a Job for Backup Copy
You can select a specific job for creating backup copy.
Once selected, the Move Snap to Tape field for the specific job will be
changed to Picked (i.e., the next backup copy operation will move this job
to media).
Right-click a storage policy containing SnapProtect backup jobs,
and then click View Jobs.
Right-click the job and then click Pick for Backup Copy.
Disable a Job for Backup Copy
You can prevent a job from being moved to media. You
can apply this option to those jobs that were previously selected for moving
to media. On selecting this option, the Move Snap to Tape field for the
specific job will be changed to Not Picked (i.e., the next backup copy operation
will not move this job to media).
Right-click a storage policy containing SnapProtect backup jobs
and then click View Jobs.
Right-click the job and then click Do not Backup Copy.
Offline Snap Copy Job Summary Report
Offline Snap Copy Job Summary Report provides
job summary details of backup copy jobs for moving snapshots to media.
Use Find to search and locate files or folders from a SnapProtect backup. If you want to restore a specific file or folder from a backup set or subclient, you can search the file or folder in the backup set or subclient.
Before searching the subclient, ensure that all the files and folders in the
subclient are included in the index. The files and folders are included in the
index when you perform the File Level backup or Enable Granular Recovery before
performing the Volume Level or Disk Level backup.