Exchange data, such as mail messages, can be restored from an offline point-in-time
virtual machine snapshot to reduce impact to the production
Exchange Server. To mine Exchange data on a virtual machine, do the following:
The addresses of both computers must be network resolvable.
Backup Proxy Computer
The backup proxy computer is used to create the snapshot of the Exchange data
on the virtual machine. It also is used to run the snap mining job. This proxy computer must satisfy
certain requirements, as listed
in System
Requirements. In addition, ensure that the proxy computer and the
Exchange Server virtual machine are members of the same domain.
On this proxy computer, install the following:
- Virtual Server
iDataAgent.
See
Getting Started - VMware Deployment
for installation instructions.
- Exchange Mailbox
iDataAgent
(Restore Only).
See Deployment - Microsoft Exchange Server
Agents for installation instructions.
|
When prompted for the Exchange Server Name, enter the
fully-qualified name of the Exchange Server (e.g.,
exchange.vm.company.com)installed on the
Exchange Server virtual machine. Ensure you also select the correct
Exchange Server Version, or else the snap mining job may fail.
|
- MediaAgent.
See MediaAgent Deployment
for installation instructions.
- Active Directory Lightweight Directory Services (AD LDS) Snap-Ins and
Command-Line Tools. This feature is used to remotely manage Active Directory
Domain Services.
- Microsoft Outlook.
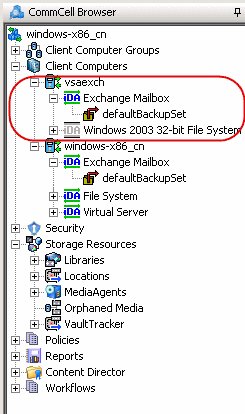
After installing, the components in CommCell Console are displayed as
follows:
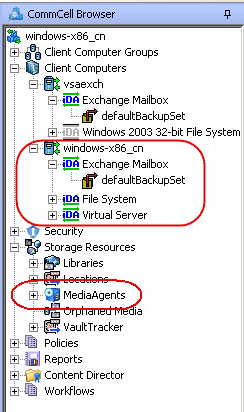
exchange server virtual Machine
This virtual machine has the Exchange data that you wish to mine. The Exchange
Server has already been installed on this machine. Install the following:
- Exchange Mailbox
iDataAgent.
See Deployment - Microsoft Exchange Server
Agents for installation instructions.
|
When prompted for the Exchange Server Name, enter the
fully-qualified name of the Exchange Server (e.g.,
exchange.vm.company.com)installed on the
Exchange Server virtual machine. Ensure you also select the correct
Exchange Server Version, or else the snap mining job may fail.
|
- Windows File System
iDataAgent (Restore Only).
See
Deployment - Windows
File System iDataAgent for installation instructions.
- VMware Tools (latest version).
See
http://downloads.vmware.com/ for
more information.
- VSS Provider.
See
VSS
Provider for step-by-step installation instructions.
After installing, the components in CommCell Console are displayed as
follows:
The following steps are performed on the backup proxy computer.
| 1. |
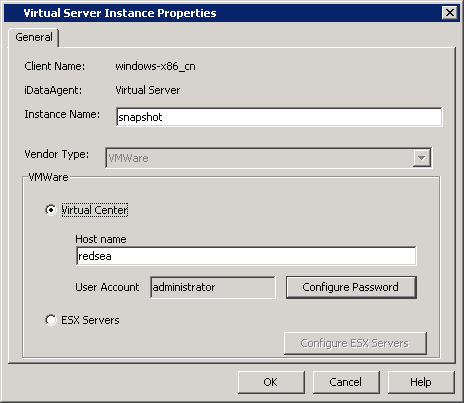
Configure an
instance of the Virtual Server iDataAgent as follows:
- From the CommCell Console, navigate to Client Computers |
Virtual Server.
- Right-click the Agent and click All Tasks | Create New
Instance.
- Enter an Instance Name and select Vendor Type.
- Click Virtual Center.
- Enter a valid Host name for the
Virtual Center.
-
Click Configure Password and enter User Name and Password of Virtual
Server. Click OK.
- Click OK.
|
 |
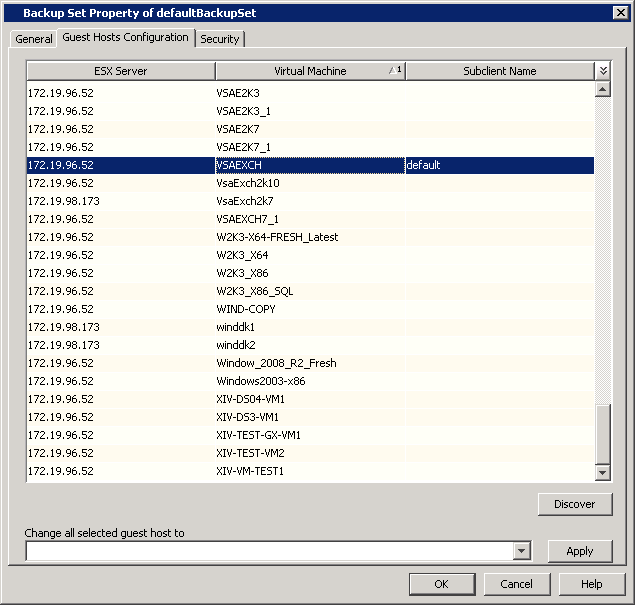
| 2. |
Discover the
Exchange Server virtual machine as follows:
- From the CommCell Console, navigate to Client Computers |
Virtual Server.
- Right-click the backupset and select Properties.
- Click the Guest Hosts
Configuration tab.
- Click Discover.
- Scroll through the list and select the Exchange Server virtual machine you wish
to mine.
- Click OK.
| |
Click the Virtual Machine column to sort the machines alphabetically. |
|
 |
The following steps are performed on the backup proxy computer.
| 1. |
Create a magnetic library if one has not
already been configured as follows:
- From the Tools menu in the CommCell
Console, click Control Panel.
- Double click Library
& Drive Configuration.
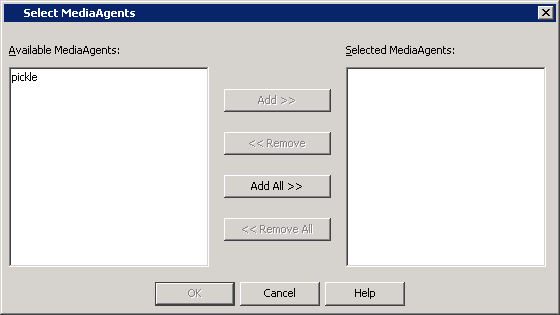
- Select the MediaAgent(s) whose devices you want to detect
or display, and then click OK.
NOTES
- If a device has already been configured for the MediaAgent, the
system displays the device in the Library &
Drive Configuration window.
- Click OK to continue.
- Click OK again if prompted.
|
 |
| 2. |
Create a
storage policy as follows:
- From the CommCell Browser, right-click Storage Policies |
New Storage Policy.
- Follow the prompts displayed in the Storage Policy Wizard:
-
Click Data Protection and Archiving for type of
Storage Policy and click Next.
- Click No for Legal Hold and click Next.
- Enter a name in Storage Policy Name and click Next.
- Enter the Primary Copy name and and click Next.
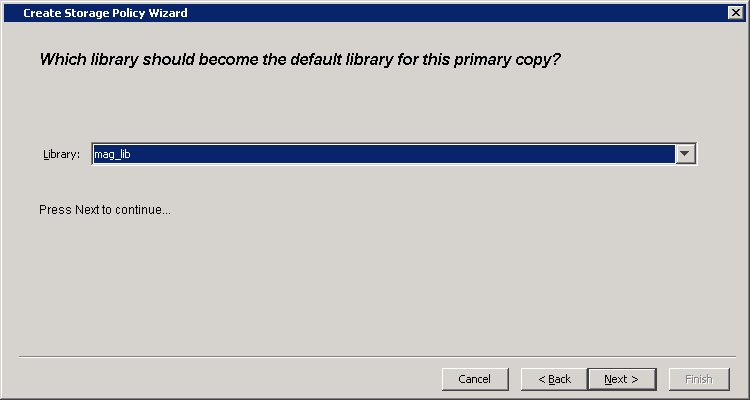
- Select the library that was created in Step 1 and click
Next.
- Select the MediaAgent and click Next.
- Configure device stream and retention criteria (default is infinite)
and click Next.
- For deduplication, select No and click Next.
- Confirm the selections and click Finish.
|
 |
The following steps are performed on the backup proxy computer.
| 1. |
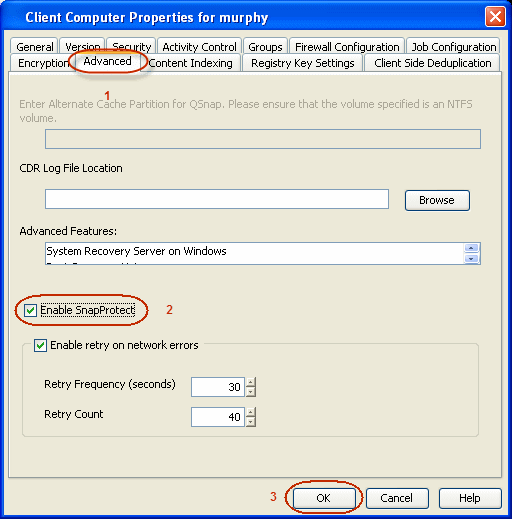
Enable SnapProtect as follows:
- From the CommCell Console, navigate to <Client>.
- Right-click the client and select Properties.
- Click on the Advanced tab.
- Select the Enable SnapProtect option to enable SnapProtect
backup for the client.
- Click OK.
|
 |
| 2. |
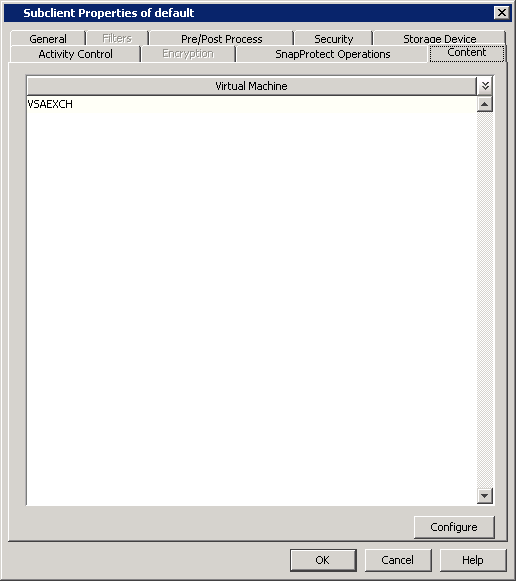
Configure the
content of the subclient as follows:
- From the CommCell Console, navigate to Client Computers |
Virtual Server.
- Right-click the sublcient and click the Content tab.
- Click Configure.
- In the Guest Hosts Configuration dialog, select the
Exchange Server virtual machine and click OK.
- Click OK.
|
 |
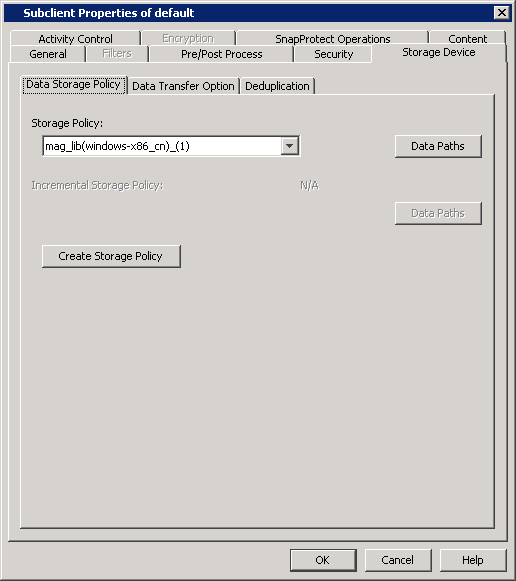
| 3. |
Assign the
storage policy to the subclient as follows:
- From the CommCell Console, navigate to Client Computers |
Virtual Server.
- Right-click the subclient and click Properties.
- Click the Strorage Device tab.
- In Storage Policy, select the storage policy as created
in Create Magnetic Library and Storage
Policy.
- Click OK.
|
 |
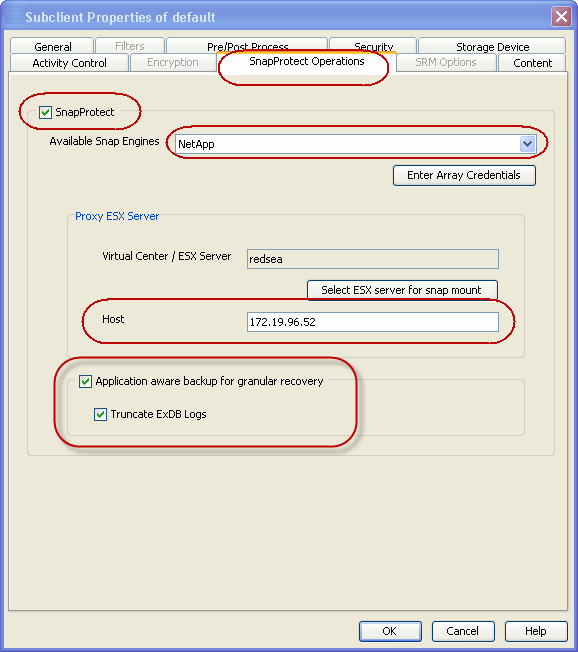
| 4. |
Enable SnapProtect and snap mining for
the subclient as follows:
- From the CommCell Console, navigate to Client Computers |
Virtual Server.
- Right-click the subclient and click Properties.
- Click the SnapProtect Operations tab.
- Select SnapProtect option to enable SnapProtect backup for
the selected subclient.
- Select the relevant snap engine from the Available Snap Engines
drop-down list.
|
Ensure that the snap engine has been configured in Array Management. To
configure it, click Enter Array Credentials and click Add.
|
- Specify the IP address of the Host by clicking Select ESX
server for snap mount. Select a Host IP address and click
OK.
- Select Application aware backup for granular recovery option
to enable snap mining for the selected subclient.
- Optionally, select the Truncate ExDB Logs to prune Exchange
Database logs that are no longer needed and prevent them from growing
to an unmanageable size. This is recommended.
- Click OK.
|
Keep in mind that once snap mining is enabled for a
subclient, it cannot be reversed. |
|
 |
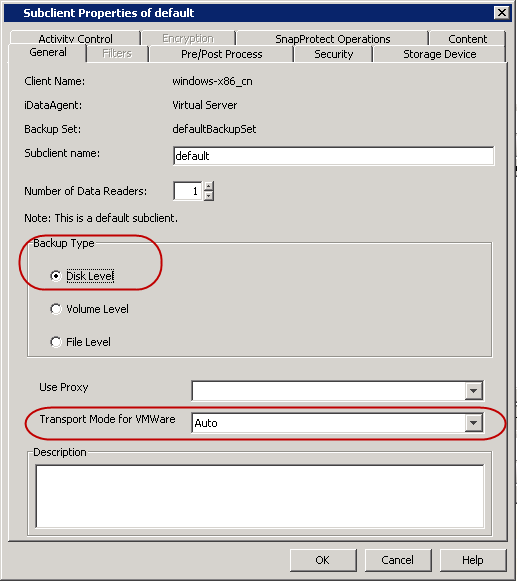
| 5. |
Configure the backup type and transport
mode for the subclient as follows:
- From the CommCell Console, navigate to Client Computers |
Virtual Server.
- Right-click the subclient and click Properties.
- For Backup Type, select Disk Level.
- In Transport Mode for VMWare, select Auto.
- Click OK.
|
 |
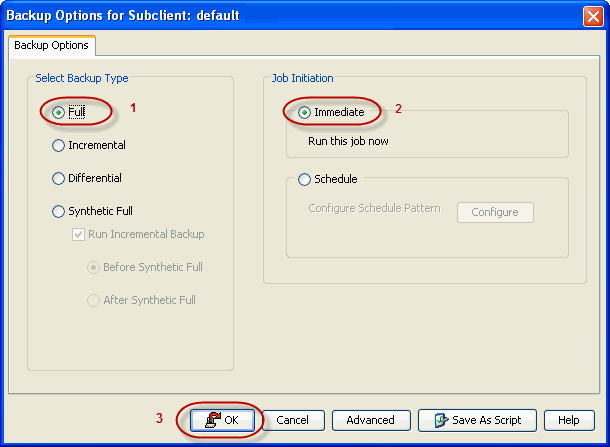
| 6. |
Run the SnapProtect
backup job as follows:
- From the CommCell Console, navigate to Client Computers |
Virtual Server.
- Right-click the subclient and click Backup.
- Click Full.
- Click OK.
In Job Controller, you can view the progress of the job.
Double-click the job to view the job details.
|
 |
The following steps are performed on the Exchange Server virtual machine.
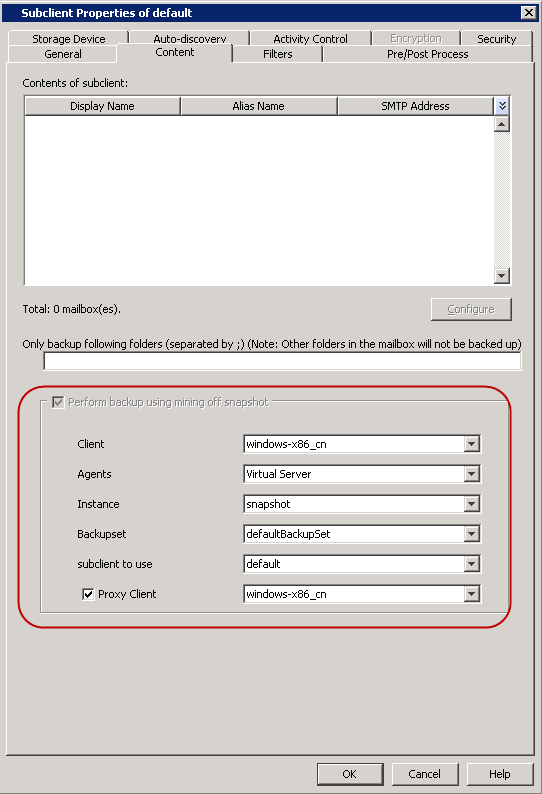
| 1. |
Configure the subclient of the Exchange Mailbox
iDataAgent as follows:
- From the CommCell Console, navigate to Client Computers |
<Exchange server client> | Exchange Mailbox.
- Right-click a subclient and click
Properties.
- Click the Content tab.
- Click Perform backup using mining off snapshot.
- Choose the client computer on which the snapshot was created in
Client.
- Choose Virtual Server as the Agent that was used to
create the snapshot.
- Choose the Instance of the Virtual Server
iDataAgent that was used
to create the snapshot.
- Choose the Backupset of the Virtual Server
iDataAgent that was used
to create the snapshot.
- Choose the subclient of the Virtual Server
iDataAgent in subclient
to use that was used to create the snapshot.
- Click Proxy Client and from the pulldown menu, select the
proxy computer that will be used to run the snap mining data
protection job. You must choose a proxy computer for running the
data protection job; it cannot be run from the Exchange Server
virtual machine itself. If desired, an additional proxy computer
could be used for running the data protection job instead of the
backup host proxy. It would have the same requirements as the backup
host proxy.
- Click OK.
|
 |
| 2. |
Run the snap mining job as follows:
- From the CommCell Console, navigate to Client Computers |
<Exchange server client> | Exchange Mailbox.
- Right-click a subclient and click Backup.
- From the CommCell Console, right-click the subclient and click
Backup.
- Select Full as backup type and Immediate
to run the job immediately.
- Click OK.
|
 |
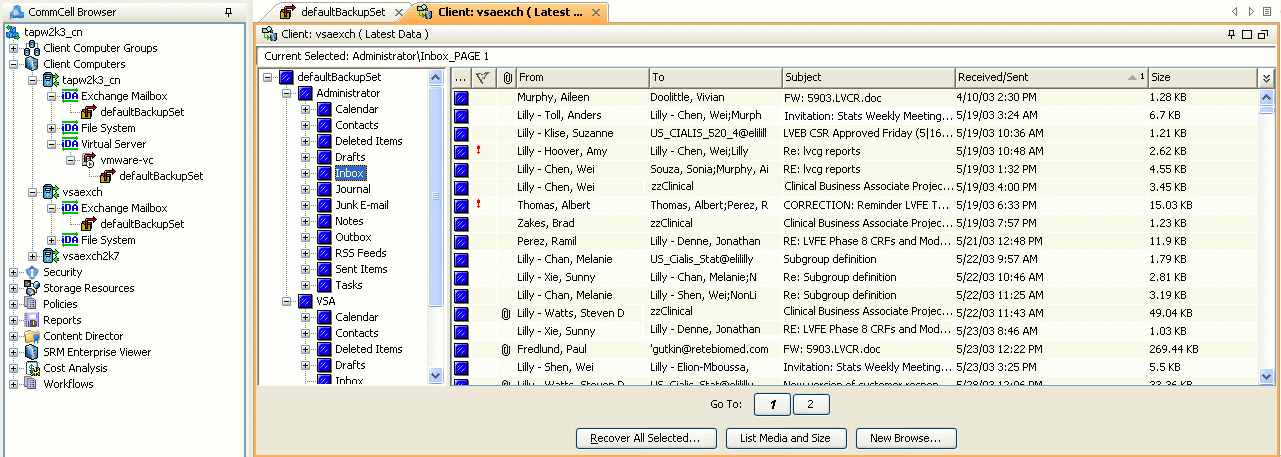
The following steps are performed on the Exchange Server virtual machine.
| 1. |
Browse and mine Exchange data as follows:
- From the CommCell Browser, right-click the subclient and click Browse Backup Data.
- Click OK.
- Select data to restore in the Browse window and click Recover
All Selected...
- Click one of the following in the Restore Options window:
- Click To Mailbox to restore data to a mailbox. Choose
whether to restore to original or different client computer and
the same or different path.
- Click To PST to restore the data to a PST file. Choose
whether to restore the PST file to a local or network drive.
- Click OK.
|
 |