SRM reporting provides a sleek, versatile, and
easy-to-use reporting framework that enables you to easily and effectively
choose, view, and analyze vital data. Enterprise and application-based reports
can be rapidly generated with out-of-the-box templates or customized with filter
criteria. Reports can be run immediately or scheduled to run daily, weekly,
monthly, etc.
In essence, SRM Exchange reports provide these features:
Templates of predefined columns are provided so that a report can be
generated quickly. The columns are preselected but can be adjusted as
needed.
Filter criteria. Reports can be customized according to particular
criteria, such as client or client group, the columns to display in the
report, etc.
Report options control how the data is displayed in a report or chart.
You can control the data size units, number of rows to display in an entire
report or before a page break, sorting order, etc.
Advanced features, such as Filters and SQL queries can also be applied to further refine the report.
When scheduled, reports can be saved and shared in various formats
(HTML, Excel, PDF) or in different languages.
Actions. When scheduled reports are run, notifications can be sent
in the form of an email or page, SNMP trap, RSS feed, Event Viewer message
to inform email recipients, computers, or a script that a report has run and
is now available.
The following sections describe the SRM Exchange reporting features in more detail.
Out-of-the box templates provide pre-selected columns and can be run immediately
after selecting clients or client computer groups. To generate a customized
report, you can start with a template and then alter the pre-selected columns by
adding or removing the columns. Note that when selecting clients, SRM data
collection must be enabled and a full backup needs to have run for the Agent in order to have
up-to-date information presented in the report.
Pay particular attention when specifying filter criteria. Selecting
criteria judiciously will aid in generating a useful report. Otherwise,
the report may be too cumbersome and cluttered.
To filter a SRM Report:
1.
From the CommCell Browser, click Reports, and then click SRM Report
Manager.
2.
Expand the applicable tree to view your agent. Then selectyour agent and click a template to display the Options window.
3.
Click the Client Selection tab and select the client computers or
client computer group. This is a required step.
4.
Click Column Selection tab.
For an out-of-the-box template, the columns are displayed here. To
change the columns, select a category and click Add or
Remove to move the columns between the Available and Selected boxes. Clicking Remove All will remove all
previously selected filters for the reports.
The columns that can be selected are listed in Available Columns.
The report options control how data is presented in the report. Either accept
the defaults or modify the options as described below.
To specify report options of a SRM Report:
1.
From the CommCell Browser, click Reports, and then click SRM Report
Manager.
2.
Expand the applicable tree to view your agent. Then selectyour agent and click a template to display the Options window.
3.
Click the Report Options tab and click the General tab
to modify these options:
Determine the Data Size Unit in the table section of the report and
when building ad hoc queries. You can elect to have them converted for
you automatically by selecting Convert data size automatically or you can
specify the unit (e.g., Bytes, KB, MB, GB, MB, TB, PB). Default is GB.
Either accept the default number of 100 rows to display
in the entire report or enter a new number in Limit number of
rows to output.
Specify the number of rows to display in the report before
breaking the page. Either accept the default of 100 or enter
a new number in Number of rows per page.
For the columns selected, use the up and down arrows to move the
sorting order of the columns in Set Sorting Order of Rows to
Return. Also specify if you want ascending (ASC) or
descending (DESC) order. For example, moving a column to the
Top of the sorting order will filter the data base on that order
first, followed by the rest of the columns. Select OFF to not
include the column in the sort.
4.
Click the Report Options tab and click the Chart Options tab
to modify these options:
If you want to switch the X/Y Axes in the charts, click Switch X/Y
Axis.
Select the columns in Values and Labels that should be displayed in the chart.
To preserve charting space, only the first 25 characters for a label are
visible in the report. To see the entire label, hover over the label with
the mouse.
Specify the Data Size Units in Chart (e.g., BYTES, KB, MB, GB, MB, TB, PB)
that you want displayed in the charts.
Enter the e Maximum Number of Bar Points Per Chart you want
displayed, or click
Draw all Bar Points to have all possible bar points drawn.
Default is 10.
For the columns selected, Filters can also
be applied to further refine the data in the report.
Selecting the Get Query tab will display the SQL query in long
notation that will be used to get the data
and generate the report. The query that is displayed is Read-only and can be
used in a third-party SQL application, such as SQL
Server Management Studio.
Configuring notifications is a step when scheduling a report. When
scheduled reports are run, notifications can be sent in the form of an email
or page, SNMP trap, RSS feed, Event Viewer message to inform email recipients, computers,
or a script that a report has run and is now available. The
possible notifications are explained in the sections below.
A notification can be sent to email or pager recipients when a scheduled
report has run. The recipient can be either a CommCell user, a CommCell user
group, a domain or external user (e.g., yahoo, gmail, etc.), or a pager address.
A notification can be e-mailed or sent to a pager to a selected list of recipients
when a scheduled report has run. The recipients can be either a
CommCell user, a CommCell user group, a domain or external user (e.g., yahoo, gmail,
etc.), or a pager address.
To configure an Email/Pager notification when a scheduled report has run:
1.
From the CommCell Browser, click Reports, and then click SRM Report
Manager.
2.
Expand the applicable tree to view your agent. Then selectyour agent and click a template to display the Options window.
3.
Configure the report by specifying clients and columns, report options, and optionally, ad hoc queries.
5.
Click Schedule to generate and schedule the report on a
daily, weekly, monthly, yearly, or even one time basis.
Optionally, click Report Options to repeat sending the report every
so many days, or run it for a particular number of times.
Click Next.
6.
In this dialog, select the report output options, such as:
Format - select MHTML, EXCEL, or PDF.
Specify a path in Destination Path if you want to save the
report to a local drive or network share.
Click Next.
7.
In this dialog, configure the E-Mail/Pager notification for the scheduled report
as follows:
Click Select [E-Mail/Pager] for notification.
Either accept default format
or add more tokens by selecting a token from the pulldown menu and
clicking Add Token.
The tokens are explained in
Alert Tokens. Click
Use default message to revert back to original default format.
Click Next.
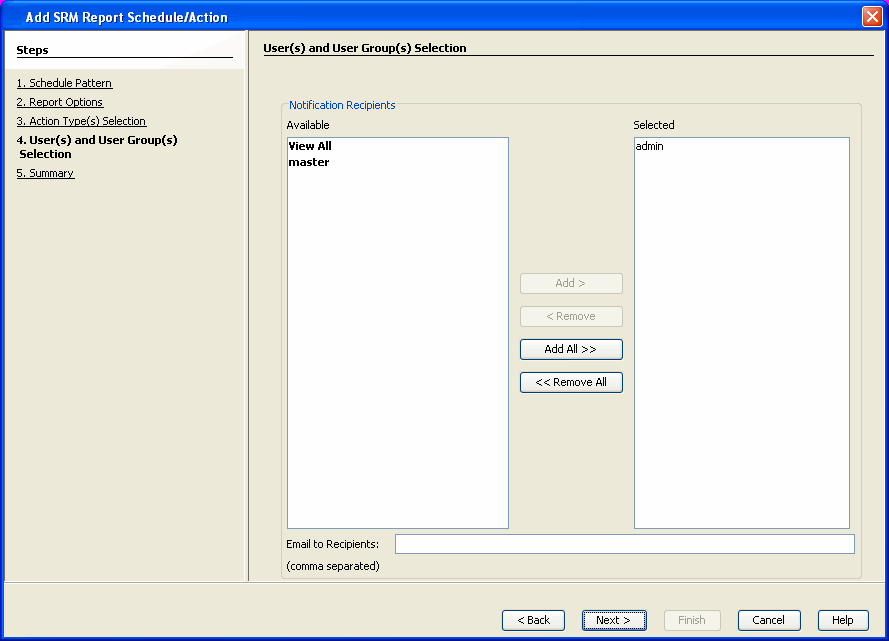
8.
In the User(s) and User Group(s) Selection dialog, specify the
recipients to whom the notification will be sent as follows:
To add or remove CommCell users or a CommCell user group, select a
user in the Available
or Selected boxes and click Add> or <Remove.
To specify a domain or external user (e.g., yahoo, gmail, etc.) or a
pager address, enter the email address in Email to Recipients field. Separate
multiple addresses with a comma.
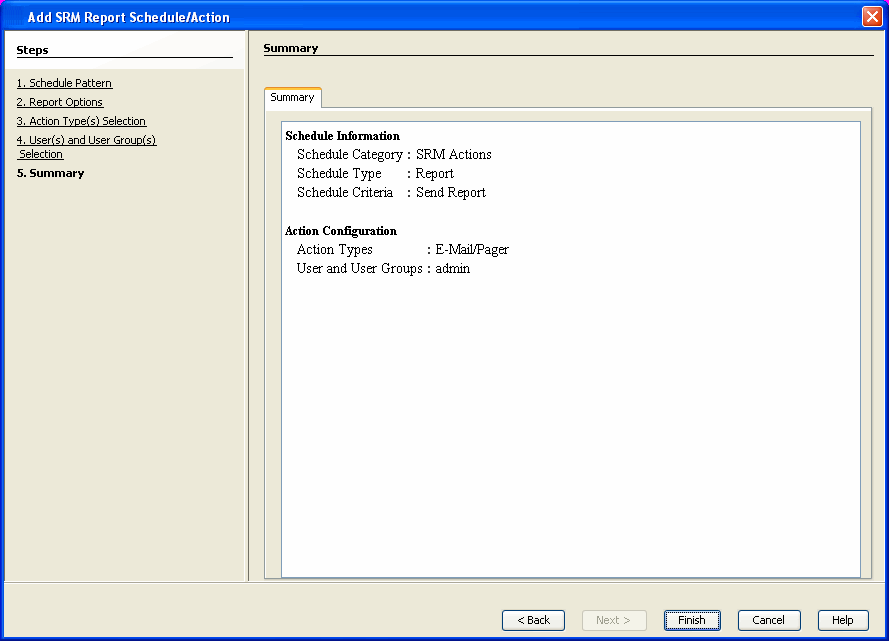
9.
Review the summary and if satisfied, click Finish.
A notification can be sent by a CommServe, using the SNMP protocol, to other
computers in the form of SNMP traps when a scheduled report has run. This notification type requires that the
SNMP Enabler software must be installed on the CommServe computer. See
SNMP
Enablers
for more information.
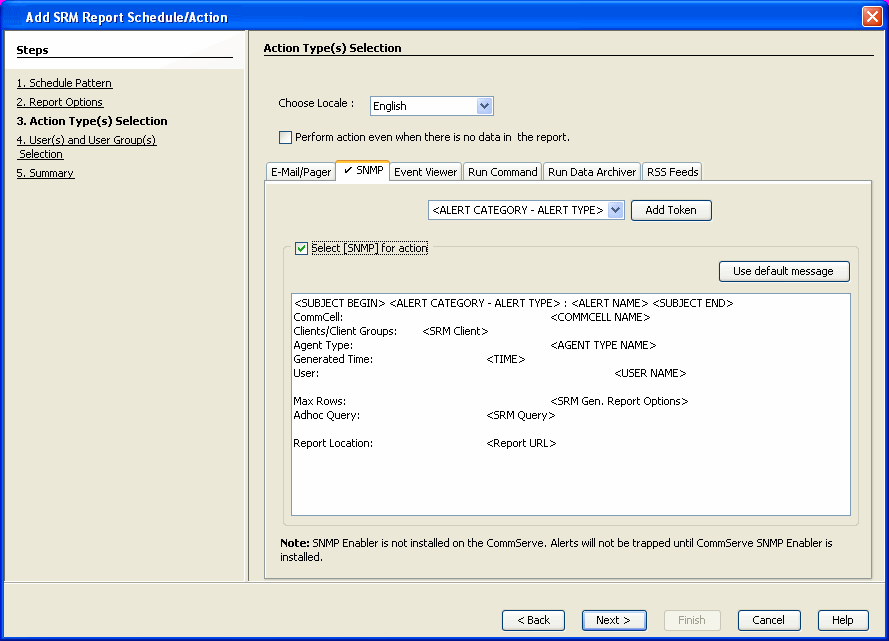
To configure an SNMP Trap notification when a scheduled report has run:
1.
From the CommCell Browser, click Reports, and then click SRM Report
Manager.
2.
Expand the applicable tree to view your agent. Then selectyour agent and click a template to display the Options window.
3.
Configure the report by specifying clients and columns, report options, and optionally, ad hoc queries.
4.
Click Schedule to generate and schedule the report on a
daily, weekly, monthly, yearly, or even one time basis.
Optionally, click Report Options to repeat sending the report every
so many days, or run it for a particular number of times.
Click Next.
5.
In this dialog, select the report output options, such as:
Format - select MHTML, EXCEL, or PDF.
Specify a path in Destination Path if you want to save the
report to a local drive or network share.
Click Next.
6.
Click the SNMP tab and configure this notification type as follows:
Click Select [SNMP] for notification.
Either accept default format
or add more tokens by selecting a token from the pulldown menu and
clicking Add Token.
The tokens are explained in
Alert Tokens. Click
Use default message to revert back to original default format.
Click Next.
7.
Review the summary and if satisfied, click Finish.
A message can be sent to the
Event Viewer on the CommServe
when a report is run or scheduled.
To configure an Event Viewer notification when a scheduled report has run:
1.
From the CommCell Browser, click Reports, and then click SRM Report
Manager.
2.
Expand the applicable tree to view your agent. Then selectyour agent and click a template to display the Options window.
3.
Configure the report by specifying clients and columns, report options, and optionally, ad hoc queries.
4.
Click Schedule to generate and schedule the report on a
daily, weekly, monthly, yearly, or even one time basis.
Optionally, click Report Options to repeat sending the report every
so many days, or run it for a particular number of times.
Click Next.
5.
In this dialog, select the report output options, such as:
Format - select MHTML, EXCEL, or PDF.
Specify a path in Destination Path if you want to save the
report to a local drive or network share.
Click Next.
6.
Click the Event Viewer tab and configure this notification type as follows:
Click Select [Event Viewer] for notification.
Either accept default format
or add more tokens by selecting a token from the pulldown menu and
clicking Add Token.
The tokens are explained in
Alert Tokens. Click
Use default message to revert back to original default format.
Click Next.
7.
Review the summary and if satisfied, click Finish.
A notification can be sent to a script when a
scheduled report has run. Once receiving the notification, the script can be
specified to run on the CommCell or a client computer. Arguments can be
specified for the script as well. You can also select an option to read and
archive a list of files and directories of a report if a supported Archiver
Agent is installed on the client computer and an On Demand Archive Set is
configured with SRM enabled.
To configure a notification to run a Script when a scheduled report has run:
1.
From the CommCell Browser, click Reports, and then click SRM Report
Manager.
2.
Expand the applicable tree to view your agent. Then selectyour agent and click a template to display the Options window.
3.
Configure the report by specifying clients and columns, report options, and optionally, ad hoc queries.
4.
Click Schedule to generate and schedule the report on a
daily, weekly, monthly, yearly, or even one time basis.
Optionally, click Report Options to repeat sending the report every
so many days, or run it for a particular number of times.
Click Next.
5.
In this dialog, select the report output options, such as:
Format - select MHTML, EXCEL, or PDF.
Specify a path in Destination Path if you want to save the
report to a local drive or network share.
Click Next.
6.
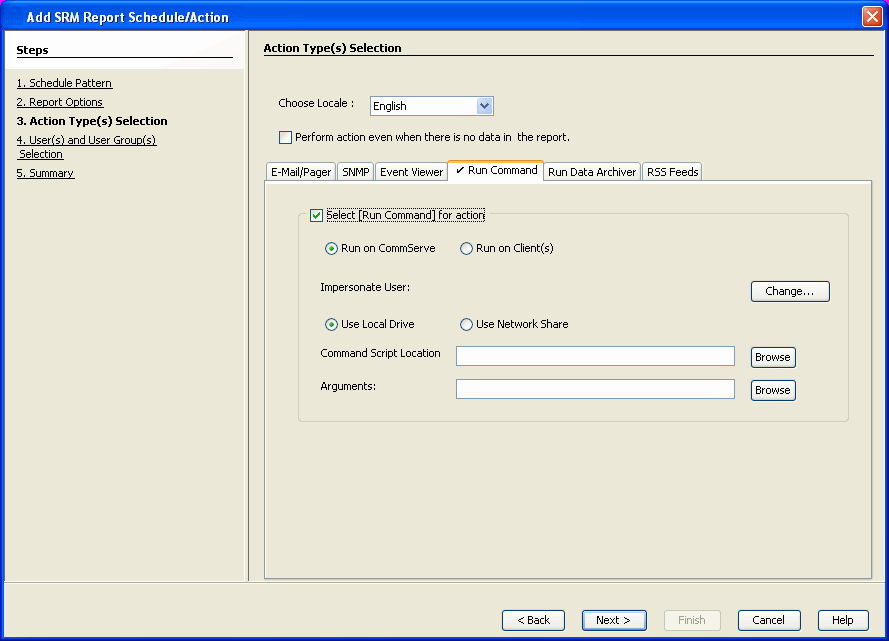
Click the Run Command tab and configure this notification type as follows:
Click Select [Run Command] for notification.
Select either Run on CommCell or Run on Client to specify
where to run the script.
Click either Use Local Drive or Use Network Share to
specify the location of the script.
Click Change... if you need to provide user account
credentials so the script has the correct permissions to run. Specify a
Windows User Account with the appropriate privileges to access the
scripts directory. User impersonation requires that the specified user
have write permissions to the scripts directory; otherwise, the user
impersonation account may not take effect. This is especially true if
the associated computer is not part of a domain and if the user is not a
domain user.
Click Browse or enter a path where the script is located in
Command Script Location.
Click Browse or enter in arguments in Arguments to be
passed to the script while running.
Click Next.
7.
Review the summary and if satisfied, click Finish.
A notification can be sent to run a Data Archiver operation when a
scheduled report has run. You can select an option to read and
archive a list of files and directories of a report if a supported Archiver
Agent is installed on the client computer and an On Demand Archive Set is
configured with SRM enabled. For the Data Archiver schedule to run successfully, archive rights on the client computer are required.
To configure a notification to run a data archiver operation when a scheduled report has run:
1.
From the CommCell Browser, click Reports, and then click SRM Report
Manager.
2.
Expand the applicable tree to view your agent. Then selectyour agent and click a template to display the Options window.
3.
Configure the report by specifying clients and columns, report options, and optionally, ad hoc queries.
4.
Click Schedule to generate and schedule the report on a
daily, weekly, monthly, yearly, or even one time basis.
Optionally, click Report Options to repeat sending the report every
so many days, or run it for a particular number of times.
Click Next.
5.
In this dialog, select the report output options, such as:
Format - select MHTML, EXCEL, or PDF.
Specify a path in Destination Path if you want to save the
report to a local drive or network share.
Click Next.
6.
Click the Run Data Archiver tab and configure this notification type by selecting Run Data Archiver if a supported Archiver
Agent is installed on the client computer and an On Demand Archive Set
is configured with SRM enabled. In this case, the list of files and
directories of the report will be read and an archive operation will be
performed on the default subclient of the archive set.
Click Next.
7.
Review the summary and if satisfied, click Finish.
A notification can be sent in a Really Simple Syndication (RSS) feed when a
scheduled report has run. The RSS feed can be automatically integrated with your
Web Browser.
To configure a RSS Feed notification when a scheduled report has run:
1.
From the CommCell Browser, click Reports, and then click SRM Report
Manager.
2.
Expand the applicable tree to view your agent. Then selectyour agent and click a template to display the Options window.
3.
Configure the report by specifying clients and columns, report options, and optionally, ad hoc queries.
4.
Click Schedule to generate and schedule the report on a
daily, weekly, monthly, yearly, or even one time basis.
Optionally, click Report Options to repeat sending the report every
so many days, or run it for a particular number of times.
Click Next.
5.
In this dialog, select the report output options, such as:
Format - select MHTML, EXCEL, or PDF.
Specify a path in Destination Path if you want to save the
report to a local drive or network share.
Click Next.
6.
Click the RSS Feeds tab and configure this notification type as follows:
Click Select [RSS Feeds] for notification.
Either accept default format
or add more tokens by selecting a token from the pulldown menu and
clicking Add Token.
The tokens are explained in
Alert Tokens. Click
Use default message to revert back to original default format.
Specify the feed location in Select/Enter the Feed Location
field.
Click Next.
7.
Review the summary and if satisfied, click Finish.
Forecasting is prediction of data usage in future, based on the usage pattern in the past. Since Prediction allows visualizing data usage in future, it helps make business decisions accordingly. Prediction is available on history reports and it can be done based on Daily/weekly/Monthly data. In the graphs, prediction lines are shown as thin lines while the actual usage is shown as thick lines.
When viewing a report in the CommCell Console, you can copy any chart to the
clipboard in .bmp format by right-clicking the
chart and selecting Copy Chart. This allows you to easily copy a chart into
other applications. Note that the Copy Charts function is not compatible with
Microsoft WordPad.
The following table lists the available SRM Exchange Agent categories
and columns that can be selected to configure a customized report.
Category/Column
Description
SRM Exchange Agent
Discovery Job
Discovery and Analysis Job
Client Properties
Displays aspects of the client computer on
which the SRM Exchange Server Agent is installed.
Hostname
Memory
Operating System
OS Vendor
OS Version
Processors
Service Pack
SP Version
Time Zone
DAG
Displays information of mailbox servers as part of a database
availability group (DAG), which provides automatic recovery at the
individual mailbox database level instead of at the server level.
Admin Display Name
Alternate Witness Server
Alternate Witness Directory
Database Availability Group IPv4 Addresses
Datacenter Activation Mode
Distinguished Name
Exchange Version
GUID
Is Valid
Name
Network Compression
Network Encryption
Network Names
Object Category
Exchange -2010 do not support Public Folder Object Category.
Object Class
Operational Servers
Organization Id
Originating Server
Primary Active Manager
Replication Port
Runspace Id
Servers
Started Mailbox Servers
Stopped Mailbox Servers
Third Party Replication
When Changed
When Created
Witness Directory
Witness Server
Exchange Entities
Displays overall aspects per each computer selected (e.g., computer
name, host group, etc.).
Administration Group
Client Computer Group
Collection Status
Collection Time
Computer
Exchange Server Name
Folder Tree
Mailbox Store
Public Folder
Public Store
Storage Group
Mailbox Distribution by Message Count
Displays a list of mailboxes per message counts (e.g., computer
name, host group).
Group
Item Count
Total Size
Type
Mailbox Distribution by Size
Displays sizes of mailboxes (total size, type, item count, and
group).
Group
Item Count
Total Size
Type
Mailbox Store Details
Summarizes aspects of mailbox stores (i.e. database that contains
the mailboxes) and compares the relative sizes of the mailbox stores in
your enterprise.
Copies
Copy Servers
Database
Healthy Copy Servers
Mailbox
Mailbox Archived Item Count
Mailbox Archived Space Saved
Mailbox Item Count
Mailbox Size
Mailbox Store Size
Mailboxes Total Size
Mounted Server
Prohibit Send Quota
Prohibit Send Receive Quota
Streaming Database
Total Mailboxes Archived Space Saved
Warning Quota
Mailbox Store History
Displays store size and mount status from past data collections of
each mailbox store over time. Used for trending purposes.
As Of
Mounted
Size
Message Distribution by Age
Displays graphs showing message age distribution by total count and total size
as well as a list of mailboxes by computer, exchange server, storage
group, mailbox store, mailbox, group, count, size, and type.
Group
Item Count
Total Size
Type
Message Distribution by Attached File Type
Displays graphs showing message attached file type distribution by
total size and by file count.
Displays graphs showing public folder total size and public count
distribution by size.
Group
Item Count
Type
Total Size
Public Folder Object Distribution by Modification Age
Displays graphs showing public folder object modification age
distribution by total size and by object.
Group
Item Count
Total Size
Type
Public Folder Object Distribution by Type
Displays graphs showing public folder object space usage
distribution by type and count distribution by type.
Group
Item Count
Total Size
Type
Public Store Details
Summarizes aspects of public stores and compares the relative sizes
and other characteristics of the public stores present in your
enterprise.
Database
Maximum Item Size
Mounted
Prohibit Post Quota
Public Folder Item Count
Public Folder Size
Public Folders Total Size
Public Store Size
Server Name
Streaming Database
Warning Quota
Public Store History
Displays store size and mount status from past data collections of
each public store over time. Used for trending purposes.
As Of
Mounted
Size
Server Details
Summarizes aspects of the Exchange server.
Back End Type
Circular Logging Enabled
Client Access Type
Edge Transport Type
Front End Type
Hub Transport Type
Log File
Mailbox and Public Stores Total Size
Mailbox Stores
Mailbox Stores Total Size
Mailbox Type
Message Tracking Enabled
Public Stores
Public Stores Total Size
Service Pack
Storage Group Size
Storage Group Volume
Subject Logging Enabled
System File
Unified Messaging Type
Version
Zero Database Enabled
Storage Group History
Displays storage group size (including the log files and system size) from past data collections and growth
tracking of each storage Group over time. Used for trending
purposes.
As Of
Size
Subclient Details
Displays total size and count of mailboxes and public folders on
each Exchange Server, per subclient.