

| Deployment | Configuration | Recovery | Troubleshooting | FAQ |
|
A Live CD will be required to boot the client. You can create a Live CD image using 1-Touch Wizard on 1-Touch server. Before creating a Live CD image, consider the following prerequisites:
Follow the steps given below to create a Live CD:
| 1. | Login to 1-Touch Server. | |
| 2. | Click Start | Programs |Bull Calypso | Calypso | 1-Touch. | |
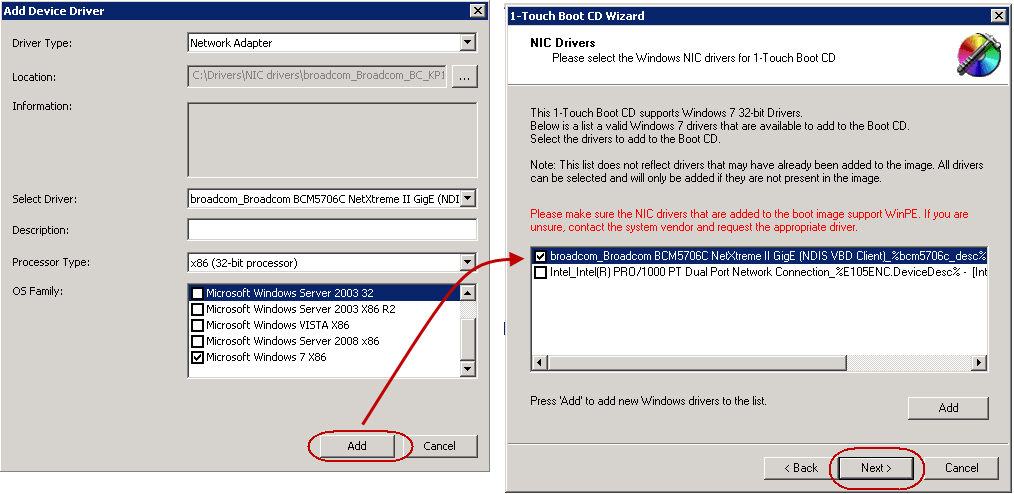
| 3. | Click 1-Touch Boot CD Wizard. |
 |
| 4. | Click Next. |
 |
| 5. | Select the processor type from the list. The processor type must match with the processor of the computer where you are restoring the client. |
 |
| 6. |
By default Mass Storage Drivers for Windows 7 WINPE are automatically
added to the boot CD. The mass storage drivers are required by the Boot
CD to connect to primary mass storage device. Click Next and go to step 8.
|
 |
| 7. |
Skip this step if you do not want to add any Mass Storage Drivers to the
list.
|
 |
||
| 8. |
By default NIC Drivers for Windows 7 WINPE are automatically added to
the boot CD. The NIC drivers are required by the ISO
to connect with the network. Click Next and go to step 10.
|
 |
||
| 9. |
Skip this step if you do not want to add any NIC Drivers.
|
 |
||
| 10. |
|
 |
||
| 11. | Create a Live CD using the ISO. |
| 1-Touch clients may have different types of operating systems and processors. You must create a Live CD for each type of processor. Ensure that you have all the latest software updates included in the Live CD. Learn more.... |
When you are restoring to a computer which has the same hardware and disk configuration as that of the backed up computer, use one of the following methods to perform the restore:
Use this method when you do not want to provide the client information during the restore. When you backup the client, the client information is stored as a client configuration.
This is a offline recovery method to restore the operating system. It does not require connection with 1-Touch Server.
| 1. | Create a 1-Touch Live CD. | |
| 2. |
|
 |
| 3. |
|
 |
| 4. |
|
 |
| 5. |
Save the response file as onetouchresponse.xml. By default, the response file is saved in the My documents folder on the computer that is running the CommCell Console. |
 |
| 6. | Copy the response file to a USB drive or a removable disk or a network location. | |
| 7. |
Connect the USB drive or the removable disk to the client that you want recover. If you want to use a network location to access the response file during the restore, follow the steps given in Accessing the Response File From an UNC Path During a Non-Interactive Restore. |
|
| 8. | Use the 1-Touch Live CD to boot the client. | |
| 9. |
|
 |
| 10. | Click OK to start the full system restore. |
 |
| 10. |
|
 |
Use this method when you want to specify the client configuration information during the restore.
This is a offline recovery method to restore the operating system. It does not require connection with 1-Touch Server.
| 1. |
Create
1-Touch Live CD Use the 1-Touch Live CD to boot the client. |
|
| 2. |
|
 |
| 3. | Click Next. |
 |
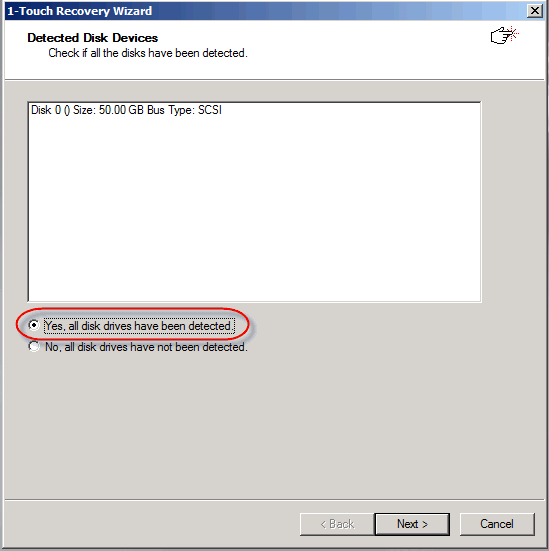
| 4. | Click Yes if all disk devices are detected. |
 |
| 5. |
|
 |
| 6. |
|
 |
| 7. |
|
 |
| 8. | Click Next. |
 |
||
| 9. |
Click Next.
|
 |
||
| 10. | Click Next. |
 |
||
| 11. | Click Next. |
 |
||
| 12. |
Click OK.
The full system restore starts. |
 |
||
| 13. |
After you click Finish, the computer may reboot one or more times. |
|
Perform the Online Restore to reinstall the operating system on the client. The Windows Distribution Shares and Drivers available on 1-Touch Server are used to reinstall the operating system.
| 1. | Login to 1-Touch Server and create Answer File for the 1-Touch Client. For more information, go to Creating an Answer File. | |
| 2. |
Create
1-Touch Live CD. Use 1-Touch Live CD to boot the client. |
|
| 3. |
|
|
| 4. | Click Next. |
|
| 5. | Click Yes if all disk devices are detected. |
|
| 6. |
|
 |
| 7. |
|
 |
| 8. | Click Next. |
 |
| 8. |
Reboot the computer after the windows installation completes. During the Windows installation process of a 1-Touch Recovery, the Windows Administrator password is set as 1Touch. Upon completion of the 1-Touch Recovery, the Administrator's original password will be restored from the backup. After the windows installation completes, the computer may reboot one or more times. |
 |
Perform a Dissimilar Disk Restore, when the computer where you are restoring, satisfies the following criteria:
Use one of the following methods to perform the restore.
Use this method when you do not want to provide the client information during the restore. When you backup the client, the client information is stored as a client configuration.
This is a offline recovery method to restore the operating system. It does not require connection with 1-Touch Server.
| 1. | Create a 1-Touch Live CD. | |
| 2. |
|
|
| 3. |
|
|
| 4. |
|
|
| 5. |
Save the response file as onetouchresponse.xml. By default, the response file is saved in the My documents folder on the computer that is running the CommCell Console. |
|
| 6. | Copy the response file to a USB drive or a removable disk or a network location. | |
| 7. |
Connect the USB drive or the removable disk to the client that you want recover. If you want to use a network location to access the response file during the restore, follow the steps given in Accessing the Response File From an UNC Path During a Non-Interactive Restore. |
|
| 8. | Use the 1-Touch Live CD to boot the client. | |
| 9. |
|
|
| 10. | Click OK to start the full system restore. |
|
| 11. |
|
 |
| 12. | Click Yes. |
 |
| 13. |
|
 |
| 14. |
|
 |
| 15. |
|
 |
| 16. |
|
 |
| 17. |
|
|
Use this method when you want to specify the client configuration information during the restore.
This is a offline recovery method to restore the operating system. It does not require connection with 1-Touch Server.
| 1. |
Create
1-Touch Live CD Use the 1-Touch Live CD to boot the client. |
|
| 2. |
|
|
| 3. | Click Next. |
|
| 4. | Click Yes if all disk devices are detected. |
|
| 5. |
|
|
| 6. |
|
|
| 7. |
|
|
| 8. |
|
 |
| 9. |
Click Next.
|
|
| 10. |
|
|
| 11. | Click Yes. |
|
| 12. |
|
|
| 13. |
|
|
| 14. |
|
|
| 15. |
|
|
| 16. |
Click OK.
The full system restore starts. |
|
||
| 17. |
|
|
Perform the Online Restore to reinstall the operating system on the client. The Windows Distribution Shares and Drivers available on 1-Touch Server are used to reinstall the operating system.
Ensure that you have selected Dissimilar Disk Mapping Restore Option while creating the answer file.
| 1. | Login to 1-Touch Server and create Answer File for the 1-Touch Client. For more information, go to Creating an Answer File. | |
| 2. |
Create
1-Touch Live CD. Use 1-Touch Live CD to boot the client. |
|
| 3. |
|
|
| 4. | Click Next. |
|
| 5. | Click Yes if all disk devices are detected. |
|
| 6. |
|
|
| 7. |
|
|
| 8. | Click Next. |
|
| 9. |
|
|
| 10. | Click Yes. |
|
| 11. |
|
|
| 12. |
|
|
| 13. |
|
|
| 14. |
|
|
| 15. |
Reboot the computer after the windows installation completes.
During the Windows installation process of a 1-Touch Recovery, the Windows Administrator password is set as 1Touch. Upon completion of the 1-Touch Recovery, the Administrator's original password will be restored from the backup. |
|
When a target system has different hardware than the backed up system, perform the Cross Hardware restore. If the backed up system is still running the Calypso services, stop the services before performing the cross hardware restore.
Use one of the following methods to perform the restore.
Use this method when you do not want to provide the client information during the restore. When you backup the client, the client information is stored as a client configuration.
This is a offline recovery method to restore the operating system. It does not require connection with 1-Touch Server.
Copy all the required Mass Storage Drivers and NIC Drivers to a network location. For example: If the target system requires Adaptec Ultra160 mass storage driver, then copy the driver.inf for Adaptec Ultra160 to a network location.
| 1. | Create a 1-Touch Live CD. | |
| 2. |
|
|
| 3. |
|
|
| 4. |
|
|
| 5. |
Save the response file as onetouchresponse.xml. By default, the response file is saved in the My documents folder on the computer that is running the CommCell Console. |
|
| 6. | Copy the response file to a USB drive or a removable disk or a network location. | |
| 7. |
Connect the USB drive or the removable disk to the client that you want recover. If you want to use a network location to access the response file during the restore, follow the steps given in Accessing the Response File From an UNC Path During a Non-Interactive Restore. |
|
| 8. | Use the 1-Touch Live CD to boot the client. | |
| 9. |
|
|
| 10. | Click OK to start the full system restore. |
|
| 11. |
|
 |
| 12. | Enter the password to access the network location where drivers are stored. |
 |
| 13. |
|
 |
| 14. | Click OK. |
 |
| 15. |
|
|
| 16. |
|
|
Use this method when you want to specify the client configuration information during the restore.
This is a offline recovery method to restore the operating system. It does not require connection with 1-Touch Server.
Copy all the required Mass Storage Drivers and NIC Drivers to a network location. For example: If the target system requires Adaptec Ultra160 mass storage driver, then copy the driver.inf for Adaptec Ultra160 to a network location.
| 1. |
Create
1-Touch Live CD Use the 1-Touch Live CD to boot the client. |
|
| 2. |
|
|
| 3. | Click Next. |
|
| 4. | Click Yes if all disk devices are detected. |
|
| 5. |
|
|
| 6. |
|
|
| 7. |
|
|
| 8. |
|
 |
||
| 9. |
|
 |
| 10. | Click Next. |
|
| 11. |
Click OK.
The full system restore starts. |
|
| 12. |
|
|
| 13. |
|
|
| 14. |
Click OK. Windows Mini-Setup Wizard configures the network settings and installs required drivers. This process may take few minutes. The computer may reboot one or more times. |
|
Perform the Online Restore to reinstall the operating system on the client. The Windows Distribution Shares and Drivers available on 1-Touch Server are used to reinstall the operating system.
Make sure that the required mass storage and NIC drivers are included in the answer file.
| 1. | Login to 1-Touch Server and create Answer File for the 1-Touch Client. For more information, go to Creating an Answer File. | |
| 2. |
Create
1-Touch Live CD. Use 1-Touch Live CD to boot the client. |
|
| 3. |
|
|
| 4. | Click Next. |
|
| 5. | Click Yes if all disk devices are detected. |
|
| 6. |
|
|
| 7. |
|
|
| 8. | Click Next. |
|
| 7. |
Check the TCP/IP and Display Adapter configurations. Use the
Client Checklist to check the
configuration. If they are incorrect, perform the following steps:
|
 |
| 9. |
During the Windows installation process of a 1-Touch Recovery, the Windows Administrator password is set as 1Touch. Upon completion of the 1-Touch Recovery, the Administrator's original password will be restored from the backup. After the windows installation completes, the computer may reboot one or more times. |
|
When a target system has different hardware and the different disk configuration than the backed up system, perform the Cross Hardware Dissimilar Disk restore. If the backed up system is still running the Calypso services, stop the services before performing the cross hardware restore.
Use one of the following methods to perform the restore.
Use this method when you do not want to provide the client information during the restore. When you backup the client, the client information is stored as a client configuration.
This is a offline recovery method to restore the operating system. It does not require connection with 1-Touch Server.
Copy all the required Mass Storage Drivers and NIC Drivers to a network location. For example: If the target system requires Adaptec Ultra160 mass storage driver, then copy the driver.inf for Adaptec Ultra160 to a network location.
| 1. | Create a 1-Touch Live CD. | |
| 2. |
|
|
| 3. |
|
|
| 4. |
|
|
| 5. |
Save the response file as onetouchresponse.xml. By default, the response file is saved in the My documents folder on the computer that is running the CommCell Console. |
|
| 6. | Copy the response file to a USB drive or a removable disk or a network location. | |
| 7. |
Connect the USB drive or the removable disk to the client that you want recover. If you want to use a network location to access the response file during the restore, follow the steps given in Accessing the Response File From an UNC Path During a Non-Interactive Restore. |
|
| 8. | Use the 1-Touch Live CD to boot the client. | |
| 9. |
|
|
| 10. | Click OK to start the full system restore. |
|
| 10. |
|
|
| 11. | Click Yes. |
|
| 12. |
|
|
| 13. |
|
|
| 14. |
|
|
| 15. |
|
|
16. |
|
|
| 17. | Enter the password to access the network location where drivers are stored. |
|
| 18. |
|
|
| 19. | Click OK. |
|
| 20. |
|
|
| 21. |
|
|
Use this method when you want to specify the client configuration information during the restore.
This is a offline recovery method to restore the operating system. It does not require connection with 1-Touch Server.
Copy all the required Mass Storage Drivers and NIC Drivers to a network location. For example: If the target system requires Adaptec Ultra160 mass storage driver, then copy the driver.inf for Adaptec Ultra160 to a network location.
| 1. |
Create
1-Touch Live CD Use the 1-Touch Live CD to boot the client. |
|
| 2. |
|
|
| 3. | Click Next. |
|
| 4. | Click Yes if all disk devices are detected. |
|
| 5. |
|
|
| 6. |
|
|
| 7. |
|
|
| 8. |
|
|
||
| 9. |
|
|
| 10. |
Click Next.
|
|
| 11. |
|
|
| 12. | Click Yes. |
|
| 13. |
|
|
| 14. |
|
|
| 15. |
|
|
| 16. |
|
|
| 17. |
Click OK.
The full system restore starts. |
|
||
| 18. |
|
|
||
| 19. |
|
|
||
| 20. |
|
|
Perform the Online Restore to reinstall the operating system on the client. The Windows Distribution Shares and Drivers available on 1-Touch Server are used to reinstall the operating system.
Make sure that the Dissimilar Disk Restore Option is selected and all the required mass storage and NIC drivers are selected while creating the answer file.
| 1. | Login to 1-Touch Server and create Answer File for the 1-Touch Client. For more information, go to Creating an Answer File. | |
| 2. |
Create
1-Touch Live CD. Use 1-Touch Live CD to boot the client. |
|
| 3. |
|
|
| 4. | Click Next. |
|
| 5. | Click Yes if all disk devices are detected. |
|
| 6. |
|
|
| 7. |
|
|
| 8. | Click Next. |
|
| 9. |
Check the TCP/IP and Display Adapter configurations. Use the
Client Checklist to check the
configuration. If they are incorrect, perform the following steps:
|
|
| 10. |
|
|
| 11. | Click Yes. |
|
| 12. |
|
|
| 12. |
|
|
| 13. |
|
|
| 14. |
|
|
| 15. |
During the Windows installation process of a 1-Touch Recovery, the Windows Administrator password is set as 1Touch. Upon completion of the 1-Touch Recovery, the Administrator's original password will be restored from the backup. After the windows installation completes, the computer may reboot one or more times. |
|
You can access the recovery response file from a network location during the non-interactive restore. Follow the steps give below to perform the non-interactive restore when the recovery response file is stored in a network location:
| 1. | Boot the client using the 1-Touch Live CD. |
| 2. |
|
|
| 3. |
Click OK. A temporary DHCP IP will be assigned automatically to the client that you are recovering. |
 |
| 4. | If the temporary DHCP IP is not assigned automatically, you have to provide the Static IP, Subnet Mask Default Gateway, Primary DNS and WINS. |
 |
| 5. |
Enter the UNC path of the
location where the response file is located and click OK. The permanent IP address of the client will be the IP address that is stored in the response file. |
 |
| 10. | Click OK to start the full system restore. |
|
During a non-interactive restore, follow the steps given below to change the client configuration:
| 1. |
|
|
| 2. |
|
 |
| 3. |
|
 |
| 4. |
|
 |
| 5. |
|
 |
| 6. |
|
 |
| 7. | Click OK to save the updated client configuration. |
You can use an USB drive to boot the client. Follow the steps given below to create an USB drive for booting the client:
DISKPART
lis disk
sel <disk number>
clean
create partition primary
select partition 1
active
format fs=ntfs quick
assign
exit
Copy the bootsect.exe from Boot folder of Win7 distribution to one of the following location:
Using the command prompt, navigate to the above location and enter following command:
BOOTSECT.EXE/NT60 <assigned drive letter for USB drive>:
Copy the content in ISO folder (SystemRecovery\Images\Windows 32-bit\BOOT_IMAGE\ISO) to USB Drive.
Connect the USB drive to the client that you want to boot.
Change the BIOS Settings on the client to boot from the USB drive.
If all nodes the cluster are down, offline recovery is not supported for the first or primary node recovery. Perform the Online Restore to recover the first node in a cluster. Once the cluster starts, remaining nodes can be recovered using offline or online recovery process.
Perform the 1-Touch recovery of the Windows Server 2003 and 2008 cluster as follows:
|
The cluster uses the following resources:
The program files required to start and run these resources must be restored to the virtual server's disk. You will need to restore the data to each virtual server using the Full System Restore of the Microsoft Windows File System iDataAgent restore. For more information, go to Restore Program Files for Virtual Server.
When the client computer and CommServe are in the same domain, DNS will be used for name resolution between client computer and CommServe.
WINS will be used for name resolution in the following scenarios:
During the Interactive Restore, you can configure the WINS as follows:
|
|
To restore the teaming network adapter:
|
|