You can create user-defined subclients to divide mailbox archives into groups
based on specific criteria. For example, you may want to archive mailboxes in
the Administrator Active Directory User group on a nightly basis, whereas
mailboxes in the Accounting Active Directory User group may only need to
be archived once a week. Creating a user-defined subclient for each user group
allows you to archive them at different intervals based on your
resources and archival needs.
By default, the content of the Default Subclient
contains all mailboxes on the Exchange server.
When you create a user-defined Subclient, the
contents of the user-defined Subclient will be excluded from the Default
Subclient.
You can choose to discover mailboxes based on the mailboxes Active Directory
User Group. Any mailbox that resides in the specified Active Directory User
Group will be discovered and automatically assigned to the user-defined subclient.
In cases where the CommServe and the Active Directory Server are
across a firewall, ensure that port 389 is opened.
From the CommCell Browser, navigate to Client Computes|
<Client> | Exchange Mailbox Archiver.
Right-click the <Archive set>for which you want
to discover mailboxes, and then click Properties.
Click the Auto Discover tab.
Select the Enable Auto Discover check box, and then click AD User Group
Affinity.
Click OK.
From the CommCell Browser, navigate to Client Computers | <Client> |
<Archive Set>.
Right-click the Archive Set, point to All Tasks, and
then click New Subclient.
In the Subclient Name box, type a name.
Click the Storage Device tab, in the Storage Policy box,
select a Storage policy, and then click OK.
Right-click the newly created subclient, and then click Properties.
Click the Auto-discovery tab, and then click Configuration.
Click Discover.
In the Domain Name box, type the Active Directory domain name for
the mailbox.
In the User Name box, type the user account name.
In the Password box, type the password for the user account, and
then click OK.
On the Configure AD User Group for Auto-discovery dialog box, click the
Subclient column to assign the Active Directory User Group to a subclient.
Alternatively, you can select the desired Active Directory User group,
and then select the subclient from the Move all selected Items to drop-downbox.
Click OK to return the subclient Properties dialog box.
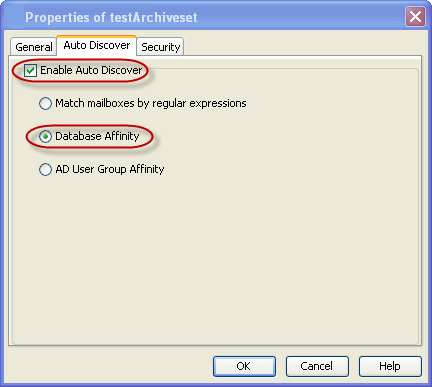
You can configure a user-defined subclient to automatically discover
mailboxes created within a particular database. This is especially useful in
cases where a number of databases exist.
From the CommCell Browser, navigate to Client Computes|
<Client> | Exchange Mailbox Archiver.
Right-click the Archive set for which you want
to discover mailboxes, and then click Properties.
Click the Auto Discover tab.
Select the Enable Auto Discover check box, and then click
Database
Affinity.
Click OK.
From the CommCell Browser, navigate to Client Computers | <Client> | Archive Set.
Right-click the Archive Set, point to All Tasks, and
then click New Subclient.
In the Subclient Name box, type a name.
Click the Storage Device tab, in the Storage Policy box,
select a Storage policy, and click OK.
Right-click the subclient, and then select Properties.
Click the Auto-discovery tab, and then click Configuration.
Click Discover. The mailbox stores will be displayed.
Assign the mailbox store to a subclient by clicking the Subclient
column and selecting one from the drop-down list. Alternatively, you can assign all databases to one subclient in the Move all selected items to
field.
Click OK to return the subclient Properties dialog box.
Regular expressions can be used to discover mailboxes based on unique
patterns. For example, regular expressions can be used to discover all
mailboxes containing a particular department name within its display name.
When mailboxes are discovered using regular expressions, any mailbox that matches the wildcard expressions
are automatically assigned to the associated user-defined subclient. If a
mailbox does not match the expressions, it is automatically assigned to the default subclient.
The following table provides some examples of useful regular
expressions:
example
description
Accounting*
Auto-discovers any mailbox
display name that begins with Accounting followed by any number
of any characters (e.g., Accounting Mailbox, Accounting Manager, etc.).
user_group?
Auto-discovers any mailbox
display name that begins with user_group followed by any one character (e.g., user_groupA,
user_group1, etc.).
[JT]im
Auto-discovers any mailbox display name that begins with
J or T and ends with im (e.g., Jim, Tim).
[a-k]Lee
Auto-discovers any mailbox display name that begins with any
character in the range of a through k inclusive and that
ends with Lee (e.g., aLee, bLee, etc.)
[!ei]nsure
Auto-discovers any mailbox
display name that ends with nsure but does not begin with e
or i (e.g., unsure).
[!a-k]Lee
Auto-discovers any mailbox display name that does not begin with
a through k and that ends with Lee (e.g., xLee, yLee, etc.).
[A-K]*
You can also use a combination
of wildcards in a single expression, if the wildcards are supported for
the type of operation you are performing. For example, if you wanted to
auto-discover all mailbox display names beginning with any characters in
the range of A through K inclusive followed by any number
of any characters, you would enter the following wildcard combination.
From the CommCell Browser, navigate to Client Computes|
<Client> | Exchange Mailbox Archiver.
Right-click the Archive set for which you want
to discover mailboxes, and then click Properties.
Click the Auto Discover tab.
Select the Enable Auto Discover check box, and then click
Database
Affinity.
Click OK.
From the CommCell Browser, navigate to Client Computers | <Client> | Archive Set.
Right-click the <Archive Set>, point to All Tasks, and
then click New Subclient.
In the Subclient Name box, type a name.
Click the Storage Device tab, in the Storage Policy box,
select a Storage policy, and click OK.
Right-click the subclient, and then select Properties.
Click the Auto-discovery tab.
In the Mail Box Display Names box, type a regular expression or
wildcard pattern to
specify that newly discovered mailbox display names matching that pattern
during auto-discovery will be assigned to this subclient. For a
comprehensive wildcard list, see
Wildcards.
Click Add. Repeat this step to enter additional wildcard
patterns.
Click OK.
Click OK to return the subclient Properties dialog box.
Automatic discovery of mailboxes can be disabled in scenarios where it is no
longer desired for mailboxes to automatically be included in routine archives.
When automatic discovery is disabled, all mailboxes must subsequently be
manually assigned to a subclient.
From the CommCell Browser, right-click the <Archive set> for which you want
to disable auto-discovery of mailboxes, and then click Properties.
By default, if a change is made to an automatically discovered mailbox that
alters the association criteria it was discovered with, the next Archive will
automatically reassign the mailbox to the appropriate subclient that satisfies
the new criteria. For example, if a mailbox was assigned to a subclient based on
its parent database and the mailbox is later moved to a different database, the
next Archive will automatically move the mailbox to the subclient associated with
the new database.
If a mailbox is manually assigned to a subclient, it is not
rendered available for automatic grouping. However you can manually assign
this mailbox to the blank subclient and during the subsequent data protection
operation this mailbox gets automatically discovered and assigned to a relevant
subclient.
In some cases, it may not be desirable for Archives to manage mailboxes in
this manner. You can disable this functionality - or enable it again later if it
has already been disabled - as follows:
From the CommCell Browser, right-click the Exchange Mailbox
Archiver client, and then click Properties.
Clear or check the Manage Content Automatically option.
Click OK.
From the CommCell Browser, navigate to Client Computes|
<Client> | Exchange Mailbox Archiver.
Right-click the <Archive set>for which you want
to discover mailboxes, and then click Properties.
Click the Auto Discover tab.
Ensure that the Enable Auto Discover check box is
selected together with either one of the following:
Archiving rules specify the criteria for the type of data to be archived.
Messages that meet this criteria are rendered available for
archiving if they satisfy any or all the archiving rules.
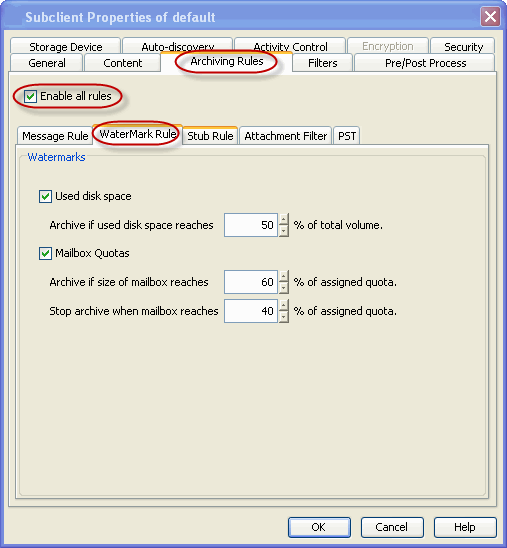
You can set rules to archive based on a specified amount of used disk space
on the database which hosts this mailbox. You can also establish a mailbox quota
rule, which will archive messages when the mailbox has exceeded the specified
threshold.
From the CommCell Browser, navigate to Client Computers | <Client> | Archive Set.
Right-click the Subclient, and then click
Properties.
Select the Archiving Rules tab.
Select the Enable all rules check box.
Click the WaterMark Rule tab.
Select the Used disk space check box.
In the Archive if used disk space reaches box, type
or select the size of the disk volume.
Select the Mailbox Quotas check box.
In the Archive if size of mailbox reaches box, type
or select the mailbox size high watermark value.
In the Stop archive when mailbox reaches box, type or select
the mailbox size low watermark value.
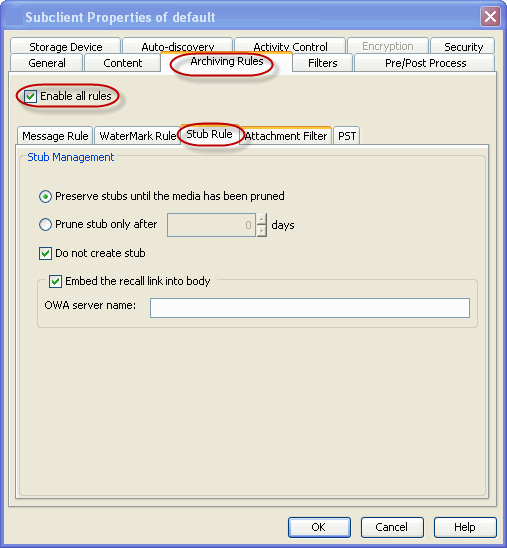
You can set rules to archive messages based on the stub properties. All the
messages matching with this criteria will be archived.
From the CommCell Browser, navigate to Client Computers | <Client> | Archive Set.
Right-click the Subclient, and then click
Properties.
Select the Archiving Rules tab.
Select the Enable all rules check box.
Click the Stub Rule tab.
Click Preserve stubs until the media has been pruned to
allow stubs to exist in a mailbox or public folder until the media
retention time has been met and data aging has been run.
In the Prune stub only after box, type or select the
number of days after which the stubs should be pruned.
Select the Do not create stub check box if you do not
want to have a stub to be created after archiving.
Select the Embed the recall link into body to embed the
recall link into the message body.
In the OWA server name box, type the URL and host name of the
server that will perform the recall. For example: https://exchangeservername
You can include or exclude attachments from an archive operation. When
attachment filters are specified, the age/size rules are ignored as archiving
criteria for attachments of the specified type. When attachment filters are not
specified, age/size rules will determine whether the attachments will be
archived. Use the following steps to configure an attachment filter.
From the CommCell Browser, navigate to Client Computers | <Client> | Archive Set.
Right-click the Subclient, and then click
Properties.
Select the Archiving Rules tab.
Select the Enable all rules check box.
Click the Attachment Filter tab.
Click Add, double-click the file extension.
Click Include to include all the attachments with the
selected extension in the Archive migration operation.
Click Exclude to exclude all the attachments with the
selected extension in the Archive migration operation.
The Exchange Mailbox Archiver Agent provides the facility for end-users to
recover messages directly from Outlook or Outlook Web Access (OWA). When
configured, a special icon, referred to as a stub, will appear in the message
header indicating that the message has been archived. By double-clicking the
message header, the user can recover the archived message back to their inbox.
There are two tasks required for this capability:
Publish OFL forms for the Exchange Server to display the stub icons.
From the Start menu open the Exchange System Manager and expand the folders node.
Right-click Public Folders tree and select View System
Folders from the Context menu.
Right-click the EFORMS REGISTRY system folder and select New
| Organizational Form.
Enter "DataArchiver Organizational Forms"
as the name of the new Organization Form. Ensure that the Language field is set to English (USA).
Select Apply.
Click OK and exit the Exchange System Manager.
Creating OFL for Exchange 2007
Refer to the CreateOFL instructions (located in the <base>
folder) for creating a custom Public Folder using the Exchange Management Shell.
Run the CreateOFL tool to create the OFL.
Publish the Forms.
Creating OFL for Exchange 2010
From the Start menu open the Exchange Management Console and expand the folders node.
Create a public folder (e.g., My Organizational
Forms Library) for the organizational forms library Public Folder.
Use the ExFolders tool to add the PR_URL_NAME property to
the organizational forms library as follows:
The ExFolders tool (ExFolders.exe) must exist in
the <Exchange_Installation_Path>\V14\Bin directory. You can download the tool
from one of the following locations:
After the download it is recommended to read the READMe that is available
together with the ExFolders.exe.
After the download, be sure to copy the ExFolders.exe file to the <Exchange_Installation_Path>\V14\Bin directory.
Navigate to the <Exchange_Installation_Path>\V14\Bin
directory, and then double-click ExFolders.exe.You must run the
ExFolders tool from an Exchange 2010 server. You can't run
it from a workstation as you could with the PFDAVAdmin tool. To learn more about
the ExFolders tool, see the Exchange Server Team Blog article
Exchange, Meet
ExFolders.
To perform this procedure, you must have administrative permissions to the public folders you're modifying. For more information, see
Understanding Public Folder Permissions.
In the ExFolders management console, navigate to File >
Connect.
In Connect, click Public Folders.
Next to the Global Catalog box, click Select, and then
select a global catalog server you want to use.
Next to the Database(s) box, click Select, select the public folder
database you want to use, and then click OK. A public folder hierarchy will
appear in the ExFolders console tree.
Expand System Folders, expand EFORMS REGISTRY, right-click
the public folder you created for the organizational forms library, and then
click Property Editor.
On the Property menu, click Add Property To View.
In Add Property To View, type 0x6707001E, and then click
OK.
Sort the Name column to find the PR_URL_NAME property you just added.
Right-click PR_URL_NAME, and then click Edit Value.
In the Value box, type /NON_IPM_SUBTREE/EFORMS REGISTRY,
and then click OK.
Close the ExFolders tool.
Use MAPI editor (Mfcmapi.exe)to add the
PR_EFORMS_LOCALE_ID property to the organizational forms library. To perform this procedure, you must use the Microsoft Exchange Server MAPI
Editor (MFCMAPI) tool on a computer that's running the 64-bit version of
Microsoft Outlook 2010. To download MFCMAPI, see
Microsoft Exchange Server MAPI
Editor. For a list of locales, see
languagecode Field.
Open MFCMAPI.
On the MDB menu, click Open Public Folder Store, and then click
OK. The
Public Folder Management Console appears.
In the console tree, expand Public Root, expand NON_IPM_SUBTREE, expand
EFORMS REGISTRY, and then click the public folder that you created for the
organizational forms library.
In the result pane, in the Property Name(s) column, click the PR_URL_NAME property.
On the Property Pane menu, click Modify 'Extra' Properties.
In Extra Properties, click Add.
In Property Tag Editor, click Select Property Tag.
In Property Selector, click PR_EFORMS_LOCALE_ID, and then click
OK.
Click OK to close Property Tag Editor, and then click OK to close
Extra
Properties.
To verify that the property was added, in the Public Folder Management
Console, locate the newly created PR_EFORMS_LOCALE_ID property in the
Property Name(s) column. A red exclamation point (!) is displayed as its
icon.
Double-click PR_EFORMS_LOCALE_ID to open Property Editor.
In the Unsigned Decimal box, type the desired locale ID, and then click
OK. For example, type 1033 for English, 1040 for Italian, and so on.
For more information about determining the locale ID, see
languagecode
Field.
Close MFCMAPI.
Edit the .oft files for the supported
languages as described in Publish the Forms.
Create the configuration .ini file in the
following format:
[FORMListToPublish]
Stub-Form = C:\Documents and Settings\administrator.SKY\Desktop\Base\Stub-ENU.oft
Cand-Form = C:\Documents and Settings\administrator.SKY\Desktop\Base\Cand-ENU.oft
LMCand-Form = C:\Documents and Settings\administrator.SKY\Desktop\Base\LMCand-ENU.oft
Publish the forms using the DMEPublishForm tool and the
Publish Manually using Config File option. A search for an OFL
that is configured with the same locale as Outlook on the local computer is
performed. If an OFL is not found with that locale, it will publish to an
English OFL if one exists.
Navigate to the PublishForm tool and OFT forms available in the base
folder and double-click the DMEPublishForm.exe.
Double-click publishform.exe
Click Publish.
The publish form program will prompt for a profile to use in order to
publish the forms to the DataArchiver Organizational Forms (or previously
existing OFL) folder.
The profile used to publish the forms must have owner
privileges to that folder.
Close the publish form program.
Follow the steps given below to publish the form for Exchange 2007 in any language other than
the ones mentioned under
supported languages:
Copy the following template forms from the resource pack:
stub-ENU.oft: Form to show the stubs in English language.
Cand-ENU.oft: Form to show the candidate messages in English language.
LMCand-ENU.oft: Form to show the local migration candidates in English
language.
Navigate to Tools in Microsoft Outlook inbox, select
Forms.
Select Design a Form.
Select "User template in File System" in Look In from the
dropdown list.
Translate the following string in the desired language:
In the Stub tab for
stub-ENU.oft: "This message has been migrated by
Bull Calypso.
To recover the original message, please close this message, re-open it,
and choose :Recover"(Bull Calypso
Outlook Add-in required)
In the space provided for Description field in the Properties tab for
stub-ENU.oft,
Cand-ENU.oft and LMCand-ENU.oft: "This form is only used by migrated message(s). Please do not use it to
create new message."
Follow the steps given below to publish the form for Exchange 2010 in any language other than
the ones mentioned under
supported languages:
Copy the following template forms from the resource pack:
stub-ENU.oft: Form to show the stubs in English language.
Cand-ENU.oft: Form to show the candidate messages in English language.
LMCand-ENU.oft: Form to show the local migration candidates in English
language.
Navigate to File in Microsoft Outlook inbox, select
Options.
Select Customize Ribbon.
Enable the Developer tab and select Design a Form.
Select "User template in File System" in Look In from the
dropdown list.
Translate the following string in the desired language:
In the Stub tab for
stub-ENU.oft: "This message has been migrated by
Bull Calypso.
To recover the original message, please close this message, re-open it,
and choose :Recover"(Bull Calypso
Outlook Add-in required)
In the space provided for Description field in the Properties tab for
stub-ENU.oft,
Cand-ENU.oft and LMCand-ENU.oft: "This form is only used by migrated message(s). Please do not use it to
create new message."
See
Resource Pack for more information on the Resource Pack.
The Exchange Mailbox Archiver Agent provides a Universal Stub option
to recall messages from any mobile device and is supported for Exchange Server
2007 or higher. When this feature is enabled, a hyperlink is embedded into the
message's body during the stubbing phase. An end-user with access to their
Outlook application, OWA, or any email-ready mobile device can recover this
stubbed message by clicking the message, which will be automatically recalled
into the user's Recovered Items folder.
In order for Universal Stub recall to work, .NET 3.5 should be installed on
the computer which has OWA Proxy Enabler installed.
From the Exchange Mailbox Archiver Agent's Subclient Properties
dialog box, navigate to the Archiving Rules | Stub Rules tab and
select the Embed the recall link into body option.
Enter the URL and host name of the server that will perform the recall
in the OWA Server Name field. For example:
You can specify whether messages or items recalled from Outlook should be
placed in the Recovered Items folder. When this option is enabled, data will be
recalled to the Recovered Items folder. When disabled, data will be recalled to
the original folder from which the data was archived.
You can specify whether messages or items recalled from Outlook Web Access (OWA)
should be placed in the Recovered Items folder. When selected, data will be
recalled to the Recovered Items folder. When disabled, data will be recalled to
the original folder from which the data was archived.
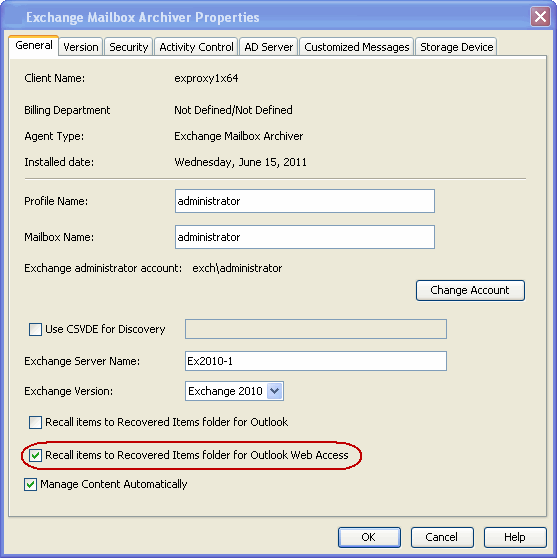
From the CommCell Browser, navigate to Client Computers | <Client> |
Right-click the Exchange Mailbox Archiver, and then click
Properties.
Select the Recall items to Recovered Items folder forOutlook Web Access
check box.
If messages are recalled multiple times, the size of the mailbox begins to
increase with unnecessary duplicate copies of the recalled messages. In such
cases, the space saving benefit of message archiving become compromised over
time.
If you would like to prevent messages from being recalled multiple times, you
can configure Outlook clients to hide the Recovered Items folder (discussed in
the above sections) while maintaining a cache of message stubs that is hidden
from users. Message stubs are placed in this cache and remain viewable in the
folder from which they were archived.
If a message recall is triggered, the software will first check the cache to
determine if the message was previously recalled. Based on this, one of the
following will take place:
If the message had not been recalled, it will be recalled from the media
and placed in the hidden cache. The message stub will remain in the original
location.
If the message had been recalled previously, the message will not be
recalled again from the media. Rather, the copy of the previously recalled
message will automatically be opened from the hidden cache.
This capability is not supported on Exchange 2003 clients.
Perform the following to configure this capability:
From the CommCell Browser, right-click the client computer that has Exchange
Mailbox Archiver Agent installed.
Click Properties.
Select Registry Key Settings.
Click Add.
Enter
nUseCache
in the Name field.
Enter
MSExchangeDMAgent
in the Location field.
From the Type list, select DWORD.
Enter 1 to enable this feature.
Click OK.
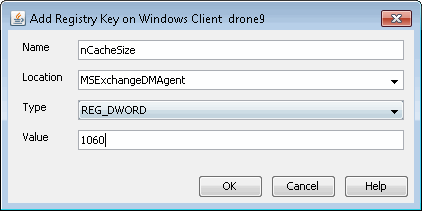
Specify a Cache Size
By default, the hidden cache will be pruned during the next archive operation
once the number of cached items reaches 100. This can be modified as follows:
From the CommCell Browser, right-click the client computer that has Exchange
Mailbox Archiver Agent installed.
Click Properties.
Select Registry Key Settings.
Click Add.
Enter
nCacheSize
in the Name field.
Enter
MSExchangeDMAgent
in the Location field.
From the Type list, select DWORD.
Enter the maximum number of items to hold in the hidden cache.
From the CommCell Browser, navigate to Client Computers | <Client> |
Right-click the Exchange Mailbox Archiver, and then click
Properties.
Select the Customized Messages tab.
Under Recover is in progress (disk library), type the
desired status message to be displayed in outlook during a stub
recovery operation from a disk library.
When a recall is performed and the media is outside the library, you can
configure an event to be displayed in the Event Viewer indicating this, as well
as a Media Handling Request alert. This capability is useful for immediately
notifying an administrator that the media is not available and the recall is
pending the media's availability.
From the CommCell Browser, navigate to Client Computers | <Client> |
Right-click the Exchange Mailbox Archiver, and then click
Properties.
Select the Customized Messages tab.
Under Error message when media is outside the library,
type the desired status message to be displayed when a stub recovery
operation is attempted for media outside the designated library..
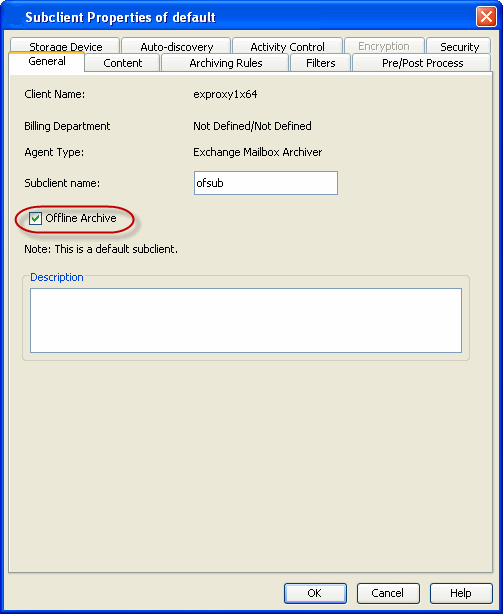
In cases where internet connectivity is not available (such as using a laptop
on an airplane), it may be desirable for users to still have the facility to
recall archived messages. This can be accomplished by configuring Outlook to
retain a copy of the archived message in a local cache on the client computer.
By default IPM.Note message types
qualify for Offline Archiving and other message class types such as IPM.Post,
IPM.Task etc are stubbed during the archiving operation.
Use the following steps to enable offline archive operations on this subclient to
allow Outlook Add-In users the capability of retaining a full copy of archived
items in local cache on the Outlook client.
In a typical organization, end-users' personal folders (*.PST files) reside on their local hard drives, network shares or a combination of both. Since PST files can only be
archived from either a local drive of the Exchange Server or a network share connected to the Exchange Server, the PST files need to be collected from various places and moved to the appropriate centralized location for
archiving. After the PST files have been moved to a centralized location, they can be then
archived to secondary storage by the Exchange Mailbox Archiver Agent.
There are four steps required to configure archives of PST files:
Ensure Outlook is installed on the computer hosting the PST files.
Prior to archiving PST files, you must ensure the folders in which the PST files reside
follow the same hierarchical structure as Exchange MAPI directory names. You can determine the MAPI directory name and container(s)
as follows:
Run the following command string from a prompt to export the user list to a file:
Ensure a shared location is available on the Exchange Server. Configure
permissions so that the user whom will be running this tool has write access.
This will be the location where the PST files are copied (if applicable) and the
PSTDiscoveryGUI.exe will be run after the
discovery process is complete.
Get the latest version of the PSTDiscovery Tool from the Resource Pack. Copy
this folder to a shared location that is accessible by all remote clients that
will be running the tool.
Configure the pst.ini file within the PSTDiscovery Folder:
SCANPATH
Use this parameter to specify one or more paths to the drives you wish to scan. If left blank all drives will be scanned. Multiple drives are delimited by a semicolon.
COPY
Specifies whether to copy the PST files from the remote
clients to the shared location on the Exchange Server. Valid values are "y" or
"n". If "n" is specified, PST files will be scanned into the database but not copied to the shared location. If "y" is specified, all scanned PST files will be copied to the shared location.
DELETE
Specifies whether to delete the source PST files once they have been copied to the shared location. Valid values are "y" or "n".
SIZE
Specifies the minimum size (in KB) that a PST file must be in order to be scanned and/or copied to the shared location.
MTIME
Specifies the time in days since the PST file was last modified. Only PSTs older than this value will be scanned and/or copied to the shared location.
LATIME
Specifies the time in days since the PST file was last accessed. Only PSTs that have not been accessed since this time will be scanned and/or copied to the shared location.
MEETALL
Specifies whether the SIZE, MTIME and LATIME criteria must all be met in order for the PST
file to be scanned and/or copied to the shared location. Valid values are "y" or "n". If "y" is specified, the PST must meet all three conditions of
SIZE, MTIME and LATIME for it to be scanned and/or copied to the shared location. If "n" is specified, the PST only has to meet one of the three conditions in order to be scanned and/or copied to the shared location.
Sample pst.ini configuration file:
SCANPATH="C:\;D:\"
COPY=y
DELETE=n
SIZE=10
MTIME=180
LATIME=180
MEETALL=n
Save any changes you have made to this configuration file.
On the client where the PsExec utility has
been copied, create a file called "clients.txt"
containing the list of clients that the PSTDiscovery Tool will be run against.
Using the following syntax, run the PSTDiscovery Tool.
Where the username and password specified have execute permissions on the
PSTDiscovery share, and write permissions to the shared location on the Exchange
client. An example of this syntax is provided in PSTDiscovery.bat in the PSTDiscovery folder from the Resource Pack.
This procedure can also be scheduled for periodic scanning of the remote
clients.
Once the scan and/or copy phase of the PSTDiscovery utility are completed, a database file will be created in the shared location containing information on all PST files that have been scanned and/or copied.
Open PSTDiscoveryGui.exe on the Exchange Server that has the specified shared location. In this PSTDiscovery
Tool, two fields must be configured before you continue.
Status Database
Click to specify the local path of the database file created in the previous step. This will populate the display pane with information on all of the PST files that have been scanned and/or copied.
Staging Path
Click to specify the local path that you would like to use as a staging area to prepare PST files for archiving.
The following information will be displayed on the screen:
Machine Name
Displays the source client name from which the PST was copied.
Orig-Path
Displays the original path of the PST file.
Net-Path (Local Path)
Displays the current local path of the PST file.
Size
Displays the size of the PST file in KB.
Mailbox Alias
Displays the alias of the mailbox this PST file was created from. To change the value, double-click on the field and enter a new alias. By default this value will be blank.
File Owner
Displays the current ownership of the PST file. To change the value, double-click on the field and enter a new owner.
Status
Displays the current status of the PST file. COPIED,
DISCOVERED, MARKED FOR MIGRATION, and MIGRATED are some of the possible values. To change a value, double-click on the field and select a new value from the list.
File Time
Displays the last Modified Date of the PST File.
Discover Time
Displays the time of the scan operation that discovered the PST file.
If PST files have been added to this shared location since the last time a scan was run, the
Local Scan button at the bottom of the tool can be used to scan the current folder location to import more PST files into the database which will then be displayed in the
tool.
In order to prepare the PST files for archiving, the Mailbox Alias field must be manually edited. For each PST file double-click on this field and specify the alias associated with the PST file.
Once the Mailbox Alias field has been manually edited, choose the PSTs you wish to prepare for Archiving. For each of the desired PST files, change the
value in the Status column to Mark for Migration.
Once you have selected all of the desired PST files, click Stage and the
tool will prepare all the designated PST files for Archiving. Once preparation has completed, a pop-up window will display the number of PST files that are now ready for archiving.
By default, the Mailboxes whose user accounts are disabled from the Active Directory are not
archived. To
include them in the archive operation, follow the steps given below:
From the CommCell Browser, navigate to Client Computers.
Right-click the <Client> in which you want to add
the registry key, and then click Properties.
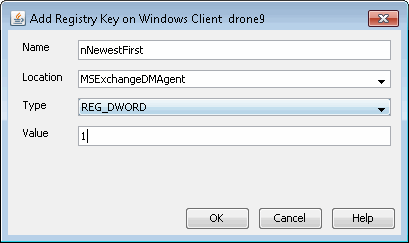
You can configure archive operations to archive the newest messages first.
This process cycles through each folder and determines the most recent messages
in the folder, which are then included in the archive operation.
From the CommCell Browser, right-click the client computer that has Exchange
Mailbox Archiver Agent installed.
Several options are available to customize the display and behavior of
archived messages in Outlook. These capabilities are described in the
following sections.
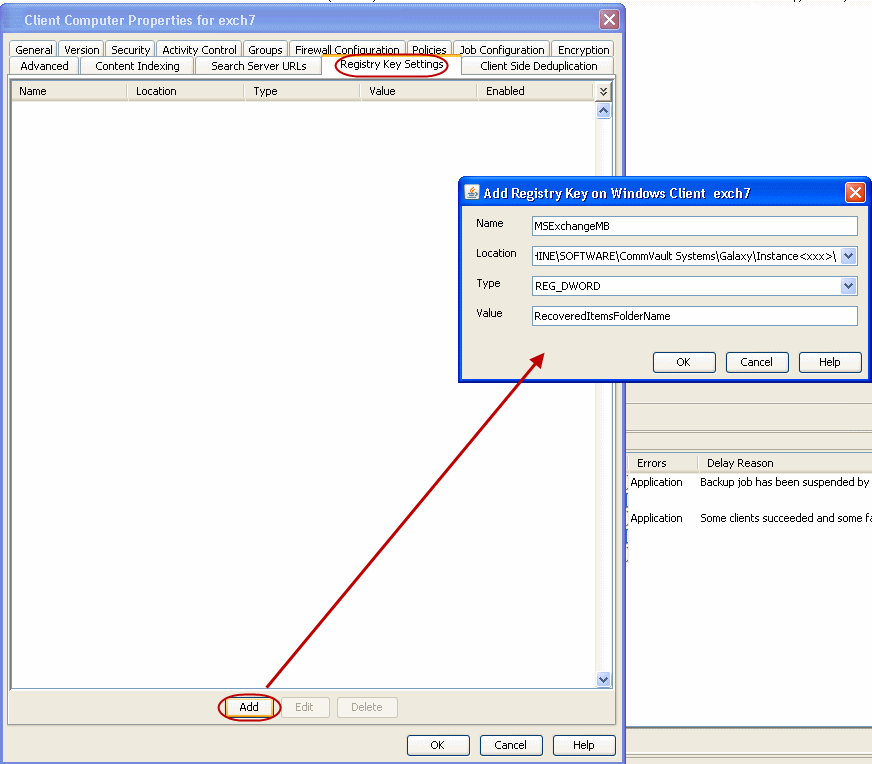
You can specify a new folder name for the Recovered Items folder. This
configuration is required on both the computer where the Exchange Archiver Agent
is installed as well as all computers containing the Outlook Add-In.
From the CommCell Browser, right-click the client computer that has Exchange
Mailbox Archiver Agent installed.
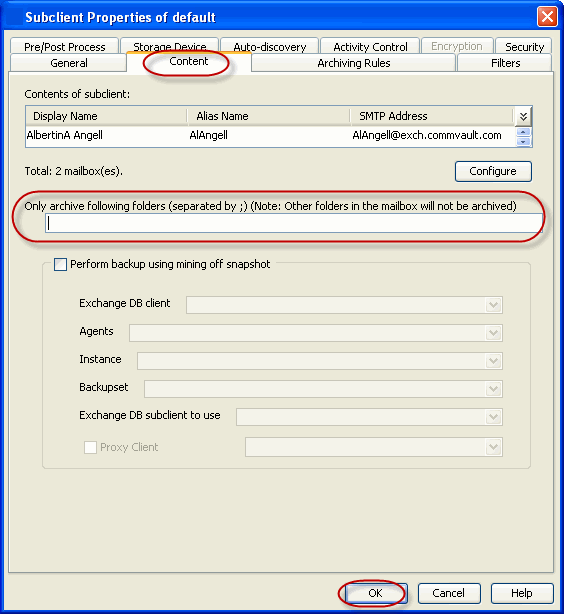
If you have folders specified in the Folder Inclusion section of the
subclient properties Content tab, you can configure this folder to be
created for all user's mailboxes as follows:
From the CommCell Browser, right-click the client computer that has Exchange
Mailbox Archiver Agent installed.
Click Properties.
Select Registry Key Settings.
Click Add.
Enter
ManagedFoldersin the Name field.
Enter
MSExchangeDMAgent
in the Location field.
From the Type list, select DWORD.
Enter 1 to display the list of attachments in the message body.
You can add custom text to the subject line of archived messages for Outlook
and OWA users. Note that this capability is not available for messages archived
using Offline Archiving.
From the CommCell Browser, right-click the client computer that has Exchange
Mailbox Archiver Agent installed.
Click Properties.
Select Registry Key Settings.
Click Add.
Enter
StubIdentifier in the Name field.
Enter
MSExchangeDMAgent
in the Location field.
From the Type list, select REG_SZ.
Enter the text you would like to display in the subject line of archived
messages.
You can exclude certain Exchange IPM classes, such as tasks, calendar and
contacts from archiving
to save space on the Archive media as well as enhance archiving performance. For example to exclude IPM.Appointment,
IPM.Contact, IPM.Schedule and IPM.Task the steps are as follows:
Using Registry Editor
incorrectly can cause serious problems that may require a reinstall of the
operating system. Microsoft does not guarantee
that problems resulting from the incorrect use of Registry Editor can be
solved. Use Registry Editor at your own risk. You must also understand how
to restore the registry if a problem occurs.
Open Registry Editor and create the following registry key:
Where class_type can be one of the following: POST, APPOINTMENT, TASK, CONTACT, ACTIVITY, DISTLIST, or any other user-defined IPM
class. However, only classes that start with "IPM." are excluded. The
<class_type> field accepts wildcards (for example, IPM.TASK.*).
Close the Registry Editor.
The IPM.NOTE class cannot be excluded, because this represents mail
messages.
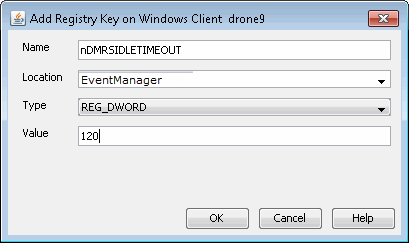
It is recommended to leave the persistent pipeline open for longer periods of
time to cache important information for subsequent recall attempts. By default
this timeout is set to 24 hours.
From the CommCell Browser, right-click the client computer that has Exchange
Mailbox Archiver Agent installed.
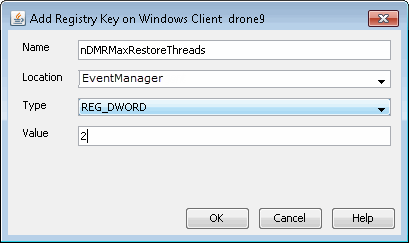
You can increase the number of persistent pipeline threads allowed for
recoveries, thereby potentially improving stub recall speed. The recommended
number of threads would be the number of Media Agents, which could possibly
be used for recoveries. By default two threads will be used. Therefore if
more than two Media Agents are potential targets for stub recalls increase
the number of threads accordingly as follows:
From the CommCell Browser, right-click the client computer that has Exchange
Mailbox Archiver Agent installed.
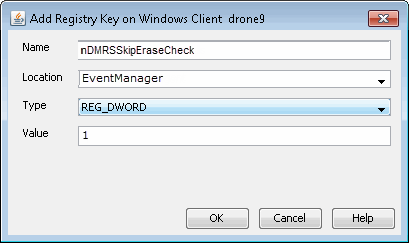
By default during each stub recall operation a check is run to verify if the
original data has been erased from the media. In case the Erase Data feature is
not enabled on the CommServe you can create the nDMRSSkipEraseCheck key to skip
the erase check and enhance the recall speed.
From the CommCell Browser, right-click the client computer that has Exchange
Mailbox Archiver Agent installed.
By default if the primary copy of the data is unavailable the stub
recall will fail. However you can configure to trigger stub recall from an
alternate data copy as follows:
In the Comcell Browser double-click the Control Panel.
Click the Browse/Search/Recovery option.
Select the Automatically switch copy to read data from any copy
option.
Several options are available for streamlining archive and recovery
operations. Benefits include faster archive and recovery speed, reduced
network bandwidth usage, and end-user computer resources. These options are
described in the following sections.
By default, the Exchange Mailbox Archiver Agent cycles through each
message in a mailbox to determine if the archiving rules have been met,
which may cause certain archive operations to take a considerable amount of
time to complete. The Exchange Mailbox Archiver Agent can be configured to
take advantage of Exchange's own message cataloging to increase archiving
speed as follows:
From the CommCell Browser, right-click the client computer that has Exchange
Mailbox Archiver Agent installed.
By default, stub recalls will time out if the recall is not successfully
processed within 2 minutes (such as cases where the media is not loaded within
that time). You can extend this timeout value up to 10 minutes by configuring the
following registry key. This key must be configured as follows:
If a proxy computer is used, this key is configured on the server
containing the OWA Proxy Enabler as well as the Outlook client.
If a proxy computer is not used, this key is configured only on the
Outlook client.
From the CommCell Browser, right-click the client computer as described
above.
Click Properties.
Select Registry Key Settings.
Click Add.
Enter
SocketTimeout
in the Name field.
Enter
MSExchangeDMAgent
in the Location field.
From the Type list, select REG_DWORD.
Enter the number of seconds after which the recall will time out. The
valid range is 120-600 seconds.
A Comma Separated Value Directory Exchange (CSVDE)
filtering option is provided to increase performance for auto-discovery
operations in cases where the discovery process may take a long time to
complete.
A CSVDE filtering example is provided below, which will filter out system
mailboxes residing on the SERVERNAME server from discovery operations for
these agents:
Use of this option requires expert-level knowledge of CSVDE,
which is a Microsoft tool used for extracting and filtering information from
Active Directory. Familiarity with constructing LDAP queries is beneficial for
successful filtering. Incorrect use of the CSVDE filtering option can result in
failed discovery and data protection operations. For more information on CSVDE,
refer to documentation from Microsoft Corporation.
From the CommCell Browser, right-click the Exchange Mailbox
Archiver client, and then click Properties.
Select the Use CSVDE
For Discovery checkbox, and then specify the desired CSVDE filter in the
Use CSVDE for Discovery box.
Click OK.
The next time a discovery operation is run, the user-specified CSVDE filter will be used.
It may be necessary to specify additional domain names for Archives in the
following circumstances:
The Exchange Server is installed in a different domain from the schema
master.
Multiple domain controllers exist that may not replicate to each other.
To ensure complete protection in these circumstances, perform the following.
From the CommCell Browser, right-click the Exchange Mailbox Archiver client, and
then click Properties.
Click the AD Server tab.
To include a domain name, click Add.
In the AD Server box, type the domain name. You can enter an IP
address or the fully-qualified domain name of the Active Directory Server.
Depending on the circumstances discussed above, the domains to include
should be:
The schema master, or
Each domain controller in your environment
Click
OK. The domain name will appear in the AD Server List.
Repeat the previous step for each domain name that you wish to include.
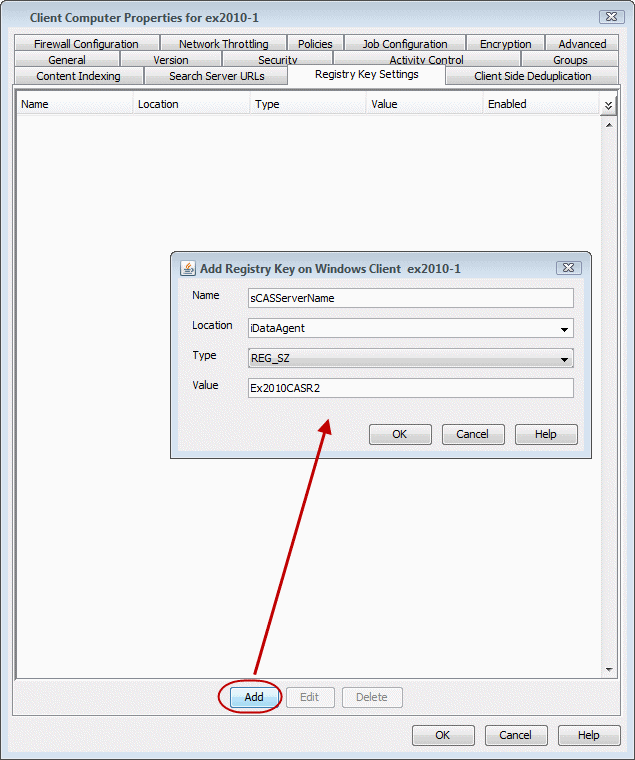
When archiving Exchange 2010 Database Availability Group (DAG) servers, you
need to configure the Mailbox and Client Access Server (CAS) roles as described
below.
From the CommCell Browser, right-click the Exchange
Mailbox Archiver Agent and click Properties.
In Exchange Server Name, enter the Mailbox server role. This role
is used when performing archive and recovery operations. If more than one role
is entered, separate them with semi-colons.
Click
OK.
Configuring Mailboxes when the CAS Role is not installed on the Mailbox Role
Server
In addition to the steps above, the following steps are required if the CAS
Role is not installed on the Mailbox Role Server.
From the CommCell Browser, right-click the client computer that has Exchange
Mailbox iDataAgent installed.
Use one of the following methods to filter mailboxes from being archived.
Filters assist in minimizing usage of protected storage and prevents
unnecessary folders (Junk, Spam) from being archived.
You can also apply regular expressions or wildcards patterns to filter
folders in mailboxes from data protection. For example, you may want to
exclude all Sent Items folders that are not essential for recovery. The
pattern you enter will be applied to all content defined for the subclient.
wildcard examples
example
description
Sent*
To filter out a folder which
begins with
Sent, specify the name of the folder and the asterisk *
wildcard with no delimiters.
Sent Items\test*
To filter out a subfolder
called test, specify the full path including the leader \
backslash.
*\test*
To filter out any path that
ends in a folder name, use the full path including the leader \
backslash and the asterisk * wildcard for the first level.
From the CommCell Browser, navigate to Client Computers | <Client> | Archive Set.
Right-click the Subclient, and then click
Properties.
Click the Filters tab.
Click Add next
to Exclude the folders that contain the following patterns.
Type the regular expressions or wildcard patterns, each on a separate line. For a
comprehensive wildcard list, see
Wildcards.
By default, mailboxes not included in a user-defined subclient are not
automatically included in archive operations. However, you can configure the
default subclient to include any discovered mailbox not included in another
subclient as follows:
From the CommCell Browser, navigate to Client Computers | <Client> | Archive Set.
Right-click the Subclient, and then click
Properties.
Click the Auto-discovery tab.
Select the Automatically add
new mailboxes that do not qualify for membership in
any of the subclients check box.
There are several configurable properties available for your agent that can be
modified from the agent, archiveset or subclient level as per your need.
It is recommended that that you do not modify the properties of a subclient when a job is in progress for that specific subclient. If
a job is in progress, either wait for the job to complete or kill the job from the
Job Controller.
The following table describes the properties that can be configured from the agent,
archive set and subclient levels.
Option
Description
Related topics
Change the Profile
Name
By default if the profile name is changed in the Exchange server it is
not reflected in the Exchange Mailbox Archiver Agent. However the
profile name can be manually changed for the archiver agent as follows:
From the CommCell Browser, navigate to Client Computes|
<Client>.
Right-click the Exchange Mailbox Archiver, and then click Properties.
In the Profile Name box, type the profile name.
Click OK.
Change the Mailbox
Name
By default if the Mailbox name is changed in the Exchange server it is
not reflected in the Exchange Mailbox Archiver Agent. However the
Mailbox name can be manually changed for the archiver agent as follows:
From the CommCell Browser, navigate to Client Computes|
<Client>.
Right-click the Exchange Mailbox Archiver, and then click Properties.
In the Mailbox Name box, type the mailbox name.
Click OK.
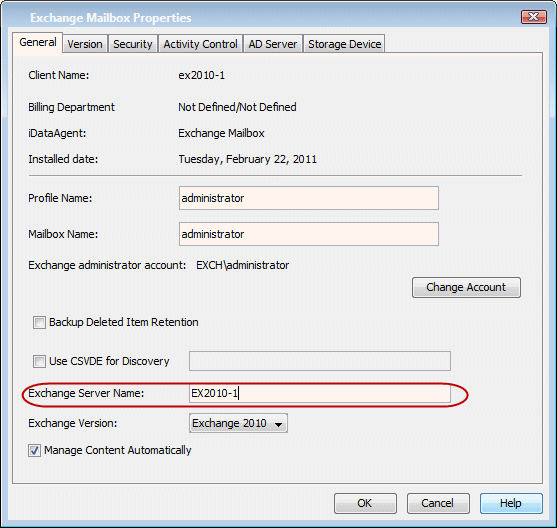
Change the Exchange Server
Name
You can modify the name of the Exchange Server that is installed on the
client computer. However, the Exchange
server name should not be the same as Client or Host Name.
From the CommCell Browser, navigate to Client Computes|
<Client>.
Right-click the Exchange Mailbox Archiver, and then click
Properties.
In the Exchange Server Name box, type the Exchange Server
name.
Click OK.
Change the Exchange Version
You can select and modify the version of the Exchange Server from the
list.
You can modify the name of the Exchange Server that is installed on the
client computer. However, the Exchange
server name should not be the same as Client or Host Name.
From the CommCell Browser, navigate to Client Computes|
<Client>.
Right-click the Exchange Mailbox Archiver, and then click
Properties.
In the ExchangeVersion list, select the Exchange
server version.
Click OK.
Change User Account Details
You must have Exchange administrator privileges to access the Exchange Server and
perform Archive and restore operations.
In the case of Archive and restore operations from the CommCell Console,
the user credentials to access the Exchange Server are provided initially
when you installed the Agent. You can modify the user credentials from CommCell
Console.
On Windows clients, use
<domain>\<administrator_name>
To change the Exchange administrator account information associated
with this agent:
From the CommCell Browser, navigate to Client Computes|
<Client>.
Right-click the Exchange Mailbox Archiver, and then click
Properties.
Click Change Account.
In Exchange Administrator Account
box type the
Account name.
Inthe Password box, type Password
In the Confirm Password box, type the password again.
Click OK.
Rename Archive Set and Subclient
You can rename a Archive set and subclient:
Renaming Archive sets:
From the CommCell Browser, navigate to Client Computes|
<Client> | Exchange Mailbox Archiver.
Right-click the Archive set, and then click Properties.
In the Archive Set box, type the Archive set name.
Click OK.
Renaming subclients:
From the CommCell Browser, navigate to Client Computes|
<Client> | Exchange Mailbox Archiver.
Right-click the Subclient, and then click Properties.
In the Subclient name box, type the subclient name.
Click OK
Change Storage Policies
You can modify the
storage policies in any of the following situations:
To include a different media for the backup operation.
To use a storage policy with a different retention criteria.
You can change the storage policies from the subclient level.
From the CommCell Browser, right-click the subclient.
Click Properties.
Click Storage Device.
Select the Storage policy from the drop-down menu.
You can efficiently configure the available resources for transferring data secured
by data protection operations from the subclient level. This includes the following:
Enable or disable Data Compression either on the client or the MediaAgent.
Configure the transfer of data in the network using the options for Network
Bandwidth Throttling and Network Agents.
You can configure the data transfer options.
From the CommCell Browser,right-click the subclient.
Click Properties.
Click Storage Device.
Click Data Transfer Option tab.
Choose the appropriate software compression option for this subclient.
Select Throttle Network Bandwidth and set the required bandwidth.
You can view the data paths associated with the primary
storage policy copy of the selected storage policy or incremental storage
policy. You can also modify the data paths including their priority from
the subclient level.
From the CommCell browser, right-click the subclient.
Click Properties.
Click Storage Device.
Select Storage Policy from the drop-down menu.
Click Data Paths.
Configure a Subclient for Pre/Post Processing of Data
Protection
You can add, modify or view Pre/Post processes for the
subclient. These are batch files or shell scripts that you can run before
or after certain job phases.
From the CommCell Browser, navigate to Client Computes|
<Client> | Exchange Mailbox Archiver | Archive
set.
Right-click the Subclient, and then click Properties.
Click the Pre/Post Process tab.
Click one of the following phases and type the full path of the
process that you want to execute during that phase. Alternatively, click
Browse to locate the process (applicable only for paths that
do not contain any spaces).
Pre-Archive
Post-Archive
Click OK.
Select Run Post archive Process for all attempts to run a
post archive process for all attempts.
For subclients on Windows platforms, Run As displays
Not Selected.
If you want to change the account that has permission
to run these commands, click Change.
In the User Account dialog box, select Use Local System
Account, or select Impersonate User and enter the user
name and password. Click OK.
If you selected Local System Account, click OK to the
message advising you that commands using this account have rights
to access all data on the client computer.
You can configure user security from the agent or subclient
level.
You can perform the following functions:
Identify the user groups to which this CommCell object is associated.
Associate this object with a user group.
Disassociate this object from a user group.
From the CommCell browser, right-click the subclient.
Click Properties.
Click Security.
Select the appropriate user groups to
which you want to associate to the CommCell object from the Available
Groups pane, and then move the user group to the Associated Groups
pane.
You can enable data encryption from the suclient level.Encryption must be enabled at the client level prior to configuring any
instances residing on that client.
From the CommCell browser, right-click the subclient.
The Version tab, at the Agent level displays the
software version of
the component.
From the CommCell browser, right-click the agent.
Click Properties.
Click Version.
Click OK.
CommCell Configuration Report
The CommCell Configuration Report provides the properties of the
CommServe, MediaAgents, clients, agents, SRM agents, subclients, and
storage policies within the CommCell based on the selected filter
criteria.
The following sections describe the steps involved in deleting an agent,
Archive set or subclient.
When you delete an instance or archiveset,
the associated data is logically deleted and you can no longer access the
corresponding data from CommCell Console for recovery purposes.
You need to uninstall or deconfigure the agent software from the client
computer before deleting from CommCell Browser. After you delete the client software, you can either leave the corresponding
data
intact for appropriate action or you can remove the data immediately. If you choose
to remove the data immediately, you must delete the agent from the CommCell
Browser. If you delete the agent, all of the agent's data is irretrievably
lost.
You cannot delete an agent while operations for that agent are
running.
From the CommCell Browser, navigate to Client Computers | <Client>.
Right-click the <Agent>, and then click Delete.
A confirmation message is displayed with the following message:
This operation will permanently delete the data
backed up from this level and it cannot be restored.
Click OK to continue with the deletion operation., or click No to
abort the deletion.