By default, Deleted Item Retention folders are not included in backups.
In some cases, it may be desirable to include them for record keeping
purposes. This can be accomplished as follows:
There are several configurable properties available for your agent that can be
modified from the agent, backup set or subclient level as per your need.
It is recommended that that you do not modify the properties of a subclient when a job is in progress for that specific subclient. If
a job is in progress, either wait for the job to complete or kill the job from the
Job Controller.
The following table describes the properties that can be configured from the agent,
backup set and subclient levels.
| Option |
Description |
Related topics |
| Change the Profile
Name |
You can modify the profile that is associated with the appropriate
Administrator Public Folder.
- From the CommCell browser, navigate to
Client Computers | <Client> | iDataAgent.
- Right-click the iDataAgent and click Properties.
- Select General tab.
- Type the Profile Name.
- Type the Mailbox Name.
- Click OK.
|
|
| Change the Exchange Server
Name |
You can modify the name of the Exchange Server that is installed on the
client computer. However, the Exchange
server name should not be the same as Client or Host Name.
- From the CommCell browser, navigate to
Client Computers | <Client> | iDataAgent.
- Right-click the iDataAgent and click Properties.
- Select General tab.
- Type the Exchange Server Name.
- Click OK.
|
|
| Change Account |
You can change the Exchange administrator account information associated with this agent.
- From the CommCell browser, navigate to
Client Computers | <Client> | iDataAgent.
- Right-click the iDataAgent and Click Properties.
- Select General tab.
- Click Change Account.
- Type the
Account name in Exchange Administrator Account
box.
- Type the Password in Password box.
- Type the password again in Confirm Password box.
- Click OK.
|
|
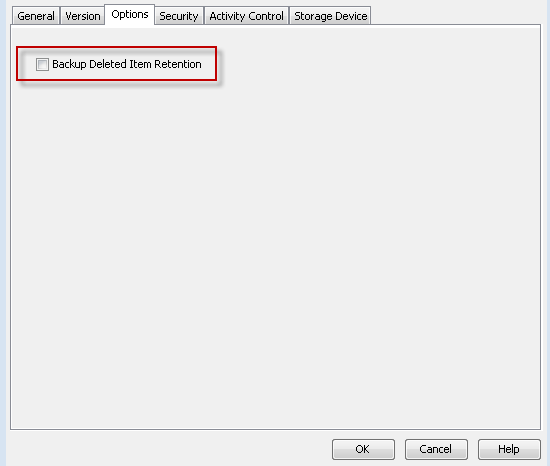
| Backup Deleted Item
Retention |
You can choose to backup the Deleted Item Retention folder.
- From the CommCell browser, navigate to
Client Computers | <Client> | iDataAgent.
- Right-click the iDataAgent and Click Properties.
- Select General.
- Select Backup Deleted Item Retention check box.
- Click OK.
|
|
| Change the Exchange Version |
You can select and modify the version of the Exchange Server from the
list.
- From the CommCell browser, navigate to
Client Computers | <Client> | iDataAgent.
- Right-click the iDataAgent and Click Properties.
- Select a version from the Exchange Version list.
- Click OK.
|
|
| AD Server |
This feature allows you to to specify the domain name of one or more
Exchange Servers containing public folders and accounts that reside in a
non-default domain or in multiple domains.
- From the CommCell browser, navigate to
Client Computers | <Client> | iDataAgent.
- Right-click the iDataAgent and Click Properties.
- Select AD Server tab. The AD Server list displays the domain names of one or more
non-default exchange servers.
- Click Add to include the domain name of a non-default
exchange server.
- Click Delete to remove the domain name of a non-default
exchange server.
- Click OK.
|
|
| Rename Backup Set and Subclient |
You can rename a backup set and subclient:
Renaming backup sets:
- From the CommCell browser, navigate to
Client Computers | <Client> | iDataAgent |
Backup Set.
- Right-click the backup set and then click
Properties.
- Type the new name in the Backup Set field.
- Click OK.
Renaming subclients:
- From the CommCell browser, navigate to
Client Computers | <Client> | iDataAgent |
Backup Set | <user-defined Subclient>.
- Right-click the subclient and then click
Properties.
- Type the new name in the Subclient name field.
- Click OK.
|
|
| Change Storage Policies |
You can modify the
storage policies in any of the following situations:
- To include a different media for the backup operation.
- To use a storage policy with a different retention criteria.
You can change the storage policies from the subclient level.
- From the CommCell Browser, right-click the subclient.
- Click Properties.
- Click Storage Device.
- Select the Storage policy from the drop-down menu.
- Click OK.
|
Refer to
Storage Policies. |
| Data Transfer Options |
You can efficiently configure the available resources for transferring data secured
by data protection operations from the subclient level. This includes the following:
- Enable or disable Data Compression either on the client or the MediaAgent.
- Configure the transfer of data in the network using the options for Network
Bandwidth Throttling and Network Agents.
You can configure the data transfer options.
- From the CommCell Browser,right-click the subclient.
- Click Properties.
- Click Storage Device.
- Click Data Transfer Option tab.
- Choose the appropriate software compression option for this subclient.
- Select Throttle Network Bandwidth and set the required bandwidth.
- Click OK.
|
Refer
to
Data
Compression and
Network Bandwidth Throttling. |
| View Data Paths |
You can view the data paths associated with the primary
storage policy copy of the selected storage policy or incremental storage
policy. You can also modify the data paths including their priority from
the subclient level.
- From the CommCell browser, right-click the subclient.
- Click Properties.
- Click Storage Device.
- Select Storage Policy from the drop-down menu.
- Click Data Paths.
|
|
| Configure a Subclient for Pre/Post Processing of Data
Protection |
You can add, modify or view Pre/Post processes for the
subclient. These are batch files or shell scripts that you can run before
or after certain job phases.
- From the CommCell browser, navigate to
Client Computers | <Client> | iDataAgent.
- Right-click the iDataAgent and Click Properties.
- Click Properties.
- Click Pre/Post Process.
- Click one of the following phases and type the full path of the
process that you want to execute during that phase. Alternatively, click
Browse to locate the process (applicable only for paths that
do not contain any spaces).
- PreBackup Process
- PostBackup Process
- Click OK.
- Select Run Post Backup Process for all attempts to run a
post backup process for all attempts.
- For subclients on Windows platforms, Run As displays
Not Selected.
If you want to change the account that has permission
to run these commands, click Change.
- In the User Account dialog box, select Use Local System
Account, or select Impersonate User and enter the user
name and password. Click OK.
- If you selected Local System Account, click OK to the
message advising you that commands using this account have rights
to access all data on the client computer.
|
Refer to Pre/Post Processes. |
| Configure Activity Control |
You can enable backup and restore operations from the agent and subclient level.
However, you can enable restore operations only from the agent level.
- From the CommCell browser, right-click the subclient.
- Click Properties.
- Click Activity Control, select or clear option(s) as desired.
- Click OK.
|
Refer
to
Activity
Control. |
| Configure User Security |
You can configure user security from the agent or subclient
level.
You can perform the following functions:
- Identify the user groups to which this CommCell object is associated.
- Associate this object with a user group.
- Disassociate this object from a user group.
- From the CommCell browser, right-click the subclient.
- Click Properties.
- Click Security.
- Select the appropriate user groups to
which you want to associate to the CommCell object from the Available
Groups pane, and then move the user group to the Associated Groups
pane.
- Click OK.
|
Refer to User Administration
and Security. |
| Enable/Disable Data Encryption |
You can enable data encryption from the suclient level.Encryption must be enabled at the client level prior to configuring any
instances residing on that client.
- From the CommCell browser, right-click the subclient.
- Click Properties.
- Click Encryption.
- Select the desired encryption.
- Click OK.
|
Refer
to
Data Encryption. |
| View Software Version |
The Version tab, at the Agent level displays the
software version of
the component.
- From the CommCell browser, right-click the agent.
- Click Properties.
- Click Version.
- Click OK.
|
|
| CommCell Configuration Report |
The CommCell Configuration Report provides the properties of the
CommServe, MediaAgents, clients, agents, SRM agents, subclients, and
storage policies within the CommCell based on the selected filter
criteria.
- From the CommCell browser, click Reports icon.
- Select CommCell Configuration.
- Click Run.
|
Refer
to
CommCell
Configuration. |
The following sections describe the steps involved in deleting an agent,
backup set or subclient.
You need to uninstall or DeConfigure the agent software from the client
computer before deleting from CommCell Browser. After you delete the client software, you can either leave the corresponding
data
intact for appropriate action or you can remove the data immediately. If you choose
to remove the data immediately, you must delete the agent from the CommCell
Browser. If you delete the agent, all of the agent's data is irretrievably
lost.
 The
Exchange Public Folder iDataAgent
uses the following entities to manage backup and restore operations from the CommCell Console.
The
Exchange Public Folder iDataAgent
uses the following entities to manage backup and restore operations from the CommCell Console.