You can use wildcards in subclient contents (e.g. *.doc, *.docx, *.xls, *.xlsx
etc.) to filter file groups from the client backups. This is useful to limit the
scope of collection/managed data from laptops.
Use the following steps to define wildcards in subclient policies:
From the CommCell Console, navigate to Policies | Subclient Policies
| <Subclient Policies>.
Right-click the Subclient Template displayed in the right
pane and click Properties.
Click Content tab.
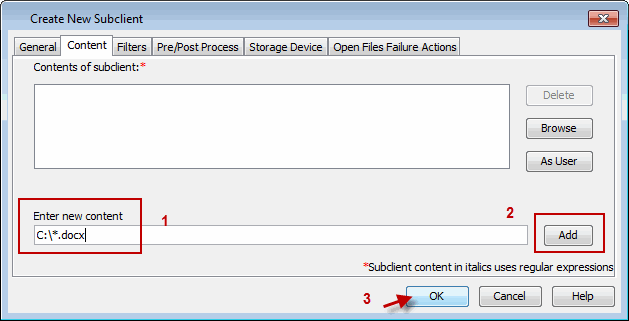
To use wildcards, in the Enter new content box, type the path
of the file or folder with wildcard character. For example:
*.docx
C:\**\.doc
D:\**\*.jpeg
C:\temp\doc*
C:\temp\doc*\**
Click Add. The content gets added under the Contents of
Subclient.
Repeat step 4-5, if you want to add more files and/or
folders for the backup.
Click OK.
If you modified the content path using
wildcards, make sure to perform a full backup.
Setup a schedule for Automatic Updates of a software to ensure that the software
is up-to-date on the laptops. Follow the steps given below to setup a schedule for
automatic updates:
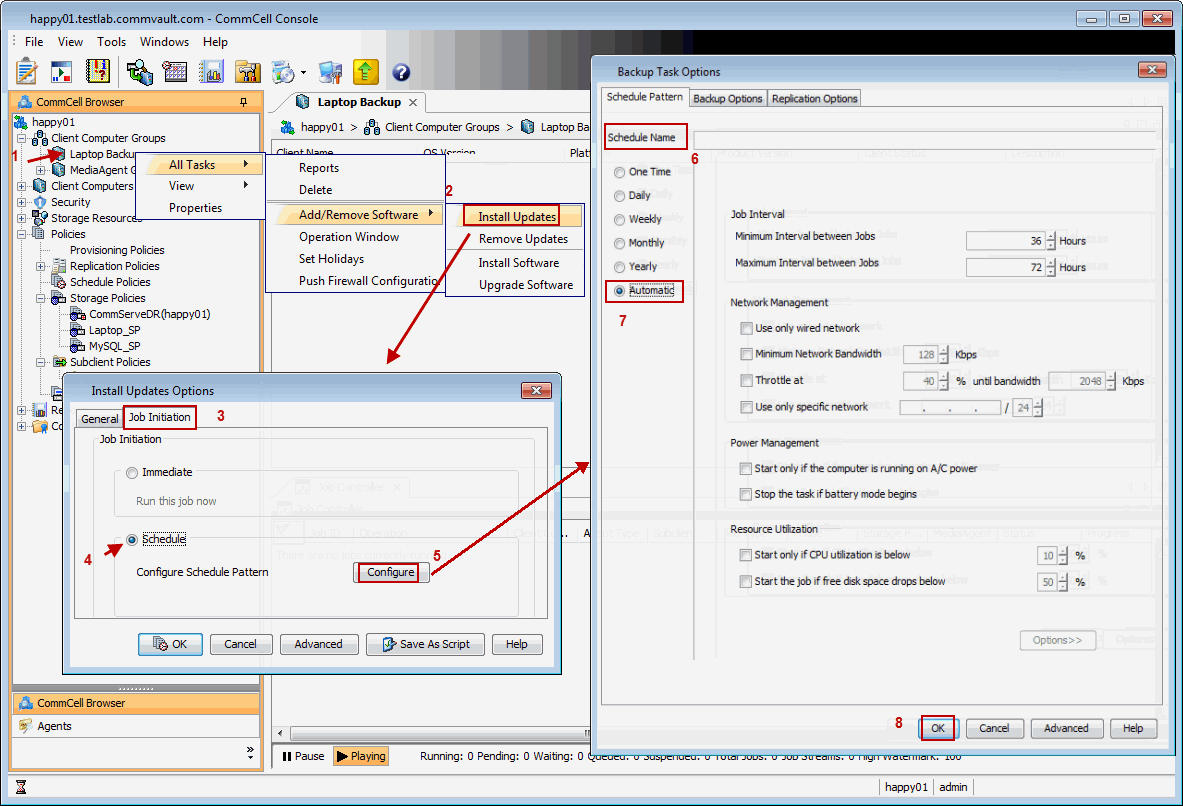
From the CommCell Console, navigate to Client Computer Groups
| <laptop group>.
Right-click the <subclient policy> and navigate to All Tasks
| Add/Remove Software and then click Install Updates.
Select Ignore Running Jobs to install updates on laptops
if you have critical backup updates or service pack to be installed
prior to running backup jobs.
Select Job Initiation tab.
Select Schedule, click Configure button.
Specify name in Schedule Name box for automatic updates
schedule.
Select Automatic option.
It is recommended to specify 3 weeks
for Minimum Interval between Job and 4 weeks for
Maximum Interval between Job.
The default backup set for all clients will be associated to a subclient policy
provided during custom package creation. If you wish to modify the content of a
subclient backup set associated with the subclient policy, you can disassociate
the client from the subclient policy and modify the content of the subclient.
Use the following steps to disassociate the client from a subclient policy and
modify the content of the subclient:
From the CommCell Console, navigate to Policies | Subclient
Policies.
Right-click the <subclient policy> and click Properties.
Select Association tab.
Expand the <client> and clear the BackupSet checkbox for
which you wish to change the association.
Click OK.
You client is now disassociated from the Subclient
Policy.
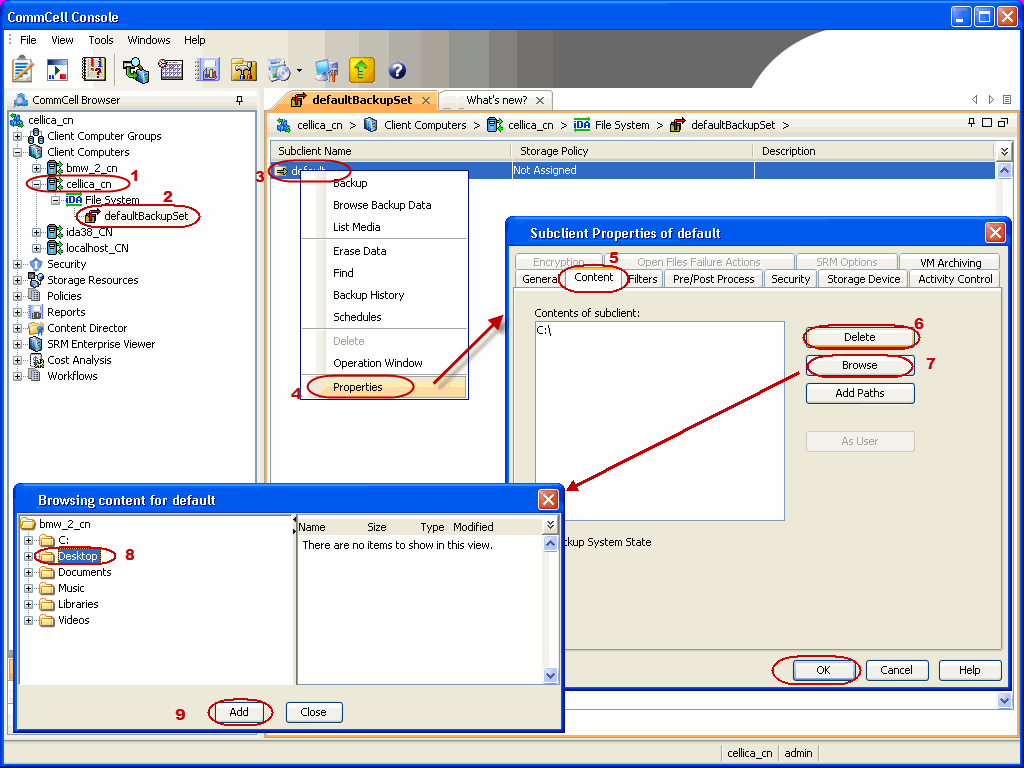
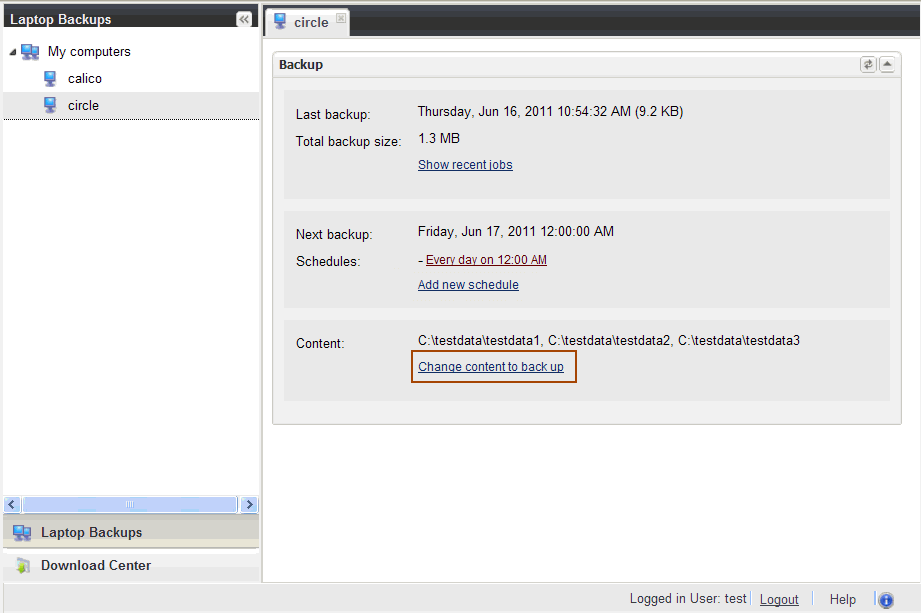
From the CommCell Console, navigate to <client computer> | File
System | defaultBackupSet right-click default subclient and
click Properties.
Select Content tab.
Select the content (e.g., E:\ or
\Music) in the Contents of subclient
and click Delete.
Click Browse and select the required content (e., Documents)
in Browsing content for default window.
Click Add.
Click Yes in the Warning window and then click Close.
Source-Side deduplication is not enabled by default, if you have installed a
laptop backup package prior to 9.0 SP3. It is recommended to enable this option
to facilitate faster backups of laptops. Use the following steps to enable source
side deduplication:
From the CommCell Browser, navigate to Client Computers |
<Client>.
Right-click the client and click Properties.
In the Client Properties dialog box, click the Client
Side Deduplication tab.
Select the Perform client side Deduplication and Enable
Client Side Disk Cache check boxes.
The network traffic for Clients and MediaAgents can be throttled based on the
network bandwidth in your environment. This is useful to regulate network
traffic and minimize bandwidth congestion.
By default, network throttling is disabled. You can enable the throttling
options for an individual client, a client group consisting multiple clients, or a
MediaAgent. Once configured, the throttling options are applied to all data
transfer and control message operations, such as Data Protection operations
including Laptop Backups, Copy operations including DASH copy, Data Recovery
Operations, etc.
The throttling values setup in the throttling rule regulates the rate at
which the data is sent and received.
You can also setup relative bandwidth throttling to ensure performance when the client
machine connects with limited bandwidth. Multiple rules can be created for same client/client group, however the lowest values
set up in different rules takes precedence for each time that intersects.
Use the following steps to set up network throttling options for Client Computer Group
and thereafter disable throttling from the automatic schedules:
From the CommCell Browser, expand Client Computers.
Right-click the <Client_Computer_Group> and then click
Properties.
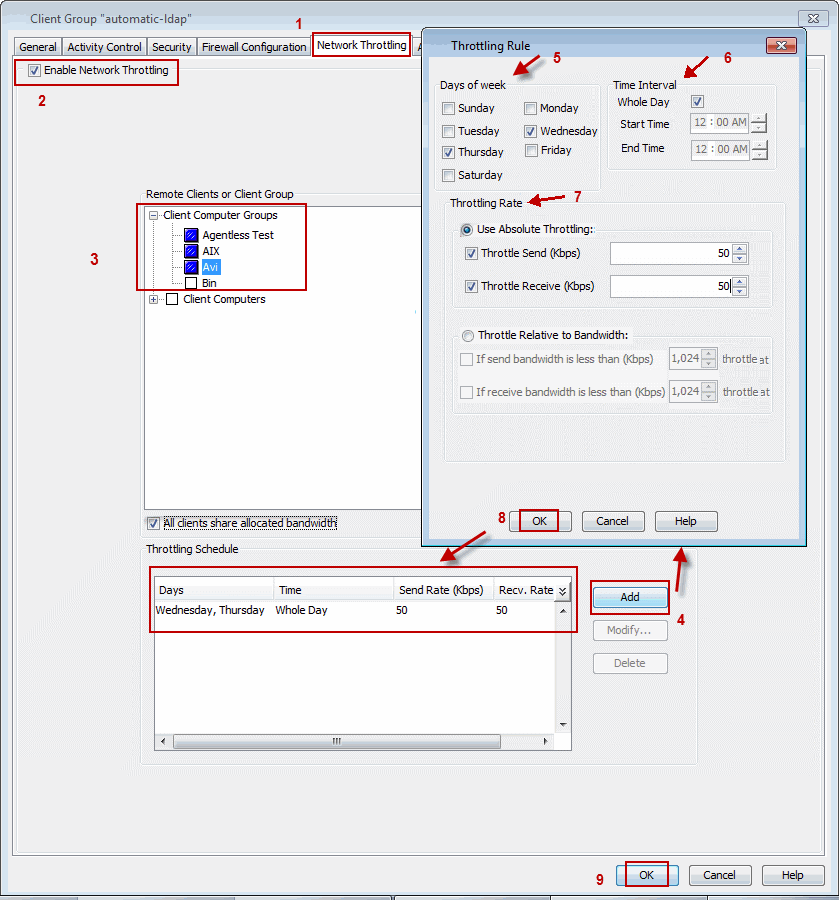
Click the Network Throttling tab.
Select Enable Network Throttling check box.
Under Client Computer Groups, select client computer groups
to setup throttling.
By default, All clients share allocated bandwidth check
box is selected to share the throttling settings among all selected
clients cumulatively.
If this check box is cleared, each client
will throttle at the configured rate instead of a combined and
shared rate.
Click Add to setup throttling rules.
If you have setup relative throttling
at the Schedule Policy level, make sure to note down the values
specified there and Disable Throttling on the Schedule Policy.
In Days of Week select a day or multiple days for the schedule
to run.
In Time Interval select whole day or a specific time interval
for the schedule to run.
Select one of the following under Throttling Rate:
Use Absolute Throttling Select
Throttle Send and/or
Throttle Receive
rate and enter appropriate values for each to throttle at the
specified speed irrespective of the available bandwidth.
Throttle Relative to bandwidth
Select If send bandwidth is less than (Kbps) to specify a
minimum bandwidth required for send throttling to take affect and
then specify the percentage rate to throttle the network bandwidth
when the minimum bandwidth is available.
Select If receive bandwidth is less than (Kbps) to
specify a minimum bandwidth required for receive throttling to take
affect and then specify the percentage rate to throttle the network
bandwidth when the minimum bandwidth is available.
If the throttle bandwidth is higher than the amount specified
in Kbps, then the job will run without throttling.
Click OK. The newly added throttling rules will be displayed in Throttling
Schedule.
Click OK.
From the CommCell Browser, navigate to Client Computer Groups
| <Client_Computer_Group> | All Tasks and click Push Firewall
Configuration.
Throttling options must be disabled at the Schedule Policy level so that the
throttling values specified in the Client/Client group level takes affect.
Use the following steps to disable network throttling options for an automatic
schedule.
From the CommCell Console, navigate to Policies | Schedule
Policies.
Right-click the <laptop schedule policy> and click Edit.
Select <schedule task> displayed in the Tasks and
then click Edit button.
In the Network Management area, clear the
following options if selected.
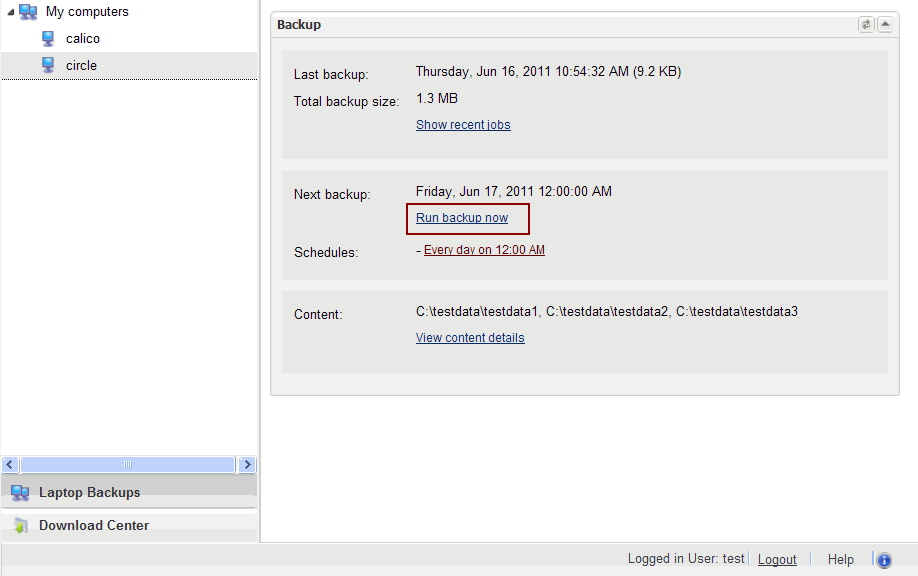
An automatic backup schedule can be created to automatically run a backup
within a specified time. It can also be scheduled to run when the resources,
such as network, power and CPU usage are met. The following sections provide
information on configuring different resource management options available to
schedule a job.
Automatic backup schedule does not
perform synthetic full backups.
You can schedule a job to run backups only if the computer is on AC power
(not battery power). Additionally, you can set an option to stop the backup job
if the computer is switched to battery power. If both this options are set for
automatic schedule, then your backups will only run when the computer is on AC
power.
Use the following procedure to schedule a job depending up on the power
management of laptops.
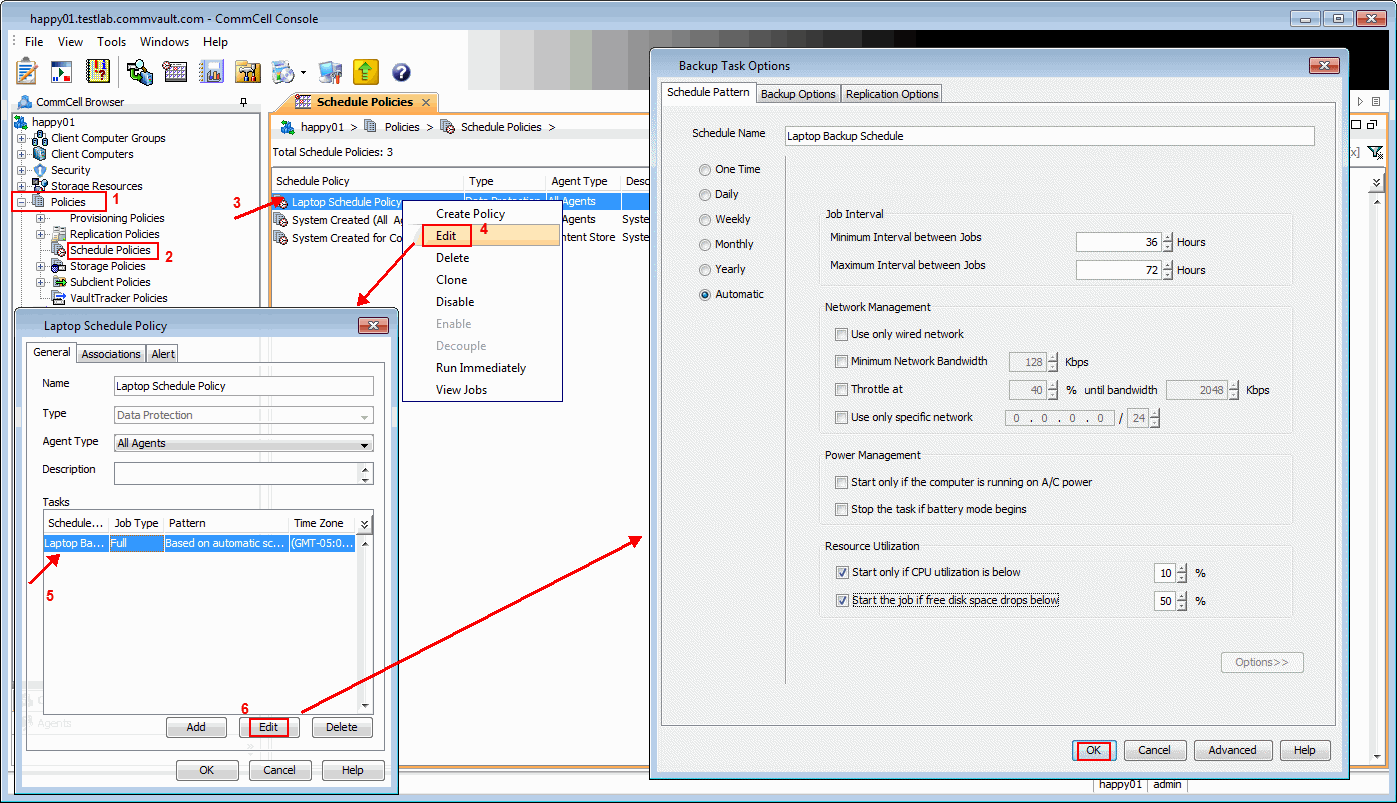
From the CommCell Console, navigate to Policies | Schedule
Policies.
Right-click the <laptop schedule policy> and click Edit.
Select <schedule task> displayed in the Tasks and
then click Edit button.
In the Power Management area, select one the following options:
Select Start only if the Computer is running on A/C power
box, to run the job only when the computer is on A/C power.
Backups continue to occur when your computer is running on A/C
power.
Select Stop the task if battery modebegins box,
backup job will not occur when the laptop is running on battery
power.
Use the following procedure to schedule a job depending upon the CPU and the
disk usage.
From the CommCell Console, navigate to Policies | Schedule
Policies.
Right-click the <laptop schedule policy> and click Edit.
Select <schedule task> displayed in the Tasks and
then click Edit button.
In the Resource Utilization area, select one of the following
options:
Select Start only if CPU usage percentage is below box,
specify the amount to run the job when CPU utilization is
below the specified percentage.
If the laptop CPU utilization
exceeds this percentage during an automatic backup, then a
backup won't start unless the CPU utilization falls below the
specified percentage.
Select Start only if free disk space percentage drops below
box, specify the amount to run the job when disk space percentage
is below the specified percentage.
If the laptop disk space
exceeds this percentage during an automatic backup, then a
backup won't start unless the disk space percentage falls below
the specified percentage.
The Automatic Client Registration feature is useful when have more than one
CommServe running in your environment. This feature simplifies the client
registration process for laptop clients. You can deploy the same installation
package for all laptops and automatically register each laptop with the
appropriate CommServe of your choice. The list of clients, where you are going
to deploy the installation package, can be administered from a central web
interface.
By default, the following users will be designated as owners of the laptop
(client) and will have privileges to access the Web Console or Backup Monitor
tool.
Active Directory users who are member of Local Administrators group
of the laptop (client).
The Active Directory domain must be the domain name specified in
step 31 during Add a New Domain
Controller.
The user account used while registering a new client with the
Register Me tool.
The user account used to install the Laptop Backup package.
Use the following sections to add or modify additional owners to a laptop.
Use the following steps to associate or disassociate members from an existing
user group to a client computer. This will allow you to manage the members in the
laptop user group.
If necessary you can use the following steps to overwrite the associate user
group available on the client with a given user group.
Right-click the View Sample XML File link and click
Save Link As... or Save Target As... to save the XML file
needed for this task.
Open the .xml file using an XML editor and modify the following
parameters:
clientName - Specify the names of the client computers
that to you want to associate to the user group.
For example:
If you wish to associate user group to client1, client2
and clientx then you must add the following:
<entity>
<clientName>client1</clientName>
<clientName>client2</clientName>
<clientName>clientx</clientName>
</entity>
userGroupName - Specify the user group to which you want
to associate to the client.
For example: If you wish to associate
usergroup1 to the above clients, then you must add the following:
<userGroupName>usergroup1</userGroupName>
associatedUserGroupsOperationType - Indicate one of the
following operation types:
ADD - To associate the User
Group to a Client
DELETE - To disassociate the User Group to a Client
OVERWRITE - To associate the user group mentioned above
and disassociate all the user group available on the client computer.
For example:
If usergroup2 and
usergroup3 are already associated
on client1, and you wish to overwrite
the available user groups with usergroup4.
This operation associates usergroup4
to the client1 and disassociates
usergroup2 and
usergroup3.
Save the file as input.xml.
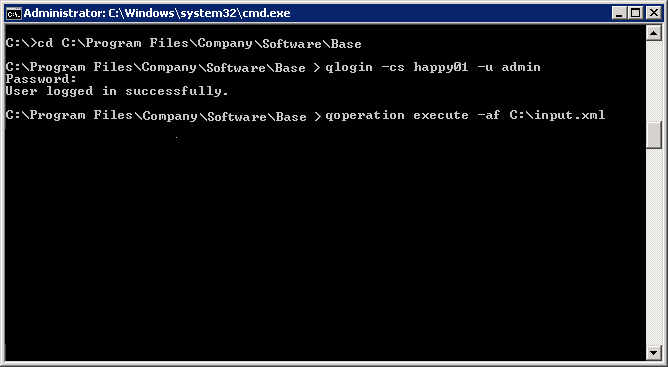
From Command prompt, navigate to <Software_Installation_Directory>/Base
and then run the following command:
Login to the CommServe using the qlogin
command and commcell credentials.
For example, to log on to CommServe
server1 with username
user1:
C:\>qlogin -cs server1 -u user1
Run the XML using the qoperation command.
For example, to
run input.xml
C:\>qoperation execute �af input.xml
You can verify the user group associated to client from Associated
Groups.
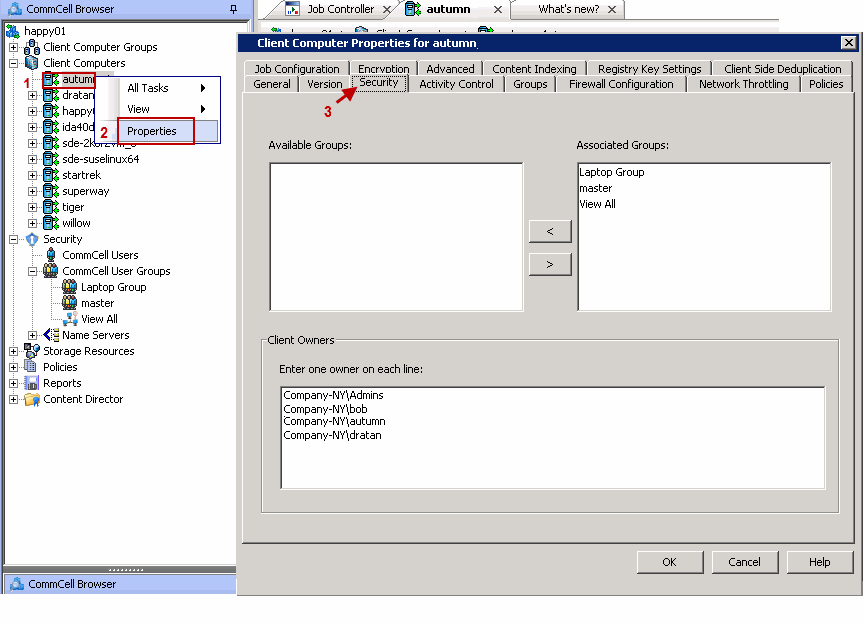
From the CommCell Browser, right-click the <Client> and
then click Properties.
Click Security tab.
The User Group specified above will be listed in the
Associated Groups.
Use the following steps to associate or disassociate members from an existing
user group to a client computer group. This will allow you to manage the members
in the laptop user group.
If necessary you can use the following steps to overwrite the associate user
group available on the client group with a given user group.
Right-click the View Sample XML File link and click
Save Link As... or Save Target As... to save the XML file
needed for this task.
Open the .xml file using an XML editor and modify the following
parameters:
clientGroupName - Specify the names of the client computer
group that you want to associate to the user group.
For example:
If you wish to associate user group to
clientgroup1, clientgroup2
and clientgroupx then your element
will appear as follows:
<entity>
<clientGroupName>clientgroup1</clientGroupName>
<clientGroupName>clientgroup2</clientGroupName>
<clientGroupName>clientgroupx</clientGroupName>
</entity>
userGroupName - Specify the user group to which you want
to associate to the client group.
For example: If you wish to
associate usergroup1 to above client
group, then you must add the following:
<userGroupName>usergroup1</userGroupName>
associatedUserGroupsOperationType - Indicate one of the
following operation types:
ADD - This will associate the
User Group to a Client Computer Group
DELETE - This will disassociate the User Group to a Client
Computer Group
OVERWRITE - To associate the user group mentioned above
and disassociate all the user group available on the client computer
group. For example:
If usergroup2 and
usergroup3 are already associated
on clientgroup1, and you wish to
overwrite the available user groups with
usergroup4. This operation associates
usergroup4 to the
clientgroup1 and disassociates
usergroup2 and
usergroup3.
Save the file as input.xml.
From Command prompt, navigate to <Software_Installation_Directory>/Base
and then run the following command:
Login to the CommServe using the qlogin
command and commcell credentials.
For example, to log on to CommServe
server1 with username
user1:
C:\>qlogin -cs server1 -u user1
Run the XML using the qoperation command.
For example, to
run input.xml
C:\>qoperation execute �af input.xml
You can verify the user group associated to client from Associated
Groups.
From the CommCell Browser, right-click the <Client_Computer_Group>
and then click Properties.
Click Security tab.
The User Group specified above will be listed in the
Associated Groups.
Use the following steps to associate or disassociate user to a client computer.
This will allow user to access the client computer and perform backup and restore
operations. This will assign user as a owner to the client computer and allow to
perform backup and restore operations.
If necessary you can use the following steps to overwrite the user available
on the client with a given user.
Right-click the View Sample XML File link and click
Save Link As... or Save Target As... to save the XML file
needed for this task.
Open the .xml file using an XML editor and modify the following
parameters:
clientName - Specify the names of the client computer
group that you want to associate to the user.
For example: If
you wish to associate user group to client1, client2
and clientx then you must add the following:
<entity>
<clientName>client1</clientName>
<clientName>client2</clientName>
<clientName>clientx</clientName>
</entity>
clientOwners - Specify the user to which you want to
associate to the client.
For example: If you wish to associate
user1 to above clients, then you
must add the following:
<clientOwners>user1</clientOwners>
clientOwnersOperationType - Indicate one of the following
operation types:
ADD - This will associate the user to
a client computer
DELETE - This will disassociate the user to a client computer
OVERWRITE - To associate the user mentioned above and
disassociate all the users available on the client computer. For
example:
If user2 and
user3 are already associated on
client1, and you wish to overwrite
the available users with user4.
This operation associates user4
to the client1 and disassociates
user2 and
user3.
Save the file as input.xml.
From Command prompt, navigate to <Software_Installation_Directory>/Base
and then run the following command:
Login to the CommServe using the qlogin
command and commcell credentials.
For example, to log on to CommServe
server1 with username
user1:
C:\>qlogin -cs server1 -u user1
Run the XML using the qoperation command.
For example, to
run input.xml
C:\>qoperation execute �af input.xml
You can verify the user associated to client from Client Owners.
From the CommCell Browser, right-click the <Client> and
then click Properties.
Click Security tab.
The user specified above will be listed in the Client Owners.
Use the following steps to associate/disassociate user to client computer group.
Once this is done the included user will have access to client computer group
and can backup and restore their data on this client.
Right-click the View Sample XML File link and click
Save Link As... or Save Target As... to save the XML file
needed for this task.
Open the .xml file using an XML editor and modify the following
parameters:
clientName - Specify the client computer groups to which
you want to associate the user.
For example: If you wish to
associate user group to clientgroup1, clientgroup2
and clientgroupx then you must add the following:
<entity>
<clientGroupName>clientgroup1</clientGroupName>
<clientGroupName>clientgroup2</clientGroupName>
<clientGroupName>clientgroupx</clientGroupName>
</entity>
clientOwners - Specify the user to which you want to
associate to the client computer group.
For example: If you wish
to associate user1 to above client,
then your element will appear as follows:
<clientOwners>user1</clientOwners>
clientOwnersOperationType - Indicate one of the following
operation types:
ADD - This will associate the User Group
to a Client Computer Group
DELETE - This will disassociate the User Group to a Client
Computer Group
OVERWRITE - To associate the user mentioned above and
disassociate all the users available on the client computer group.
For example:
If user2 and
user3 are already associated on
clientgroup1, and you wish to overwrite
the available user groups with user4.
This operation associates user4
to the client1 and disassociate
user2 and
user3.
Save the file as input.xml.
From Command prompt, navigate to <Software_Installation_Directory>/Base
and then run the following command:
Login to the CommServe using the qlogin
command and commcell credentials.
For example, to log on to CommServe
server1 with username
user1:
C:\>qlogin -cs server1 -u user1
Run the XML using the qoperation command.
For example, to
run input.xml
C:\>qoperation execute �af input.xml
You can verify the user associated to client from Client Owners.
From the CommCell Browser, right-click the <Client_Computer_Group>
and then click Properties.
Click Security tab.
The user specified above will be listed in the Client Owners.
By default, the following users will be designated as owners of the laptop
(client) and will have privileges to access the Web Console or Backup Monitor
tool.
Active Directory users who are member of Local Administrators group
of the laptop (client).
The Active Directory domain must be the domain name specified in
step 31 during Add a New Domain
Controller.
The user account used while registering a new client with the
Register Me tool.
The user account used to install the Laptop Backup package.
Use the following steps to add user profiles as client owners.
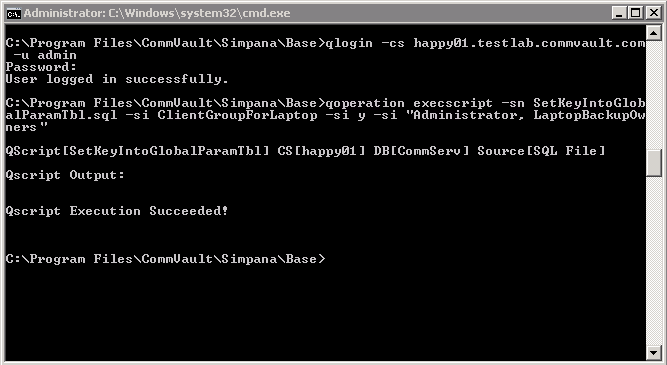
Logon to the CommServe computer.
From the Command prompt, login to the CommServe using the
qlogin command and commcell credentials.
For example, to log on to CommServe server11
with username user1:
C:\>qlogin -cs server1 -u user1
Run the following execscript operation using qoperation:
qoperation execscript -sn SetKeyIntoGlobalParamTbl.sql
-si ClientGroupForLaptop -si y -si "Administrators,EnumUserProfiles"
Where:
Administrators - is the
Administrators group under local group.
EnumUserProfiles - are the user profiles
defined in the laptop.
Make sure to include new groups with the existing
groups
while executing the script. If not the script will
overwrite existing groups with the new group specified
as a value in the script.
By default, the following users will be designated as owners of the laptop
(client) and will have privileges to access the Web Console or Backup Monitor
tool.
Active Directory users who are member of Local Administrators group
of the laptop (client).
The Active Directory domain must be the domain name specified in
step 31 during Add a New Domain
Controller.
The user account used while registering a new client with the
Register Me tool.
The user account used to install the Laptop Backup package.
If you want to designate all the users in a user group as owners of the
laptop (client), follow the steps given below to specify the user group (defined
in the laptop):
Logon to the CommServe computer.
From the Command prompt, login to the CommServe using the
qlogin command and commcell credentials.
For example, use the following command to log on to CommServe server11
with username user1:
C:\>qlogin -cs server1 -u user1
Run the following execscript operation using qoperation:
Usage:
qoperation execscript -sn SetKeyIntoGlobalParamTbl.sql
-si ClientGroupForLaptop -si y -si "Administrators,<group1>,<groupx>"
Where:
<Group1>,<Groupx>:Specify the name of the local user group, whose members will be
added as owner of the laptop (client). You can add multiple local user groups
as input to the script.
Make sure to include new groups with the existing
groups
while executing the script. If not the script will
overwrite existing groups with the new group specified
as a value in the script.
By default, the owners of the laptop (client) will have permissions to perform all operations
from the Web Console and Backup Monitor.
If necessary, you can define specific capabilities to enable user interface
options in the Web Console and Backup Monitor to client owners in the CommCell.
Such capabilities include the following:
For Web Console:
Running backup jobs
Changing content rules
Adding schedules
Conducting browse/restore
For Backup Monitor:
Running backup jobs
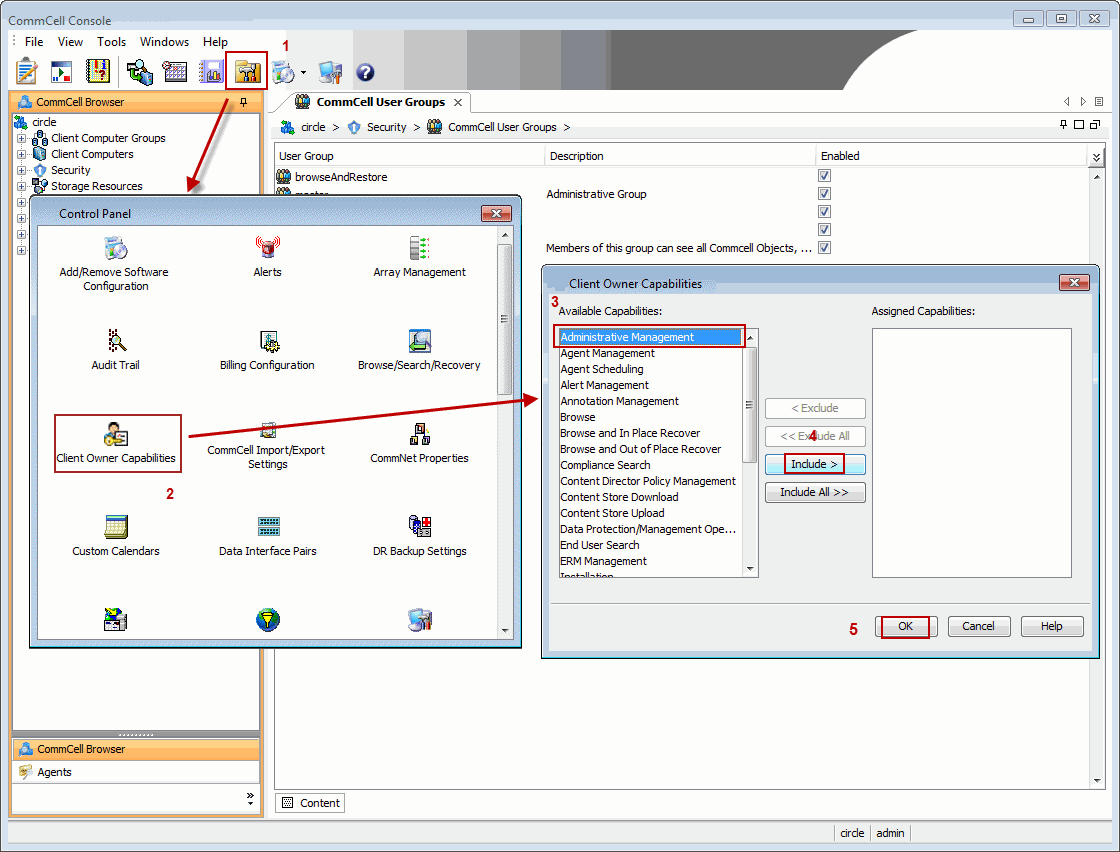
Use the following steps to assign the security rights to the laptop user.
From the CommCell Browser, click Control Panel icon.
From the Control Panel, double-click Client Owner Capabilities.
Select Client Owner capabilities from the Available Capabilities
list box.
Click Include > to move the selected capabilities to the
Assigned Capabilities list box.
Click OK.
The following table provides the list of specific rights that are applicable
to a laptop user.
By default, the laptop users will have permissions to perform all operations
from the Web Console. If you have defined specific rules to enable the user interface
options in Web Console, you can define the download privilege as follows:
From the CommCell Browser, expand the Security node.
Right-click the CommCell User Groups and then click New
User Group.
Specify the user group name in Name box.
Click Capabilities tab.
Select Browse and Out of Place Recover and End User Search
capabilities from the Available Capabilities list box.
Click
> to move the selected capabilities to the Assigned Capabilities
list box.
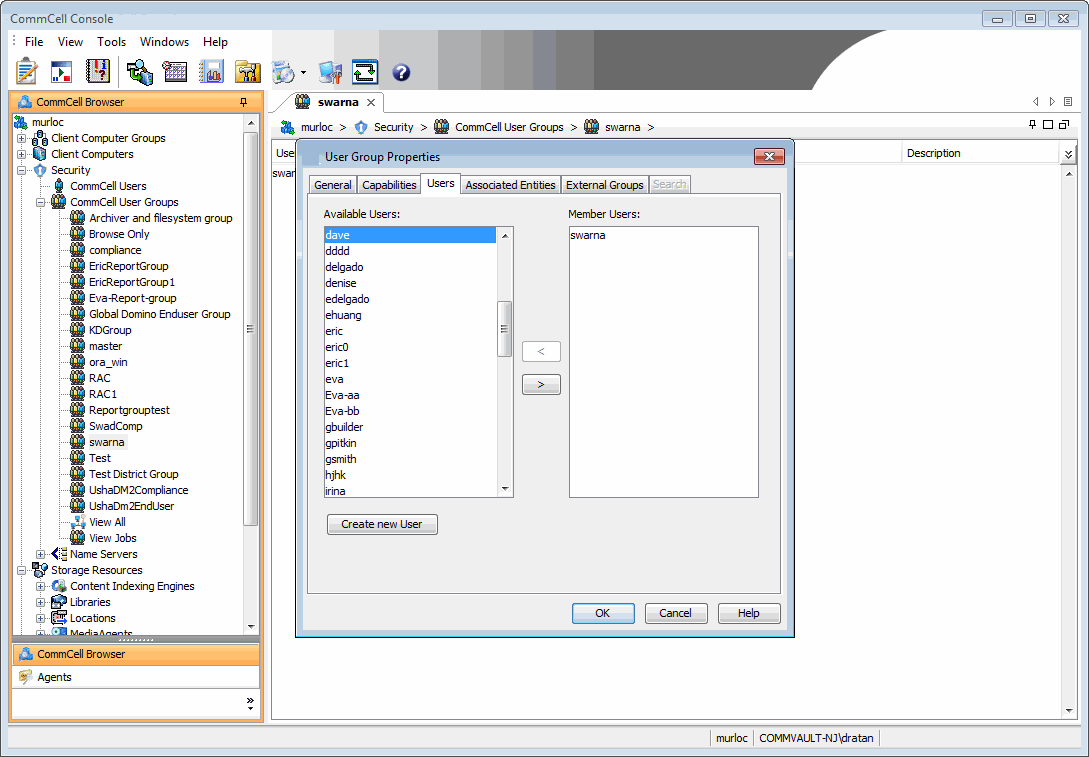
Click Users tab.
Select the existing users available in Available Users list.
Click > to move the selected capabilities to the Member Users
list box.
Use the following steps, to add a new user:
Click Create new User button.
Type name in User Name box.
Type password in Password and Confirm Password
box.
Type name of a user in Full Name box.
Type email address in E-Mail box.
Click OK.
The user will be displayed in the Available Users list.
Repeat step 7 to assign the above user to User Group.
By default, the Backup Monitor tool
button is configured to launch Laptop User Guide documentation directly from the
documentation web site.
However, if you wish to modify the default location to the documentation site
that is hosted on intranet site or on a shared network location, use the
following steps.
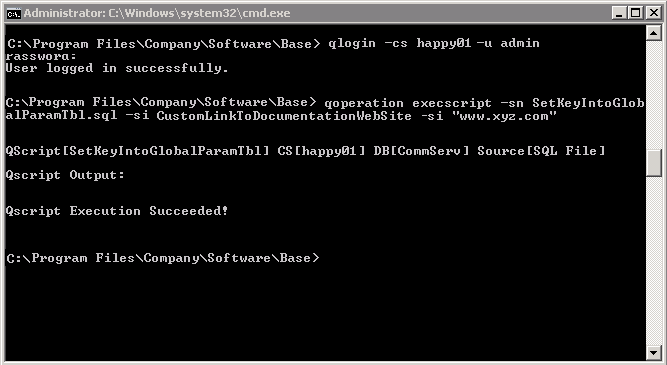
Logon to the CommServe computer.
From the Command prompt, login to the CommServe using the
qlogin command and commcell credentials.
For example, to log on to CommServe server11
with username user1:
C:\>qlogin -cs server1 -u user1
Run the following execscript operation using qoperation:
Usage:
qoperation execscript -sn SetKeyIntoGlobalParamTbl.sql
-si CustomLinkToDocumentationWebSite -si y -si "<URL>"
Example:
qoperation execscript -sn SetKeyIntoGlobalParamTbl.sql
-si CustomLinkToDocumentationWebSite -si y -si "www.xyz.com"
Where:
<URL>:Specify the
path of the hosted intranet site or shared network location.
Download and install the latest version of JAVA with all the updates on
the Web client computer.
Open the command prompt window on the Web client computer, and execute the following command to verify if JAVA has been properly
installed on the Web client computer:
C:\java -version
If you find
that JAVA with the latest updates has not been installed, uninstall JAVA that
you have installed and reinstall it again with all the updates. Navigate to
the command prompt on the Web client computer, and run the command specified
in step 4 to verify if JAVA has been installed successfully.
Skip this step if the updates are
installed successfully.
Start Tomcat services. If the Tomcat fails to start, point the JVM manually to Tomcat using the following steps:
Open the command prompt window on the Web client computer, navigate to
<PRODUCT_INSTALL_PATH>\Apache\bin
folder and execute the following command:
Jobs that fail to complete successfully are automatically restarted based on
the job restartability configuration set in the Control Panel. For laptop
backup jobs and install updates job, it is recommended to configure the job
restartability as follows:
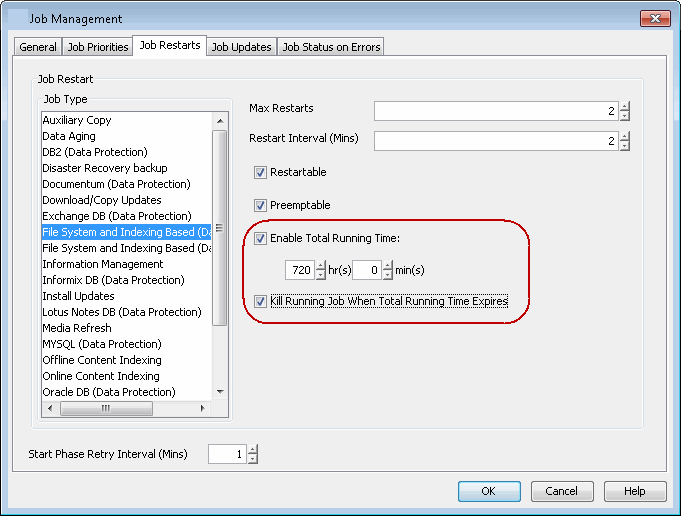
From the CommCell Browser, click Control Panel icon.
Select
Job Management.
From the Job Type list, select File System and Indexing Based
(Data Protection) .
Select the Enable Total Running Time check and specify the
Total Running Time as 720 or 1440 hrs. The Total Running Time is
the maximum elapsed time before a job can be restarted or killed.
Select the Kill Running Jobs
When Total Running Time Expires check box to kill the job after reaching the
maximum elapsed time.
From the Job Type list, select Install Updates.
Select the Enable Total Running Time check box and specify the
Total Running Time as 72 hrs. The Total Running Time is the
maximum elapsed time before a job can be restarted or killed.
Select the Kill Running Jobs
When Total Running Time Expires check box to kill the job after reaching the
maximum elapsed time.