Administrator creates a subclient policy to specify the folders (e.g.
Documents, Music, Videos, etc,.) such that the contents (e.g. word processing
documents, digital photos, music files and so on) of user laptops gets backed
up.
However, the administrator must request the users to copy the files and
folders to be backed up into the specified folder(s) in subclient policy.
A user can also backup files or folder other than the folders specified by
administrator, by adding backup content path from Web Console. See,
Adding Backup Content
for step-by-step procedure.
What will happen When Multiple Routes Are Added For Firewall In A Laptop?
If the multiple route includes a direct connection, and if the direct
connection is available, then the laptop will automatically use the direct
connection.
If a direction connection is not available, then the proxy setup will be
used.
If you have multiple proxies defined, the laptop will automatically use
the faster connection.
Can I configure both absolute and relative
throttling rules together?
Yes. Both absolute and relative throttling rules can be configured for the
same client or client group. They work in conjunction, the absolute value will
takes precedence, after the percentage of relative bandwidth is calculated.
For example if you create a rule for a client with absolute throttling where
the send or receive value is set at 1,000 kbps along with another rule where the
relative throttling for the same client is set at 50% of bandwidth if the
bandwidth is less than 5,000 kbps. If the bandwidth measured for the client is
4,000 kbps then 50% of that value will result in 2,000 kbps.
Since the value set for the absolute throttling rule is below the calculated
bandwidth for the relative throttling rule, the absolute throttling rule will
take precedence and will not exceed beyond 1,000 kbps.
How Do I Assign Different Capabilities To Different Sets Of Users?
Create user groups with the appropriate capabilities and attach the
respective users to each of these groups.
What will Happen if I Configure the iDataAgent for Laptop or Desktop Backup?
The following laptop features
will get enabled when you configure an iDataAgent
for Laptop or Desktop backup:
Automatic Ownership - After the successful installation of the laptop
software, all the users which belong to the Laptop's administrator group
will be assigned as owners of the laptop. For more information, refer to
Assigning Laptop Owners.
Automatic Scheduling - You can create an automatic backup schedule to
perform the data protection operation based on the environmental conditions
of the laptop. For example: Network usage, CPU utilization, Power
management. For more information refer to
Configuring Automatic Backup Schedules.
Backup Monitor Tool - You can now monitor the backup jobs on your laptop
using the Backup Monitor that runs on the system tray. For more information,
refer to Monitor - Laptop
User.
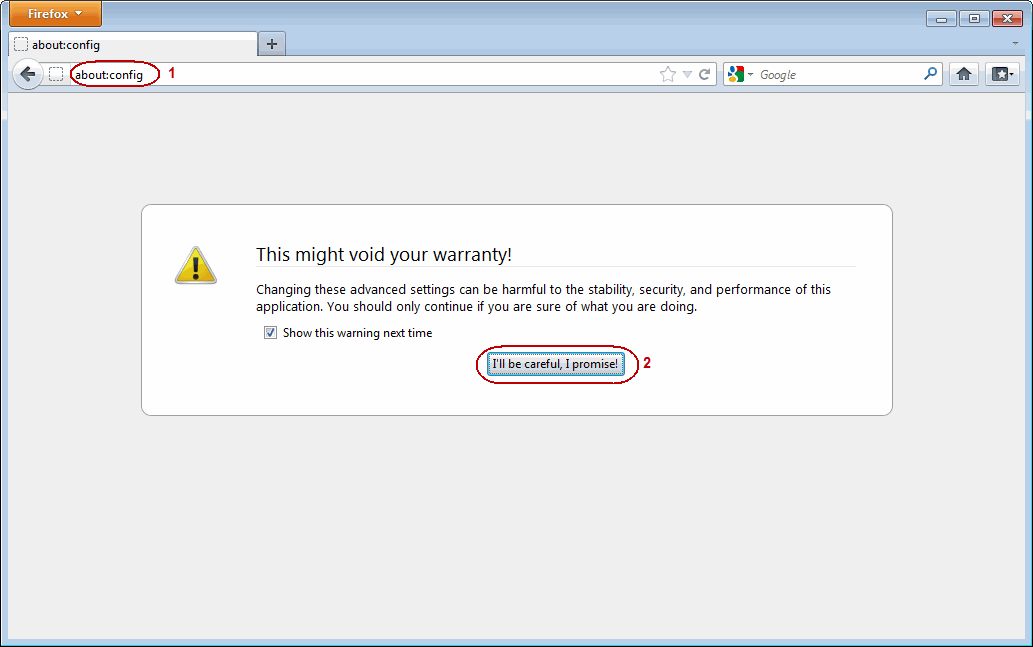
Perform the following steps to ensure that your Firefox web browser is
enabled to perform Single Sign On authentication.
1.
Open your Firefox web browser.
Type about:config in the address
bar.
Click I'll be careful, I promise!.
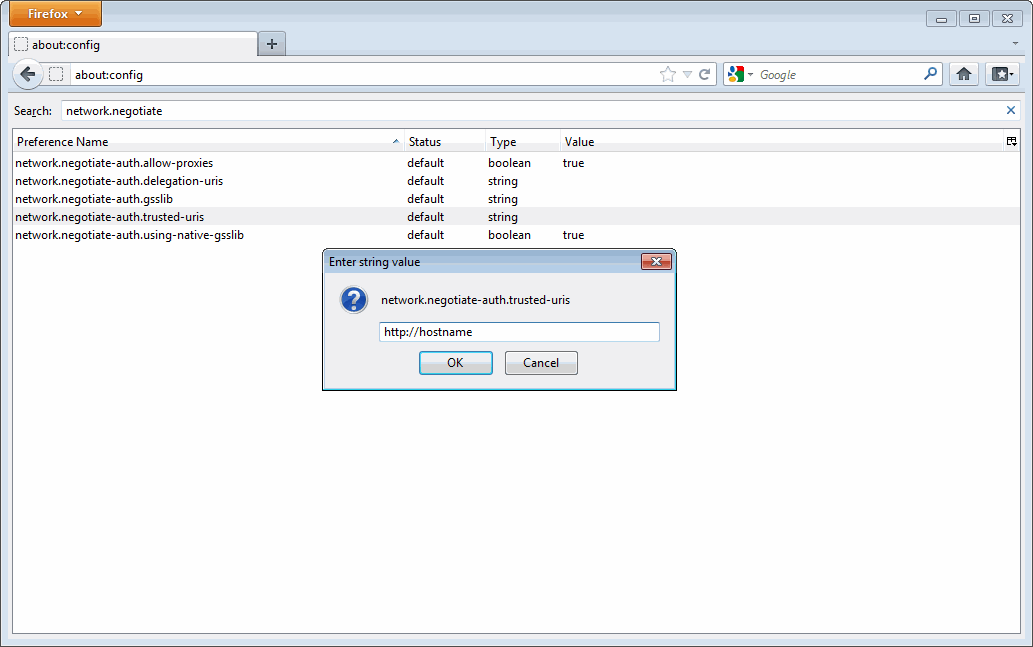
2.
Double-click
network.negotiate-auth.trusted-uris from the Preference Name
list. You can easily find this preference by typing
network.negotiate in the Search
box.
This preference lists the sites that are allowed to engage in SPNEGO
Authentication with the browser.
3.
Enter the domain name or URL of your CommServe in the popup
window. For example, http://hostname If more than one domain, enter
the values delimited by a comma.
Click OK.
4.
Restart the Firefox web browser.
How Do I Assign Multiple Users As Laptop Owners?
By default, all users and groups who are member of Administrators group
on the laptop (client) will be automatically designated as owners.
The following sections describes how to assign multiple users as owners to a
client or multiple clients (client computer groups).
Use the following steps to associate or disassociate members from an existing
user group to a client computer. This will allow you to manage the members in the
laptop user group.
If necessary you can use the following steps to overwrite the associate user
group available on the client with a given user group.
Right-click the View Sample XML File link and click
Save Link As... or Save Target As... to save the XML file
needed for this task.
Open the .xml file using an XML editor and modify the following
parameters:
clientName - Specify the names of the client computers
that to you want to associate to the user group.
For example:
If you wish to associate user group to client1, client2
and clientx then you must add the following:
<entity>
<clientName>client1</clientName>
<clientName>client2</clientName>
<clientName>clientx</clientName>
</entity>
userGroupName - Specify the user group to which you want
to associate to the client.
For example: If you wish to associate
usergroup1 to the above clients, then you must add the following:
<userGroupName>usergroup1</userGroupName>
associatedUserGroupsOperationType - Indicate one of the
following operation types:
ADD - To associate the User
Group to a Client
DELETE - To disassociate the User Group to a Client
OVERWRITE - To associate the user group mentioned above
and disassociate all the user group available on the client computer.
For example:
If usergroup2 and
usergroup3 are already associated
on client1, and you wish to overwrite
the available user groups with usergroup4.
This operation associates usergroup4
to the client1 and disassociates
usergroup2 and
usergroup3.
Save the file as input.xml.
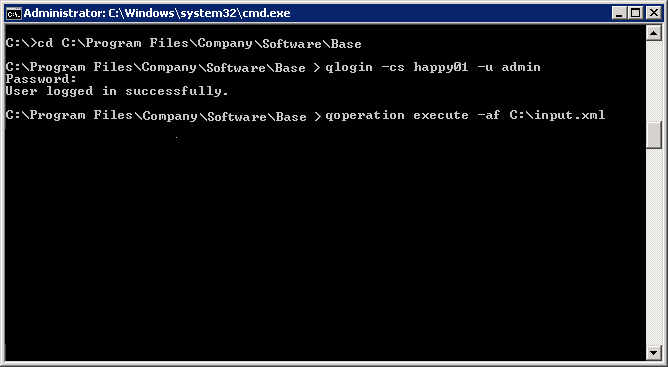
From Command prompt, navigate to <Software_Installation_Directory>/Base
and then run the following command:
Login to the CommServe using the qlogin
command and commcell credentials.
For example, to log on to CommServe
server1 with username
user1:
C:\>qlogin -cs server1 -u user1
Run the XML using the qoperation command.
For example, to
run input.xml
C:\>qoperation execute –af input.xml
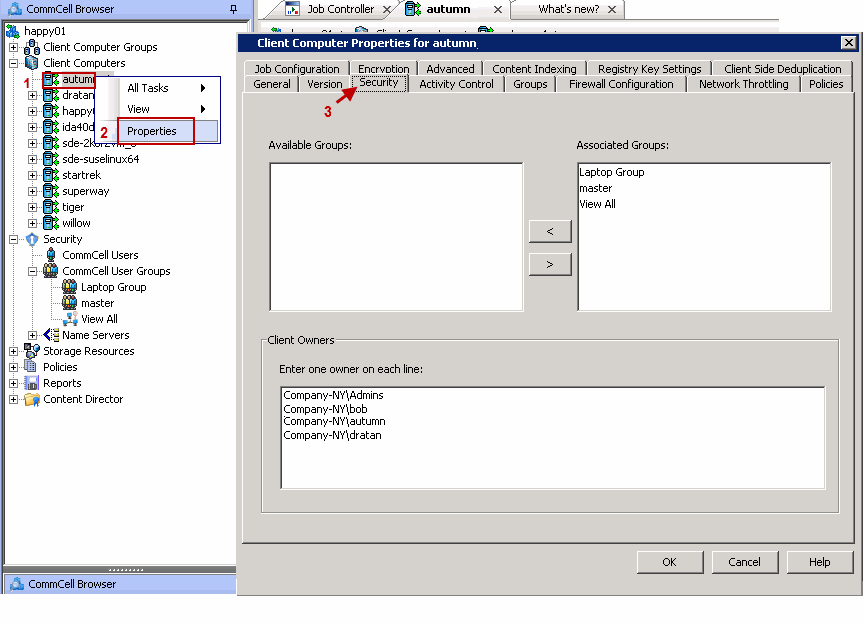
You can verify the user group associated to client from Associated
Groups.
From the CommCell Browser, right-click the <Client> and
then click Properties.
Click Security tab.
The User Group specified above will be listed in the
Associated Groups.
Use the following steps to associate or disassociate members from an existing
user group to a client computer group. This will allow you to manage the members
in the laptop user group.
If necessary you can use the following steps to overwrite the associate user
group available on the client group with a given user group.
Right-click the View Sample XML File link and click
Save Link As... or Save Target As... to save the XML file
needed for this task.
Open the .xml file using an XML editor and modify the following
parameters:
clientGroupName - Specify the names of the client computer
group that you want to associate to the user group.
For example:
If you wish to associate user group to
clientgroup1, clientgroup2
and clientgroupx then your element
will appear as follows:
<entity>
<clientGroupName>clientgroup1</clientGroupName>
<clientGroupName>clientgroup2</clientGroupName>
<clientGroupName>clientgroupx</clientGroupName>
</entity>
userGroupName - Specify the user group to which you want
to associate to the client group.
For example: If you wish to
associate usergroup1 to above client
group, then you must add the following:
<userGroupName>usergroup1</userGroupName>
associatedUserGroupsOperationType - Indicate one of the
following operation types:
ADD - This will associate the
User Group to a Client Computer Group
DELETE - This will disassociate the User Group to a Client
Computer Group
OVERWRITE - To associate the user group mentioned above
and disassociate all the user group available on the client computer
group. For example:
If usergroup2 and
usergroup3 are already associated
on clientgroup1, and you wish to
overwrite the available user groups with
usergroup4. This operation associates
usergroup4 to the
clientgroup1 and disassociates
usergroup2 and
usergroup3.
Save the file as input.xml.
From Command prompt, navigate to <Software_Installation_Directory>/Base
and then run the following command:
Login to the CommServe using the qlogin
command and commcell credentials.
For example, to log on to CommServe
server1 with username
user1:
C:\>qlogin -cs server1 -u user1
Run the XML using the qoperation command.
For example, to
run input.xml
C:\>qoperation execute –af input.xml
You can verify the user group associated to client from Associated
Groups.
From the CommCell Browser, right-click the <Client_Computer_Group>
and then click Properties.
Click Security tab.
The User Group specified above will be listed in the
Associated Groups.
Use the following steps to associate or disassociate user to a client computer.
This will allow user to access the client computer and perform backup and restore
operations. This will assign user as a owner to the client computer and allow to
perform backup and restore operations.
If necessary you can use the following steps to overwrite the user available
on the client with a given user.
Right-click the View Sample XML File link and click
Save Link As... or Save Target As... to save the XML file
needed for this task.
Open the .xml file using an XML editor and modify the following
parameters:
clientName - Specify the names of the client computer
group that you want to associate to the user.
For example: If
you wish to associate user group to client1, client2
and clientx then you must add the following:
<entity>
<clientName>client1</clientName>
<clientName>client2</clientName>
<clientName>clientx</clientName>
</entity>
clientOwners - Specify the user to which you want to
associate to the client.
For example: If you wish to associate
user1 to above clients, then you
must add the following:
<clientOwners>user1</clientOwners>
clientOwnersOperationType - Indicate one of the following
operation types:
ADD - This will associate the user to
a client computer
DELETE - This will disassociate the user to a client computer
OVERWRITE - To associate the user mentioned above and
disassociate all the users available on the client computer. For
example:
If user2 and
user3 are already associated on
client1, and you wish to overwrite
the available users with user4.
This operation associates user4
to the client1 and disassociates
user2 and
user3.
Save the file as input.xml.
From Command prompt, navigate to <Software_Installation_Directory>/Base
and then run the following command:
Login to the CommServe using the qlogin
command and commcell credentials.
For example, to log on to CommServe
server1 with username
user1:
C:\>qlogin -cs server1 -u user1
Run the XML using the qoperation command.
For example, to
run input.xml
C:\>qoperation execute –af input.xml
You can verify the user associated to client from Client Owners.
From the CommCell Browser, right-click the <Client> and
then click Properties.
Click Security tab.
The user specified above will be listed in the Client Owners.
Use the following steps to associate/disassociate user to client computer group.
Once this is done the included user will have access to client computer group
and can backup and restore their data on this client.
Right-click the View Sample XML File link and click
Save Link As... or Save Target As... to save the XML file
needed for this task.
Open the .xml file using an XML editor and modify the following
parameters:
clientName - Specify the client computer groups to which
you want to associate the user.
For example: If you wish to
associate user group to clientgroup1, clientgroup2
and clientgroupx then you must add the following:
<entity>
<clientGroupName>clientgroup1</clientGroupName>
<clientGroupName>clientgroup2</clientGroupName>
<clientGroupName>clientgroupx</clientGroupName>
</entity>
clientOwners - Specify the user to which you want to
associate to the client computer group.
For example: If you wish
to associate user1 to above client,
then your element will appear as follows:
<clientOwners>user1</clientOwners>
clientOwnersOperationType - Indicate one of the following
operation types:
ADD - This will associate the User Group
to a Client Computer Group
DELETE - This will disassociate the User Group to a Client
Computer Group
OVERWRITE - To associate the user mentioned above and
disassociate all the users available on the client computer group.
For example:
If user2 and
user3 are already associated on
clientgroup1, and you wish to overwrite
the available user groups with user4.
This operation associates user4
to the client1 and disassociate
user2 and
user3.
Save the file as input.xml.
From Command prompt, navigate to <Software_Installation_Directory>/Base
and then run the following command:
Login to the CommServe using the qlogin
command and commcell credentials.
For example, to log on to CommServe
server1 with username
user1:
C:\>qlogin -cs server1 -u user1
Run the XML using the qoperation command.
For example, to
run input.xml
C:\>qoperation execute –af input.xml
You can verify the user associated to client from Client Owners.
From the CommCell Browser, right-click the <Client_Computer_Group>
and then click Properties.
Click Security tab.
The user specified above will be listed in the Client Owners.