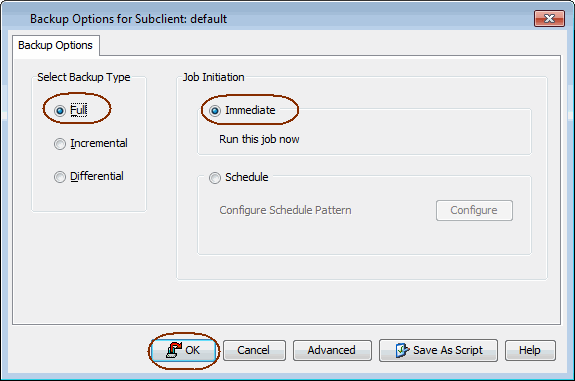
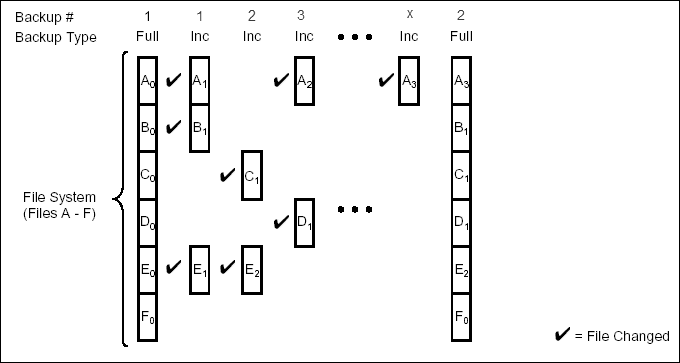
Full backups provide the most comprehensive protection of data.
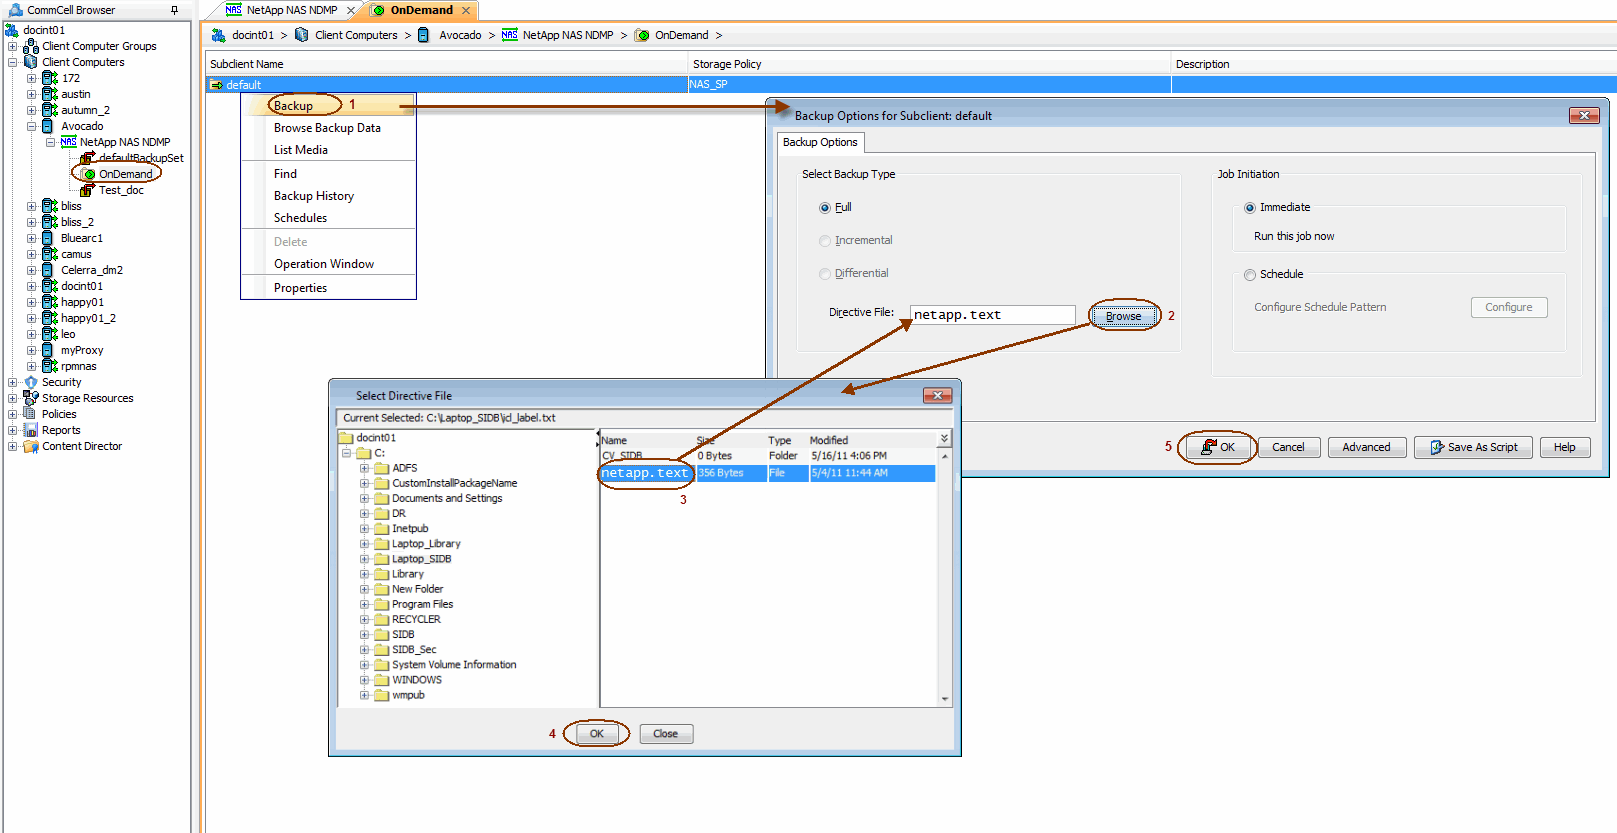
An On-Demand backup provides the flexibility of specifying content each time
you perform a backup operation.
You can perform backups of NAS data from the command line interface.
Command line backups enable you to perform backup operation on multiple clients
simultaneously. In order to run the backups from command line, you need an input xml file
which contains the parameters for configuring the backup options. This input xml
file can be obtained from one of the following ways:
To run command line operations you must first login to the CommServe as
follows:
In addition to the parameters provided in the template xml file, if you want
to include additional options for the backup, you can do so by selecting the
required options from the CommCell Console and generate the command line xml
script for the backup.
Follow the steps given below to generate a script which you can use to
perform a backup from the command line interface:
The following sections provide information
on the different job management options available:
Jobs that fail to complete successfully are automatically restarted based on
the job restartability configuration set in the Control Panel. Keep in mind that changes
made to this configuration will affect all
jobs in the entire CommCell.
To Configure the job restartability for a specific job, you can modify the
retry settings for the job. This will override the setting in the Control Panel. It is also possible to override the default CommServe configuration for individual
jobs by configuring retry settings when initiating the job. This configuration,
however, will apply only to the specific job.
The following controls are available for running jobs in the Job Controller window:
The following sections describe the additional NAS features available for
different file servers.
The following table describes the available additional options to further
refine your backup operations:
| Startup Options |
The Startup Options are used by the Job Manager to set priority for resource
allocation. This is useful to give higher priority to certain jobs. You can set
the priority as follows:
-
From the CommCell Browser, navigate to <Client> |
<File Server> NAS NDMP | defaultBackupSet.
- Right-click the Subclient in the right pane and click Backup.
- Click Advanced and click Startup tab.
- Select the Change
Priority checkbox.
- Enter a priority number - 0 is the highest priority and 999 is the
lowest priority.
- Select the Start up in suspended State check box to start the job
in a suspended state.
- Click OK.
|
Refer to Job Priority and
Priority Precedence. |
| Alerts |
This option enables users or user groups to get automatic notification on the
status of the data protection job. Follow the steps given below to set up the
criteria to raise notifications/alerts:
- From the CommCell Browser, navigate to <Client> |
<File Server> NAS NDMP | defaultBackupSet.
- Right-click the Subclient in the right pane and click Backup.
- Click Advanced and select the Alert tab.
- Click Add Alert.
- From the Add Alert Wizard dialog box, select the required threshold and
notification criteria and click Next.
- Select the required notification types and click Next.
- Select the recipients and click Next.
- Click Finish.
- Click OK.
|
Refer to Alerts. |
| Backup Job Summary Report |
The Backup Job Summary Report provides you with information about all the
backup jobs that are run in last 24 hrs for a specific subclient. You can get
information such as status, time, data size etc. for each backup job. It is useful
to run this report after performing the backup. Follow the steps
given below to generate the report:
- From the Tools menu in the CommCell Console, click Reports.
- Navigate to Reports | Jobs | Job Summary.
- Click Data Management on the General tab in the right
pane.
- Select the Computers tab.
- Click Subclient and select the Edit tab.
- Navigate to <Client> |
<File Server> NAS NDMP | BackupSet |
Subclient.
- Click Run.
|
Refer to Backup Job Summary Report. |
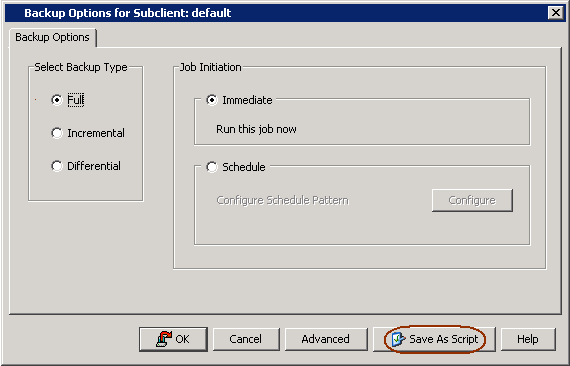
| Command Line Backups |
Command Line Interface enables you to perform backups or restore from the command line. The
commands can be executed from the command line or can be integrated into scripts. You can also generate command line scripts for specific operations from the CommCell
Browser using the Save As Script option.
|
Refer to Command Line Interface. |
| CommCell Readiness Report |
The CommCell Readiness Report provides you with vital information, such as
connectivity and readiness of the Client, MediaAgent and CommServe. It is useful
to run this report before performing the data protection or recovery job. Follow the steps
given below to generate the report:
- From the Tools menu in the CommCell Console, click Reports.
- Navigate to Reports | CommServe | CommCell Readiness.
- Click the Client tab and click the Modify button.
- In the Select Computers dialog box, clear the Include All
Client Computers and All Client Groups check box.
- Select the client from the Exclude list.
- Click the Include > button.
- Click OK.
- Click the MediaAgent tab.
- Clear the Include All MediaAgents checkbox.
- Select the MediaAgent from the Exclude list.
- Click Include >.
- Click Run.
The generated report is displayed.
|
Refer to CommCell Readiness Report. |
| Create New Index |
This option accelerates Full or On Demand backups and is enabled by default.
When you perform a browse and restore operation, the default browse displays
data up to the most recent full backup. To browse and restore older data you
have to use the options to browse before or between specific dates. When disabled, Full or On Demand backups may be slower. However the default
browse displays all data in the entire retention period; not just one full
backup cycle. Use the following steps to configure this option for specific Full
or On Demand backups. This option can also be configured for all subclients at
the iDataAgent level.
- From the CommCell Browser, navigate to <Client> |
<File Server> NAS NDMP | defaultBackupSet.
- Right-click the Subclient in the right pane and click Backup.
- Select Full as a backup type and click Advanced.
- Select the Create new index check box.
- Click OK.
|
Refer to Index. |
| Data Path Options |
Data Protection operations use a default Library, MediaAgent, Drive
Pool, and Drive as the Data Path. You can use this option to change the
data path if the default data path is not available. Follow the steps
given below to change the default data path:
- From the CommCell Browser, navigate to <Client> |
<File Server> NAS NDMP | defaultBackupSet.
- Right-click the Subclient in the right pane and click Backup.
- Click Advanced and select the Data Path tab.
- Select the MediaAgent
and Library.
- Select the Drive Pool and Drive for optical and tape
libraries.
- Click OK.
|
Refer to Change Data Path. |
| Index Cache Server |
Index Cache Server provides the facility to automatically continue data
protection operations when there are job failures due to loss of connectivity to
the index. You can configure the Index Cache Server as follows:
- From the CommCell Browser, navigate to Storage Resources | MediaAgent.
- Right-click the <MediaAgent> and click Properties.
- Click the Catalog tab and ensure that the Index Cache Server
is configured.
- From the CommCell Browser, navigate to <Client> |
<File Server> NAS NDMP | defaultBackupSet.
- Right-click the Subclient in the right pane and click Backup.
- Click Advanced.
- Make sure that the Use shared profile if present with transaction
logging option is selected.
- Click OK.
|
Refer to
Index Cache Server for more information. |
| Start New Media |
The Start New Media option enables you to start the data protection operation on
a new media. This feature provides control over where the data physically
resides. Use the following steps to start the data protection operation on a new
media:
- From the CommCell Browser, navigate to <Client> |
<File Server> NAS NDMP | defaultBackupSet.
- Right-click the Subclient in the right pane and click Backup.
- Click Advanced and select the Media tab.
- Select the Start New Media check box.
- Click OK.
|
Refer to
Start
New Media. |
| Mark Media Full |
This option marks the media as full, two minutes after the successful completion
of the data protection job. This option prevents another job from writing to
this media. Follow the steps given below:
- From the CommCell Browser, navigate to <Client> |
<File Server> NAS NDMP | defaultBackupSet.
- Right-click the Subclient in the right pane and click Backup.
- Click Advanced and select Media tab.
- Select the Mark Media Full on Success check box.
- Click OK.
|
Refer
to
Export Media. |
| Allow other Schedules to use Media Set |
The Allow Other Schedules to use Media Set option allows jobs that are part
of the schedule or schedule policy and using the specific storage policy to
start a new media. It also prevents other jobs from writing to the same set of
media.
- From the CommCell Browser, navigate to <Client> |
<File Server> NAS NDMP | defaultBackupSet.
- Right-click the Subclient in the right pane and click Backup.
- Click Advanced and select the Media tab.
- Select the Allow Other Schedules To Use Media Set check
box.
- Click OK.
|
Refer to
Creating an Exportable Media Set. |
| Extended Data Retention |
This option allows you to extend the expiration date of a specific job. This
will override the default retention set at the corresponding storage policy
copy. Follow the steps given below to extend the expiration date:
- From the CommCell Browser, navigate to <Client> |
<File Server> NAS NDMP | defaultBackupSet.
- Right-click the Subclient in the right pane and click Backup.
- Click Advanced and select the Media tab.
- Select one of the following options:
- Infinite - Select this option to extend the expiration date by
infinite number of days
- Number of day - Select this option to specify the number of days
to extend the expiration date and then enter the number of days.
- Click OK.
|
Refer to
Extended Retention Rules. |
| Vault Tracker |
This feature provides the facility to manage media that is removed from a
library and stored in offsite locations. Depending on your VaultTracker setup,
select the required options. Use the following steps to access and select the
VaultTracker options.
- From the CommCell Browser, navigate to <Client> |
<File Server> NAS NDMP | defaultBackupSet.
- Right-click the Subclient in the right pane and click Backup.
- Click Advanced and select the VaultTracking tab.
- Select the required options.
- Click OK.
|
Refer to
VaultTracker
or
VaultTracker
Enterprise. |