Understanding the data retention and aging process is important for managing
storage in your CommCell.
Basic retention is defined as follows:
Retention itself is defined using cycles and/or days
Data retention is defined in a storage policy copy
Retention Cycles
A retention cycle starts with a full (or synthetic full)
backup followed by all subsequent incremental, differential, or transactional log
backups that are dependent upon the full backup.
When retention cycles are defined, the number of cycles must be exceeded
before the data is eligible for aging.
Retention Days
Retention days are the minimum number of days that all data protection jobs
must be kept.
When retention days are defined, the number of days must be exceeded
before the data is eligible for aging.
Understanding Retention Days and Cycles
When a combination of days and cycles are used, the
retention days must be exceeded for all jobs in the cycle before the data is
eligible for aging.
The following example illustrates how days and cycles work together:
The primary copy of a storage policy is set to 2 cycles and 14 days.
All clients pointing to the storage policy has a
schedule of one full backup every Monday, followed by an incremental backup
on subsequent days of the week.
In the above example, the primary copy will always have a minimum of two
weeks worth of data at any given point.
Note, however, that the actual aging will occur only when
the cycle is completed in the third week.
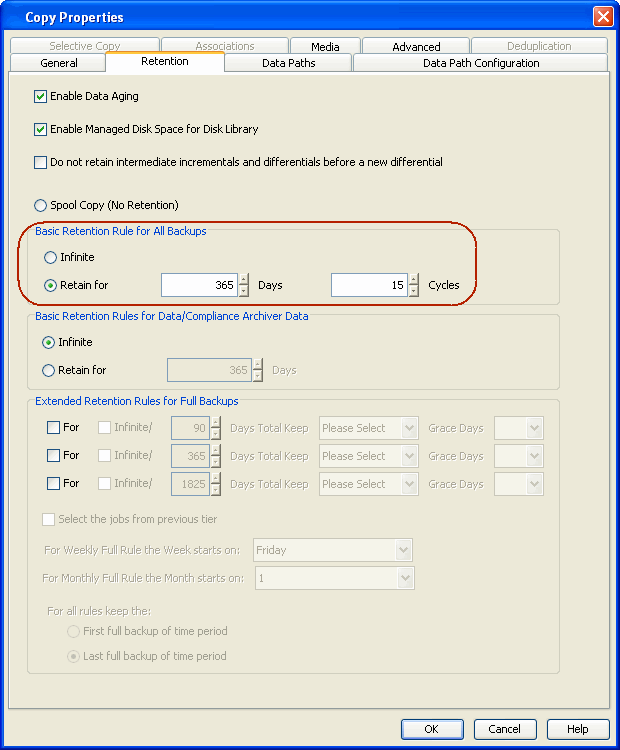
Setting
Up Basic Retention Rules
Right-click the desired storage policy copy, and select Properties.
Click the Retention tab.
Click Retain for and enter the number of days and cycles appropriate for your organization.
By default, retention is set to 365 days and 15 cycles.
In all other cases, it is recommended that the Auxiliary Copy feature be used
for extended storage as it actually creates another physical copy of the data,
thereby reducing the risk of data loss due to media failure.
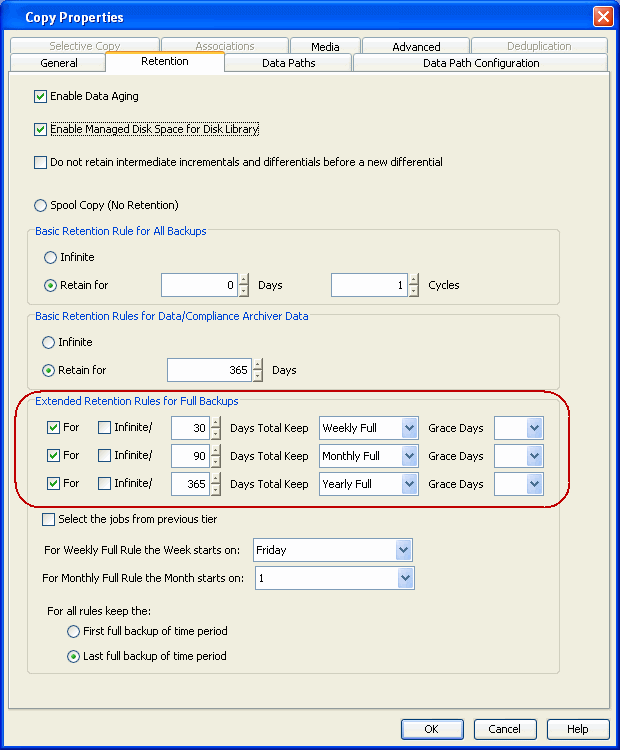
Understanding Extended Retention Rules
Extended retention allows you to retain a specific full (or synthetic full)
backup for an additional period of time. For example, you may want to retain
your monthly full backups for 90 days.
Extended retention rules allow you to define three additional "extended"
retention periods for full (or synthetic full) backups. For example:
You may want to retain your weekly full backups for 30 days.
You may want to retain your monthly full backup for 90 days.
You may want to retain your yearly full backup for 365 days.
A backup job will be selected for extended retention based on its start time.
For example: If a backup job starts at 11:55 pm on August 31st and ends at 1 am
on September 1st, then it will be selected as the last full backup for the month
of August and will be picked up for extended retention.
Setting Up Extended Retention Rules
Use the following steps for setting up the extended retention rules:
Right-click the storage policy copy and click Properties.
Click the Retention tab.
Set the basic retention rules by clicking Retain for and entering the number of days and cycles appropriate for your organization.
Set the extended retention rules as follows:
Click the For
button.
Enter the number of Days
Total to retain the backup.
Click the Keep drop-down list, and select the desired backup
criteria (e.g., Monthly Full).
Click the Grace Days drop-down list and
select the number of days (e.g., 2).
Repeat Step 4 to configure additional extended retention.
Database Agents have unique retention rules and behaviors for logs. Refer to
the Data Aging topic for your Agent for complete details on log retention
rules.
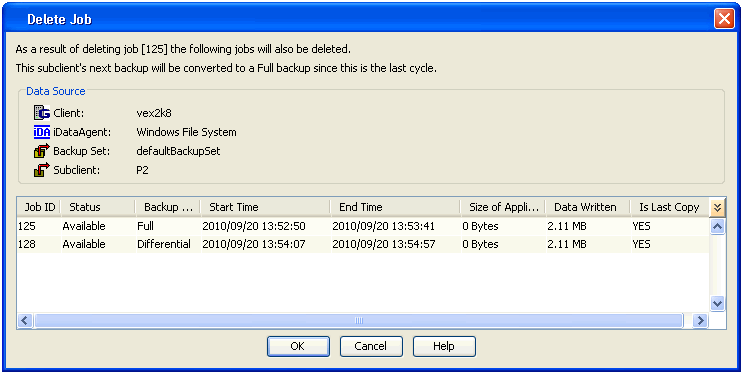
You can delete a specific job if it no longer needs to be retained. This is
useful to remove bad jobs that may impact your Auxiliary Copy
operation. You can also use this option to remove unnecessary jobs that are
preventing media from being reused.
Note that all dependent jobs will be automatically aged when a full job is
selected for deletion.
1.
From the CommCell Browser, navigate to
Policies | Storage Policies.
Right-click
the storage policy copy and click View | Jobs.
2.
Click OK.
3.
Right-click the
job and click Delete Job.
4.
Click OK.
5.
A list of dependent jobs (incremental backups, log backups,
etc.), if available, will be displayed.
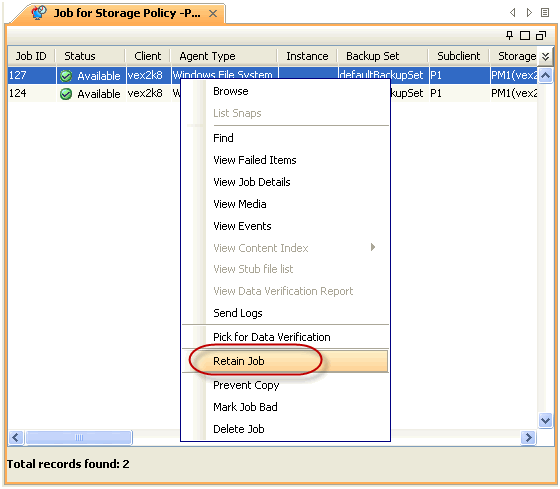
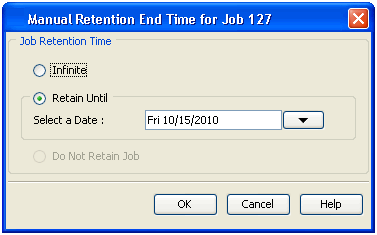
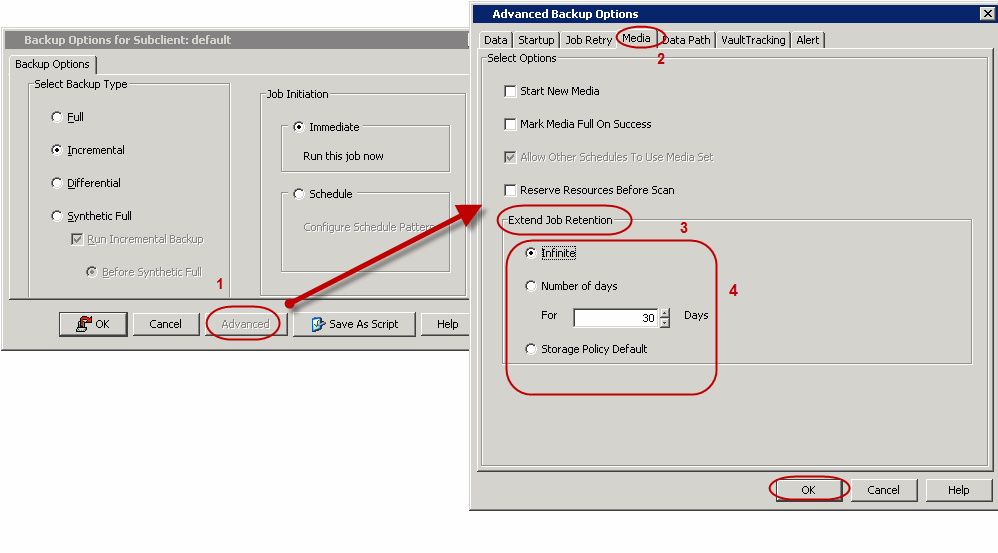
You can override the pre-defined storage policy retention rules and apply new
rules for specific data retention jobs. Follow the steps given below to manually
specify the data retention time for a specific job.
Overriding the retention is a job based
retention operation and does not affect any other jobs, it only
affects the job that you are changing the retention.
From the CommCell Console, navigate to <Client> |
File System |
defaultBackupSet.
Right-click the Subclient and click Backup
Click Advanced tab and click Media.
Specify the retention rules to apply to this job in the Extend
Job Retention section.
Infinite: Retains this job indefinitely.
Numberof Days: Prunes (deletes) this job
after the number of days specified.
Storage Policy Default: Applies the
retention rules of the associated storage policy.
Several options are available for leveraging data aging jobs across a
CommCell. These options reduce overhead on the CommServe computer and provide
CommCell administrators with the flexibility to perform data aging operations
for their own entities at times convenient for them. The following sections
describe these options.
This option may be useful in the following scenarios:
Each storage policy in your CommCell is designated for specific
clients (such as clients in a branch office) and you want administrators to perform data aging for only the
clients in their area
Your CommCell contains a large number of storage policies, which may
result in data aging jobs taking significant amounts of time and
resources
Right-click the CommServe icon and click All
Tasks |
Data Aging.
Click Advanced.
Click Age Granular.
Click Select Copies.
Click Prune Selected Copies.
Highlight and click the copies you wish to age.
Click OK.
The data aging job runs and all data that meets the retention
criteria in the selected copies will be aged.
Data aging operations age data according to the time zone of the associated
storage policy.
You can designate the following time zones for a storage policy:
CommServe Time Zone (default)
Storage Policy Time Zone
Client Computer Time Zones
Exercise caution while changing time zones,
especially when the time zone of a client is set to an earlier time.
This can cause data to be aged earlier than intended.
The CommServe time zone is the default for all storage policies. Use this
option if you want your aging operations to be performed using the CommServe's
time zone.
1.
From the CommCell Console, navigate to Policies |
Storage Policies.
Right-click the storage policy and click Properties.
2.
Click the Time Zone drop-down list, and select CommServeTime Zone.
Data aging behavior differs based on the types of copies that you are using.
The following table describes the behavior for aging specific copy types.
Copy Name
Description
Primary Copy without Secondary Copies
If data aging can be performed on a primary copy and there are no secondary copies
defined, the data on the primary copy can be aged provided the data has exceeded
its specified retention criteria.
Primary Copy with Synchronous and Selective Copies
Data aging can be performed on a storage policy with synchronous and/or selective copies defined. Data is aged according to the primary copy retention rule only when all data eligible to be aged is copied to all active copies during an auxiliary copy operation.
Secondary Copy
The data aging of a secondary copy is dependent on
the selected retention criteria set for that copy.
Incremental Storage Policy Copy
If data aging is performed on a storage policy that
has an incremental storage policy enabled, the data aging operation
counts backup cycles across both full and incremental storage policies.
Data on a full storage policy is aged based on the retention of the full
storage policy, and data on the incremental policy is aged based on the
retention rules of the incremental policy.
If the incremental storage
policy is also being used as a regular storage policy (and has full
backups), the full backups will be also aged according to any basic and
extended retention rules that are set.
It is recommended that the retention rule for the full storage policy
is greater than the incremental storage policy. Data on incremental
policy will be aged earlier if it has shorter retention than the full
storage policy. If the incremental storage policy has longer retention
than a full storage policy, this may result in dangling incremental
jobs.
Source Copy that is not a Primary Copy
Data Aging can be performed on data copied during an
auxiliary copy operation from a non-primary copy source.
The rules for data aging on source copies are as follows:
Data can be aged from the primary copy when there are To Be Copied jobs and the primary copy is
not the source copy.
Data can be aged from a secondary copy that is a source copy once all of its data is copied to the secondary copy.
The following examples illustrate how data is aged from a storage
policy that has three copies; primary copy Primary_01, Secondary_01, and
Secondary_02. Secondary_02 uses Secondary_01 as a source copy. The
retention rules for each copy are as follows:
Primary_01 = 15 days and 2 cycles
Secondary_01 = 1 day and 1 cycle
Secondary_02 = 30 days and 2 cycles
Spool Copy
Allows you to use a primary copy as a temporary
holding area for protected data until it is copied to an active
synchronous copy. Once copied, the data on the primary copy is aged.
This copy has a retention rule of 0 days and 0 cycles, and hence, once an
auxiliary copy operation is performed, all data on this copy is aged when Data
Aging is run.
Synchronous copies can not be deleted when a primary copy has the
Spool Copy (no retention) option enabled, and there is no coverage for all of
the subclients in the secondary copies. Instead, users are prompted with a
warning message to change the retention period of the primary copy or to create
another synchronous copy. The rule for data aging from spool copies is as follows:
The data must be copied to an active synchronous copy. The way
in which data is aged is also contingent upon the following:
Whether the data protection operation was successful, killed, or
failed.
Whether the storage policy has secondary copies and whether they
are active.
Whether jobs are disabled on the storage policy copy.
Whether jobs still need to be copied to secondary copies.
Incremental and Differential Copies
Incremental and differential copies are retained
based on the rules defined for their associated storage policy copy.
However, you can configure data aging to age intermediate incremental
and differential copies preceding a new differential. This is useful to
minimize wasted disk space.
Note that this configuration will also
consider the retention days set on the storage policy copy for incremental
or differential jobs. If the differential job is run, then incremental or
differential jobs before the last differential in a cycle are pruned once the retention
day criteria is met. For example, if your jobs ran in the following pattern:
Assuming that Do not retain intermediate incremental and
differentials before a new differential option is selected and from the intermediate jobs between
Full
and Differential_02 once these jobs (Incremental_01, Incremental_02, Differential_01,
Incremental_03, Incremental_04) meets the days retention criteria
then these jobs will be aged, even if these jobs haven't met the cycle
criteria.
Use the following steps to configure data aging to age intermediate
incremental and differential jobs:
From the CommCell Browser, navigate to Policies | Storage
Policies | <Storage Policy>.
Right-click <Storage Policy Copy> and then click
Properties.
Click the Retention tab.
Select Do not retain intermediate incremental and
differentials before a new differential check box.
Data is only removed from media when all data on the media has been
aged. As such, if half the data on a given media has been aged, that data
will remain available for data recovery operations until the remaining data on
the media is aged. Once all data on the media is aged, the media will then be
recycled for future data protection operations.
Once a data aging operation deletes all data on tape media that has
exceeded its retention rules, the media is returned to the associated scratch
pool. Once the tape media is reused, the data originally written to it cannot be
restored. Media that has an active status is not recycled back to the scratch pool until
the media has a non-active status.
As the data aging operation only marks the metadata for deletion, the actual
data in the media may be available for restores. You can view such aged data
during browse and restores operations by enabling the following option.
From the CommCell Browser, right-click the CommServe, click Control
Panel, and then click Browse/Recovery.
Click and enable the Show Data Aged During Browse and Recovery
option.
Click OK.
Aged data will now be included in the display when you start a Browse and
Restore operation.
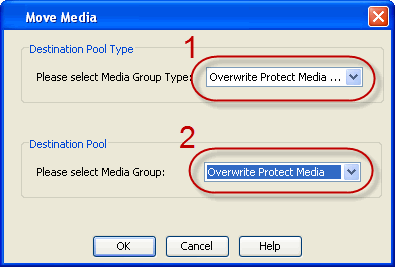
You can save a spare media containing aged data and prevent the media from
being overwritten, thereby allowing you to restore the data from the media at
any time.
From the CommCell Browser, select Destination Pool type |
Libraries | <Library name> | Media By Groups |
Default Scratch.
The contents of the scratch pool are displayed in the right pane of the
Browser.
From the right pane of the CommCell Browser, right-click the media that
you want to move, and then click Move.
Select the Overwrite Protect Media pool in the Destination Pool
type and the specific Overwrite Protect Media pool in Destination Pool.
Click OK to complete the transfer.
You can also save assigned media containing aged data.
From the CommCell Browser, select Destination Pool type |
Libraries | <Library name> | Media By Groups |
Assigned Media.
The contents of the Assigned Media pool is displayed in the right pane of
the Browser.
From the right pane of the CommCell Browser, right-click the media that
you want to prevent reuse, and then click Prevent Reuse.
Select the specific Overwrite Protect Media pool in Destination Saved
Pool.
If necessary, you can manually delete the contents of a media before the
media's remaining data is aged. Use this option if you require the use of
the media for critical data protection jobs and are certain you will no longer need any of the
remaining data on
that media.
Caution
Once deleted, the contents of the media are not available for data recovery
operations, and the system will not automatically force the next data protection
operation to be a full backup. If you delete the contents of the media,
you should immediately run a full backup for all the subclients associated with
the media once the operations is complete.
From the the CommCell Browser, select the Assigned Media
node.
Right-click the desired media
and select Delete Contents.
The Delete Contents option will be displayed only for
those media that are available in the library.
Click Yes.
Type erase and reuse media and click OK.
Select the name of the scratch pool to which the media must be moved, after
the contents are deleted.
Click OK.
Click OK.
The media information is deleted from the CommServe database and the media
is moved to the specified scratch pool.
Two disk capacity thresholds for managed disk space can be defined. They are:
A threshold (in percentage) for starting the data aging operation (upper
limit)
A threshold (in percentage) for stopping the data aging (lower limit)
Enable Managed Disk Space
The Enable Managed Disk Space for disk data option is available
in the Retention tab of the Copy Properties dialog box. If a
storage policy is created with a valid retention criteria other than infinite
retention, then this option is automatically enabled in the copies.
Configure Disk Capacity Thresholds
The pre-defined thresholds for disk capacity for a disk library can be
defined in the Mount Paths tab of the Library Properties
(associated with a disk library) dialog box.
Configure Disk Check Frequency
The frequency for checking the disk space and deleting
data is determined by the frequency established in the Interval (Minutes) between
disk space updates option established in the
Service Configuration tab of the Media Management Configuration
dialog box in the Control Panel.
When a client or an agent is deconfigured, the client's data is aged according
to the corresponding storage policy copy�s retention time and cycle rules.
If necessary, you can ignore retention cycle rules for the deconfigured
client. This option prevents the deconfigured client's data from being aged
according to backup cycles that the client is no longer included in.
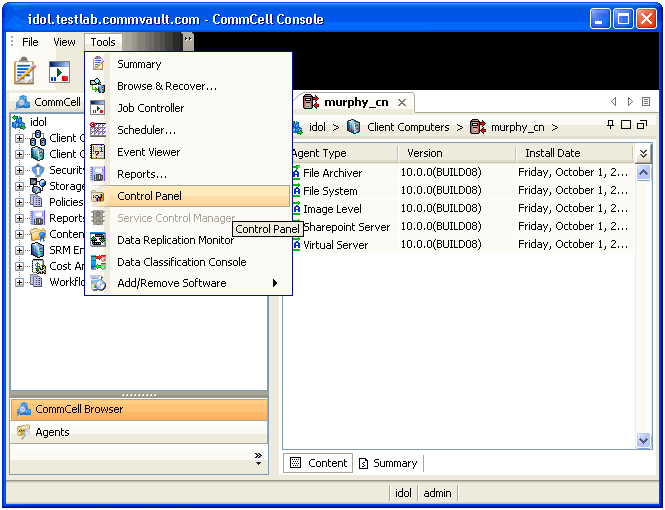
From the CommCell Browser, select Tools | Control Panel.
Double-click Media Management
Click the Data Aging tab.
Change the value for the Ignore Cycles Retention on
De-Configured Clients option from 0 to 1.
Click OK.
You can temporarily suspend client activity to age its data without
uninstalling the client software or meeting the cycle retention requirement.
This makes media more readily available for new data.
By default, the disaster recovery backup data is retained for 60 days and 60 cycles.
If you want to change the retention time
for disaster recovery backup data, it is recommended that you keep the default
setting as the minimum and configure extended retention rules defined as
follows:
Weekly = 180 days
Monthly = infinite
From the CommCell Browser, double-click the Storage
Policy Copy associated with your Disaster Recovery backups.
Click the Retention
tab.
Ensure that the Basic Retention Rule is set to the following setting:
60
Days
60 Cycles
Enable the first Extended Retention Rule and specify:
180 Days Total
Keep Weekly Full
Enable the second Extended Retention Rule and specify:
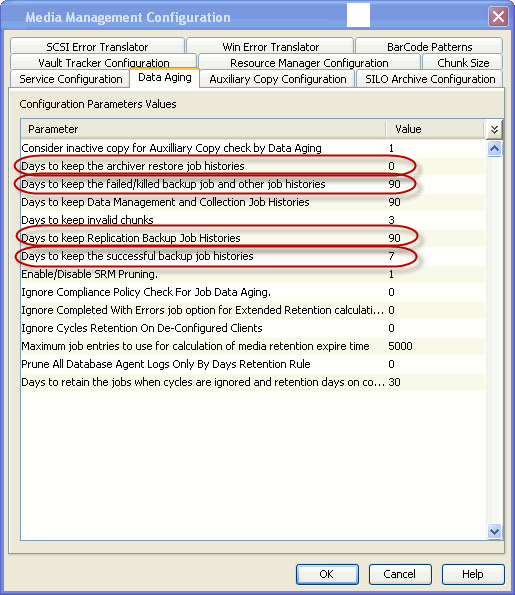
Job history data is aged according to the following criteria:
The job type
The status of the job
The retention rules of the
corresponding storage policy copy retention criteria
The following table illustrates how job history data is aged.
Job Type
Job Status
When It Is Aged
All Jobs
Any
When the job's storage policy or storage policy copy is
deleted
Data Protection Job History/Disaster Recovery
Backup Job History
Successful
With its associated data, which is aged based on the
associated storage policy copy's defined retention rules
Failed/Killed
90 Days
Data Recovery Job History (including CDR
Recovery operations)
Any
90 Days
Administration Job History
Any
90 Days
You
can change the default retention times
for job history data as follows:
From the Tools menu, click
Control Panel and then select Media Management.
Click the Data Aging tab.
Choose one of these parameters and click the Value field
to change the default retention time:
Days to keep the successful Backup Job Histories:
Records are retained 7 days.
Days to keep the archiver restore job histories: This
setting is applicable for Exchange Compliance Archiver. All
other archiver restore job histories will be aged based on the
Days to keep the successful backup job histories
parameter. Records are retained for 0 days.
When the value is set to 0, the retention is
set to infinite and not zero days.
Days to keep the failed/killed backup job and other job
histories: Records are retained for 90 days. Applies
to: auxiliary copy jobs, stub recall jobs, failed jobs, killed
jobs, jobs that failed to start, and non-archive restore jobs.
Days to keep Data Management and Collection Job Histories:
Records are retained for 90 days.
Days to keep Replication Backup Job Histories:
Records are retained 90 days.
Data Aging operations will automatically look up the deduplication store
before data is deleted from the disk. Data Aging will only delete the source
data when all the references to a given block is aged. So if you
see older chunks in disk libraries remaining on the volume even if the original
data is deleted, it might be due to the fact that deduplication reference(s)
to the chunk is still valid.
If a deduplication store is offline, then that store will not be
aged until all data on the store is eligible for aging.
Do not manually delete the Deduplication Store. The Deduplication Store
facilitates the deduplication backup jobs and data aging jobs. If deleted,
new deduplicated backup jobs cannot be performed and the existing data in
the disk mount paths will never be aged.
The following procedures describe the available retention
configurations for snapshots. For movement to media retention, refer to
Data Aging - Getting Started.
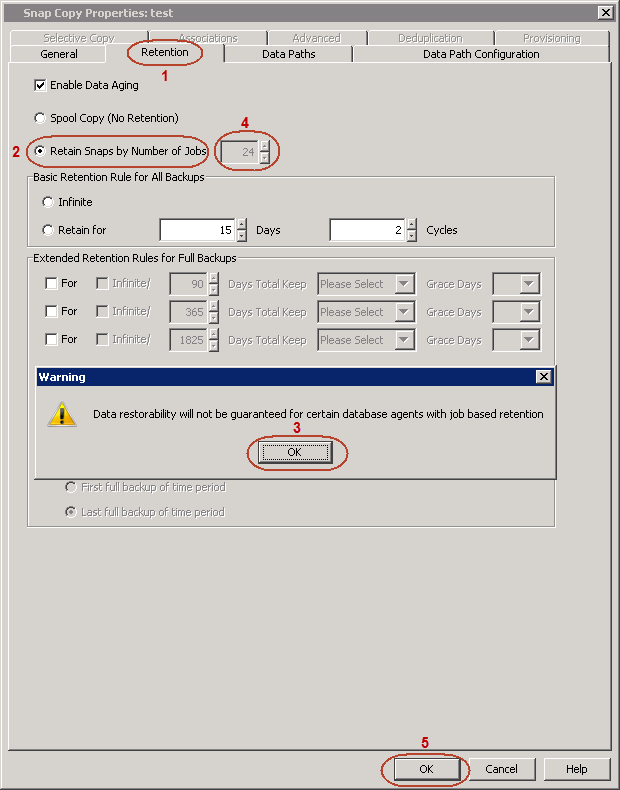
By default, snapshots are pruned based on the number of retention days and
cycles specified in the storage policy. You can configure your snapshot
copy to retain a defined number of SnapProtect backup jobs. When the total
number of jobs goes above the specified retention number, the remaining jobs
will be pruned. This configuration is recommended for File System and File
System like Agents. This feature is supported for SnapProtect operations
performed using the NetApp storage array.
The NetApp Snap Management license is required for retaining snaps by number of jobs.
1.
From the CommCell Console, navigate to Policies |
Storage Policies | <Storage Policy>.
Right-click the primary snapshot copy and click Properties.
2.
Click the Retention tab.
Click Retain Snaps by Number of Jobs.
Click OK to the warning dialog box.
Specify the number of jobs to be retained for the primary copy.
The following table describes the behavior for other operations on data
aging.
operation
Description
Related Topics
Erase Data
Data that has been backed up or archived can be permanently erased. The
erased data will not be available for browsing and recovery.
When data is
marked for erasing, the data remains on the media until it is aged off
according to the retention rules set for the data in the storage policy
or storage policy copy.
Data from Erase Backup/Archive operations can be aged as follows:
If the Erase Backup/Archive operation is older than all the
backup data of the agent that the Erase backup/archive job was run
for.
If there are already three Erase Backup/Archive operations
that were run for the agent.
Archive files are aged upon completion of auxiliary copy
operations.
Data protection operations can be run concurrently to the same media
using more than one data stream. This avoids having to back up data at
much slower than actual speeds of the tape.
Multiplexed data chunk sizes are determined by the type of data that
is being multiplexed; file system data and database data.
If the first backup is a file system type backup, all other
backups joining multiplexing will have a chunk size of 4 GB.
If the first backup is a database type backup, all other backups
joining multiplexing will have a chunk size of 16 GB.
Multiplexed data is aged when all jobs (multiplexed) on a single
chunk have met the defined retention rules of their associated storage
policy copy.
To enable data multiplexing in a storage policy copy:
From the CommCell Browser, right click the storage policy copy
whose storage policy you want to enable data multiplexing, then
click Properties.
From the Media tab of the Copy Properties dialog
box, select Enable Multiplexing.
Select the number of subclients whose data will be multiplexed
to the same media from the Multiplexing Factor list box.
Click OK to save your changes.
To enable data multiplexing for Oracle jobs,
click Control Panel, and then select Job Management.
Then click Enable Multiplexing for Oracle.
When an active Silo store has been sealed and moved to storage, all the
backup jobs that went to that store must meet the retention rules (defined
in their associated storage policy copy) for the store to become aged. Once
all of the jobs have met their retention criteria, the entire store is considered
ageable, and the Silo (tape) backup jobs are then aged. The tape designated
for the Silo storage is then refreshed and available for re-use.
Extended retention rules are not supported on Storage Policy Copies
configured for Silo Storage.
If you have cloud storage configured with deduplication, the pruning of
the data will not be done until the store is sealed and all the backup
jobs associated to that store meets the retention rules for the store to
become aged.
Disabled Jobs
If data aging is performed on a storage policy copy that has disabled
jobs, these jobs are aged differently. If the disabled job is a full
backup job, the entire cycle is marked as disabled. In this case, data
aging does not count the disabled full backup as a valid cycle. If the
disabled job is an incremental or differential backup and the full
backup job is not disabled, the cycle is counted as a valid cycle.
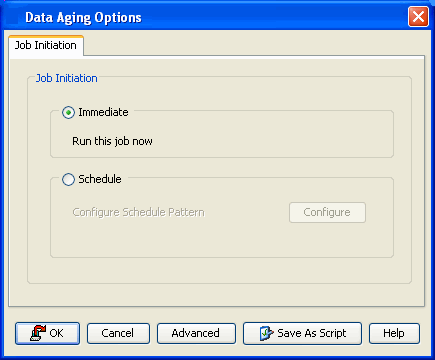
From the CommCell Console, right click the CommServe icon and click All Tasks | Data Aging.
2.
Select Schedule.
Click OK.
3.
Select the appropriate scheduling options and click OK.
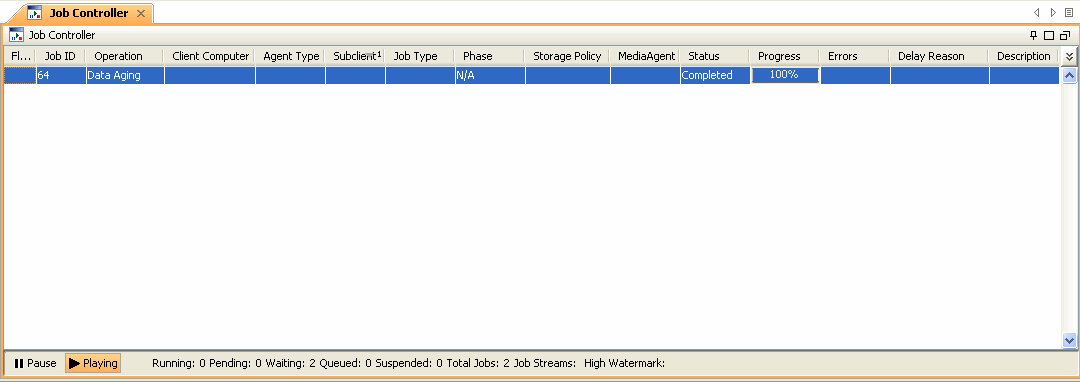
4.
Data aging operation will execute according to the specified
schedule. You can track the progress of the job from the
Job
Controller window. When the job has completed, the Job Controller displays
Completed.
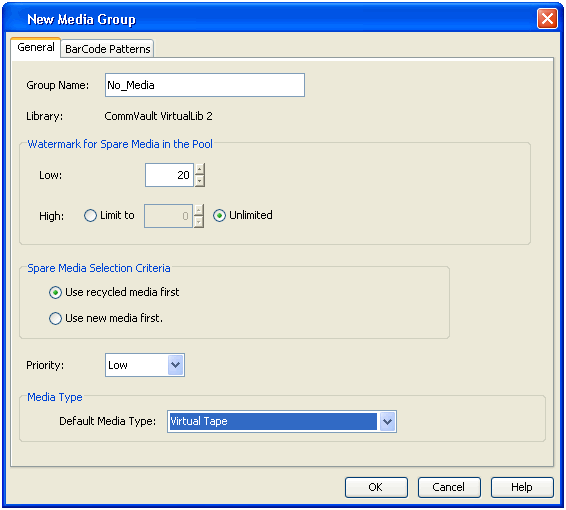
From the CommCell Browser, navigate to Storage Resources |
Libraries, right-click
the Media By Groups | New Media Group | Spare
Media Group.
2.
Specify
No_Media.
Select
Default Media Type.
3.
Right-click the client computer and
click Properties.
4.
Click the Activity Control tab.
Clear Enable Data Management and Enable Data Recovery and then
click OK.
5.
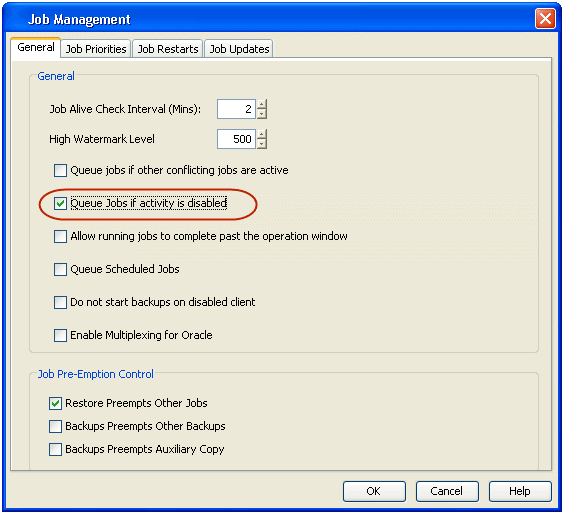
Click Tools | Control
Panel.
6.
Click Job Management.
7.
Select Queue Jobs if activity is disabled.
8.
If any jobs are run after the Jobs of activity is
disabled, you can see in the Job Controller that the jobs status
Queued.
9.
Re-point all the client's subclients to the No_Backups storage
policy. When a user changes the storage policy association of a
subclient, retention cycles are set to zero (0), therefore, only
the retention days must be exceeded for data to be aged. In this
case, the data in the storage policy to which the client's
subclients were originally pointing to will age accordingly.
Note that if the client computer's activity is re-enabled, you
can point the subclients back to their original storage policy
Resume Client Activity
1.
From the CommCell Browser, right-click
the client computer and click Properties.
2.
Select Enable Data Management and Enable Data Recovery.
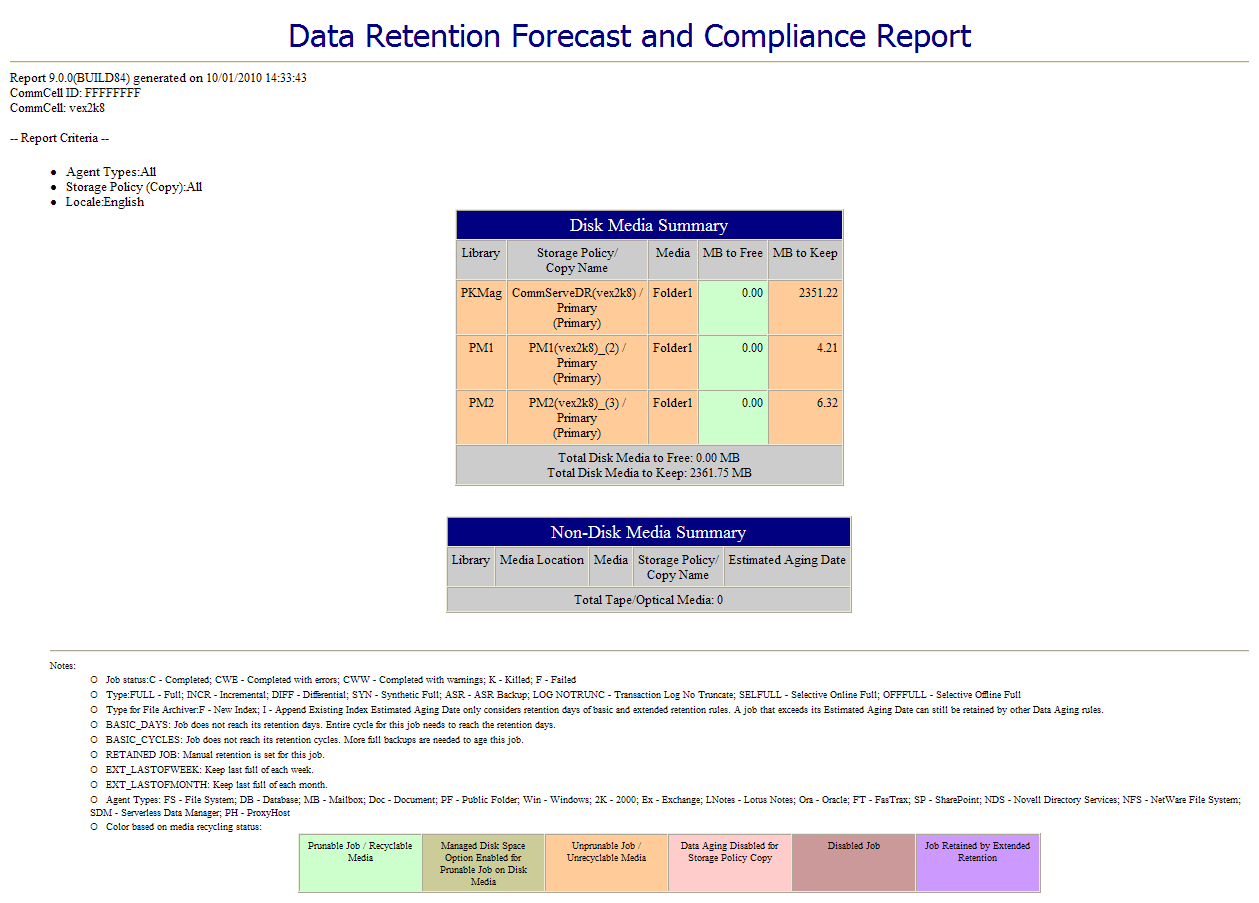
To ensure only data intended for aging is actually aged, it is important to
identify the data that will be aged based on the retention rules you have
configured. You can do so by running the Data Retention Forecast and
Compliance Report, which provides the following:
A list of data protection jobs that are on each media or disk volume.
A list of data protection jobs that either exceed their retention criteria or
need to be retained.
An estimated date, including the time zone, on which a job is due to be aged.
If this report displays data you do not intend to age, you
must fine-tune your rules accordingly. Once you run a data aging
job, the unintended data will be lost.
1.
From the CommCell Browser, click the Reports icon.
2.
Expand Reports and select
Data Retention Forecast and Compliance.
3.
Click Run.
4.
The report will display the data to be aged
when the data aging job is run.