Table of contents |
Related Topics |
|
Provides comprehensive information on running jobs from the command line. Provides comprehensive information on scheduling jobs. Provides comprehensive information on managing jobs. |
When defining your subclient for various backup operations, you need to choose the SAP interface to be used for the backup. You can use the following SAP backup interfaces for SAP for Oracle iDataAgent:
The Rman_util interface (also referred to as the RMAN utility) is used when you need to perform an incremental backup of the online database. When you select this option, you actually allow the Oracle RMAN utility to control the backup operation.
RMAN_PARMS="ENV=(CvClientName=<client name>,CvInstanceName=<instance name>"
For example:
RMAN_PARMS="ENV=(CvClientName=bumblebe,CvInstanceName=Instance001)"
RMAN_PARMS="SBT_LIBRARY=/<install path>/<Base directory version>/libobk.<xx>,ENV=(CvClientName=<client name>,CvInstanceName=<instance name>"
For Example:
RMAN_PARMS="SBT_LIBRARY=/opt/calypso/Base64/libobk.so,ENV=(CvClientName=aha,CvInstanceName=Instance001)"
The util_file interface is used when you need to perform a full backup of the SAP for Oracle data files as File System data. When selecting this option for online backup, the Oracle database is locked till the full backup operation is completed.
The util_file_online interface is similar to the util_file interface. you can use this interface to perform a full or selective online full backup operations. When selecting this option for online backup, the Oracle database locks each table space that is being backed up and releases it once that table space backup is completed.
Follow the procedure given below to choose the desired Backup interface.
A full backup contains all the data that comprises a subclient's contents. Though, full backups provide the most comprehensive protection of data, it consumes most amount of time and resources.
| If you are using a stand-alone drive, you are prompted to load a specific cartridge into the drive. If you are using a library, you will not receive this prompt. The system loads the tapes automatically. Your cartridges should be appropriately labeled. This will enable you to locate the correct cartridge for a restore job, if necessary. |
An incremental backup contains only data that is new or has changed since the
last backup, regardless of the type. On average, incremental backups consume far
less media and place less of a burden on resources than full backups.
Always ensure that your first backup is a full backup.
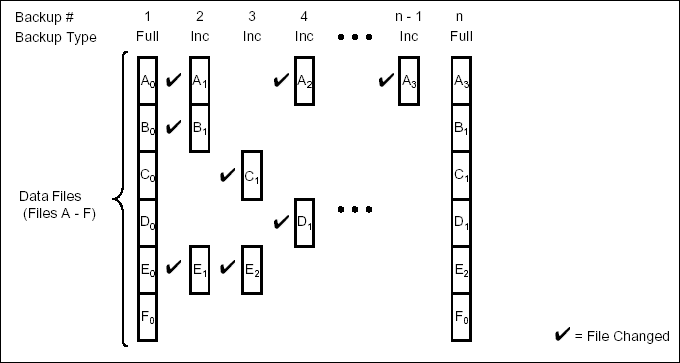
The illustration on the right clarifies the nature of full and incremental backups. For simplicity, assume there is a database that contains six data files as represented in the figure.
Backup #1 is a full backup and therefore writes all the data, changed and unchanged, to the backup media. Backups #2 through #n-1 are incrementals and only back up those files that have changed since the time of the last backup, regardless of the type. For example, files A, B, and E changed after the full backup and were therefore backed up in Backup #2. Backup #4 backed up files A and D because both files were modified sometime after Backup #3 occurred. File F did not change; hence, it was not backed up in any of the incremental backups, but it was included in both full backups, which, by definition, back up everything.
For SAP for Oracle iDataAgent, incremental backups are performed using the rman_util backup interface.
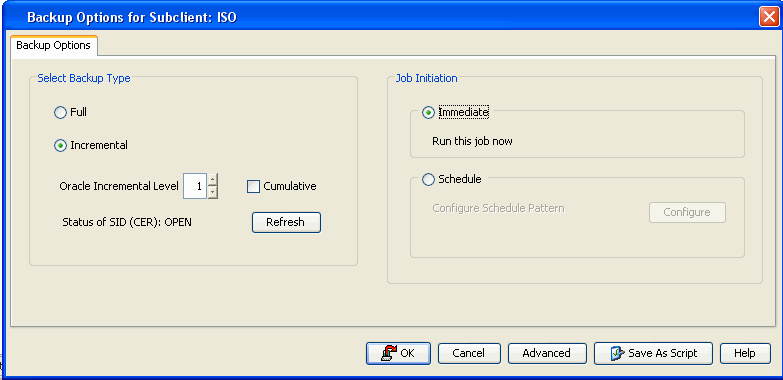
Backup Type:
Backup Schedule:
| If you are using a stand-alone drive, you are prompted to load a specific cartridge into the drive. If you are using a library, you will not receive this prompt. The system loads the tapes automatically. Your cartridges should be appropriately labeled. This will enable you to locate the correct cartridge for a restore job, if necessary. |
Offline backups are performed when the Oracle database is shut down and unavailable for use. Offline backups are always full backups and does not include the archived log files.
Offline backups can be performed when the database is in offline or online mode. If the database is online, it shuts down the database, performs the backup and then brings up the database back.
In order to backup the Oracle database when it is offline, you can create a separate user-defined subclient for offline backup. See Creating Subclient for Offline Backups for step-by-step instructions.
| When performing SAP for Oracle offline backups from the CommCell Console, the database is forced to shutdown by default. However, you can disable this by setting the sNOOFFLINEFORCE registry key on the client computer with SAP for Oracle iDataAgent. |
Online backups are performed when the database is online and in ARCHIVELOG mode. Data files and archived log files are included when you back up the database in online mode. You can perform a full or incremental backups when the database is online. These backups do not require database downtime and are extremely useful when you need to perform a point-in-time restore of the Oracle database.
In order to backup the Oracle database when it is online, you can create a separate user-defined subclient for online backup. See Creating Subclient for online Backups for step-by-step instructions.
You can backup a subset of the online database which undergo changes frequently. To backup a subset of the online database, you can create a separate user-defined subclient. See Creating Subclient to Backup Individual DataFiles/Tablespaces for step-by-step instructions.
Archive log backups are useful when you want to recover database transactions that have been lost due to an operating system or disk failure. You can apply these archive logs to an online backup in order to recover a database.
Full backups generally includes both the data and logs. However, you can also take backups of the archive logs only. In order to backup only the archive logs, you need to create a separate subclient for archive logs. See Creating Subclient for Log Backups for step-by-step instructions.
By default, the first backup operation on the default subclient will include the entire database (data and archive logs) when the database is online and in ARCHIVELOG mode.
If archive log destination is different than the default $SAPDATA_HOME/saparch location, set the sSAPARCH registry key to enable the GUI backup to obtain the new SAPARCH location.
Selective Online Full backup is a full backup taken when Oracle database is online, and the backup data is copied to a selective copy (during an auxiliary copy operation) from which it can be restored.
The advantage of this type of backup is that both data and logs use the same storage policy, which means that they reside together on the same media, and are completely self-contained for restore and long term archiving purposes. This is especially useful in disaster recovery situations by alleviating the need to locate different offsite media from various jobs to gather the necessary data and logs to recover the database. Also, the data aging rules for selective online full backups are different from regular full backups, as both data and logs are aged together under the same storage policy.
You need to create a separate subclient to perform a selective online full backup of the Oracle database. See Creating Subclient for Selective Online Full Backups for step-by-step instructions.
When performing selective online full backups, note the following:
During selective online full backups, if the data streams (defined at the subclient level) is less than the archive log streams (defined at the instance level), then both the data phase and the archive log phase will use the same number of streams defined for the data in the subclient, and will ignore the number of streams set for the archive logs.
For more information on special data aging rules for selective online full backups, see Selective Online Full Backup Retention Rules.
A selective copy allows you to copy backup data selectively from a source copy to this copy, providing for better tape rotation. Since only selective backups can be copied to selective copies, the selective copies cannot be promoted to the primary copy, only synchronous copies can be promoted. Note that the data selection process does not have to be the same for all auxiliary copies.
Selective copy will not only copy Selective Online Full and Offline Full jobs, it will also copy log backup jobs that are linked to selective online full backup jobs.
In addition to using CommCell Console, you can also perform full and incremental backups from the Command Line Interface.
You can perform Command Line backup operations using one of the following methods:
You can use qcommands to perform backup operations from the command line interface. You can also integrate these qcommands into your own scripts or scheduling programs. In addition, you can also generate scripts for specific operations from the CommCell Console using the Save As Script option. These scripts can later be executed using the commands from the command line interface.
Usage: backup [-cs commserver] -c client -a iDataAgent -i instance -b backupset -s subclient -t Q_FULL|Q_INC|Q_DIFF|Q_SYNTH [-scid subclientId] [-af argsfile] [-tf tokenfile] [-tk token] [-h]
Example:
bash-3.00# ./qoperation backup -c sunsign -a
Q_SAP_ORADB -i CER -s default -t Q_FULL
9251
For comprehensive information on command line backups, refer to the
Command Line Interface documentation.
You can perform backups from the SAP command line using the BRBACKUP and BRARCHIVE commands.
brbackup -t offline/online -d util_file/rman_util/util_file_online -m full/incr
BRBACKUP command can back up control files and data files within one or more table spaces, and (if necessary) log files. BRBACKUP can back up all of these file types with the database either online or offline. Also, BRBACKUP saves the profiles and logs relevant to the backup.
Examples:
brbackup -t online -d util_file -m all -u /
brbackup -t online -d rman_util -m FULL -u /
brbackup -t online -d rman_util -m INCR -u /
The BRARCHIVE command is used to backup the archived redo log files.
Examples:
brarchive -sd -c -b -m all -t util_file
brarchive -d rman_util -s
brarchive -d util_file -s
brarchive -d util_file -sc
brarchive -d util_file -ss
brarchive -d util_file -sd
brarchive -d util_file -scd
brarchive -d util_file -ssd
brarchive -d util_file -cs
brarchive -d util_file -cds
brarchive -d util_file -ds
brarchive -d util_file -dc
Some of the command options commonly used by BRBACKUP and BRARCHIVE commands are listed below:
| Option | Argument | Values |
| -a | -archive | [<DB_SID>,<log_no>[=<rest_dest>] |
| -b | -backup | <log_name>|last |
| -r | -parfile | <parameter_file> |
| -c | -confirm | force |
| -d | -device | util_file|rman_util |
| -m | -mode | all|full|incr| |
| -o | -output | dist|time[,time|dist] |
| -t | -type | online|offline |
Before you run backups from the SAP command line, ensure that the appropriate parameter file containing information regarding the instance and the client is in place. Be sure to include at least the CVInstanceName parameter name followed by the name of the instance and also the CVClientName parameter name followed by the name of the client.
For example:
CvInstanceName
Instance001
CvClientName
bumblebee
numstreams
1
SelectiveOnlineFull
1
| When performing backups from the command line, note
the following: Multi-stream log backups are supported only from the command line interface. For comprehensive information on multi streaming, refer to the Streams documentation. |
In a consistent online backup, the database files and the offline redo log files are backed up together in the same backup volume. This backup type allows you to take logical consistent backups without having to shutdown the database.
The offline redo log files backed up along with the database are completely independent from the BRARCHIVE log backups.
Use the following steps to run a consistent online full backup:
| 1. | Include the instance name and client name parameters in the init.utl file. | For example:
CvInstanceName Instance001 CvClientName client1 |
| 2. | From the SAP command line, type the command to run a consistent online full backup. | brbackup -t online_cons -d util_file -m full |
In addition to SAP command line, you can also use the BRTools user interface to perform backup and restore operations. BRTools is an easy-to-use interface that provides menus to run different types of backup or restore operations. For detailed information on using the BRTools interface, see SAP documentation.
Prior to performing backup operations using BRTools interface, ensure to set the appropriate values in the parameter file.
A sample BRTools backup operation is given below:
| 1. | From the BRTools interface main menu, select 4 to perform a backup operation. | BR*Tools main
menu\par \par 1 = Instance management\par 2 - Space management\par 3 - Segment management\par 4 - Backup and database copy\par 5 - Restore and recovery\par 6 - Check and verification\par 7 - Database statistics\par 8 - Additional functions\par 9 - Exit program\par \par Standard keys: c - cont, b - back, s - stop, r - refr, h - help\par -------------------------------------------------------------------------------\par BR0662I Enter your choice:\par |
| 2. | From the BRTools choice menu, select 1 to perform a database backup. | BR0656I Choice
menu 9 - please make a selection\par -------------------------------------------------------------------------------\par Backup and database copy\par \par 1 = Database backup\par 2 - Archivelog backup\par 3 - Database copy\par 4 - Non-database backup\par 5 - Backup of database disk backup\par 6 - Verification of database backup\par 7 - Verification of archivelog backup\par 8 - Additional functions\par 9 - Reset program status\par \par Standard keys: c - cont, b - back, s - stop, r - refr, h - help\par -------------------------------------------------------------------------------\par \b BR0662I Enter your choice:\b0\par |
| 3. | From the BRTools input menu, select
the input values, such as device type, backup type etc. For example, select 2 to specify the device type. |
BR0657I Input
menu 15 - please check/enter input values\par -------------------------------------------------------------------------------\par BRBACKUP main options for backup and database copy\par \par 1 - BRBACKUP profile (profile) ....... [initCER.sap]\par 2 - Backup device type (device) ...... [util_file]\par 3 # Tape volumes for backup (volume) . []\par 4 ~ BACKINT/Mount profile (parfile) .. [?/dbs/init@.utl]\par 5 - Database user/password (user) .... [/]\par 6 - Backup type (type) ............... [offline_force]\par 7 - Disk backup for backup (backup) .. [no]\par 8 # Delete disk backup (delete) ...... [no]\par 9 ~ Files for backup (mode) .......... [all]\par \par Standard keys: c - cont, b - back, s - stop, r - refr, h - help\par -------------------------------------------------------------------------------\par BR0662I Enter your choice:\par |
| 4. | Specify the value for the device type. For example, util_file
|
BR0280I BRTOOLS
time stamp: 2010-02-23 17.58.47\par BR0681I Enter string value for "device" (tape|tape_auto|tape_box|pipe|pipe_auto|pipe_box|disk|stage| util_file|util_file_online|rman_util|rman_disk|rman_stage) [util_file]:\par |
| 5. | From the BRBackup main options menu, select 4 to provide the parameter file. | BRBACKUP main
options for backup and database copy\par \par 1 - BRBACKUP profile (profile) ....... [initCER.sap]\par 2 - Backup device type (device) ...... [util_file]\par 3 # Tape volumes for backup (volume) . []\par 4 ~ BACKINT/Mount profile (parfile) .. [?/dbs/init@.utl]\par 5 - Database user/password (user) .... [/]\par 6 - Backup type (type) ............... [offline_force]\par 7 - Disk backup for backup (backup) .. [no]\par 8 # Delete disk backup (delete) ...... [no]\par 9 ~ Files for backup (mode) .......... [all]\par \par |
| 6. | Enter the path to the parameter file. Example; /dbs/initCER.utl |
BR0280I BRTOOLS
time stamp: 2010-02-23 17.59.26\par BR0681I Enter string value for "parfile" [?/dbs/init@.utl]:\par |
| 7. | Go to step 5. Select the backup options
as required.
Repeat this process, till you have entered all the required parameters for the backup operation. Once all the options are selected, enter c to initiate the backup operation. |
|
| 8. | The summary of the options selected,
will be displayed. Enter c to continue the operation. |
BR0291I BRBACKUP
will be started with options '-p initCER.sap -d util_file -r ?/dbs/initCER.utl
-t online -m all -k no -l E'\par \par BR0280I BRTOOLS time stamp: 2010-02-23 18.03.38\par BR0670I Enter 'c[ont]' to continue, 'b[ack]' to go back, 's[top]' to abort:\par |
BACKINT is another interface program that internally uses the SAP BRTools to communicate with the SAP Oracle Database and perform backup and restore operations. It also allows you to inquire about backup requests and executes them.
backint -u <user_id> [-f <function>] [-t <type>] [-p <par_file>] [-i <in_file>] [-o <out_file>] [-c]
| -u | Specifies the BACKINT user ID. Normally, this will be the database instance name (ORACLE_SID) | None |
| -f | Specifies the operation (backup, restore, or inquire) | backup |
| -t | Specifies the backup type: file or file_online | file |
| -p | Specifies the backup utility
parameter file containing the parameters that determine the backup
procedure specific to the backup utility. The SAP BRtools specify the location of this utility parameter file in their own parameter file (parameter util_par_file), but they do not evaluate its contents. |
none |
| -i | Specifies the input file (text file) that defines the files and directories to be backed up.
|
By default, the data is read from the standard input. |
| -o | Specifies the output text file that will contain the processing messages and the results of the operation. | By default, the messages are displayed on the standard output. |
| -c | unattended mode (does not involve user interaction) | attended mode |
The BACKINT interface takes the backup requests defined in the input file and returns a backup ID (BID) for each file that is backed up. Also, it provides details on the files that were successfully backed up and failed to be backed up.
Example:
backint -u CER -f backup -t file �p /oracle/CER/dbs/initCER.utl -i dummy -o dummy.out
The output file looks like below:
Program: backint
Parameters: Client node: RC1
Function: backup
Input File: dummy
Output File: dummy.out
Profile: /oracle/CER/dbs/initC11.utl
Parallel sessions: 1 BKI0008I: Number of bytes to save: 0.012 MB.
Backup started ... #SAVED SAP___9409020458 /oracle/CER/sapdata1/user1i_1/user1i.data1
BKI0022I: Bytes saved so far: 0.012 MB (100.0%).
The BACKINT interface program inquires about the backup requests based on the user ID, backup ID, or the file name.
For example, if you set the tag #NULL in front of the file name in the input file, the inquire operation lists out all the backup jobs that contains the specific file name.
Example;
#NULL /oracle/CER/sapdata1/user1i_1/user1i.data1
The output file looks like below:
Program: backint
Parameters: Client node:
RC1 Function: backup
Input File: dummy
Output File: dummy.out
Profile: /oracle/CER/dbs/initCER.utl
Parallel sessions: 1
#BACKUP SAP___9409020458 /oracle/CER/sapdata1/user1i_1/user1i.data1
#BACKUP SAP___9409020450 /oracle/CER/sapdata1/user1i_1/user1i.data1
| 1 |
|
|
| 2 |
|

|
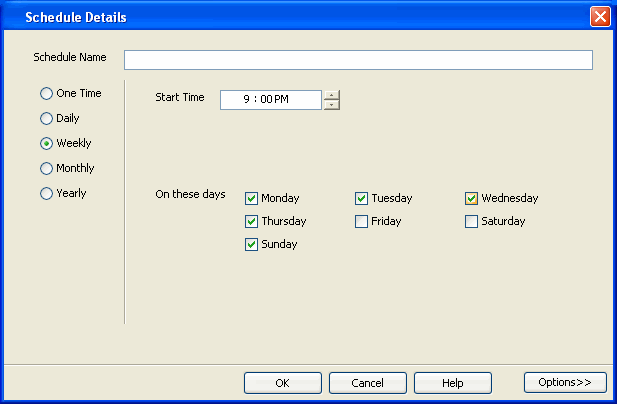
| 3 | Select the appropriate scheduling options. For example:
|
|
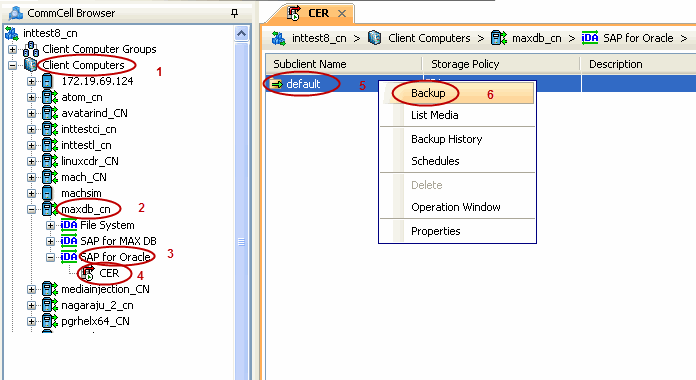
Once you initiate the backup operation, a backup job is generated in the Job Controller. Jobs can be managed in a number of ways. The following sections provide information on the different job management options available:
Jobs that fail to complete successfully are automatically restarted based on the job restartability configuration set in the Control Panel. Keep in mind that changes made to this configuration will affect all jobs in the entire CommCell.
To Configure the job restartability for a specific job, you can modify the retry settings for the job. This will override the setting in the Control Panel. It is also possible to override the default CommServe configuration for individual jobs by configuring retry settings when initiating the job. This configuration, however, will apply only to the specific job.
|
Backup jobs for this Agent are resumed from the point-of-failure. |
|
|
|
|
The following controls are available for running jobs in the Job Controller window:
Suspend |
Temporarily stops a job. A suspended job is not terminated; it can be restarted at a later time. |
Resume |
Resumes a job and returns the status to Waiting, Pending, Queued, or Running. The status depends on the availability of resources, the state of the Operation Windows, or the Activity Control setting. |
Kill |
Terminates a job. |
| BRTools Error Code | Message | Job Status |
| 0 | Successful | Completed |
| 1 | Warnings � all files were processed (for example, backed up or restored) | Completed With Warning |
| 2 | Canceled during the initialization phase by a user or other signal | Completed With One or More Errors |
| 3 | Errors occurred during the initialization phase, processing was not started | Completed With One or More Errors |
| 4 | Canceled by a user or other signal during processing | Completed With One or More Errors |
| 5 | Started, but not completed because errors occurred during processing | Completed With One or More Errors |
| 6 | Internal termination | Completed With One or More Errors |
Several additional options are available to further refine your backup
operations. The following table describes these options, as well as the steps
for configuring them.
Be sure to read the overview material referenced for each feature prior to using
them.
| Option | Description | related topics |
| Data |
You can select transaction logging options for a backup job.
|
|
| Startup Options |
The Startup options facilitate the startup behavior of the backup job.
|
Refer to Job Priority and Priority Precedence for more information. |
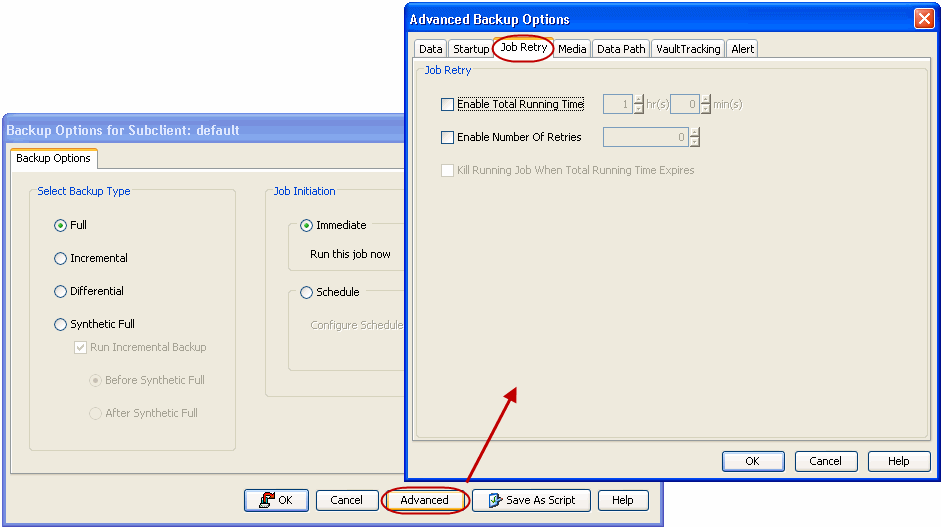
| Job Retry Options |
Job Retry options enable you to configure the retry behavior of the backup
jobs.
|
Refer to the Job Management documentation for a comprehensive overview prior to using these features |
| Media Options |
You can start the backup operation in a new media.
|
Refer to Creating an Exportable Media Set and Start New Media for more information. |
| Allow other Schedules to use Media Set |
This options allows jobs that are part of a schedule policy or schedule
and using a specific storage policy to start a new media and also
prevent other jobs from writing to the set of media. This option is
available only when Start New Media and Mark Media Full options are
enabled.
|
|
| Data Path Options |
Data Protection operations use a specific data path (Library, MediaAgent,
Drive Pool, and Drive) to perform the backup operations as configured in the
CommCell. By default, the system automatically identifies the data path for the
backup operations.
|
Refer to Change Data Path for more information. |
| Vault Tracker |
The VaultTracker feature provides the facility to manage media that are
removed from a library and stored in offsite locations.
|
Refer to the following documentation for a comprehensive overview prior
to using this feature:
|
| Alerts |
You can configure alerts for a specific backup job.
|
Refer to Alerts for more information. |