While the Virtual Server iDataAgent
is capable of backing up the entirety of your VMware environment using a single
instance, backup set, and subclient configuration, it is often not practical to
do so. For example, a Virtual Center may contain as few as two ESX Servers, each
containing no more than 10 virtual machines. In this scenario, a single instance
configured for the entire Virtual Center may be sufficient. However, if a
Virtual Center contains upwards of 50 ESX Servers, each containing at least 20
virtual machines, a backup of a single Virtual Center instance may take a
significant amount of time to complete. As such, it is important to consider how
much data must be backed up at a given time.
As a best practice, consider the following recommendations:
If creating an instance for an entire Virtual Center containing a large
number of ESX Servers and virtual machines, consider performing backups at
the backup set or subclient level. These backups can be staggered throughout
the day to ensure minimal resources are consumed.
If backups for a Virtual Center instance must be performed at the
instance level, consider utilizing the Incremental and Differential backup
options described in the Getting Started documentation.
If it is desirable to be able to perform backups at the instance level
for both the Virtual Center and individual ESX Servers, consider creating
one instance for the Virtual Center and additional instances for each ESX
Server. This provides the flexibility to perform comprehensive backups for
both the Virtual Center and ESX Servers as needed.
From the CommCell Browser, right-click the agent and select Create
New Instance.
Follow the procedure described in the
Getting Started configuration documentation.
Because backup sets dictate the data assigned to each subclient, it is
recommended that backup sets be configured with the number of anticipated
subclients in mind. For example, if an ESX Server has 100 virtual machines, all
of which need to be backed up, then consider creating two backup sets. Each
backup set can then contain five subclients with 10 virtual machines assigned to
each. Such a scenario provides the flexibility of performing narrower backups
staggered at different times, saving time and resources.
From the CommCell Browser, right-click the instance for which you want
to create a new backup set and select New Backup Set.
Follow the procedure described in the
Getting Started configuration documentation.
For Virtual Centers or ESX Servers that have a large number of virtual
machines, it is recommended that the virtual machines be distributed across more
than one subclient. This helps to enhance backup and recovery performance for
each subclient, as well as preserves network resources. Additionally,
user-defined subclients also provide the facility to group virtual machine
backups of a specific entity, such as an ESX Server or datastore, together.
To further enhance
performance in environments where a proxy server is used, consider assigning a
different proxy server to each subclient. This ensures no single computer is
given a substantially higher load.
From the CommCell Browser, right-click the backup set for which you
want to create a new subclient and select New Subclient.
Enter the name for
the subclient in the Subclient Name text box.
Click Content tab.
Select the
virtual machines to be added to the subclient.
You can create a separate account for backup and restore operations. If you
are creating a user account other than administrator, ensure that the following
permissions are assigned to the user account:
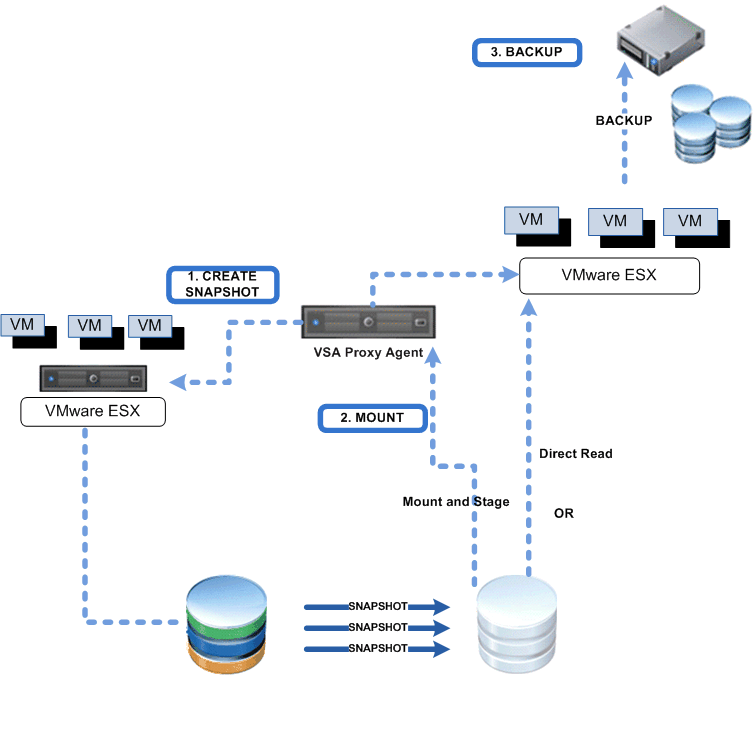
Backups using vSphere VADP environment provide significant performance
improvements over VCB.
During
backups, the Virtual Server
iDataAgent requests a snapshot of
the virtual machine hosted on the VMFS datastore. The snapshot VMDK and
virtual machine configuration files are then
copied to the storage media without requiring any dedicated disk
cache on the proxy server. In the case of incremental backups, Change
Block Tracking (CBT) helps quickly identify the data blocks on the virtual
machine that have changed since the last backup.
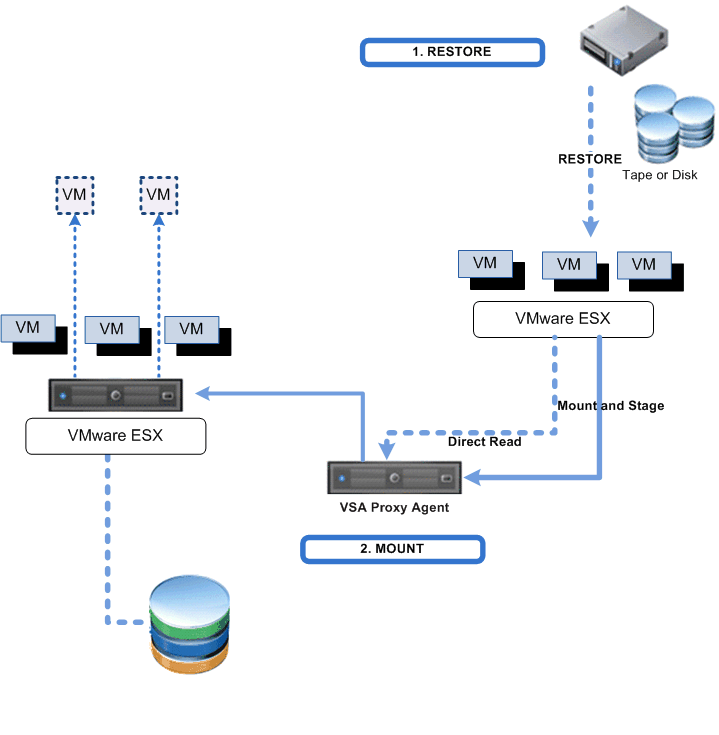
Similarly, during restores, virtual machines are restored directly to the
appropriate ESX Server and datastore without the need for staging on the proxy
server with VMware Converter. This capability provides for much faster restores.
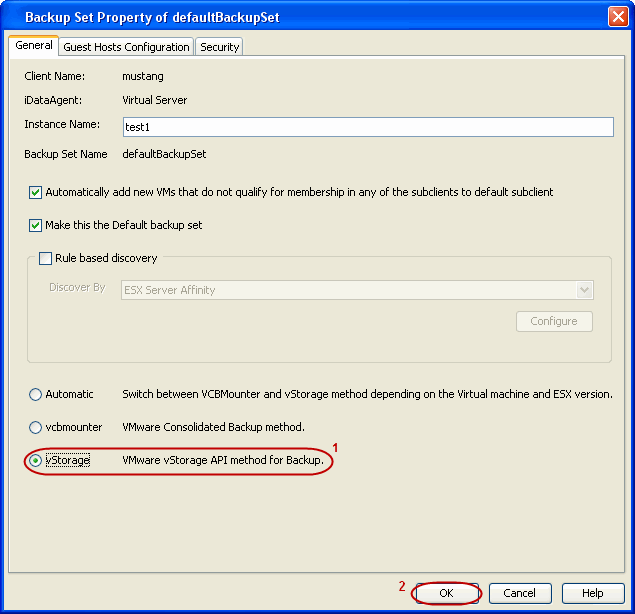
From the CommCell Browser, right-click the backup set and click
Properties.
Select vStorage.
Click OK.
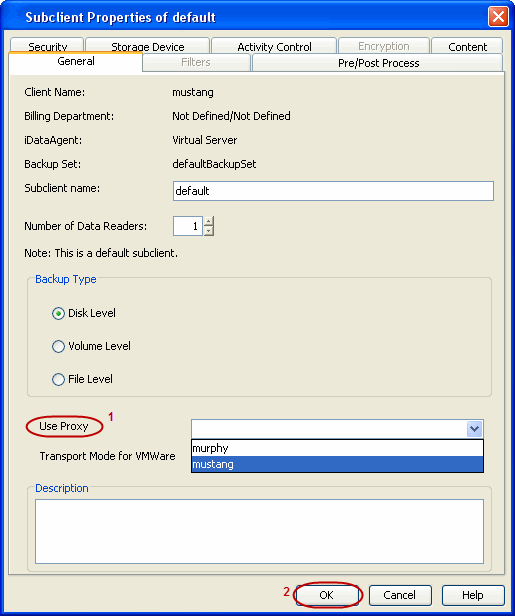
From the CommCell Browser, right-click the subclient click Properties.
Select the proxy computer from the Use Proxy menu.
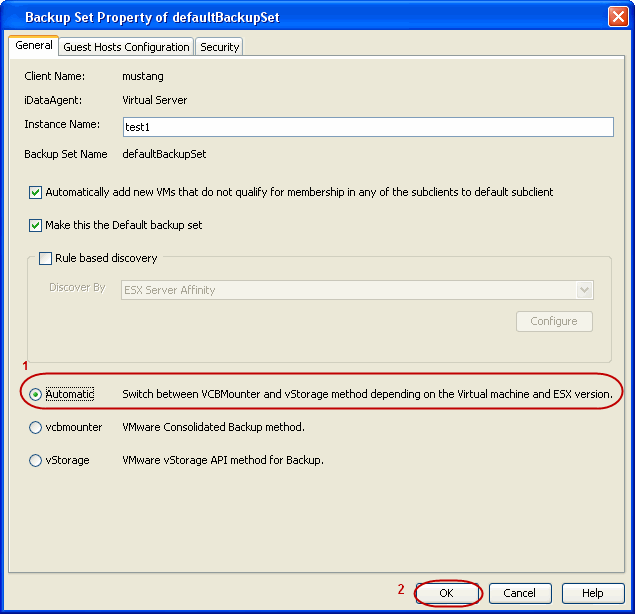
You can also perform backup operations from an environment wherein both
technologies exist. To accomplish this, simply ensure the following components
are installed on the proxy computer:
VMware Consolidated Backup (VCB)
vSphere VADP
the Virtual Server
iDataAgent
Once these components are prepared, backups will leverage between VCB and
vSphere as appropriate.
From the CommCell Browser, right-click the backup set and click
Properties.
Select Automatic.
Click OK.
From the CommCell Browser, right-click the subclient and click Properties.
Select the proxy computer from the Use Proxy menu.
Click OK.
The vStorage API can be used to restore backups performed with VCB. The
backup data will first be staged to the proxy and then vStorage will perform the
restore.
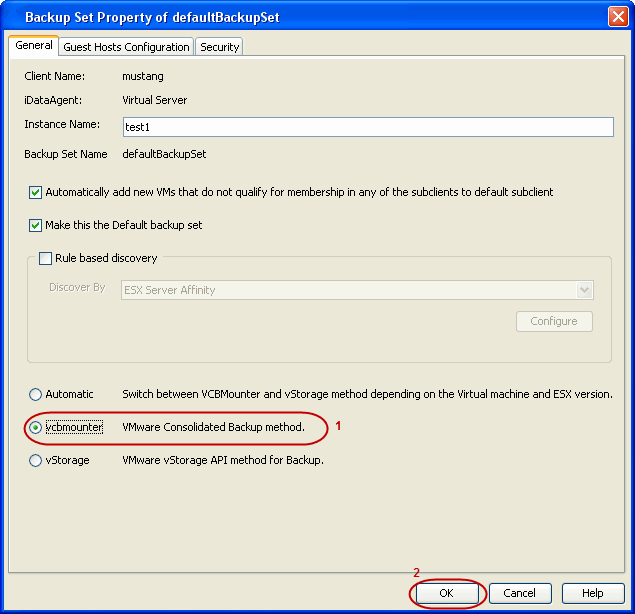
For
ESX Servers prior to version 4.x, backups using VCB environment requires
a proxy server to copy the data to be processed before being backed up
or restored. In addition to ample disk space for copying the virtual
machine data, the proxy server also requires the Virtual Server
iDataAgent, VMware Consolidated Backup,
and VMware Converter to be installed to process all the data prior to
moving to the backup media or restore destination.
From the CommCell Browser, right-click the backup set and click
Properties.
Select vcbmounter
Click OK.
From the CommCell Browser, right-click the subclient and click
Properties.
Select the proxy computer from the Use Proxy menu.
Backups
of entire ESX Servers consist of backing up all virtual machines that reside on
the ESX Server. This option is useful in scenarios where each ESX Server contains a
number of virtual machines that must be protected together.
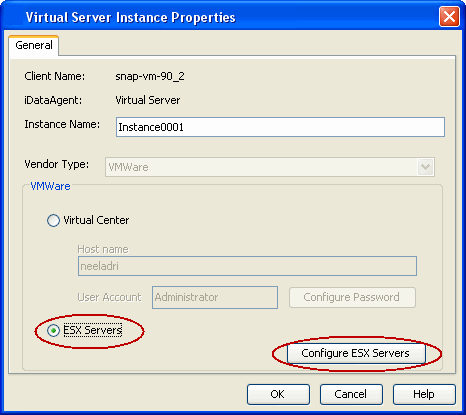
From the CommCell Browser, right-click the Virtual Server
Instance and click Properties.
Select ESX Servers.
Click Configure ESX Server.
Click Add.
Enter the following:
ESX Server name
ESX User Name and Password. Re-confirm the
password.
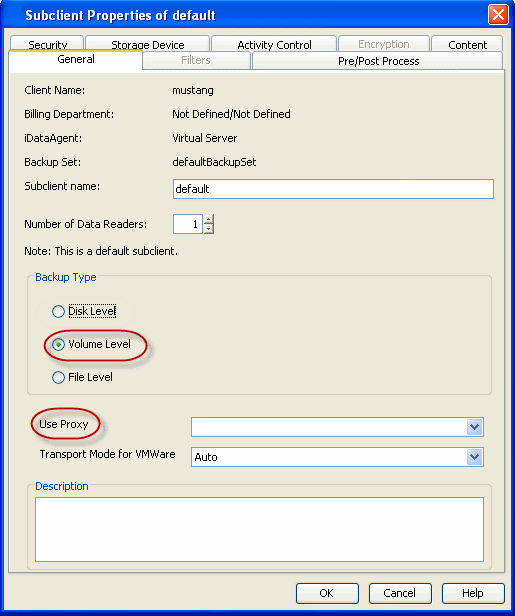
You
can create separate subclients to backup specific volumes of the virtual
machine data. Use this option if you do not want to back up an entire
virtual machine.
From the CommCell Browser, navigate to the Subclient and
click Properties.
Select Volume-Level from the Backup Types.
Select the proxy computer from the Use Proxy menu.
Click Storage Device tab. Ensure that a Storage Policy is
selected.
In addition to backing up virtual server disks and volumes, you can also create separate subclients to backup specific files/folders in the virtual machine.
Use this option if you only need to back up a select number of important
files rather than an entire virtual machine or volume.
From the CommCell Browser, navigate to the Subclient and
click Properties.
Click Properties.
Select File-Level from the Backup Types.
Select the proxy computer from the Use Proxy menu.
Click Storage Device tab. Ensure that a Storage Policy is
selected.
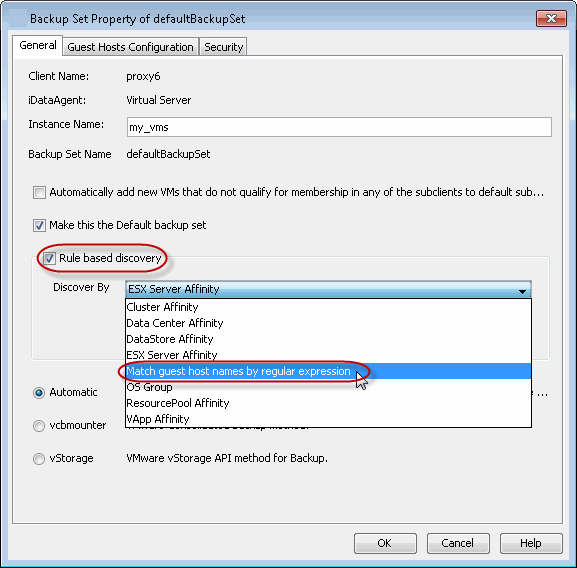
While virtual machine discovery can always be performed manually, it may be useful
to discover virtual machines based on a specific set of criteria, particularly in
environments where virtual machines are added, removed, or relocated on a routine
basis. The following sections describe several methods of discovering virtual machines
based on specific criteria, as well as the configuration steps required.
Virtual machines in HotAdd configurations
should always be excluded from subclient content.
While rule-based discovery provides certain levels of granularity
in populating virtual machines to back up, there may be scenarios where an
entire ESX Server or Virtual Center requires complete protection on a routine
basis. The Automatically add new VMs that do not qualify for membership in
any of the subclients option provides the facility to assign any virtual
machines found during discovery to the default subclient provided the virtual
machine is not already configured in another subclient.
Note, however, that selecting this option overrides any previously configured
regular expressions, ESX Server affinity, or the selection of Do Not Backup
for any virtual machines.
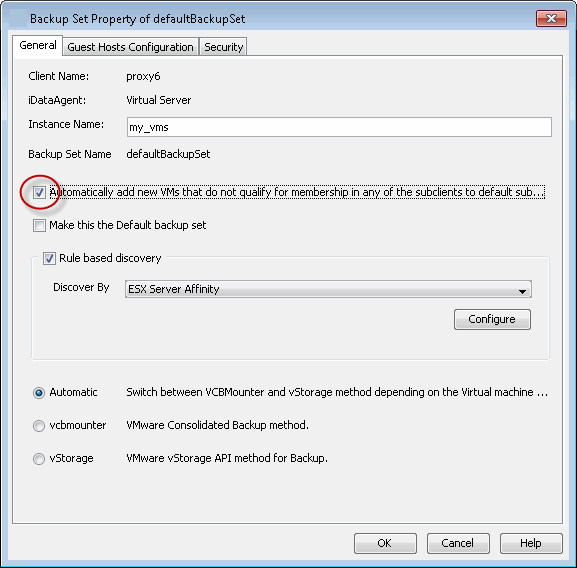
From the CommCell Browser, right-click the backup set and select
Properties.
Select Automatically add
new VMs that do not qualify for membership in
any of the subclients.
When configured, new virtual machines
found on the ESX Server are automatically assigned to the desired subclient and
backed up when backup operations on the subclient are performed. This capability
is useful in scenarios where:
a large number of virtual machines exist, rendering the manual process of
adding them to a subclient unfeasible.
virtual machines are added to an ESX server on a frequent basis.
Optionally, you can choose to exclude specific virtual machines from being added
without deselecting this option. However, note that these virtual machines will not be
backed up unless each is reassigned to the desired subclient.
From the CommCell Browser, right-click the backup set for which you want
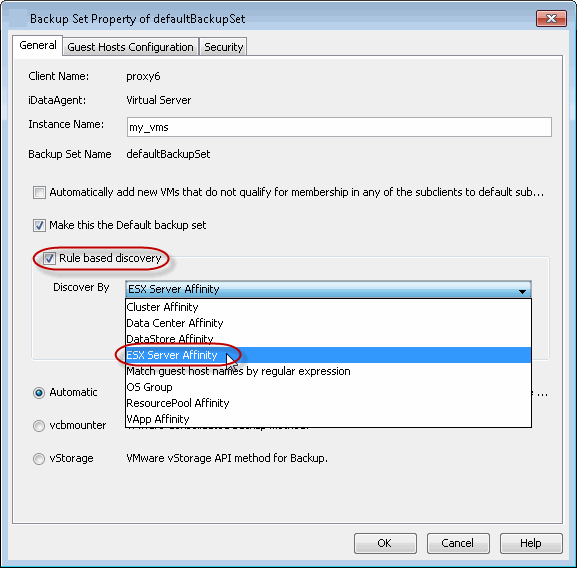
to discover guest hosts and then click Properties.
Select Rule-Based Discovery.
Click Discover By drop-down box and
select ESX Server Affinity.
Click Configure.
Select the ESX Server you wish to configure for auto discovery and select the
subclient you wish to associate with the ESX Server.
To exclude a select number
of virtual machines from being backed up, choose the Do Not Backup option
in the Subclient column.
Manually add the additional virtual machines from the second ESX Server.
Once configured, all virtual machines from the pre-configured ESX Server, as
well as the virtual machines selected from the second ESX Server, will be backed
up during the next backup operation.
When configured, new virtual machines
found on the cluster are automatically assigned to the desired subclient and
backed up when backup operations on the subclient are performed. This capability
is useful if your virtual machines are strategically arranged among clusters in
your environment.
Optionally, you can choose to exclude specific clusters from being added
without deselecting this option. However, note that these clusters will not be
backed up unless each is reassigned to the desired subclient.
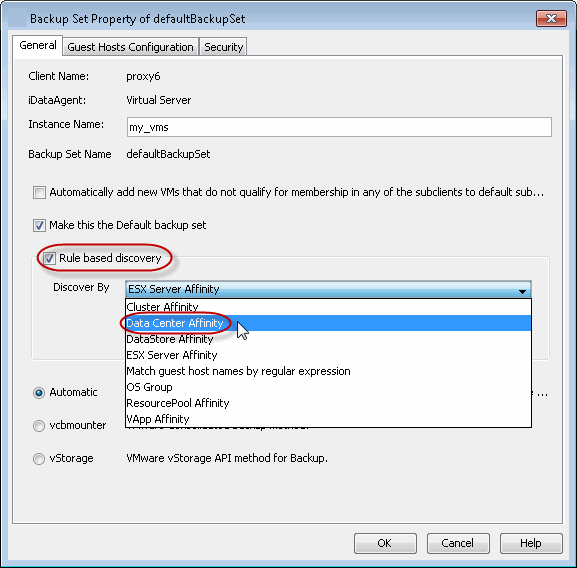
From the CommCell Browser, right-click the backup set for which you want
to discover guest hosts and then click Properties.
Select Rule-Based Discovery.
Click Discover By drop-down box and
select Cluster Affinity.
Click Configure.
Click Discover.
Select the cluster you wish to configure for auto discovery and select the
subclient you wish to associate with it.
To exclude a select number
of clusters from being backed up, choose the Do Not Backup option
in the Subclient column.
When configured, new virtual machines
found on a Data Center are automatically assigned to the desired subclient and
backed up when backup operations on the subclient are performed. This capability
is useful if your virtual machines are strategically arranged among Data Centers
in your environment.
Optionally, you can choose to exclude specific Data
Centers from being added
without deselecting this option. However, note that these Data Centers will not be
backed up unless each is reassigned to the desired subclient.
From the CommCell Browser, right-click the backup set for which you want
to discover guest hosts and then click Properties.
Select Rule-Based Discovery.
Click Discover By drop-down box and
select Data Center Affinity.
Click Configure.
Select the Data Centers you wish to configure for auto discovery and select the
subclient you wish to associate with it.
To exclude a select number
of Data Centers from being backed up, choose the Do Not Backup option
in the Subclient column.
When configured, new virtual
machines found in the datastore are automatically assigned to the desired subclient
and backed up when backup operations on the subclient are performed. This capability
is useful if you want to limit discovery of virtual machines to a specific datastore
in scenarios where:
a particular datastore houses virtual machines of vital importance or that
are prone to considerable change.
you have a large number of datastores and intend to limit your backup and
restore operations to a select group of datastores.
Optionally, you can choose to exclude specific virtual machines from being added
without deselecting this option. However, that these virtual machines will not be
backed up unless each is reassigned to the desired subclient.
From the CommCell Browser, right-click the backup set for which you want
to discover guest hosts and then click Properties.
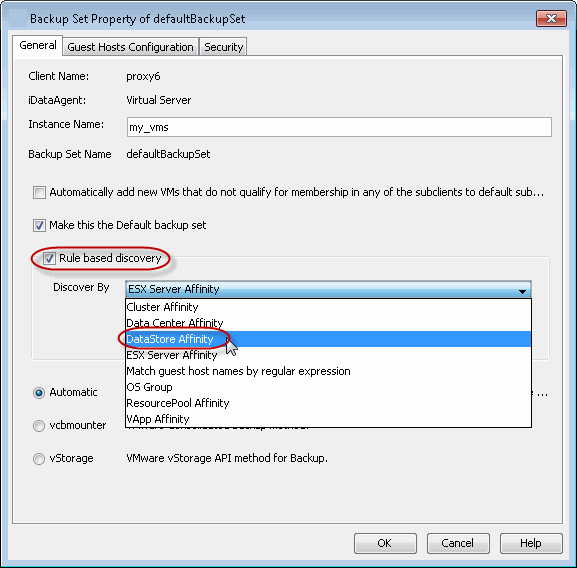
Select Rule-Based Discovery.
Click Discover By drop-down box and
select DataStore Affinity.
Click Configure.
From the DataStore Configuration for Auto Discovery dialog box, locate
the datastores you wish to configure for auto discovery and select the subclient
you wish to associate each with.
To exclude a select number of datastores from
being backed up, choose the Do Not Backup option in the Subclient
column.
If necessary, click Configure to add, edit, or remove ESX
Servers.
When configured, new virtual
machines found in the resource pool are automatically assigned to the desired subclient
and backed up with backup operations on the subclient are performed. This capability
is useful in scenarios where virtual machines are added to a datastore server on
a frequent basis.
Optionally, you can choose to exclude specific resource pools from being added without
deselecting this option. However, that these virtual machines will not be backed
up unless each is reassigned to the desired subclient.
From the CommCell Browser, right-click the backup set for which you want
to discover guest hosts and then click Properties.
Select Rule-Based Discovery.
Click Discover By drop-down box and
select Resource Pool Affinity.
Click Configure.
From the Resource Pool Configuration for Auto Discovery dialog box,
locate the resource pools you wish to configure for auto discovery and select
the subclient you wish to associate each with.
To exclude a select number of
resource pools from being backed up, choose the Do Not Backup option
in the Subclient column.
Select the ESX Server that should be used to discover the resource pools.
If necessary, click Configure to add, edit, or remove ESX Servers.
If your virtual machines consist of many different operating systems, it may
be useful to discover them based on the operating systems they are running. The
Virtual Server iDataAgent provides the
facility to select the virtual machine operating systems that should be included
in the subclient. When discovery operations are later performed, only virtual machines
running the operating systems selected will be incorporated into the subclient content
for backups.
From the CommCell Browser, right-click the backup set for which you want
to discover guest hosts and then click Properties.
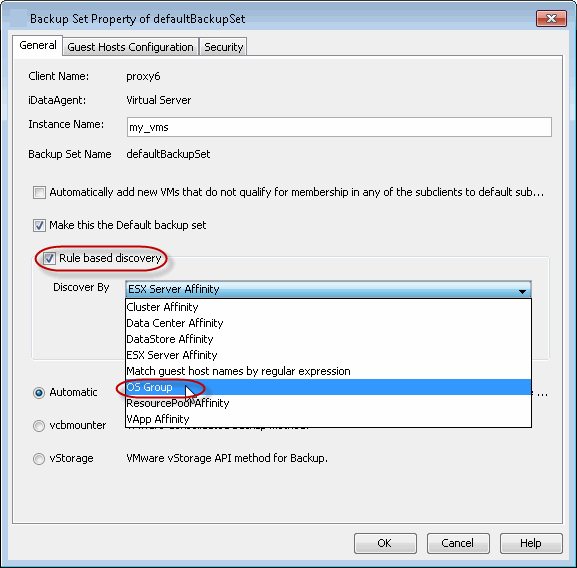
Select Rule-Based Discovery.
Click Discover By drop-down box and
select OS Group.
Click Configure.
Add a filter for the desired operating system to the Wildcard names
for OS column for the subclient to which you want to apply the filter.
When configured, new virtual machines
associated with the selected vApps are automatically assigned to the desired subclient and
backed up when backup operations on the subclient are performed. This capability
is useful if you want to back up virtual machines sharing similar vApps at the
same time.
Optionally, you can choose to exclude specific vApps from being added
without deselecting this option. However, note that these vApps will not be
backed up unless each is reassigned to the desired subclient.
From the CommCell Browser, right-click the backup set for which you want
to discover guest hosts and then click Properties.
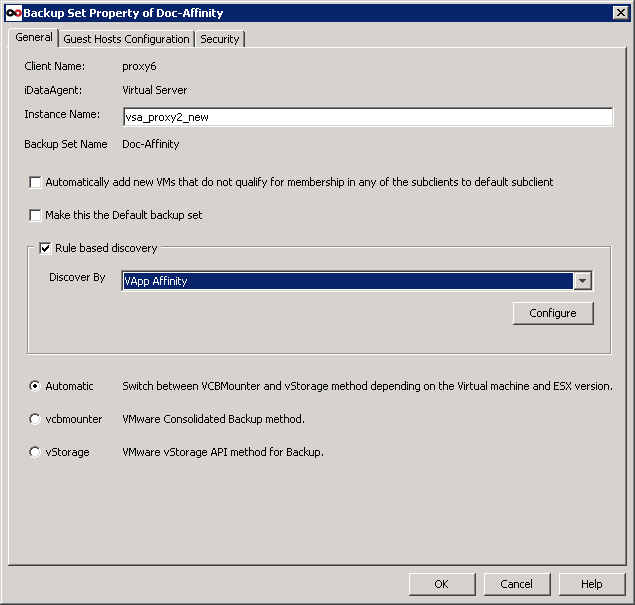
Select Rule-Based Discovery.
Click Discover By drop-down box and
select vApp Affinity.
Click Configure.
Select the vApps you wish to configure for auto discovery and select the
subclient you wish to associate with it.
To exclude a select number
of vApps from being backed up, choose the Do Not Backup option
in the Subclient column.
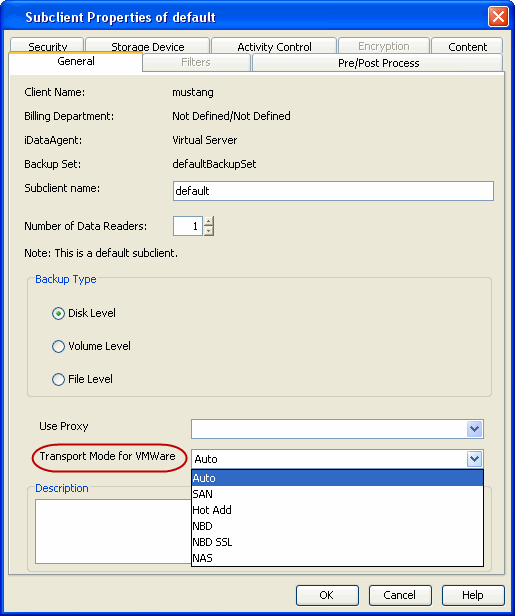
By default, the software automatically determines the transport mode
currently being used in your environment prior to each backup operation. This
process can be eliminated by configuring the subclient to use a specific
transport mode for all backups of that subclient. Doing so negates the need for
the software to search your environment for the appropriate mode, thereby
increasing backup performance.
From the CommCell Browser, right-click the subclient and click Properties.
Click the Transport Mode for VMware drop-down box and select
any of the following transport modes:
SAN
HotAdd
NAS
NBD SSL
NBD
If you want the software to automatically set the transport mode based on
your setup, select Auto.
Click OK.
In VCB environments, the NAS transportmode is not attempted during auto discovery operations. However, you can force
the NAS mode by selecting it in the CommCell Console.
If you are performing backup of VMware templates, the
NBD mode is used during the backup operation
irrespective of any transport mode that you have selected.
In vSphere VADP environments, you can force one of the following transport
modes to be used for all virtual machine backups by configuring the
vStorageTransportMode registry key. The following transport modes can be forced
using this registry key:
SAN
HotAdd
NBD
Follow
the steps below to configure this key:
From the CommCell Browser, navigate to Client Computers.
Right-click the <Client>, and then click Properties.
Click the Registry Key Settings tab.
Click Add.
In the Name field, type
vStorageTransportMode.
In the Location field, type
VirtualServer.
In the Type list, select REG_SZ.
In the Value field, type the transport mode you want to
use in lower-case letters (i.e., san, hotadd, nbd).
You can use the VMware tools to perform the any operations before or after the
backup.
For example: A virtual machine hosts a oracle database and you want to enable
the Hot backup of the database before performing the backup, you can run a
script using the VMware Tools.
On the Linux virtual machines, the script /usr/sbin/pre-freeze-script will be
executed when the software snapshot is created and /user/sbin/post-freeze-script
will be executed when the software snapshot is removed. Ensure that these
scripts are executable by the VMware tools user.
The following scripts are available to
perform the Pre/Post processes using VMware tools:
Operation
Procedure
Scripts
The scripts can be used to take snapshot of a VM with DB2
Application. This script allows VMWARE to suspend I/O updates to DB2
database till VMWARE LINUX guest snap shot is completed.
On a Linux virtual machine, copy the pre-freeze-script and
post-thaw-script to /usr/bin directory.
Copy write_suspend and write_resume scripts to a location where
DB2 database can execute it. (Preferably to a directory under DB2
home)
The scripts can be used to take snapshot of a VM with
MAXDB
Application. This script allows VMWARE to suspend I/O updates to MAXDB
database till VMWARE LINUX guest snap shot is completed.
On a Linux virtual machine, copy the pre-freeze-script and
post-thaw-script to /usr/bin directory.
Copy suspend_logwriter and resume_logwriter scripts to a location where
MAXDB database can execute it. (Preferably to a directory under
MAXDB
home)
The scripts can be used to take snapshot of a VM with
Oracle
Application. This script allows VMWARE to suspend I/O updates to Oracle
database till VMWARE LINUX guest snap shot is completed.
On a Linux virtual machine, copy the pre-freeze-script and
post-thaw-script to /usr/bin directory.
Copy pre-freeze-script.sql and post-thaw-script.sql scripts to a location where
Oracle database can execute it. (Preferably to a directory under
Oracle
home)
These scripts change the entire database to backup mode.
If the virtual machine has Oracle iDataAgent installed on it, you can
also use the consistent-archivelog-backup.rman script as a sample to run
archivelog backup. This will get a consistent snap and also all the
latest archived logs and current control file.
The scripts can be used to take snapshot of a VM with
Sybase
Application. This script allows VMWARE to suspend I/O updates to Sybase
database till VMWARE LINUX guest snap shot is completed.
On a Linux virtual machine, copy the pre-freeze-script and
post-thaw-script to /usr/bin directory.
Copy pre-freeze-script.sql and post-thaw-script.sql scripts to a location where
Sybase database can execute it. (Preferably to a directory under
Sybase
home)
These scripts execute sybase quiesce commands which will
stop updates to databases.
Certain properties of Agents, Instances, and Subclients can be modified to
accommodate changes to your configuration, data, or desired backup behavior.
It is recommended that that you do not modify the properties of an instance or
subclient when a job is in progress for that specific instance or subclient. If
a job is in progress, either wait for the job to complete or kill the job from the
Job Controller.
The following table describes the properties that can be configured from these levels.
Option
Description
Related topics
Job Results Directory
Ensure that the full path name for the Job Results Directory, combined
with the VMDK file name, is no
greater than 255 characters in length.
From the CommCell Browser, right-click the icon of the client
computer whose job results path you want to change, then click
Properties.
From the Job Configuration tab of the Client Computer
Properties dialog box, click User Name/Password to
establish or change the Impersonate User account to access the Job
Results Directory. Click OK once you have administered the
account.
From the Job Configuration tab, type a new job results
path in the Job results path field.
You can also click Browse to browse to a new job results path
from the Browse for Job Result Path dialog box. Click OK.
In order to perform discovery, backup, and restore operations within
a single instance, you need administrator-level global, virtual machine,
and resource privileges.
You can configure the user account associated with the Virtual Center.
From the CommCell browser, right-click the virtual server
instance.
Click Properties.
Click Configure Password.
Type the user name.
Type password and confirm password.
You can configure the user account associated with the ESX Server.
Click Configure ESX Server.
Select the ESX server.
Click Edit.
Type the username.
Type the password and confirm password.
Change Storage Policies
You can modify the
storage policies in any of the following situations:
To include a different media for the backup operation.
To use a storage policy with a different retention criteria.
You can change the storage policies from the subclient level.
From the CommCell Browser, right-click the subclient.
Click Properties.
Click Storage Device.
Select the Storage policy from the drop-down menu.
From the CommCell Browser, right-click thesubclient.
Click
Properties.
Type the new name in the Subclient name field.
Click OK.
Data Transfer Options
You can efficiently configure the available resources for transferring data secured
by data protection operations from the subclient level. This includes the following:
Enable or disable Data Compression either on the client or the MediaAgent.
Configure the transfer of data in the network using the options for Network
Bandwidth Throttling and Network Agents.
You can configure the data transfer options.
From the CommCell Browser,right-click the subclient.
Click Properties.
Click Storage Device.
Click Data Transfer Option tab.
Choose the appropriate software compression option for this subclient.
Select Throttle Network Bandwidth and set the required bandwidth.
You can view the data paths associated with the primary
storage policy copy of the selected storage policy or incremental storage
policy. You can also modify the data paths including their priority from
the subclient level.
From the CommCell browser, right-click the subclient.
Click Properties.
Click Storage Device.
Select Storage Policy from the drop-down menu.
Click Data Paths.
Number of Data Readers
Use this option to specify the number of
simultaneous backup data streams allowed for this subclient.
From the CommCell browser,right-click the subclient.
Configure a Subclient for Pre/Post Processing of Data
Protection
You can add, modify or view Pre/Post processes for the
subclient. These are batch files or shell scripts that you can run before
or after certain job phases.
From the CommCell browser, right-click the subclient.
Click Properties.
Click Pre/Post Process.
Click one of the following phases and type the full path of the
process that you want to execute during that phase. Alternatively, click
Browse to locate the process (applicable only for paths that
do not contain any spaces).
PreBackup Process
PostBackup Process
Click OK.
Select Run Post Scan Process for all attempts to run a
post scan process for all attempts .
Select Run Post Backup Process for all attempts to run a
post backup process for all attempts.
For subclients on Windows platforms, Run As displays
Not Selected.
If you want to change the account that has permission
to run these commands, click Change.
In the User Account dialog box, select Use Local System
Account, or select Impersonate User and enter the user
name and password. Click OK.
If you selected Local System Account, click OK to the
message advising you that commands using this account have rights
to access all data on the client computer.
You can configure user security from the agent or subclient
level.
You can perform the following functions:
Identify the user groups to which this CommCell object is associated.
Associate this object with a user group.
Disassociate this object from a user group.
From the CommCell browser, right-click the subclient.
Click Properties.
Click Security.
Select the appropriate user groups to
which you want to associate to the CommCell object from the Available
Groups pane, and then move the user group to the Associated Groups
pane.
You can enable data encryption from the suclient level.Encryption must be enabled at the client level prior to configuring any
instances residing on that client.
From the CommCell browser, right-click the subclient.
The Version tab, at the Agent level displays the
software version and post-release service packs and updates installed for
the component.
From the CommCell browser, right-click the agent.
Click Properties.
Click Version.
Click OK.
CommCell Configuration Report
The CommCell Configuration Report provides the properties of the
CommServe, MediaAgents, clients, agents, subclients, and
storage policies within the CommCell based on the selected filter
criteria.
The following sections describe the steps involved in deleting an instance, backup
set, or subclient.
When you delete an instance or backupset,
the associated data is logically deleted and you can no longer access the
corresponding data from CommCell Console for recovery purposes.
Consider the following before deleting an instance:
When you delete a specific instance all job schedules and job histories
that pertain to any of the levels within the deleted instance are deleted.
You cannot delete an instance if it is being backed up. Attempts to
delete an instance under such conditions cause the deletion to fail. If a
backup is in progress, either wait for the backup to complete or kill the
backup job using the Job Manager. Once the backup is no longer in progress,
you can delete the instance level.
You cannot delete an instance if there is only one instance present for
an agent. To delete the final instance, you must remove the agent
software from the client computer.
From the CommCell Browser, right-click the instance that you want to
delete, click All Tasks and then click Delete.
Click Yes to confirm the deletion. (Clicking No cancels
the deletion and retains the node.)
Type the requested phrase in the Enter Confirmation Text dialog
box and click OK. This should delete the instance.
 The Virtual Server
iDataAgent uses three main components
to perform backup and restore operations from the CommCell Console.
The Virtual Server
iDataAgent uses three main components
to perform backup and restore operations from the CommCell Console.