The Erase Data feature allows you to permanently erase any data that was
archived.
This is useful if you want to erase data so that it cannot be recovered again.
For example, you may want to erase archived data for legal purposes or compliance
regulations.
Keep in mind that the erase data operation only erases the archived data -
the
source data will remain on the local hard drive. Therefore, it is recommended to delete
the data from the source first so that it will not be archived again.
The Erase Data operation makes the data inaccessible for browsing and
recovery - the data will remain on the media and take up space until it is aged
off according to the retention rules set for the data. Data will not be
recoverable using any data recovery methods. If the archive job
is already content indexed, the data being erased will be removed from the
index.
Using Erase Data, you can erase
data such as mailboxes, folders in a mailbox, messages within a folder,
PST files, and
attachments.
To erase data, a filter storage policy needs to be associated with the Agent.
Ensure that the filter storage policy that you associate with the agent has
retention criteria that is greater than or equal to the retention criteria of
the storage policy for the data to be erased.
1.
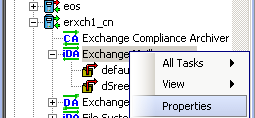
From the CommCell Browser, right-click the appropriate agent icon
and then click Properties.
NOTES
Your screen may look different from the example shown.
2.
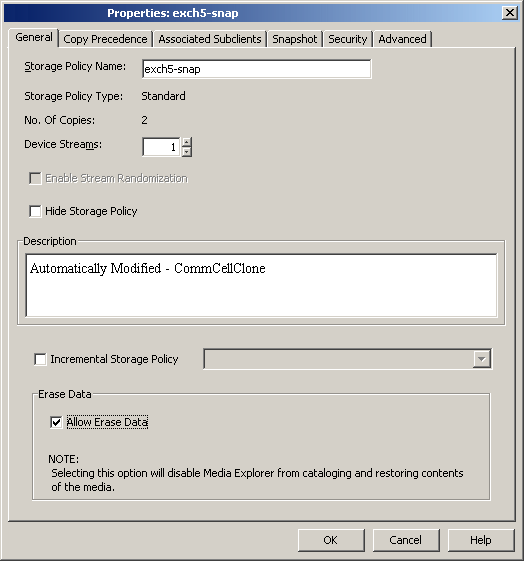
From the Storage Device tab of the agent Properties dialog box, select a filter storage policy from the Filter Storage Policy list.
To erase data, the storage
policy assigned to the subclient where data will be erased needs permission to allow
the erasing of data. Ensure that the retention criteria of the storage
policy for the data to be erased is equal or greater to the filter storage
policy that is associated with the agent.
1.
From the CommCell Browser, right-click the storage policy you want to
allow for the erasing of data, then click Properties.
2.
From the
General tab of the Storage Policy Properties dialog box, select the Allow
Erase Data
check box.
After the configuration has been completed, you
can now browse and erase data.
run or schedule erase data job
1.
From the CommCell Browser, right-click the agent or instance that contains the data which you want to erase, select All Tasks and then click Erase Data By Browsing.
NOTES
Your screen may look different from the example shown.
2.
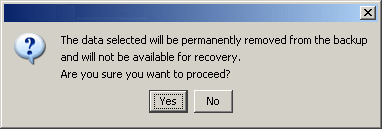
You are warned that the data will be permanently removed. Click Yes to continue.
3.
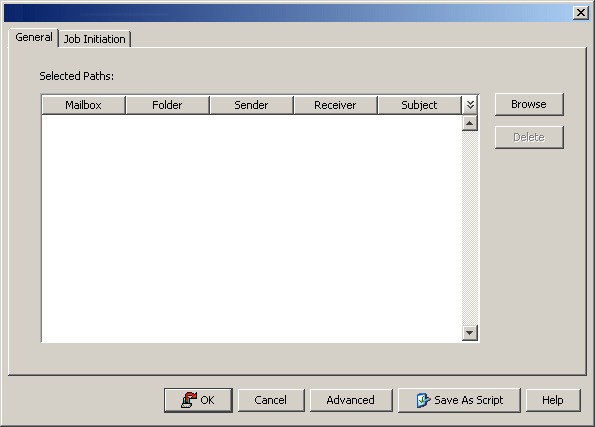
From the
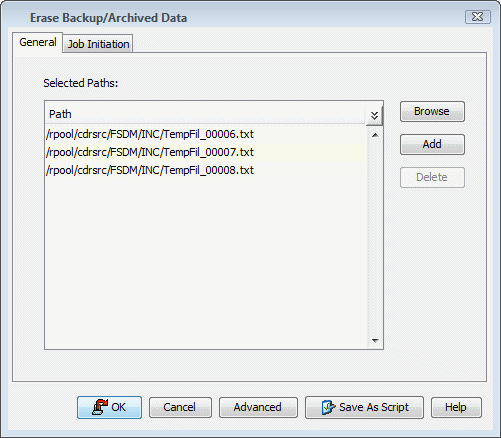
Erase Data by Browsing dialog box, click Browse.
When a path is selected and a browse time is
specified, all data that matches the path will be erased even if the
data was not backed up in the specified time range.
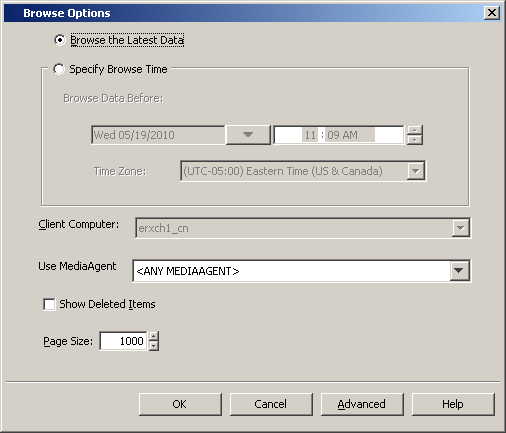
4.
In the Browse Options dialog box, select a browse time range and any advanced browse options,
and click
OK.
5.
From the browse selection window, select the data objects that you want
to erase, and click OK.
If you need to erase data from a specific
folder that is not visible in the current browse selection, you need
to browse to a point in time to a backup that included the folder.
Then, you can select the data under that folder to be erased.
6.
Optionally, you can click Advanced to configure an alert for this job.
7.
Click Job Initiation if you would like to run this job
immediately or schedule it.
Click Immediate and then OK to run the job now.
When the job is done, Job Controller displays Completed.
If Schedule is selected, click Configure to create a
schedule for this operation. Your Erase Data by Browsing operation will execute according to the specified schedule. See
Create a Job Schedule for more information.
This functionality provides a convenient alternative to the CommCell
Console for authorized users to browse and erase data from the Outlook Add-In. Keep in mind that Administrative Management capabilities are required in the CommCell for the ID
of the logged in mailbox user.
To
browse and erase messages from Outlook Add-In:
Log on to your mailbox in Outlook.
Select Tools -> Mailbox Archiver -> Find and Recover
Messages.
Depending on your configuration, an authentication window may display. If applicable, enter the user name and password authorized to access the CommCell, then click OK. Single sign-on users will not receive this prompt and can skip to
the next step.
From the Find/Browse and Recover Messages dialog, click the Browse and Recover Messages tab.
The Browse Options dialog will display.
From the Browse Options dialog, choose either Browse the latest
data or Specify Browse Time. If you selected Specify Browse Time
then you will need to enter the Browse Data Before date, time and time
zone in the corresponding fields. Optionally, you can click Advanced to
access the Advanced Browse Options and enter the Exclude Data Before
date, time and time zone. After specifying the browse time and any advanced
options, click OK. The
Exchange Server Selection dialog will display.
From the Exchange Server Selection dialog, specify which Exchange Server you want to browse then click OK.
If no messages were located within the specified time range, a pop-up window
will indicate that no data was found. Otherwise, the messages that were found
within the specified time range will appear in the display pane.
To erase data from the browse results, right-click on the desired messages in the display pane
of the Browse and Recover Messages tab, then click Erase All Selected.
A confirmation dialog will indicate that all the selected messages will be
permanently deleted. Click OK to continue.
A confirmation dialog will indicate that the erase data request has been
submitted. Click OK. To monitor the progress of the erase data job, check
the Job Controller in the CommCell Console.
This functionality provides a convenient alternative to the CommCell Console
for authorized users to find and erase data which matches specified search
criteria from the Outlook Add-In. Keep in mind that Administrative Management capabilities
are required in the CommCell for the ID
of the logged in mailbox user.
The advanced search fields are only available for backwards compatibility
support of searching legacy content indexes created by prior releases of this
product.
To find and
erase messages in Outlook Add-In::
Log on to your mailbox in Outlook.
Select Tools -> Mailbox Archiver -> Find and Recover Messages.
Depending on your configuration, an authentication window may display. If applicable, enter the user name and password authorized to access the CommCell, then click OK. Single sign-on users will not receive this prompt and can skip to
the next step.
To search data archived by the Exchange Mailbox Archiver Agent, select
the Exchange Archiver option.
To search data backed up by the Exchange Mailbox
iDataAgent, select the Exchange
Mailbox option.
Optionally, you can click the
Time Range tab to specify a time range in which to search.
To set the browse time range, select a Start Time and End Time in
the Search Time Range group box. If you want to narrow the search to
include only messages received within a specified time range, click the
Specify Time Range checkbox then enter the Start Time and End Time
in the Receive Time Range group box.
Optionally, if you are searching a legacy content index, you can click the
Advanced Search
tab and enter advanced search criteria.
Once all search criteria has been entered, click Find Now.
If there is more than one Exchange Server and/or archive set that may be
searched, an Exchange Server
Selection pop-up dialog will display. Select the appropriate options and
click OK to continue.
If no messages matched the specified search criteria, a pop-up will indicate that no data was found. Otherwise, the messages that matched the search criteria will appear in the display pane.
If you would like to save the search results to a delimited text file, then
right-click on the desired messages in the display pane and select Export
Results View. Enter the path and file name and click Save.
To erase data from the search results, click on the desired messages in the display pane then click
Erase All Selected.
A confirmation dialog will indicate that all the selected messages will be
permanently deleted. Click OK to continue.
A confirmation dialog will indicate that the erase data request has been
submitted. Click OK. To monitor the progress of the erase data job, check
the Job Controller in the CommCell Console.
The Find feature allows you to search and locate data such as files,
directories, and messages in a backup. Once located, this data can be erased.
After erasing the data, it can no longer be browsed or
restored. However, the data will remain on the media and take up space until it
is aged off according to the retention rules set for the data.
Keep in mind that the erase data operation only erases the backup data -
the
source data will remain on the local hard drive. Therefore, it is recommended to delete
the data from the source first so that it will not be backed up again.
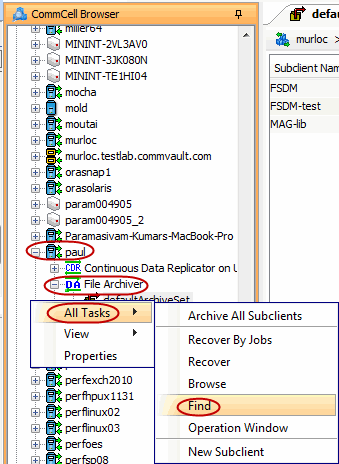
1.
From the CommCell Browser, navigate to Client Computers |<Client>|
<Agent>.
Right-click Backup Set or Subclient, click
All Tasks | Find.
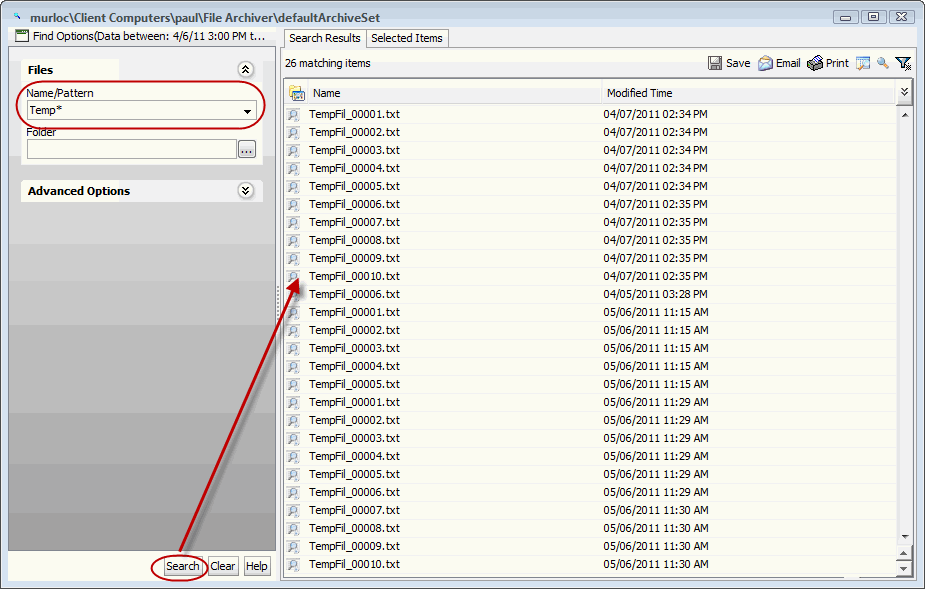
2.
Enter search criteria. For example, you can type a file name
in Name/Pattern to narrow the search. You can search for partial words without the need
for wildcard characters at the beginning and/or end of the search
string.
These wildcards, or a combination of these wildcards, are
supported:
* for any number of
characters e.g., Accounting*.
? for any one character
e.g., user_group?.
[] for a range of characters
e.g., [a-k]Lee.
[!] for a negation of a
range of characters e.g., [!a-k] Lee.
Click Search. The data that matches the criteria are displayed in Search
Results.
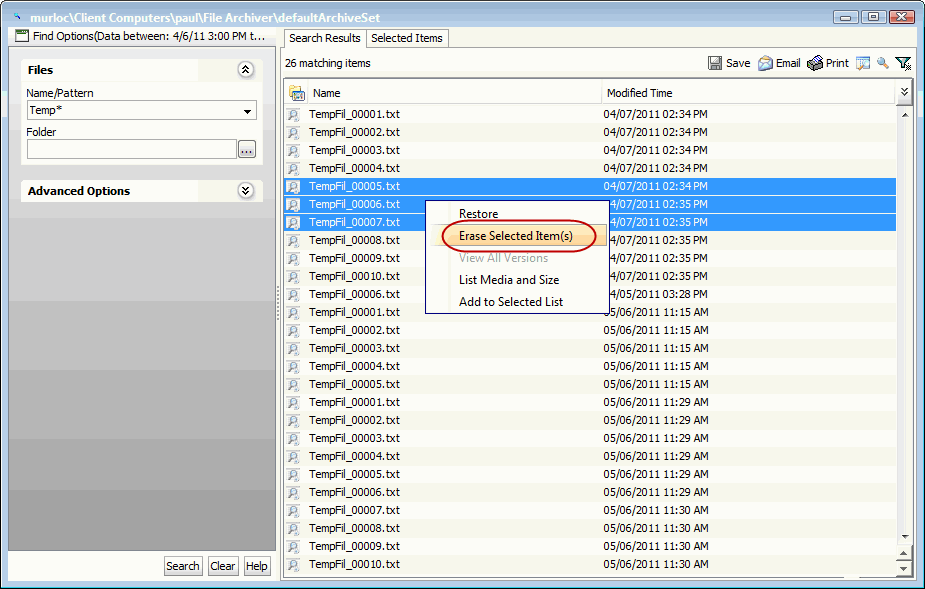
3.
Select one or more items.
Right-click the items and select Erase Selected Item(s).
You can also erase data when it has
been moved to Selected Items.
4.
Click Yes.
5.
Optionally, modify what will be erased by selecting either Browse,
Add, or Delete.
Stubs contain information abut the archived data to facilitate end-users with
non-browse recovery operations (i.e., stub recalls) from third-party
applications.
Keep in mind that the erase stubs operation only erases the archived stubs -
the
source stubs will remain on the local hard drive. Therefore, it is recommended to
permanently delete
the stubs from the source first so that it will not be archived again.
The Erase Stubs operation makes the archived data inaccessible for recalling - the
stubs will remain on the media and take up space until they are aged
off according to the retention rules set for them. Stubs will not be
recoverable using using any data recovery methods. If the archive job
is already content indexed, the stubs being erased will be removed from the
index.
After erasing stubs, it may take up to one hour for the
erase data cache to be erased. Therefore, a recall operation may
succeed during that time. Once the erase data cache is refreshed
on the CommServe, stub recalls will be blocked for the data that
has been erased.
The Erase Stubs feature allows you to erase stubs that were
archived by Outlook Add-In.
This is useful if you want to erase stubs so that they cannot be recalled again.
For example, you may want to erase stubs for legal purposes or compliance
regulations.
Stubs can be erased from Outlook Add-in to
erase stubs in a mailbox, since the Erase Data by Browsing method does not erase
them. Stubs are erased from Outlook Add-in in two steps:
This feature is supported for data archived and does not require Administrative
Management capabilities in the CommCell.
The procedure is supported if the Erase Data capability was selected during DataArchiver Outlook Add-In installation.
When Outlook 2003 is running in Cached Exchange Mode, stubs
may appear that have been attempted to erase with the Erase Data
by Browsing feature. This is because the stubs still reside on
the Exchange Server. Outlook 2003 defaults to Cached Exchange
Mode when installed; however, you can disable this option in the
E-mail account settings in order to work around this issue
The Outlook Add-In provides options under the Outlook
Tools menu allowing end-users to make additions to the Erase List,
and remove entries from the Erase List, if configured for your client. When selected message
stubs are
added to the Erase List, then the next Erase Stubs operation on the Exchange
Server will include them for erasing. The folder used for the Erase List can
also be customized using the
EraseStubsFolderName
registry key.
To select stubs to be erased:
From Microsoft Outlook, select the stubs that you want to erase.
Go to the Tools menu, click Mailbox Archiver and then click Add Selected Stubs to Erase List. If you want to erase all of the stubs in the folder click Add Stubs in Selected Folder to Erase List.
A folder will appear in your folder list called Data
Migrator. Under this folder another folder is created called
Migrated Data to Be Erased.
The stubs you have selected to be erased will be moved to the
Migrated Data to Be Erased folder.
All stubs to be erased will remain in the Migrated Data to Be Erased folder until an Erase Stubs job is run from the CommCell
Console. The data will then be marked as unrecoverable.
Erase Stubs jobs can be scheduled
or run immediately, and can be run for one subclient or all subclients within an
archive set. Once the Erase Stubs job has been run, the data can no longer be
browsed or recovered. While the Erase Stubs job is
running on the mailbox, the
EraseDeletedStubs
registry key
allows the user to erase all stubs in the Deleted
Items folder.
From the CommCell Browser, right-click the archive set of the Exchange Mailbox Archiver Agent or an individual subclient, click All Tasks and then click Erase Stubs.
If you are erasing stubs for an archive set, you are asked to confirm that you want to erase all stubs marked for deletion on this client. Click Yes to continue.
Optionally, you can click Add Alert to configure an alert for this job.
Click the JobRetry tab to specify the job running time and the number of job retries. See
Restarting
Jobs and
Job Running Time for more information.
If you select Run Immediately, the Erase Stubs job will begin when you click OK, and you can track the progress in Job Controller.
If you select Schedule the
Schedule Details (Schedule Details) dialog box will open. This allows you to create a new schedule for this operation. After you are finished click OK to continue. Your Erase operation will execute according to the specified schedule. See
Create a Job Schedule for more information.
You can remove stubs from the erase list with the following procedure, provided that an
Erase Stubs job has not yet been run from the CommCell Console which erases the stubs on the erase list.
To remove stubs from the erase list:
From Microsoft Outlook, navigate to the erase list folder called
Migrated Data to Be Erased.
Select the stubs that you want to remove from the erase list, then drag and drop the selected stubs back to the folders from which they originated.
The selected stubs will then be removed from the erase list, and will not be erased.
To view the log files
of a CommServe, MediaAgent, or client computer.
From the CommCell Browser, right-click a CommServe, MediaAgent, or client
computer, click View, and then click Log Files. The Select the Log File to Open
window displays.
To see a specific log file, either select the log file name from the list
or type the name of the log file in the field provided. (In the Files of
type field, Log Files (*.log) is displayed by default.) Click Open.
The contents of the log file are displayed.
An Administrative Job Summary Report provides details of all the Erase Data
jobs.
To
create an Erase Data Job Summary report:
From the CommCell Browser, click the Reports icon.
Select Job Summary from the Reports pane of the Report
Selection dialog box.
From the General tab, select Administrative Jobs and then select
Erase Backup/Archived Data.
Select the filter criteria to include in the Erase Backup/Archived Data
Job Summary Report from the various tabs (e.g., Computers, Selection,
Options, Time Range).
From the Output tab, select the output format and/or save options for
the report.
Click one of the following: Run to generate the report
immediately, Schedule to schedule the reports for specific times,
Save Template to save the report filter options into the My Reports
node, or Close to exit the window.
When erasing stubs, you can click Advanced in the Erase Stubs selected for deletion
dialog box to access the Job Retry tab where you can set a number for Job Retries and
the total Job Running Time options.
To view the log files
of a CommServe, MediaAgent, or client computer.
From the CommCell Browser, right-click a CommServe, MediaAgent, or client
computer, click View, and then click Log Files. The Select the Log File to Open
window displays.
To see a specific log file, either select the log file name from the list
or type the name of the log file in the field provided. (In the Files of
type field, Log Files (*.log) is displayed by default.) Click Open.
The contents of the log file are displayed.
An Administrative Job Summary Report provides details of all the Erase Data
jobs.
To
create an Erase Data Job Summary report:
From the CommCell Browser, click the Reports icon.
Select Job Summary from the Reports pane of the Report
Selection dialog box.
From the General tab, select Administrative Jobs and then select
Erase Backup/Archived Data.
Select the filter criteria to include in the Erase Backup/Archived Data
Job Summary Report from the various tabs (e.g., Computers, Selection,
Options, Time Range).
From the Output tab, select the output format and/or save options for
the report.
Click one of the following: Run to generate the report
immediately, Schedule to schedule the reports for specific times,
Save Template to save the report filter options into the My Reports
node, or Close to exit the window.
Once an erase data job has completed, it may be useful to view specific historical
information about the job, such as the following:
Items that failed during the job
Items that succeeded during the job
Details of the job
Media associated with the job
Events of the job
Log files of the job.
This information can be viewed in the Job History window. The history provided depends on the entity from which the job history is viewed.
For example, viewing job history from the subclient level will yield information
for the jobs performed for that subclient. Conversely, viewing job history from
the instance level will yield information for jobs run from all subclients within
that instance.
To view the backup job history:
From the CommCell Browser, right-click the entity (client computer,
iDataAgent, instance, or subclient)
whose backup history you want to view, click View, and then click
View Job History.
From the Job History
filter window select the filter options, if any, that you want to apply, and
then click OK. The system displays the
Job History
window.
Once you have chosen your filter options, they are displayed in the Job History window.
To view the additional options discussed above, right-click the desired job
choose the appropriate option.